1. Introduction
1.介绍
In this tutorial, we’re going to take an in-depth look at the Tomcat Manager Application.
在本教程中,我们将深入了解Tomcat管理器应用程序。
In a nutshell, the Tomcat Manager App is a web application that is packaged with the Tomcat server and provides us with the basic functionality we need to manage our deployed web applications.
简而言之,Tomcat Manager App是随Tomcat服务器打包的Web应用,为我们提供了管理已部署的Web应用所需的基本功能。
As we’re going to see, the application has many features and services. Besides allowing us to manage deployed applications, we can also see the status and configuration of the server and its applications.
正如我们将要看到的,该应用程序有许多功能和服务。除了允许我们管理已部署的应用程序,我们还可以看到服务器及其应用程序的状态和配置。
2. Installing Tomcat
2.安装Tomcat
Before we delve into the Tomcat Manager App, we first need to install a Tomcat server.
在我们深入研究Tomcat管理器应用程序之前,我们首先需要安装一个Tomcat服务器。
Fortunately, installing Tomcat is an easy process. Please refer to our Introduction to Apache Tomcat guide for help installing Tomcat. In this tutorial, we’ll be using the latest Tomcat 9 version.
幸运的是,安装Tomcat是一个简单的过程。请参考我们的Apache Tomcat 介绍指南,以获得安装 Tomcat 的帮助。在本教程中,我们将使用最新的Tomcat 9 版本。
3. Accessing the Tomcat Manager App
3.访问Tomcat管理器应用程序
Now, let’s take a look at how to use the Tomcat Manager App. We have two options here — we can choose to use the web-based (HTML) application or the text-based web service.
现在,让我们来看看如何使用Tomcat管理器应用程序。我们在这里有两个选择–我们可以选择使用基于网络(HTML)的应用程序或基于文本的网络服务。
The text-based service is ideal for scripting, whereas the HTML application is designed for humans.
基于文本的服务是脚本的理想选择,而HTML应用是为人类设计的。
The web-based application is available at:
基于网络的应用程序可在以下网站获得:。
- http[s]://<server>:<port>/manager/html/
While the corresponding text service is available at:
而相应的文本服务可在:。
- http[s]://<server>:<port>/manager/text/
However, before we can access these services, we need to configure Tomcat. By default, it can only be accessed by users with the correct permissions.
然而,在我们能够访问这些服务之前,我们需要配置Tomcat。默认情况下,它只能由具有正确权限的用户访问。
Let’s go ahead and add such users by editing the conf/tomcat-users file:
让我们继续通过编辑conf/tomcat-users文件来添加这些用户。
<tomcat-users>
  <role rolename="manager-gui"/>
  <role rolename="manager-script"/>
  <user username="tomcatgui" password="s3cret" roles="manager-gui"/>
  <user username="tomcattext" password="baeldung" roles="manager-script"/>
</tomcat-users>
As we can see, we added two new users:
我们可以看到,我们增加了两个新用户。
- tomcatgui – has the manager-gui role and can use the web-based application
- tomcattext – has the manager-script role and can use the text-based web service
In the next section, we’ll see how we can use these two users to demonstrate the capabilities of the Tomcat Manager App.
在下一节中,我们将看到如何使用这两个用户来展示Tomcat管理器应用程序的功能。
4. Listing Currently Deployed Applications
4.列出当前部署的应用程序
In this section, we’ll learn how to see a list of the currently deployed applications.
在本节中,我们将学习如何查看当前部署的应用程序的列表。
4.1. Using the Web
4.1.使用网络
Let’s open http://localhost:8080/manager/html/ to view the Tomcat Manager App webpage. We need to authenticate as the tomcatgui user to do so.
让我们打开http://localhost:8080/manager/html/以查看Tomcat管理器应用程序的网页。我们需要以tomcatgui用户的身份进行认证才能这样做。
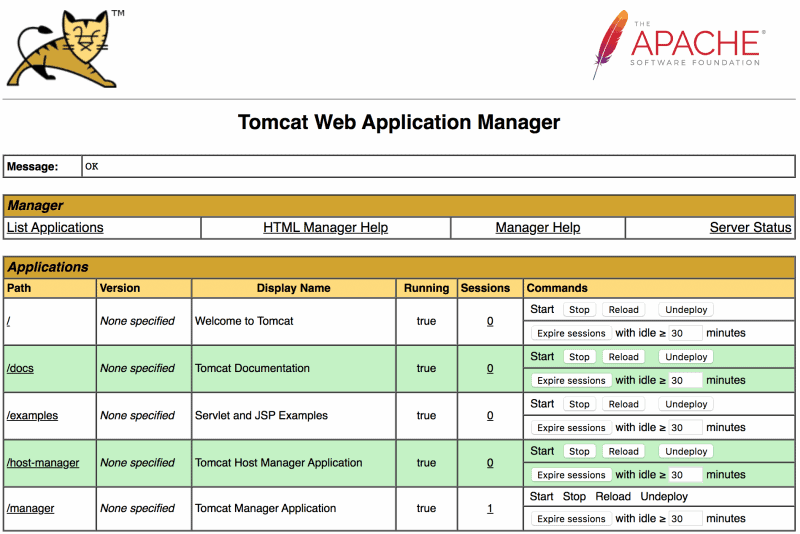
Once logged in, the web page lists all the deployed applications at the top of the page. For each application, we can see if it is running or not, the context path, and the number of active sessions. There are also several buttons we can use to manage the applications:
一旦登录,网页就会在页面顶部列出所有已部署的应用程序。对于每个应用程序,我们可以看到它是否正在运行,上下文路径,以及活动会话的数量。还有几个按钮,我们可以用来管理这些应用程序。
4.2. Using the Text Service
4.2.使用文本服务
Alternatively, we can list all the deployed applications using the text web service. This time we make a curl request using the tomcattext user to authenticate:
另外,我们可以使用文本网络服务列出所有部署的应用程序。这次我们使用tomcattext用户进行认证,提出一个curl请求。
curl -u tomcattext:baeldung http://localhost:8080/manager/text/listJust like the web page, the response shows all the deployed applications with their current state and number of active sessions. For example, we can see the manager application is running and has one active session:
就像网页一样,响应显示了所有部署的应用程序及其当前状态和活动会话的数量。例如,我们可以看到manager应用程序正在运行,有一个活动会话。
OK - Listed applications for virtual host [localhost]
/:running:0:ROOT
/examples:running:0:examples
/host-manager:running:0:host-manager
/manager:running:1:manager
/docs:running:0:docs
5. Managing Applications
5.管理应用程序
One of the key pieces of functionality that the Tomcat Manager App allows us to do is stop, start, and reload applications.
Tomcat管理器应用程序允许我们做的关键功能之一是停止、启动和重新加载应用程序。
5.1. Using the Web
5.1.使用网络
In the case of the web application, stopping and starting the applications is just a matter of clicking the buttons on the web page. The outcome and any problems are reported in the message field at the top of the page.
在网络应用的情况下,停止和启动应用程序只是点击网页上的按钮而已。结果和任何问题都会在页面顶部的信息栏中报告。
5.2. Using the Text Service
5.2.使用文本服务
Likewise, we can stop and start applications using the text service. Let’s stop and then start the examples application using a curl request:
同样地,我们可以使用文本服务来停止和启动应用程序。让我们使用curl请求来停止并启动examples应用程序。
curl -u tomcattext:baeldung http://localhost:8080/manager/text/stop?path=/examples
OK - Stopped application at context path [/examples]
curl -u tomcattext:baeldung http://localhost:8080/manager/text/start?path=/examples
OK - Started application at context path [/examples]The path query parameter indicates which application to manage and must match the context path of the application.
path查询参数表示要管理哪个应用程序,必须与应用程序的上下文路径相匹配。
We can also reload applications to pick up changes to classes or resources. However, this only works for applications that are unpacked into a directory and not deployed as WAR files.
我们还可以重新加载应用程序,以获取类或资源的变化。然而,这只适用于被解压到目录中的应用程序,而不是作为WAR文件部署。
Here is an example of how we can reload the docs application using the text service:
下面是一个例子,说明我们如何使用文本服务重新加载docs应用程序。
curl -u tomcattext:baeldung http://localhost:8080/manager/text/reload?path=/docs
OK - Reloaded application at context path [/docs]
Remember, though, we only need to click the reload button to achieve the same in the web application.
不过请记住,我们只需要点击重新加载按钮就可以在网络应用中实现同样的效果。
6. Expiring Sessions
6.即将到期的会议
In addition to managing applications, we can manage user sessions. The Tomcat Manager App shows details on current user sessions and allows us to expire sessions manually.
除了管理应用程序之外,我们还可以管理用户会话。Tomcat管理器应用程序显示了当前用户会话的详细信息,并允许我们手动终止会话。
6.1. Via the Web Interface
6.1.通过网络界面
We can view current user sessions by following the link in the Sessions column for all listed applications.
我们可以通过所有列出的应用程序的Sessions栏中的链接来查看当前用户会话。
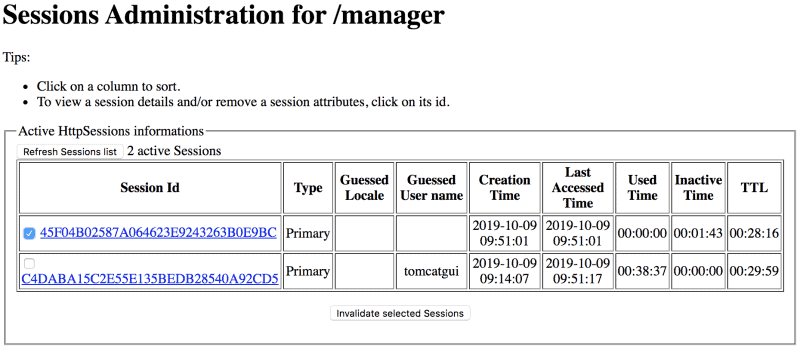
In the example below, we can see there are two user sessions for the manager application. It shows the duration of the session, how long it has been inactive, and how long until it expires (30 minutes by default).
在下面的例子中,我们可以看到manager应用程序有两个用户会话。它显示了会话的持续时间,它已经不活动了多长时间,以及离过期还有多长时间(默认为30分钟)。
We can also manually destroy sessions by selecting them and choosing Invalidate selected sessions:
我们也可以通过选择会话并选择无效选定会话来手动销毁会话。
On the home page, there is a button to Expire sessions. This also destroys sessions that have been idle for the specified period of minutes.
在主页上,有一个Expire sessions的按钮。这也会销毁闲置了指定时间段的会话。
6.2. Via the Text Web Service
6.2.通过文本网络服务
Again, the text service equivalents are straightforward.
同样,文本服务的等价物是直截了当的。
To view details on current user sessions, we call the session endpoint with the context path of the application we are interested in. In this example, we can see there are currently two sessions for the manager application:
要查看当前用户会话的详细信息,我们用我们感兴趣的应用程序的上下文路径调用session端点。在这个例子中,我们可以看到当前有两个manager应用程序的会话。
curl -u tomcattext:baeldung "http://localhost:8080/manager/text/sessions?path=/manager"
OK - Session information for application at context path [/manager]
Default maximum session inactive interval is [30] minutes
Inactive for [2 - <3] minutes: [1] sessions
Inactive for [13 - <14] minutes: [1] sessions
If we want to destroy inactive user sessions, then we use the expire endpoint. In this example, we expire sessions that have been inactive for more than 10 minutes for the manager application:
如果我们想销毁不活动的用户会话,那么我们使用expire端点。在这个例子中,我们销毁了manager应用程序中超过10分钟的不活动会话。
curl -u tomcattext:baeldung "http://localhost:8080/manager/text/expire?path=/manager&idle=10"
OK - Session information for application at context path [/manager]
Default maximum session inactive interval is [30] minutes
Inactive for [5 - <6] minutes: [1] sessions
Inactive for [15 - <16] minutes: [1] sessions
Inactive for [>10] minutes: [1] sessions were expired
7. Deploying Applications
7.部署应用程序
Now that we have seen how we can manage our applications, let’s see how we can deploy new applications.
现在我们已经看到如何管理我们的应用程序,让我们看看如何部署新的应用程序。
To get started, download the Tomcat sample WAR so we have a new application to deploy.
为了开始工作,请下载Tomcat 示例 WAR,这样我们就有一个新的应用程序可以部署。
7.1. Using the Web
7.1.使用网络
Now, we have a few options to deploy our new sample WAR using the web page. The easiest method is to upload the sample WAR file and deploy it:
现在,我们有几个选择来部署我们新的样本WAR,使用网页。最简单的方法是上传样本WAR文件并部署它。
The WAR is deployed with a context path matching the name of the WAR. If successful, the sample application is deployed, started, and displayed in the list of applications. If we follow the /sample link in the context path, we can view our running sample application:
WAR被部署,其上下文路径与WAR的名称相匹配。如果成功,样本应用程序被部署、启动,并显示在应用程序的列表中。如果我们遵循上下文路径中的/sample链接,我们可以查看我们正在运行的示例应用程序。
So that we can deploy the same application again, let’s click on the Undeploy button. As the name suggests, this will undeploy the application. Note that this also deletes all files and directories for the deployed application.
这样我们就可以再次部署同一个应用程序,让我们点击Undeploy按钮。顾名思义,这将取消部署应用程序。请注意,这也会删除已部署应用程序的所有文件和目录。
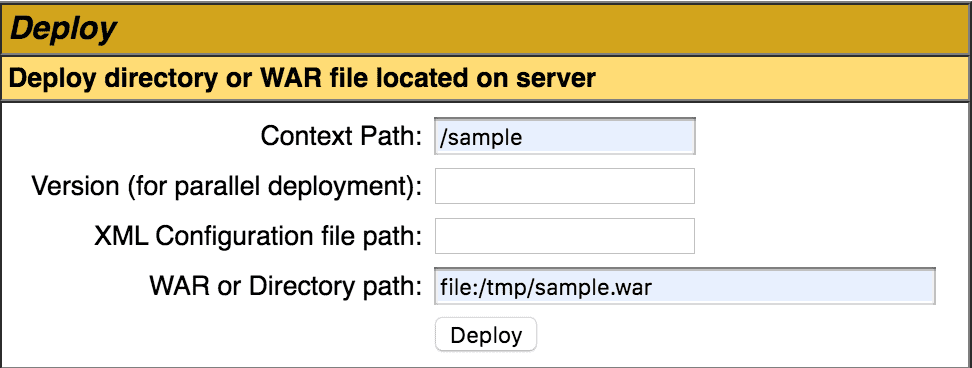
Next, we can deploy the sample WAR file by specifying the file path. We specify the file path URI to the WAR file or the unpacked directory plus the context path. In our case, the sample WAR is in the /tmp directory, and we are setting the context path to /sample:
接下来,我们可以通过指定文件路径来部署样本WAR文件。我们指定WAR文件的文件路径URI或解压后的目录加上上下文路径。在我们的案例中,样本WAR在/tmp目录下,我们将上下文路径设置为/sample。
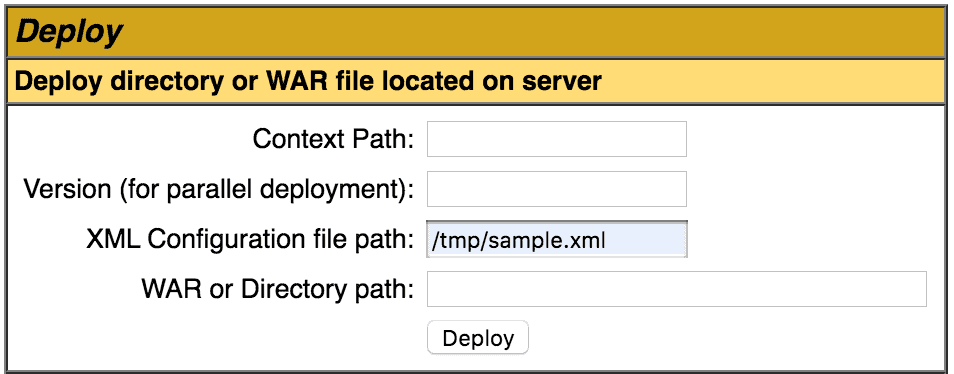
Alternatively, we can specify the file path to an XML deployment descriptor. This approach allows us to specify additional attributes affecting how the application is deployed and run. In the example below, we are deploying the sample WAR application and making it reloadable.
另外,我们可以指定XML部署描述符的文件路径。这种方法允许我们指定影响应用程序部署和运行方式的额外属性。在下面的例子中,我们正在部署示例的WAR应用程序,并使其可重新加载。
Note that any path specified in the deployment descriptor is ignored. The context path is taken from the file name of the deployment descriptor. Take a look at the Common Attributes to understand why, as well as a description of all the other possible attributes:
请注意,部署描述符中指定的任何路径都被忽略。上下文路径取自部署描述符的文件名。请看常见属性以了解原因,以及所有其他可能属性的描述。
<Context docBase="/tmp/sample.war" reloadable="true" />7.2. Using the Text Service
7.2.使用文本服务
Now let’s have a look at deploying applications using the text service.
现在我们来看看使用文本服务部署应用程序的情况。
Firstly, let’s undeploy our sample application:
首先,让我们重新部署我们的示例应用程序。
curl -u tomcattext:baeldung "http://localhost:8080/manager/text/undeploy?path=/sample"
OK - Undeployed application at context path [/sample]
To deploy it again, we specify the context path and the location URI of the sample WAR file:
为了再次部署它,我们指定上下文路径和样本WAR文件的位置URI。
curl -u tomcattext:baeldung "http://localhost:8080/manager/text/deploy?path=/sample&war=file:/tmp/sample.war"
OK - Deployed application at context path [/sample]
Furthermore, we can also deploy an application using the XML deployment descriptor:
此外,我们还可以使用XML部署描述符来部署一个应用程序。
curl -u tomcattext:baeldung "http://localhost:8080/manager/text/deploy?config=file:/tmp/sample.xml"
OK - Deployed application at context path [/sample]
8. Viewing SSL Configuration
8.查看SSL配置
We need to enable SSL in Tomcat before we can see any SSL configuration. First, let’s create a new certificate Keystore with a self-signed certificate in our Tomcat’s conf directory:
在我们看到任何SSL配置之前,我们需要在Tomcat中启用SSL。首先,让我们在Tomcat的conf目录下创建一个带有自签名证书的新证书Keystore。
keytool -genkey -alias tomcat -keyalg RSA -keystore conf/localhost-rsa.jks
Next, we change the conf/tomcat-server.xml file to enable the SSL connector in Tomcat:
接下来,我们修改conf/tomcat-server.xml文件以启用Tomcat的SSL连接器。
<Connector port="8443" protocol="org.apache.coyote.http11.Http11NioProtocol"
           maxThreads="150" SSLEnabled="true">
    <SSLHostConfig>
        <Certificate certificateKeystoreFile="conf/localhost-rsa.jks" type="RSA" />
    </SSLHostConfig>
</Connector>
Once we restart Tomcat, we find it runs securely on port 8443!
一旦我们重新启动Tomcat,我们发现它在8443端口上安全运行
8.1. Using the Web
8.1.使用网络
Let’s open https://localhost:8443/manager/html to see the Tomcat Manager App again. It should look exactly the same.
让我们打开https://localhost:8443/manager/html,再次看到Tomcat管理器应用程序。它看起来应该是完全一样的。
We can now view our SSL configuration using the buttons under Diagnostics:
现在我们可以使用Diagnostics下的按钮查看我们的SSL配置。
- The Ciphers button shows all the SSL ciphers understood by Tomcat
- Next, the Certificates button shows details of our self-signed certificate
- Finally, the Trusted Certificates button shows trusted CA certificate details; in our example, it does not display anything of interest as we have not added any trusted CA certificates
Also, the SSL configuration files can be dynamically re-loaded at any time. We can re-load per virtual host by entering the hostname. Otherwise, all configuration is re-read:
此外,SSL配置文件可以在任何时候动态地重新加载。我们可以通过输入主机名来重新加载每个虚拟主机。否则,所有配置都会被重新读取。
8.2. Using the Text Service
8.2.使用文本服务
Likewise, we can get the same information using the text service. We can view all:
同样,我们也可以使用文本服务获得同样的信息。我们可以查看所有。
- SSL ciphers using the sslConnectorCiphers resource:
curl -ku tomcattext:baeldung "https://localhost:8443/manager/text/sslConnectorCiphers"- Certificates using the sslConnectorCerts resource:
curl -ku tomcattext:baeldung "https://localhost:8443/manager/text/sslConnectorCerts"- Trusted certificates using the sslConnectorTrustedCerts resource:
curl -ku tomcattext:baeldung "https://localhost:8443/manager/text/sslConnectorTrustedCerts"The SSL configuration can be re-loaded using:
可以用以下方法重新加载SSL配置。
curl -ku tomcattext:baeldung "https://localhost:8443/manager/text/sslReload"
OK - Reloaded TLS configuration for all TLS virtual hosts
Note the -k option in the curl command as we are using a self-signed certificate.
注意curl命令中的-k选项,因为我们使用的是自签证书。
9. Viewing the Server Status
9.查看服务器状态
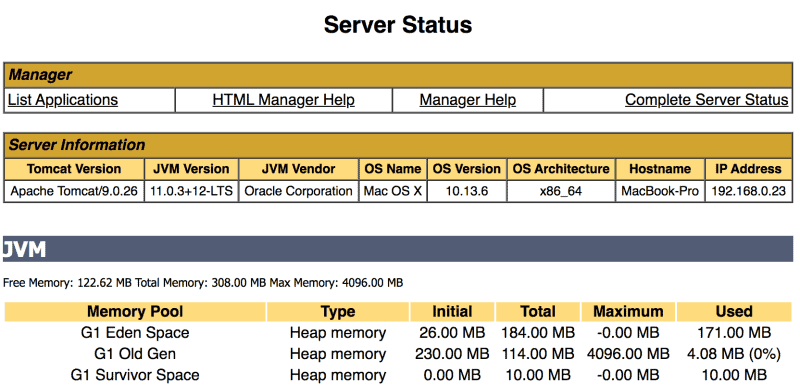
The Tomcat Manager App also shows us the status of the server and the deployed applications. These pages are particularly handy when we want to view overall usage statistics.
Tomcat管理器应用程序还向我们显示服务器和部署的应用程序的状态。当我们想查看总体使用情况统计时,这些页面特别方便。
If we follow the Server Status link, displayed in the top right, we see details on the server. The Complete Server Status link shows additional details on the applications:
如果我们跟随显示在右上方的服务器状态链接,我们会看到服务器的详细信息。完整的服务器状态链接显示了关于应用程序的额外细节。
There is no corresponding text service. However, we can modify the Server Status link to view the server status in XML. Unfortunately, doing the same for the Complete Server Status link may or may not work, depending on which Tomcat version we are using.
没有相应的文本服务。但是,我们可以修改服务器状态链接以查看XML中的服务器状态。不幸的是,对完整的服务器状态链接进行同样的操作,可能会也可能不会成功,这取决于我们所使用的Tomcat版本。
10. Saving Configuration
10.保存配置
The text service allows us to save the current configuration to the Tomcat conf/server.xml. This is very useful if we have changed the configuration and want to save it for later use.
文本服务允许我们将当前配置保存到Tomcat conf/server.xml。如果我们改变了配置,并希望将其保存起来供以后使用,这就非常有用。
Thankfully, this also backs up the previous conf/server.xml, although any previous comments may be removed in the new conf/server.xml configuration file.
值得庆幸的是,这也备份了之前的conf/server.xml,尽管在新的conf/server.xml配置文件中可以删除之前的任何注释。
However, before we can do this, we need to add a new listener. Edit the conf/server.xml and add the following to the end of the list of the existing listeners:
然而,在我们这样做之前,我们需要添加一个新的监听器。编辑conf/server.xml,在现有监听器列表的末尾添加以下内容。
<Listener className="org.apache.catalina.storeconfig.StoreConfigLifecycleListener" />Once we’ve restarted Tomcat, we can save our configuration using:
一旦我们重新启动了Tomcat,我们就可以用以下方法保存我们的配置。
curl -u tomcattext:baeldung "http://localhost:8080/manager/text/save"
OK - Server configuration saved
11. Diagnostics
11. 诊断法
Lastly, let’s look at additional diagnostic features provided by the Tomcat Manager App.
最后,让我们看看Tomcat管理器应用程序提供的其他诊断功能。
11.1. Thread Dump
11.1.螺纹倾销
We can use the text service to get a thread dump of the running Tomcat server:
我们可以使用文本服务来获取运行中的Tomcat服务器的线程转储:。
curl -u tomcattext:baeldung "http://localhost:8080/manager/text/threaddump"
OK - JVM thread dump
2019-10-06 23:19:10.066
Full thread dump Java HotSpot(TM) 64-Bit Server VM (11.0.3+12-LTS mixed mode):
...
This is particularly useful when we need to analyze or find threads that are causing performance issues, such as long-running or deadlocked threads.
当我们需要分析或找到导致性能问题的线程时,例如长期运行或死锁的线程,这特别有用。
11.2. Finding Memory Leaks
11.2.寻找内存泄漏
Tomcat generally does a good job of preventing memory leaks. But when we do suspect a memory leak, the Tomcat Manager App has a memory leak detection service to help us. It performs a full garbage collection and detects any classes still resident in memory since the last time the application was reloaded.
Tomcat通常在防止内存泄漏方面做得很好。但当我们怀疑有内存泄漏时,Tomcat管理器应用程序有一个内存泄漏检测服务来帮助我们。它执行全面的垃圾收集,并检测自上次重载应用程序后仍驻留在内存中的任何类。
We only need to run the Find Leaks button on the web page to detect leaks.
我们只需要在网页上运行查找泄漏按钮来检测泄漏。
Similarly, the text service can run memory leak detection:
同样地,文本服务可以运行内存泄漏检测。
curl -u  tomcattext:baeldung "http://localhost:8080/manager/text/findleaks?statusLine=true"
OK - No memory leaks found
11.3. Displaying Available Resources
11.3.显示可用资源
The text service provides a list of available resources. In this example, we see we have one in-memory database available:
文本服务提供了一个可用资源的列表。在这个例子中,我们看到我们有一个可用的内存数据库。
curl -u tomcattext:baeldung "http://localhost:8080/manager/text/resources"
OK - Listed global resources of all types
UserDatabase:org.apache.catalina.users.MemoryUserDatabase
12. Conclusion
12.结论
In this article, we’ve taken a detailed look at the Tomcat Manager App. We started by installing the application and seeing how to give access by configuring permissions for two distinct users.
在这篇文章中,我们已经详细了解了Tomcat管理器应用程序。我们从安装应用程序开始,看到如何通过为两个不同的用户配置权限来给予访问。
Then we explored several examples using the web-based application and text-based web service. We saw how we could view, manage, and deploy applications using a variety of methods. Then we took a look at how to view the server’s configuration and status.
然后我们使用基于网络的应用程序和基于文本的网络服务探索了几个例子。我们看到了我们如何使用各种方法查看、管理和部署应用程序。然后我们看了一下如何查看服务器的配置和状态。
To learn more about The Tomcat Manager App, check out the online documentation.
要了解有关The Tomcat Manager App的更多信息,请查看在线文档。
