1. Overview
1.概述
When two browsers need to communicate, they typically need a server in between to coordinate the communication, passing messages between them. But having a server in the middle results in a delay in communication between the browsers.
当两个浏览器需要通信时,它们通常需要一个服务器在中间协调通信,在它们之间传递信息。但是在中间有一个服务器会导致浏览器之间的通信延迟。
In this tutorial, we’ll learn about WebRTC, an open-source project that enables browsers and mobile applications to communicate directly with each other in real-time. Then we’ll see it in action by writing a simple application that creates a peer-to-peer connection to share data between two HTML clients.
在本教程中,我们将了解WebRTC,这是一个开源项目,使浏览器和移动应用程序能够直接进行实时通信。然后我们将通过编写一个简单的应用程序,在两个HTML客户端之间创建一个点对点连接以共享数据,从而看到它的实际效果。
We’ll be using HTML, JavaScript, and the WebSocket library along with the built-in WebRTC support in the web browsers to build a client. And, we’ll be building a Signaling server with Spring Boot, using WebSocket as the communication protocol. Finally, we’ll see how to add video and audio streams to this connection.
我们将使用HTML、JavaScript和WebSocket库以及网络浏览器中的内置WebRTC支持来构建一个客户端。而且,我们将用Spring Boot构建一个信号服务器,使用WebSocket作为通信协议。最后,我们将看到如何向该连接添加视频和音频流。
2. Fundamentals and Concepts of WebRTC
2.WebRTC的基本原理和概念
Let’s see how two browsers communicate in a typical scenario without WebRTC.
让我们看看在没有WebRTC的典型情况下,两个浏览器是如何进行通信的。
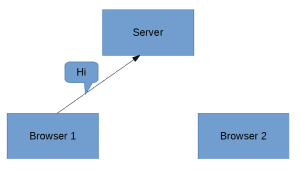
Suppose we have two browsers, and Browser 1 needs to send a message to Browser 2. Browser 1 first sends it to the Server:
假设我们有两个浏览器,浏览器1需要向浏览器2发送一个消息。浏览器1首先将其发送到服务器。
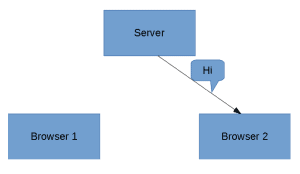
After the Server receives the message, it processes it, finds Browser 2, and sends it the message:
在服务器收到消息后,它处理它,找到浏览器2,并向它发送消息。
Since the server has to process the message before sending it to browser 2, communication takes place in near real-time. Of course, we’d like it to be at real-time.
由于服务器在向浏览器2发送消息之前必须对其进行处理,因此通信是以近实时的方式进行的。当然,我们希望它是at实时的。
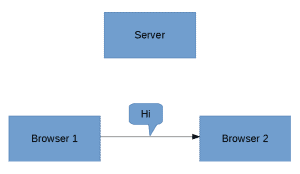
WebRTC solves this problem by creating a direct channel between the two browsers, eliminating the need for the server:
WebRTC通过在两个浏览器之间创建一个直接通道,消除了对服务器的需求,从而解决了这个问题。
As a result, the time it takes to pass messages from one browser to another is reduced drastically as the messages now route directly from sender to receiver. It also takes away the heavy lifting and bandwidth incurred from the servers and causes it to be shared between the clients involved.
因此,从一个浏览器到另一个浏览器传递信息所需的时间大大减少,因为信息现在直接从发送方到接收方。它还带走了服务器上的繁重工作和带宽,使其在相关的客户之间共享。
3. Support for WebRTC and Built-In Features
3.对WebRTC和内置功能的支持
WebRTC is supported by major browsers like Chrome, Firefox, Opera, and Microsoft Edge, as well as platforms like Android and iOS.
WebRTC得到了Chrome、Firefox、Opera和Microsoft Edge等主要浏览器以及Android和iOS等平台的支持。
WebRTC does not need any external plugins to be installed in our browser as the solution comes bundled out-of-the-box with the browser.
WebRTC不需要在我们的浏览器中安装任何外部插件,因为该解决方案与浏览器捆绑在一起,开箱即用。
Furthermore, in a typical real-time application involving video and audio transmission, we have to depend heavily on C++ libraries, and we have to handle a lot of problems, including:
此外,在一个典型的涉及视频和音频传输的实时应用程序中,我们必须严重依赖C++库,而且我们必须处理很多问题,包括。
- Packet-loss concealment
- Echo cancellation
- Bandwidth adaptivity
- Dynamic jitter buffering
- Automatic gain control
- Noise reduction and suppression
- Image “cleaning”
But WebRTC handles all these concerns under the hood, making it simpler to make real-time communications between clients.
但WebRTC在引擎盖下处理所有这些问题,使客户端之间的实时通信更加简单。
4. Peer-to-Peer Connection
4.点对点的连接
Unlike a client-server communication, where there’s a known address for the server, and the client already knows the address of the server to communicate with, in a P2P (peer-to-peer) connection, none of the peers has a direct address to another peer.
与客户-服务器通信不同的是,服务器有一个已知的地址,而客户已经知道与之通信的服务器地址,在P2P(点对点)连接中,没有一个对等体有直接的地址给另一个对等体。
To establish a peer-to-peer connection, there are few steps involved to allow clients to:
要建立一个点对点的连接,有几个步骤可以让客户端。
- make themselves available for communication
- identify each other and share network-related information
- share and agree on the format of the data, mode, and protocols involved
- share data
WebRTC defines a set of APIs and methodologies for performing these steps.
WebRTC定义了一套用于执行这些步骤的API和方法学。
For the clients to discover each other, share the network details, and then share the format of the data, WebRTC uses a mechanism called signaling.
为了让客户发现对方,分享网络细节,然后分享数据的格式,WebRTC使用了一种叫做signaling的机制。
5. Signaling
5.信号传递
Signaling refers to the processes involved in network discovery, creation of a session, managing the session, and exchanging the media-capability metadata.
信令指的是网络发现、创建会话、管理会话和交换媒体能力元数据的过程。
This is essential as the clients need to know each other up front to initiate the communication.
这一点至关重要,因为客户需要在前面了解对方,以启动沟通。
To achieve all these, WebRTC does not specify a standard for signaling and leaves it to the developer’s implementation. So, this provides us the flexibility to use WebRTC on a range of devices with any technology and supporting protocol.
为了实现所有这些,WebRTC没有指定信令的标准,而是将其留给开发者实现。因此,这为我们提供了灵活性,可以在一系列具有任何技术和支持协议的设备上使用WebRTC。
5.1. Building the Signaling Server
5.1.构建信令服务器
For the signaling server, we’ll build a WebSocket server using Spring Boot. We can begin with an empty Spring Boot project generated from Spring Initializr.
对于信令服务器,我们将使用Spring Boot构建一个WebSocket服务器。我们可以从一个由Spring Initializr生成的空Spring Boot项目开始。
To use WebSocket for our implementation, let’s add the dependency to our pom.xml:
为了在实现中使用WebSocket,让我们在pom.xml中添加该依赖性。
<dependency>
    <groupId>org.springframework.boot</groupId>
    <artifactId>spring-boot-starter-websocket</artifactId>
    <version>2.4.0</version>
</dependency>
We can always find the latest version to use from Maven Central.
我们可以随时从Maven中心找到要使用的最新版本。
The implementation of the signaling server is simple — we’ll create an endpoint that a client application can use to register as a WebSocket connection.
信令服务器的实现很简单–我们将创建一个端点,客户端应用程序可以用它来注册为WebSocket连接。
To do this in Spring Boot, let’s write a @Configuration class that extends the WebSocketConfigurer and overrides the registerWebSocketHandlers method:
要在Spring Boot中做到这一点,让我们编写一个@Configuration类,该类扩展了WebSocketConfigurer并重写了registerWebSocketHandlers方法。
@Configuration
@EnableWebSocket
public class WebSocketConfiguration implements WebSocketConfigurer {

    @Override
    public void registerWebSocketHandlers(WebSocketHandlerRegistry registry) {
        registry.addHandler(new SocketHandler(), "/socket")
          .setAllowedOrigins("*");
    }
}
Note that we’ve identified /socket as the URL that we’ll register from the client that we’ll be building in the next step. We also passed in a SocketHandler as an argument to the addHandler method — this is actually the message handler that we’ll create next.
请注意,我们已经将/socket确定为我们将从客户端注册的URL,我们将在下一步建立该客户端。我们还传入了一个SocketHandler作为addHandler方法的参数–这实际上是我们接下来要创建的消息处理器。
5.2. Creating Message Handler in Signaling Server
5.2.在信令服务器中创建消息处理程序
The next step is to create a message handler to process the WebSocket messages that we’ll receive from multiple clients.
下一步是创建一个消息处理器,以处理我们将从多个客户端收到的WebSocket消息。
This is essential to aid the exchange of metadata between the different clients to establish a direct WebRTC connection.
这对于帮助不同的客户端之间交换元数据以建立直接的WebRTC连接至关重要。
Here, to keep things simple, when we receive the message from a client, we will send it to all other clients except to itself.
在这里,为了保持简单,当我们从一个客户那里收到消息时,我们将把它发送给所有其他客户,除了它自己。
To do this, we can extend TextWebSocketHandler from the Spring WebSocket library and override both the handleTextMessage and afterConnectionEstablished methods:
要做到这一点,我们可以扩展TextWebSocketHandler来自Spring WebSocket库并重载handleTextMessage和afterConnectionEstablished方法:
@Component
public class SocketHandler extends TextWebSocketHandler {

    List<WebSocketSession>sessions = new CopyOnWriteArrayList<>();

    @Override
    public void handleTextMessage(WebSocketSession session, TextMessage message)
      throws InterruptedException, IOException {
        for (WebSocketSession webSocketSession : sessions) {
            if (webSocketSession.isOpen() && !session.getId().equals(webSocketSession.getId())) {
                webSocketSession.sendMessage(message);
            }
        }
    }

    @Override
    public void afterConnectionEstablished(WebSocketSession session) throws Exception {
        sessions.add(session);
    }
}
As we can see in the afterConnectionEstablished method, we add the received session to a list of sessions so that we can keep track of all the clients.
正如我们在afterConnectionEstablished方法中所看到的,我们将收到的会话添加到会话列表中,这样我们就可以跟踪所有的客户端。
And when we receive a message from any of the clients, as can be seen in the handleTextMessage, we iterate over all the client sessions in the list and send the message to all other clients except the sender by comparing the session id of the sender and the sessions in the list.
而当我们收到来自任何一个客户端的消息时,正如在handleTextMessage中可以看到的,我们遍历列表中的所有客户端会话,并通过比较发送者和列表中的会话ID,将消息发送给除发送者之外的所有其他客户端。
6. Exchanging Metadata
6.交换元数据
In a P2P connection, the clients can be very different from each other. For example, Chrome on Android can connect to Mozilla on a Mac.
在P2P连接中,客户端之间可能非常不同。例如,Android上的Chrome浏览器可以连接到Mac上的Mozilla。
Hence, the media capabilities of these devices can vary widely. Therefore, it’s essential for a handshake between peers to agree upon the media types and codecs used for communication.
因此,这些设备的媒体能力可能差别很大。因此,对等体之间的握手必须就用于通信的媒体类型和编解码达成一致。
In this phase, WebRTC uses the SDP (Session Description Protocol) to agree on the metadata between the clients.
在这个阶段,WebRTC使用SDP(会话描述协议)来商定客户端之间的元数据。
To achieve this, the initiating peer creates an offer that must be set as a remote descriptor by the other peer. In addition, the other peer then generates an answer that is accepted as a remote descriptor by the initiating peer.
为了实现这一点,发起对等体创建一个必须被其他对等体设置为远程描述符的提议。此外,另一个对等体随后产生一个答案,被发起对等体接受为远程描述符。
The connection is established when this process is complete.
这个过程完成后,连接就建立了。
7. Setting Up the Client
7.设置客户端
Let’s create our WebRTC client such that it can act both as the initiating peer and the remote peer.
让我们创建我们的WebRTC客户端,使其既能作为发起方对等体,又能作为远程对等体。
We’ll begin by creating an HTML file called index.html and a JavaScript file named client.js which index.html will use.
我们将首先创建一个名为index.html的HTML文件和一个名为client.js的JavaScript文件,index.html将使用它。
To connect to our signaling server, we create a WebSocket connection to it. Assuming that the Spring Boot signaling server that we built is running on http://localhost:8080, we can create the connection:
为了连接到我们的信号服务器,我们要创建一个WebSocket连接到它。假设我们建立的Spring Boot信号服务器运行在http://localhost:8080上,我们可以创建连接。
var conn = new WebSocket('ws://localhost:8080/socket');To send a message to the signaling server, we’ll create a send method that will be used to pass the message in the upcoming steps:
为了向信令服务器发送消息,我们将创建一个send方法,在接下来的步骤中用来传递消息。
function send(message) {
    conn.send(JSON.stringify(message));
}
8. Setting Up a Simple RTCDataChannel
8.设置一个简单的RTCDataChannel
After setting up the client in the client.js, we need to create an object for the RTCPeerConnection class:
在client.js中设置好客户端后,我们需要为RTCPeerConnection类创建一个对象。
configuration = null;
var peerConnection = new RTCPeerConnection(configuration);
In this example, the purpose of the configuration object is to pass in the STUN (Session Traversal Utilities for NAT) and TURN (Traversal Using Relays around NAT) servers and other configurations that we’ll be discussing in the latter part of this tutorial. For this example, it’s sufficient to pass in null.
在这个例子中,配置对象的目的是传入STUN(Session Traversal Utilities for NAT)和TURN(Traversal Using Relays around NAT)服务器和其他配置,我们将在本教程的后半部分讨论。在这个例子中,传入null即可。
Now, we can create a dataChannel to use for message passing:
现在,我们可以创建一个dataChannel来用于消息传递。
var dataChannel = peerConnection.createDataChannel("dataChannel", { reliable: true });Subsequently, we can create listeners for various events on the data channel:
随后,我们可以为数据通道上的各种事件创建监听器。
dataChannel.onerror = function(error) {
    console.log("Error:", error);
};
dataChannel.onclose = function() {
    console.log("Data channel is closed");
};
9. Establishing a Connection With ICE
9.与ICE建立联系
The next step in establishing a WebRTC connection involves the ICE (Interactive Connection Establishment) and SDP protocols, where the session descriptions of the peers are exchanged and accepted at both peers.
建立WebRTC连接的下一步涉及到ICE(交互式连接建立)和SDP协议,其中对等体的会话描述在两个对等体中进行交换和接受。
The signaling server is used to send this information between the peers. This involves a series of steps where the clients exchange connection metadata through the signaling server.
信令服务器被用来在对等体之间发送这些信息。这涉及到一系列的步骤,客户端通过信令服务器交换连接元数据。
9.1. Creating an Offer
9.1.创建一个要约
Firstly, we create an offer and set it as the local description of the peerConnection. We then send the offer to the other peer:
首先,我们创建一个offer并将其设置为peerConnection的本地描述。然后我们将offer发送给另一个对等体。
peerConnection.createOffer(function(offer) {
    send({
        event : "offer",
        data : offer
    });
    peerConnection.setLocalDescription(offer);
}, function(error) {
    // Handle error here
});
Here, the send method makes a call to the signaling server to pass the offer information.
在这里,send方法对信令服务器进行了调用,以传递offer信息。
Note that we are free to implement the logic of the send method with any server-side technology.
注意,我们可以自由地用任何服务器端的技术来实现发送方法的逻辑。
9.2. Handling ICE Candidates
9.2 处理ICE的候选人
Secondly, we need to handle the ICE candidates. WebRTC uses the ICE (Interactive Connection Establishment) protocol to discover the peers and establish the connection.
其次,我们需要处理ICE的候选人。WebRTC使用ICE(交互式连接建立)协议来发现对等体并建立连接。
When we set the local description on the peerConnection, it triggers an icecandidate event.
当我们在peerConnection上设置本地描述时,会触发一个icecandidate事件。
This event should transmit the candidate to the remote peer so that the remote peer can add it to its set of remote candidates.
这个事件应该把候选者传送给远程对等体,以便远程对等体可以把它添加到其远程候选者集合中。
To do this, we create a listener for the onicecandidate event:
要做到这一点,我们为onicecandidate事件创建一个监听器。
peerConnection.onicecandidate = function(event) {
    if (event.candidate) {
        send({
            event : "candidate",
            data : event.candidate
        });
    }
};
The icecandidate event triggers again with an empty candidate string when all the candidates are gathered.
当所有的候选人都收集完毕时,icecandidate事件会再次触发,并出现一个空的候选人字符串。
We must pass this candidate object as well to the remote peer. We pass this empty candidate string to ensure that the remote peer knows that all the icecandidate objects are gathered.
我们必须把这个候选对象也传递给远程对等体。我们传递这个空的候选字符串,以确保远程对等体知道所有的icecandidate对象都被收集。
Also, the same event is triggered again to indicate that the ICE candidate gathering is complete with the value of candidate object set to null on the event. This need not be passed on to the remote peer.
另外,同样的事件被再次触发,以表明ICE候选人的收集已经完成,事件中candidate对象的值被设置为null。这不需要传递给远程对等体。
9.3. Receiving the ICE Candidate
9.3.接收ICE候选人
Thirdly, we need to process the ICE candidate sent by the other peer.
第三,我们需要处理另一个对等体发送的ICE候选人。
The remote peer, upon receiving this candidate, should add it to its candidate pool:
远程对等体在收到该候选者后,应将其加入其候选者库:。
peerConnection.addIceCandidate(new RTCIceCandidate(candidate));9.4. Receiving the Offer
9.4.收到要约
After that, when the other peer receives the offer, it must set it as the remote description. In addition, it must generate an answer, which is sent to the initiating peer:
之后,当另一个对等体收到offer时,它必须将其设置为远程描述。此外,它必须生成一个answer,将其发送给发起对等体。
peerConnection.setRemoteDescription(new RTCSessionDescription(offer));
peerConnection.createAnswer(function(answer) {
    peerConnection.setLocalDescription(answer);
        send({
            event : "answer",
            data : answer
        });
}, function(error) {
    // Handle error here
});
9.5. Receiving the Answer
9.5.接受答案
Finally, the initiating peer receives the answer and sets it as the remote description:
最后,发起的对等人收到回答并将其设置为远程描述。
handleAnswer(answer){
    peerConnection.setRemoteDescription(new RTCSessionDescription(answer));
}
With this, WebRTC establishes a successful connection.
借此,WebRTC建立了一个成功的连接。
Now, we can send and receive data between the two peers directly, without the signaling server.
现在,我们可以直接在两个对等体之间发送和接收数据,不需要信令服务器。
10. Sending a Message
10.发出信息
Now that we’ve established the connection, we can send messages between the peers using the send method of the dataChannel:
现在我们已经建立了连接,我们可以使用dataChannel的send方法在对等体之间发送消息。
dataChannel.send(“message”);Likewise, to receive the message on the other peer, let’s create a listener for the onmessage event:
同样地,为了接收另一个对等体上的消息,让我们为onmessage事件创建一个监听器。
dataChannel.onmessage = function(event) {
    console.log("Message:", event.data);
};
To receive the message on the data channel, we also have to add a callback on the peerConnection object:
为了接收数据通道上的消息,我们还必须在peerConnection对象上添加一个回调。
peerConnection.ondatachannel = function (event) {
    dataChannel = event.channel;
};
With this step, we have created a fully functional WebRTC data channel. We can now send and receive data between the clients. Additionally, we can add video and audio channels to this.
通过这一步,我们已经创建了一个功能齐全的WebRTC数据通道。我们现在可以在客户端之间发送和接收数据。此外,我们还可以在此添加视频和音频通道。
11. Adding Video and Audio Channels
11.添加视频和音频通道
When WebRTC establishes a P2P connection, we can easily transfer audio and video streams directly.
当WebRTC建立一个P2P连接时,我们可以很容易地直接传输音频和视频流。
11.1. Obtaining the Media Stream
11.1.获取媒体流
Firstly, we need to obtain the media stream from the browser. WebRTC provides an API for this:
首先,我们需要从浏览器中获取媒体流。WebRTC为此提供了一个API。
const constraints = {
    video: true,audio : true
};
navigator.mediaDevices.getUserMedia(constraints).
  then(function(stream) { /* use the stream */ })
    .catch(function(err) { /* handle the error */ });
We can specify the frame rate, width, and height of the video using the constraints object.
我们可以使用约束对象指定视频的帧率、宽度和高度。
The constraint object also allows specifying the camera used in the case of mobile devices:
在移动设备的情况下,该约束对象还允许指定所使用的摄像头。
var constraints = {
    video : {
        frameRate : {
            ideal : 10,
            max : 15
        },
        width : 1280,
        height : 720,
        facingMode : "user"
    }
};
Also, the value of facingMode can be set to “environment” instead of “user” if we want to enable the back camera.
此外,如果我们想启用后置摄像头,facingMode的值可以设置为“环境”而不是“用户”。
11.2. Sending the Stream
11.2.发送数据流
Secondly, we have to add the stream to the WebRTC peer connection object:
其次,我们必须将流添加到WebRTC对等体连接对象中。
peerConnection.addStream(stream);Adding the stream to the peer connection triggers the addstream event on the connected peers.
将流添加到对等体连接中,会在连接的对等体上触发addstream事件。
11.3. Receiving the Stream
11.3.接收水流
Thirdly, to receive the stream on the remote peer, we can create a listener.
第三,为了接收远程对等体上的流,我们可以创建一个监听器。
Let’s set this stream to an HTML video element:
让我们把这个流设置为一个HTML视频元素。
peerConnection.onaddstream = function(event) {
    videoElement.srcObject = event.stream;
};
12. NAT Issues
12.NAT问题
In the real world, firewall and NAT (Network Address Traversal) devices connect our devices to the public Internet.
在现实世界中,防火墙和NAT(网络地址穿越)设备将我们的设备连接到公共互联网。
NAT provides the device an IP address for usage within the local network. So, this address is not accessible outside the local network. Without a public address, peers are unable to communicate with us.
NAT为设备提供一个在本地网络内使用的IP地址。所以,这个地址在本地网络之外是无法访问的。没有公共地址,对等人就无法与我们沟通。
To address this issue, WebRTC uses two mechanisms:
为了解决这个问题,WebRTC使用了两种机制。
- STUN
- TURN
13. Using STUN
13.使用STUN
STUN is the simplest approach to this problem. Before sharing the network information to the peer, the client makes a request to a STUN server. The responsibility of the STUN server is to return the IP address from which it receives the request.
STUN是解决这一问题的最简单方法。在向对等体共享网络信息之前,客户机向STUN服务器发出请求。STUN服务器的责任是返回它收到请求的IP地址。
So, by querying the STUN server, we get our own public-facing IP address. We then share this IP and port information to the peer we want to connect to. The other peers can do the same to share their public-facing IPs.
因此,通过查询STUN服务器,我们得到我们自己的面向公众的IP地址。然后我们把这个IP和端口信息分享给我们想连接的对等体。其他对等体也可以做同样的事情来分享他们面向公众的IP。
To use a STUN server, we can simply pass the URL in the configuration object for creating the RTCPeerConnection object:
要使用STUN服务器,我们可以简单地在配置对象中传递URL,以创建RTCPeerConnection对象。
var configuration = {
    "iceServers" : [ {
        "url" : "stun:stun2.1.google.com:19302"
    } ]
};
14. Using TURN
14.使用TURN
In contrast, TURN is a fallback mechanism used when WebRTC is unable to establish a P2P connection. The role of the TURN server is to relay data directly between the peers. In this case, the actual stream of data flows through the TURN servers. Using the default implementations, TURN servers also act as STUN servers.
相反,TURN是在WebRTC无法建立P2P连接时使用的一种后备机制。TURN服务器的作用是在对等体之间直接转发数据。在这种情况下,实际的数据流会流经TURN服务器。使用默认实现,TURN服务器也充当STUN服务器。
TURN servers are publicly available, and clients can access them even if they are behind a firewall or proxy.
TURN服务器是公开的,客户即使在防火墙或代理服务器后面也可以访问它们。
But, using a TURN server is not truly a P2P connection, as an intermediate server is present.
但是,使用TURN服务器并不是真正的P2P连接,因为有一个中间服务器存在。
Note: TURN is a last resort when we are unable to establish a P2P connection. As the data flows through the TURN server, it requires a lot of bandwidth, and we’re not using P2P in this case.
注意:TURN是我们无法建立P2P连接时的最后手段。由于数据流经TURN服务器,它需要大量的带宽,在这种情况下,我们不使用P2P。
Similar to STUN, we can provide the TURN server URL in the same configuration object:
与STUN类似,我们可以在同一个配置对象中提供TURN服务器URL。
{
  'iceServers': [
    {
      'urls': 'stun:stun.l.google.com:19302'
    },
    {
      'urls': 'turn:10.158.29.39:3478?transport=udp',
      'credential': 'XXXXXXXXXXXXX',
      'username': 'XXXXXXXXXXXXXXX'
    },
    {
      'urls': 'turn:10.158.29.39:3478?transport=tcp',
      'credential': 'XXXXXXXXXXXXX',
      'username': 'XXXXXXXXXXXXXXX'
    }
  ]
}
15. Conclusion
15.结论
In this tutorial, we discussed what the WebRTC project is and introduced its fundamental concepts. We then built a simple application to share data between two HTML clients.
在本教程中,我们讨论了什么是WebRTC项目并介绍了其基本概念。然后我们建立了一个简单的应用程序,在两个HTML客户端之间共享数据。
We also discussed the steps involved in creating and establishing a WebRTC connection.
我们还讨论了创建和建立WebRTC连接的步骤。
Furthermore, we looked into the use of STUN and TURN servers as a fallback mechanism when WebRTC fails.
此外,我们研究了使用STUN和TURN服务器作为WebRTC失败时的后备机制。
You can check out the examples provided in this article over on GitHub.
你可以查看本文在GitHub上提供的例子。


