1. Introduction
1.绪论
In this tutorial, we’ll learn how to install and use the OpenCV computer vision library and apply it to real-time face detection.
在本教程中,我们将学习如何安装和使用OpenCV计算机视觉库并将其应用于实时人脸检测。
2. Installation
2.安装
To use the OpenCV library in our project, we need to add the opencv Maven dependency to our pom.xml:
要在我们的项目中使用OpenCV库,我们需要在pom.xml中添加opencvMaven依赖项。
<dependency>
    <groupId>org.openpnp</groupId>
    <artifactId>opencv</artifactId>
    <version>3.4.2-0</version>
</dependency>
For Gradle users, we’ll need to add the dependency to our build.gradle file:
对于Gradle用户来说,我们需要在build.gradle文件中添加该依赖关系。
compile group: 'org.openpnp', name: 'opencv', version: '3.4.2-0'After adding the library to our dependencies, we can use the features provided by OpenCV.
在将该库加入我们的依赖关系后,我们可以使用OpenCV提供的功能。
3. Using the Library
3.使用图书馆
To start using OpenCV, we need to initialize the library, which we can do in our main method:
为了开始使用OpenCV,我们需要初始化这个库,我们可以在main方法中完成。
OpenCV.loadShared();OpenCV is a class that holds methods related to loading native packages required by the OpenCV library for various platforms and architectures.
OpenCV是一个类,它持有与加载不同平台和架构的OpenCV库所需的本地包有关的方法。
It’s worth noting that the documentation does things slightly differently:
值得注意的是,文档中的做法略有不同。
System.loadLibrary(Core.NATIVE_LIBRARY_NAME)Both of those method calls will actually load the required native libraries.
这两个方法的调用实际上将加载所需的本地库。
The difference here is that the latter requires the native libraries to be installed. The former, however, can install the libraries to a temporary folder if they are not available on a given machine. Due to this difference, the loadShared method is usually the best way to go.
这里的区别是,后者需要安装本地库。然而,前者可以将库安装到一个临时文件夹中,如果它们在特定的机器上不可用。由于这一差异,loadShared方法通常是最好的方法。
Now that we’ve initialized the library, let’s see what we can do with it.
现在我们已经初始化了这个库,让我们看看我们能用它做什么。
4. Loading Images
4.加载图像
To start, let’s load the sample image from the disk using OpenCV:
首先,让我们用OpenCV从磁盘加载样本图像。
public static Mat loadImage(String imagePath) {
    Imgcodecs imageCodecs = new Imgcodecs();
    return imageCodecs.imread(imagePath);
}
This method will load the given image as a Mat object, which is a matrix representation.
这个方法将以Mat对象加载给定的图像,这是一个矩阵表示法。
To save the previously loaded image, we can use the imwrite() method of the Imgcodecs class:
为了保存先前加载的图像,我们可以使用imwrite()类的Imgcodecs方法。
public static void saveImage(Mat imageMatrix, String targetPath) {
    Imgcodecs imgcodecs = new Imgcodecs();
    imgcodecs.imwrite(targetPath, imageMatrix);
}
5. Haar Cascade Classifier
5.头发层叠式分类器
Before diving into facial-recognition, let’s understand the core concepts that make this possible.
在深入研究面部识别之前,让我们先了解使之成为可能的核心概念。
Simply put, a classifier is a program that seeks to place a new observation into a group dependent on past experience. Cascading classifiers seek to do this using a concatenation of several classifiers. Each subsequent classifier uses the output from the previous as additional information, improving the classification greatly.
简单地说,分类器是一个程序,它试图将一个新的观察结果放入一个依赖于过去经验的组中。级联分类器试图通过几个分类器的串联来实现这一目标。每个后续的分类器都使用前一个分类器的输出作为额外的信息,从而大大改善分类。
5.1. Haar Features
5.1.头发特征
Face detection in OpenCV is done by Haar-feature-based cascade classifiers.
OpenCV中的人脸检测是由基于Haar-feature的级联分类器完成的。
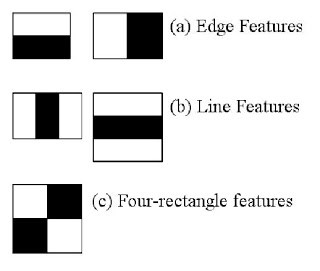
Haar features are filters that are used to detect edges and lines on the image. The filters are seen as squares with black and white colors:
Haar特征是用于检测图像上的边缘和线条的过滤器。过滤器被视为具有黑白颜色的方块:
These filters are applied multiple times to an image, pixel by pixel, and the result is collected as a single value. This value is the difference between the sum of pixels under the black square and the sum of pixels under the white square.
这些过滤器被多次应用到图像上,逐个像素,其结果被收集为一个单一的值。这个值是黑色方块下的像素之和与白色方块下的像素之和的差。
6. Face Detection
6.面部检测
Generally, the cascade classifier needs to be pre-trained to be able to detect anything at all.
一般来说,级联分类器需要经过预先训练才能检测到任何东西。
Since the training process can be long and would require a big dataset, we’re going to use one of the pre-trained models offered by OpenCV. We’ll place this XML file in our resources folder for easy access.
由于训练过程可能很长,并且需要一个大的数据集,我们将使用OpenCV提供的预训练的模型之一。我们将把这个XML文件放在我们的resources文件夹里,以便于访问。
Let’s step through the process of detecting a face:
让我们逐步了解检测人脸的过程:。
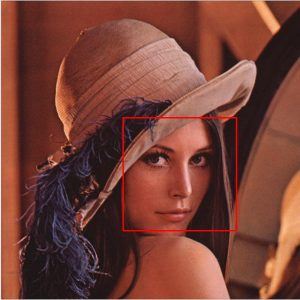
We’ll attempt to detect the face by outlining it with a red rectangle.
我们将尝试用一个红色的矩形来勾勒出脸部的轮廓来检测。
To get started, we need to load the image in Mat format from our source path:
要开始,我们需要从我们的源路径加载Mat格式的图像。
Mat loadedImage = loadImage(sourceImagePath);Then, we’ll declare a MatOfRect object to store the faces we find:
然后,我们将声明一个MatOfRect对象来存储我们找到的面。
MatOfRect facesDetected = new MatOfRect();Next, we need to initialize the CascadeClassifier to do the recognition:
接下来,我们需要初始化CascadeClassifier来进行识别。
CascadeClassifier cascadeClassifier = new CascadeClassifier();
int minFaceSize = Math.round(loadedImage.rows() * 0.1f);
cascadeClassifier.load("./src/main/resources/haarcascades/haarcascade_frontalface_alt.xml");
cascadeClassifier.detectMultiScale(loadedImage,
  facesDetected,
  1.1,
  3,
  Objdetect.CASCADE_SCALE_IMAGE,
  new Size(minFaceSize, minFaceSize),
  new Size()
);
Above, the parameter 1.1 denotes the scale factor we want to use, specifying how much the image size is reduced at each image scale. The next parameter, 3, is minNeighbors. This is the number of neighbors a candidate rectangle should have in order to retain it.
上面,参数1.1表示我们要使用的比例系数,指定在每个图像比例下图像大小减少多少。下一个参数,3,是minNeighbors.这是一个候选矩形应该有的邻居数量,以便保留它。
Finally, we’ll loop through the faces and save the result:
最后,我们将循环浏览这些面孔并保存结果。
Rect[] facesArray = facesDetected.toArray();
for(Rect face : facesArray) {
    Imgproc.rectangle(loadedImage, face.tl(), face.br(), new Scalar(0, 0, 255), 3);
}
saveImage(loadedImage, targetImagePath);
When we input our source image, we should now receive the output image with all the faces marked with a red rectangle:
当我们输入源图像时,我们现在应该收到输出图像,所有的面都用红色矩形标记。
7. Accessing the Camera Using OpenCV
7.使用OpenCV访问摄像机
So far, we’ve seen how to perform face detection on loaded images. But most of the time, we want to do it in real-time. To be able to do that, we need to access the camera.
到目前为止,我们已经看到如何对加载的图像进行人脸检测。但在大多数情况下,我们想实时地进行检测。为了能够做到这一点,我们需要访问摄像头。
However, to be able to show an image from a camera, we need a few additional things, apart from the obvious — a camera. To show the images, we’ll use JavaFX.
然而,为了能够显示来自摄像头的图像,除了明显的–摄像头之外,我们还需要一些额外的东西。为了显示图像,我们将使用JavaFX。
Since we’ll be using an ImageView to display the pictures our camera has taken, we need a way to translate an OpenCV Mat to a JavaFX Image:
由于我们将使用一个ImageView来显示我们的相机拍摄的图片,我们需要一种方法来将OpenCV的Mat翻译成JavaFX的Image。
public Image mat2Img(Mat mat) {
    MatOfByte bytes = new MatOfByte();
    Imgcodecs.imencode("img", mat, bytes);
    InputStream inputStream = new ByteArrayInputStream(bytes.toArray());
    return new Image(inputStream);
}
Here, we are converting our Mat into bytes, and then converting the bytes into an Image object.
在这里,我们正在将我们的Mat 转换为字节,然后将字节转换为Image 对象。
We’ll start by streaming the camera view to a JavaFX Stage.
我们将首先把摄像机视图流式传输到一个JavaFX Stage.。
Now, let’s initialize the library using the loadShared method:
现在,让我们使用loadShared方法来初始化这个库。
OpenCV.loadShared();Next, we’ll create the stage with a VideoCapture and an ImageView to display the Image:
接下来,我们将用一个VideoCapture和一个ImageView来显示Image创建舞台。
VideoCapture capture = new VideoCapture(0);
ImageView imageView = new ImageView();
HBox hbox = new HBox(imageView);
Scene scene = new Scene(hbox);
stage.setScene(scene);
stage.show();
Here, 0 is the ID of the camera we want to use. We also need to create an AnimationTimer to handle setting the image:
这里,0 是我们想要使用的相机的ID。我们还需要创建一个AnimationTimer来处理设置图像。
new AnimationTimer() {
    @Override public void handle(long l) {
        imageView.setImage(getCapture());
    }
}.start();
Finally, our getCapture method handles converting the Mat to an Image:
最后,我们的getCapture方法处理将Mat转换为Image。
public Image getCapture() {
    Mat mat = new Mat();
    capture.read(mat);
    return mat2Img(mat);
}
The application should now create a window and then live-stream the view from the camera to the imageView window.
应用程序现在应该创建一个窗口,然后将摄像机的视图实时传送到imageView窗口。
8. Real-Time Face Detection
8.实时人脸检测
Finally, we can connect all the dots to create an application that detects a face in real-time.
最后,我们可以把所有的点连接起来,创建一个可以实时检测人脸的应用程序。
The code from the previous section is responsible for grabbing the image from the camera and displaying it to the user. Now, all we have to do is to process the grabbed images before showing them on screen by using our CascadeClassifier class.
上一节的代码负责从摄像头抓取图像,并将其显示给用户。现在,我们要做的就是通过使用我们的CascadeClassifier class,在将抓取的图像显示在屏幕上之前对其进行处理。
Let’s simply modify our getCapture method to also perform face detection:
让我们简单地修改我们的getCapture方法,以同时执行人脸检测:。
public Image getCaptureWithFaceDetection() {
    Mat mat = new Mat();
    capture.read(mat);
    Mat haarClassifiedImg = detectFace(mat);
    return mat2Img(haarClassifiedImg);
}
Now, if we run our application, the face should be marked with the red rectangle.
现在,如果我们运行我们的应用程序,这个面应该被标记为红色的矩形。
We can also see a disadvantage of the cascade classifiers. If we turn our face too much in any direction, then the red rectangle disappears. This is because we’ve used a specific classifier that was trained only to detect the front of the face.
我们还可以看到级联分类器的一个缺点。如果我们向任何方向过多地转动脸部,那么红色矩形就会消失。这是因为我们使用了一个特定的分类器,该分类器只被训练为检测脸的正面。
9. Summary
9.摘要
In this tutorial, we learned how to use OpenCV in Java.
在本教程中,我们学习了如何在Java中使用OpenCV。
We used a pre-trained cascade classifier to detect faces on the images. With the help of JavaFX, we managed to make the classifiers detect the faces in real-time with images from a camera.
我们使用预先训练好的级联分类器来检测图像上的人脸。在JavaFX的帮助下,我们设法让分类器实时检测来自摄像头的图像上的人脸。
As always all the code samples can be found over on GitHub.
像往常一样,所有的代码样本都可以在GitHub上找到over。


