1. Overview
1.概述
In this tutorial, we’ll see how to display error messages originating from a Spring-based back-end application in Thymeleaf templates.
在本教程中,我们将看到如何在Thymeleaf模板中显示源自基于Spring的后端应用程序的错误信息。
For our demonstration purposes, we’ll create a simple Spring Boot User Registration app and validate the individual input fields. Additionally, we’ll see an example of how to handle global-level errors.
出于演示目的,我们将创建一个简单的Spring Boot用户注册应用,并验证各个输入字段。此外,我们将看到一个如何处理全局级错误的例子。
First, we’ll quickly set up the back-end app and then come to the UI part.
首先,我们将快速设置后端应用程序,然后来到用户界面部分。
2. Sample Spring Boot Application
2.Spring Boot应用示例
To create a simple Spring Boot app for User Registration, we’ll need a controller, a repository, and an entity.
要为用户注册创建一个简单的Spring Boot应用,我们需要一个控制器、一个存储库和一个实体。
However, even before that, we should add the Maven dependencies.
然而,在此之前,我们应该添加Maven的依赖性。
2.1. Maven Dependency
2.1.Maven的依赖性
Let’s add all the Spring Boot starters we’ll need – Web for the MVC bit, Validation for hibernate entity validation, Thymeleaf for the UI and JPA for the repository. Furthermore, we’ll need an H2 dependency to have an in-memory database:
让我们添加所有我们需要的Spring Boot启动器 – 用于MVC位的Web,用于hibernate实体验证的Validation,用于UI的Thymeleaf以及用于存储库的JPA。此外,我们还需要一个H2依赖关系来拥有一个内存数据库。
<dependency>
    <groupId>org.springframework.boot</groupId>
    <artifactId>spring-boot-starter-web</artifactId>
    <version>2.7.2</version>
</dependency>
<dependency>
    <groupId>org.springframework.boot</groupId>
    <artifactId>spring-boot-starter-validation</artifactId>
    <version>2.7.2</version>
</dependency>
<dependency>
    <groupId>org.springframework.boot</groupId>
    <artifactId>spring-boot-starter-thymeleaf</artifactId>
    <version>2.7.2</version>
</dependency>
<dependency>
    <groupId>org.springframework.boot</groupId>
    <artifactId>spring-boot-starter-data-jpa</artifactId>
    <version>2.7.2</version>
</dependency>
<dependency>
    <groupId>com.h2database</groupId>
    <artifactId>h2</artifactId>
    <scope>runtime</scope>
    <version>1.4.200</version>
</dependency>
2.2. The Entity
2.2.实体
Here’s our User entity:
这里是我们的User实体。
@Entity
public class User {
    @Id
    @GeneratedValue(strategy = GenerationType.AUTO)
    private Long id;

    @NotEmpty(message = "User's name cannot be empty.")
    @Size(min = 5, max = 250)
    private String fullName;

    @NotEmpty(message = "User's email cannot be empty.")
    private String email;

    @NotNull(message = "User's age cannot be null.")
    @Min(value = 18)
    private Integer age;

    private String country;

    private String phoneNumber;

    // getters and setters
}
As we can see, we’ve added a number of validation constraints for the user input. Such as, fields should not be null or empty and have a specific size or value.
正如我们所看到的,我们已经为用户输入添加了一些验证约束。比如,字段不应该是空的或空的,并且有一个特定的大小或值。
Notably, we haven’t added any constraint on the country or phoneNumber field. That’s because we’ll use them as an example for generating a global error, or an error not tied to a particular field.
值得注意的是,我们没有在country或phoneNumber字段上添加任何约束条件。这是因为我们将以它们为例,生成一个全局性的错误,或一个不与特定字段相联系的错误。
2.3. The Repository
2.3.存储库
We’ll use a simple JPA repository for our basic use case:
我们将使用一个简单的JPA 存储库来实现我们的基本用例。
@Repository
public interface UserRepository extends JpaRepository<User, Long> {}
2.4. The Controller
2.4.控制器
Finally, to wire everything together at the back-end, let’s put together a UserController:
最后,为了在后端将所有东西连接起来,让我们把一个UserController放在一起。
@Controller
public class UserController {

    @Autowired
    private UserRepository repository;
    @GetMapping("/add")
    public String showAddUserForm(User user) {
        return "errors/addUser";
    }

    @PostMapping("/add")
    public String addUser(@Valid User user, BindingResult result, Model model) {
        if (result.hasErrors()) {
            return "errors/addUser";
        }
        repository.save(user);
        model.addAttribute("users", repository.findAll());
        return "errors/home";
    }
}
Here we’re defining a GetMapping at the path /add to display the registration form. Our PostMapping at the same path deals with validation when the form is submitted, with subsequent save to the repository if all goes well.
这里我们定义了一个GetMapping,在路径/add上显示注册表。我们的PostMapping在同一路径下处理表单提交时的验证问题,如果一切顺利的话,随后会保存到资源库中。
3. Thymeleaf Templates With Error Messages
3.带有错误信息的百里叶模板
Now that the basics are covered, we’ve come to the crux of the matter, that is, creating the UI templates and displaying error messages, if any.
现在基础知识已经涵盖了,我们已经来到了问题的关键,即创建UI模板和显示错误信息(如果有的话)。
Let’s construct the templates piecemeal based on what type of errors we can display.
让我们根据我们可以显示的错误类型零散地构建模板。
3.1. Displaying Field Errors
3.1.显示字段错误
Thymeleaf offers an inbuilt field.hasErrors method that returns a boolean depending on whether any errors exist for a given field. Combining it with a th:if we can choose to display the error if it exists:
Thymeleaf提供了一个内置的field.hasErrors方法,根据给定字段是否存在任何错误,返回一个布尔值。将其与th:if相结合,我们可以选择在错误存在时显示它。
<p th:if="${#fields.hasErrors('age')}">Invalid Age</p>Next, if we want to add any styling, we can use th:class conditionally:
接下来,如果我们想添加任何样式,我们可以使用th:class有条件地。
<p  th:if="${#fields.hasErrors('age')}" th:class="${#fields.hasErrors('age')}? error">
  Invalid Age</p>
Our simple embedded CSS class error turns the element red in color:
我们简单的嵌入式CSS类error将该元素的颜色变成红色。
<style>
    .error {
        color: red;
    }
</style>
Another Thymeleaf attribute th:errors gives us the ability to display all errors on the specified selector, say email:
另一个Thymeleaf属性th:errors让我们能够显示指定选择器上的所有错误,例如email:。
<div>
    <label for="email">Email</label> <input type="text" th:field="*{email}" />
    <p th:if="${#fields.hasErrors('email')}" th:errorclass="error" th:errors="*{email}" />
</div>
In the above snippet, we can also see a variation in using the CSS style. Here we’re using th:errorclass, which eliminates the need for us to use any conditional attribute for applying the CSS.
在上面的片段中,我们也可以看到使用CSS样式的变化。这里我们使用的是th:errorclass,这样我们就不需要使用任何条件属性来应用CSS。
Alternatively, we may choose to iterate over all validation messages on a given field using th:each:
另外,我们可以选择使用th:each来遍历一个给定字段的所有验证信息。
<div>
    <label for="fullName">Name</label> <input type="text" th:field="*{fullName}"
      id="fullName" placeholder="Full Name">
    <ul>
        <li th:each="err : ${#fields.errors('fullName')}" th:text="${err}" class="error" />
    </ul>
</div>
Notably, we used another Thymeleaf method fields.errors() here to collect all validation messages returned by our back-end app for the fullName field.
值得注意的是,我们在这里使用了另一个Thymeleaf方法fields.errors()来收集所有由后端应用程序返回的fullName字段的验证信息。
Now, to test this, let’s fire up our Boot app and hit the endpoint http://localhost:8080/add.
现在,为了测试这一点,让我们启动我们的Boot应用程序,并点击端点http://localhost:8080/add。
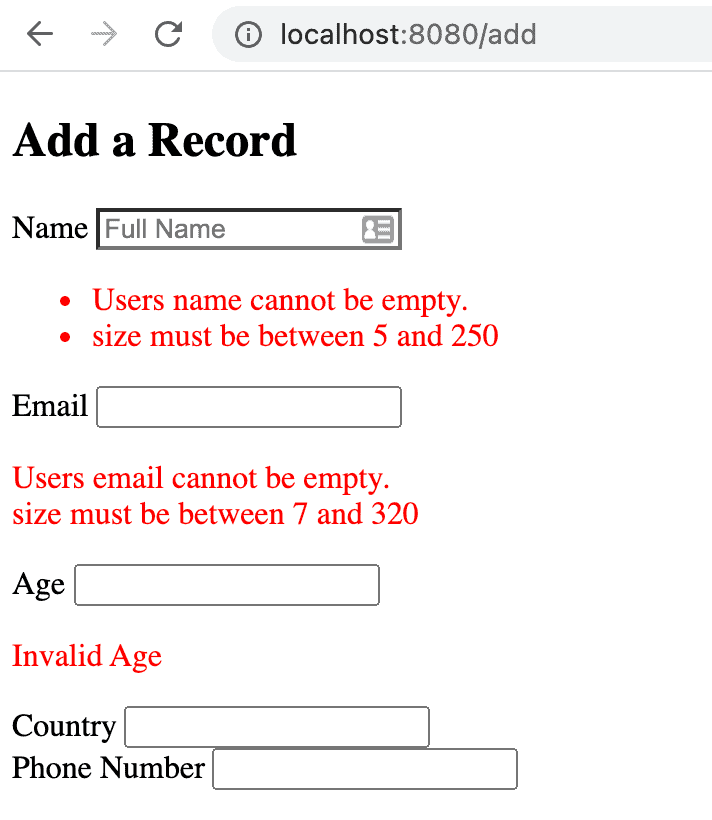
This is how our page looks when we don’t supply any input at all:
当我们不提供任何输入时,我们的页面就是这个样子。
3.2. Displaying All Errors at Once
3.2.一次性显示所有错误
Next, let’s see how instead of showing every error message one by one, we can show it all in one place.
接下来,让我们看看如何取代逐一显示每条错误信息,而是在一个地方显示所有错误信息。
For that, we’ll use Thymeleaf’s fields.hasAnyErrors() method:
为此,我们将使用Thymeleaf的fields.hasAnyErrors()方法。
<div th:if="${#fields.hasAnyErrors()}">
    <ul>
        <li th:each="err : ${#fields.allErrors()}" th:text="${err}" />
    </ul>
</div>
As we can see, we used another variant fields.allErrors() here to iterate over all the errors on all the fields on the HTML form.
我们可以看到,我们在这里使用了另一个变体fields.allErrors()来遍历HTML表单上所有字段的所有错误。
Instead of fields.hasAnyErrors(), we could have used #fields.hasErrors(‘*’). Similarly, #fields.errors(‘*’) is an alternate to #fields.allErrors() that was used above.
我们可以使用#fields.hasAnyErrors(),而不是#fields.hasErrors(‘*’)。同样,#fields.errors(‘*’)也是上面使用的#fields.allErrors()的一个替代方案。
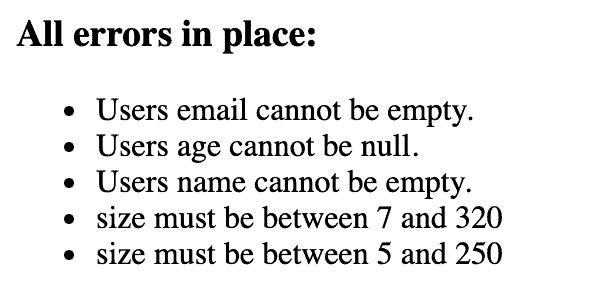
Here’s the effect:
效果是这样的。
3.3. Displaying Errors Outside Forms
3.3.在表格外显示错误
Next. let’s consider a scenario wherein we want to display validation messages outside an HTML form.
接下来,让我们考虑一种情况,即我们想在一个HTML表单外显示验证信息。
In that case, instead of using selections or (*{….}), we simply need to use the fully-qualified variable name in the format (${….}) :
在这种情况下,不要使用选择或(*{….}),我们只需要使用格式为(${….})的完全限定变量名。
<h4>Errors on a single field:</h4>
<div th:if="${#fields.hasErrors('${user.email}')}"
 th:errors="*{user.email}"></div>
<ul>
    <li th:each="err : ${#fields.errors('user.*')}" th:text="${err}" />
</ul>
This would display all error messages on the email field.
这将显示email字段上的所有错误信息。
Now, let’s see how we can display all the messages at once:
现在,让我们看看如何一次显示所有的信息。
<h4>All errors:</h4>
<ul>
<li th:each="err : ${#fields.errors('user.*')}" th:text="${err}" />
</ul>
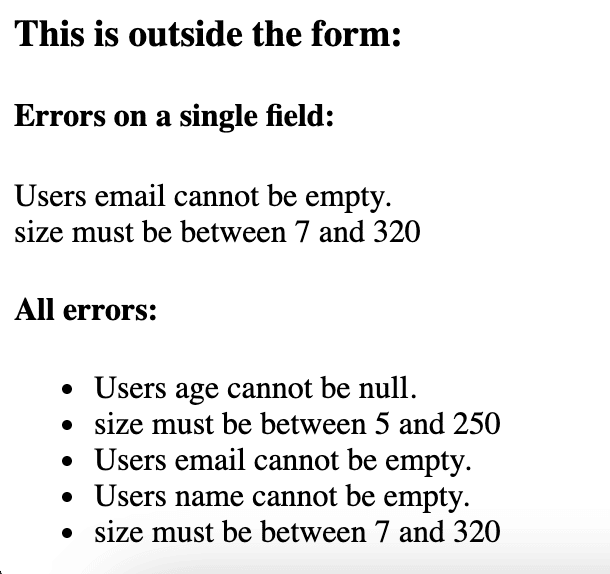
And here’s what we see on the page:
下面是我们在页面上看到的情况。
3.4. Displaying Global Errors
3.4.显示全局错误
In a real-life scenario, there might be errors not specifically associated with a particular field. We might have a use case where we need to consider multiple inputs in order to validate a business condition. These are called global errors.
在现实生活中,可能会出现与某一特定字段没有具体关联的错误。我们可能有一个用例,我们需要考虑多个输入以验证一个业务条件。这些被称为全局错误。
Let’s consider a simple example to demonstrate this. For our country and phoneNumber fields, we might add a check that for a given country, the phone numbers should start with a particular prefix.
让我们考虑一个简单的例子来证明这一点。对于我们的country和phoneNumber字段,我们可以添加一个检查,对于一个特定的国家,电话号码应该以一个特定的前缀开始。
We’ll need to make a few changes on the back-end to add this validation.
我们需要在后端做一些修改,以增加这种验证。
First, we’ll add a Service to perform this validation:
首先,我们将添加一个Service来执行这个验证。
@Service
public class UserValidationService {
    public String validateUser(User user) {
        String message = "";
        if (user.getCountry() != null && user.getPhoneNumber() != null) {
            if (user.getCountry().equalsIgnoreCase("India")
              && !user.getPhoneNumber().startsWith("91")) {
                message = "Phone number is invalid for " + user.getCountry();
            }
        }
        return message;
    }
}
As we can see, we added a trivial case. For the country India, the phone number should start with the prefix 91.
我们可以看到,我们添加了一个微不足道的案例。对于国家印度,电话号码应该以91的前缀开始。
Second, we’ll need a tweak to our controller’s PostMapping:
第二,我们需要对控制器的PostMapping进行调整。
@PostMapping("/add")
public String addUser(@Valid User user, BindingResult result, Model model) {
    String err = validationService.validateUser(user);
    if (!err.isEmpty()) {
        ObjectError error = new ObjectError("globalError", err);
        result.addError(error);
    }
    if (result.hasErrors()) {
        return "errors/addUser";
    }
    repository.save(user);
    model.addAttribute("users", repository.findAll());
    return "errors/home";
}
Finally, in the Thymeleaf template, we’ll add the constant global to display such type of error:
最后,在Thymeleaf模板中,我们将添加常量global来显示这种类型的错误。
<div th:if="${#fields.hasErrors('global')}">
    <h3>Global errors:</h3>
    <p th:each="err : ${#fields.errors('global')}" th:text="${err}" class="error" />
</div>
Alternatively, instead of the constant, we can use methods #fields.hasGlobalErrors() and #fields.globalErrors() to achieve the same.
另外,我们可以使用#fields.hasGlobalErrors()和#fields.globalErrors()方法来代替常量,以实现同样的目的。
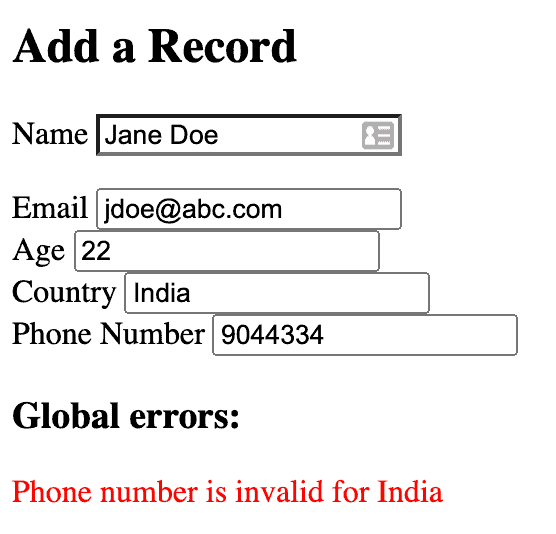
This is what we see on entering an invalid input:
这就是我们在输入一个无效的输入时看到的情况。
4. Conclusion
4.总结
In this tutorial, we built a simple Spring Boot Application to demonstrate how to display various types of errors in Thymeleaf.
在本教程中,我们构建了一个简单的Spring Boot应用程序,以演示如何在Thymeleaf中显示各种类型的错误。
We looked at displaying field errors one by one and then all at one go, errors outside HTML forms, and global errors.
我们研究了逐一显示字段错误和一次性显示所有错误、HTML表单之外的错误以及全局错误。
As always, source code is available over on GitHub.
一如既往,源代码可在GitHub上获取。


