1. Overview
1.概述
In this tutorial, we’ll illustrate how we can use Cucumber tag expressions to manipulate the execution of tests and their relevant setups.
在本教程中,我们将说明如何使用Cucumber标签表达式来操纵测试的执行及其相关设置。
We’re going to look at how we can separate our API and UI tests and control what configuration steps we run for each.
我们将研究如何将我们的API和UI测试分开,并控制我们为每个测试运行的配置步骤。
2. Application with UI and API Components
2.带有用户界面和API组件的应用程序
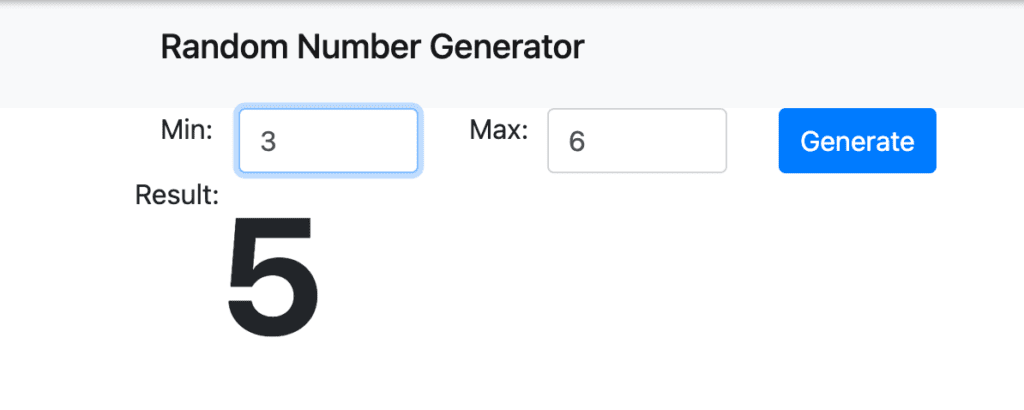
Our sample application has a simple UI for generating a random number between a range of values:
我们的示例应用程序有一个简单的用户界面,用于在一个数值范围内生成一个随机数。
We also have a /status Rest endpoint returning an HTTP status code. We’ll cover both of these functionalities with acceptance tests, using Cucumber and Junit 5.
我们还有一个/status Rest端点,返回HTTP状态代码。我们将使用Cucumber和Junit 5,用验收测试涵盖这两种功能。
For cucumber to work with Junit 5, we must declare cucumber–junit-platform-engine as its dependency in our pom:
为了让cucumber与Junit 5一起工作,我们必须在我们的pom中声明cucumber–junit-platform-engine作为其依赖。
<dependency>
    <groupId>io.cucumber</groupId>
    <artifactId>cucumber-junit-platform-engine</artifactId>
    <version>6.10.3</version>
</dependency>
3. Cucumber Tags and Conditional Hooks
3.Cucumber标签和条件钩子
Cucumber tags can help us with grouping our scenarios together. Let’s say that we have different requirements for testing the UI and the API. For example, we need to start a browser to test the UI components, but that’s not necessary for calling the /status endpoint. What we need is a way to figure out which steps to run and when. Cucumber tags can help us with this.
Cucumber标签可以帮助我们将我们的场景分组。比方说,我们对测试UI和API有不同的要求。例如,我们需要启动浏览器来测试UI组件,但对于调用/status端点来说,这并不是必须的。我们需要的是一种方法,以弄清哪些步骤要运行,何时运行。Cucumber标签可以帮助我们解决这个问题。
4. UI Tests
4.UI测试
First, let’s group our Features or Scenarios together by a tag. Here we mark our UI feature with a @ui tag:
首先,让我们通过一个标签将我们的功能或场景组合起来。这里我们用@ui 标签来标记我们的UI功能。
@ui
Feature: UI - Random Number Generator

  Scenario: Successfully generate a random number
    Given we are expecting a random number between min and max
    And I am on random-number-generator page
    When I enter min 1
    And I enter max 10
    And I press Generate button
    Then I should receive a random number between 1 and 10
Then, based on these tags, we can manipulate what we run for this group of features by using conditional hooks. We do this with separate @Before and @After methods annotated with the relevant tags in our ScenarioHooks:
然后,基于这些标签,我们可以通过使用条件钩子来操纵我们对这组特征的运行。 我们通过单独的@Before和@After方法来实现这一点,并在我们的ScenarioHooks中用相关的标签进行注释。
@Before("@ui")
public void setupForUI() {
    uiContext.getWebDriver();
}
@After("@ui")
public void tearDownForUi(Scenario scenario) throws IOException {
uiContext.getReport().write(scenario);
uiContext.getReport().captureScreenShot(scenario, uiContext.getWebDriver());
uiContext.getWebDriver().quit();
}5. API Tests
5.API测试
Similarly to our UI tests, we can mark our API feature with the @api tag:
与我们的UI测试类似,我们可以用@api标签标记我们的API功能。
@api
Feature: Health check

  Scenario: Should have a working health check
    When I make a GET call on /status
    Then I should receive 200 response status code
    And should receive a non-empty body
We also have our @Before and @After methods with @api tag:
我们也有我们的@Before和@After方法与@api标签。
@Before("@api")
public void setupForApi() {
    RestAssuredMockMvc.mockMvc(mvc);
    RestAssuredMockMvc.config = RestAssuredMockMvc.config()
      .logConfig(new LogConfig(apiContext.getReport().getRestLogPrintStream(), true));
}

@After("@api")
public void tearDownForApi(Scenario scenario) throws IOException {
    apiContext.getReport().write(scenario);
}
When we run our AcceptanceTestRunnerIT, we can see that our appropriate setup and teardown steps are being executed for the relevant tests.
当我们运行我们的AcceptanceTestRunnerIT时,我们可以看到我们适当的设置和拆除步骤正在为相关测试执行。
6. Conclusion
6.结论
In this article, we have shown how we can control the execution of different sets of tests and their setup/teardown instructions by using Cucumber Tags and Conditional Hooks.
在这篇文章中,我们展示了如何通过使用Cucumber标签和条件钩子来控制不同测试集的执行及其设置/删除指令。
As always, the code for this article is available over on GitHub.
一如既往,本文的代码可在GitHub上获得over。
