1. Overview
1.概述
When we’re testing with Apache JMeter, we may wish to add a delay between the requests to make a better model of our user behavior.
当我们用Apache JMeter进行测试时,我们可能希望在请求之间添加一个延迟,以便对我们的用户行为进行更好的建模。
In this tutorial, we’ll create a simple test plan. We’ll look at the available parameters for tuning the generated workload, and then configure timers to add delays.
在本教程中,我们将创建一个简单的测试计划。我们将查看用于调整生成的工作负载的可用参数,然后配置定时器以增加延迟。
2. Use Case
2.使用案例
Sometimes we may wish to add a delay between requests:
有时我们可能希望在请求之间增加一个延迟。
- Avoid errors connected with too many requests sent in a given amount of time
- Emulate real user actions with natural gaps for performed actions
- Tune the number of requests per minute to have a finer controlled configuration of workload
3. Using Delays
3.使用延时
Firstly, we need to define the loading profile. We can have various aims here:
首先,我们需要定义加载配置文件。我们在这里可以有各种目标:
- See how the system behaves under a growing workload to find performance limits
- Check how the application recovers after peak load
There are two JMeter options for simulating these use cases:
有两个JMeter选项用于模拟这些用例:
- Thread group – how many parallel users
- Timer – the delays between requests for each user
4. Test Plan
4.测试计划
4.1. A Basic Plan
4.1.一个基本计划
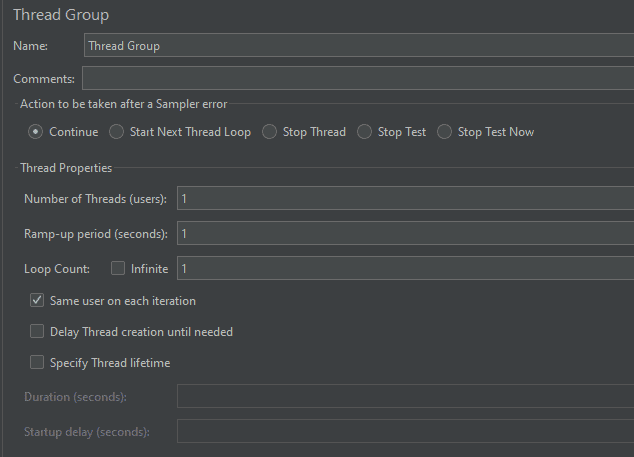
Let’s create a basic test plan with one Thread Group. We’ll set the number of parallel requests, the ramp-up period, and the number of times to execute the test. We should note that one thread in JMeter notation means one concurrent user.
让我们创建一个有一个线程组的基本测试计划。我们将设置并行请求的数量,上升期,以及执行测试的次数。我们应该注意,一个线程在JMeter的符号中意味着一个并发用户。
We can use the ramp-up period to create increases in workload. Here we need to set the period to reach the defined Number of Threads starting from 1 thread.
我们可以使用ramp-up period来创造工作负荷的增加。在这里,我们需要设置周期,以达到定义的线程数,从1个线程开始。
To create a more sophisticated loading profile, we can also specify the thread lifetime. This setting means 2 things:
为了创建一个更复杂的加载配置文件,我们还可以指定线程寿命。这个设置意味着两件事。
- Startup delay – how much time JMeter waits to start a thread
- Duration – how long it runs for
The Loop Count is also a useful setting to specify the amount of repetition of specified HTTP requests.
Loop Count也是一个有用的设置,可以指定指定的HTTP请求的重复量。
4.2. Adding Requests
4.2.添加请求
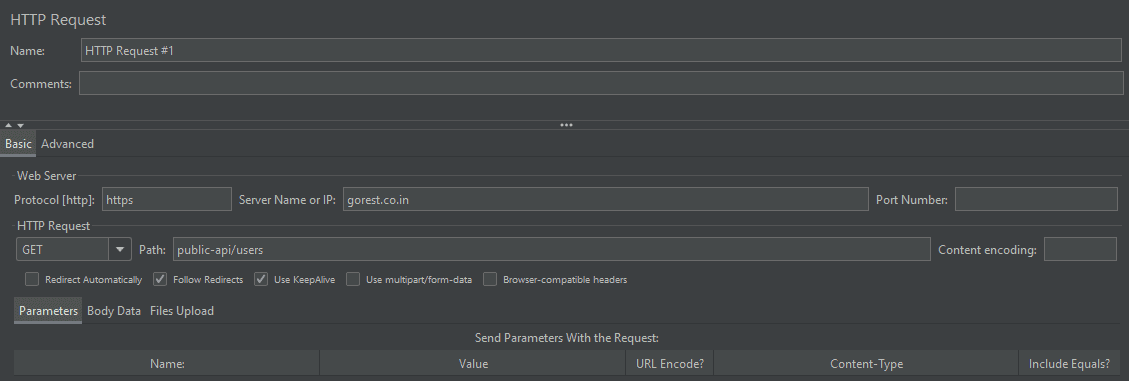
Next, we’ll add two HTTP Requests. We’ll use the Online REST API at https://gorest.co.in/ to test our script. HTTP Request settings are configured in the user interface:
接下来,我们将添加两个HTTP请求。我们将使用https://gorest.co.in/的在线REST API来测试我们的脚本。HTTP请求设置是在用户界面上配置的。
Let’s also add two assertions, just to check that requests return some data.
让我们也添加两个断言,只是为了检查请求是否返回一些数据。
We need to check that our test works without errors. For this reason, let’s add the View Results Tree element and then run our test plan.
我们需要检查我们的测试工作是否没有错误。出于这个原因,让我们添加查看结果树元素,然后运行我们的测试计划。
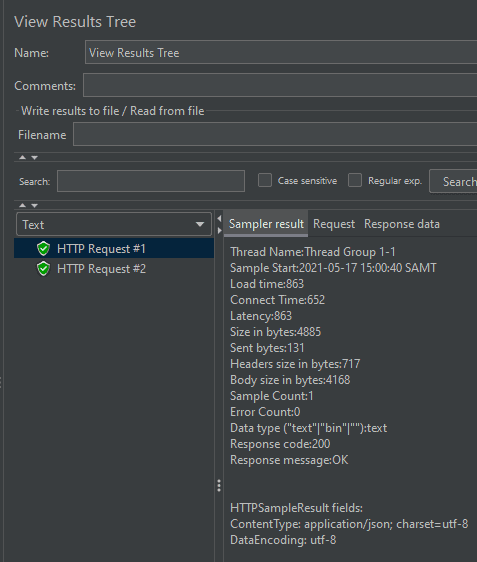
The result of running the first request is shown in the View Results Tree panel.
运行第一个请求的结果显示在查看结果树面板中。
Let’s look at the Sampler result output for our second request. Here, Sample Start is 2021-05-17 15:00:40, the same time as the first request. It means that by default, we don’t have any delays between the requests.
让我们看一下第二个请求的Sampler result输出。这里,Sample Start是2021-05-17 15:00:40,与第一次请求的时间相同。这意味着,在默认情况下,我们的请求之间没有任何延迟。
Thread Name:Thread Group 1-1
Sample Start:2021-05-17 15:00:40 SAMT
With this in mind, let’s see how we can increase this gap between the requests.
考虑到这一点,让我们看看我们如何能够增加请求之间的这种差距。
5. Adding Timers
5.添加定时器
5.1. Constant Timer
5.1.定时器
To add a timer element, we need to right-click on the Thread Group element and select Add, Timer, Constant Timer.
要添加一个定时器元素,我们需要右击线程组元素并选择添加,定时器,恒定定时器。
Here, we’ve added a Constant Timer with a Thread Delay of three seconds to our thread group. This timer adds a delay between each request.
在这里,我们为线程组添加了一个恒定计时器,线程延迟为3秒。这个定时器在每个请求之间增加了一个延迟。
Let’s now re-run our test plan and check the View Results Tree. We should see that requests were run with the delay that we set in the timer element.
现在让我们重新运行我们的测试计划,并检查查看结果树。我们应该看到,请求是以我们在定时器元素中设置的延迟运行的。
Thread Name:Thread Group 1-1
Sample Start:2021-05-17 15:18:17 SAMT
And we can see that the next HTTP Request was run three seconds after the first.
我们可以看到,下一个HTTP请求是在第一个请求的三秒后运行的。
Thread Name:Thread Group 1-1
Sample Start:2021-05-17 15:18:20 SAMT
5.2. Alternative to Constant Timer
5.2.恒定定时器的替代方案
As an alternative to Constant Timer, we can use Uniform Random Timer. This type of timer can be added in the same way as Constant Timer.
作为恒定计时器的替代品,我们可以使用均匀随机计时器。这种类型的定时器可以用与恒定定时器相同的方式添加。
In the dropdown menu, it’s right after Constant Timer.
在下拉菜单中,它就在Constant Timer之后。
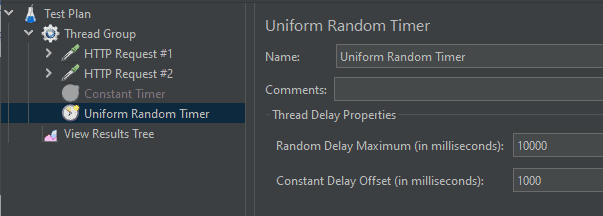
As we can see from the timer name, we should use it when we want this delay to vary in some specified range. Let’s add this timer to our sample and see how it works:
从定时器的名称中我们可以看到,当我们希望这个延迟在某个指定的范围内变化时,我们应该使用它。让我们把这个定时器添加到我们的样本中,看看它是如何工作的。
Constant Delay Offset adds a permanent part for each delay. Random Delay Maximum helps us to define an additional random part that will be added to Constant Delay Offset. These settings allow us to provide a random factor without the delay becoming too small.
恒定延迟偏移为每个延迟添加一个永久部分。随机延迟最大值帮助我们定义一个额外的随机部分,它将被添加到恒定延迟偏移中。这些设置允许我们提供一个随机因素而不使延迟变得太小。
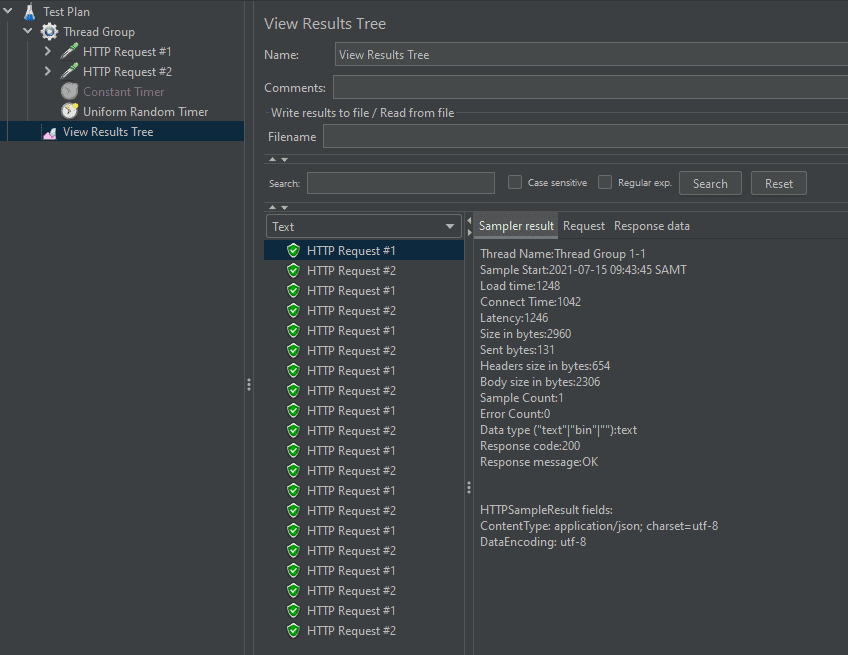
Let’s run this test and take a look at the View Results Tree element:
让我们运行这个测试,看一下查看结果树元素。
If we take a closer look at Sample Start points, we’ll see that random delays were added in according to the defined Timer parameters.
如果我们仔细看一下样本开始点,我们会发现,根据定义的定时器参数,随机延迟被添加进去。
Thread Name:Thread Group 1-1
Sample Start:2021-07-15 09:43:45 SAMT

Thread Name:Thread Group 1-1
Sample Start:2021-07-15 09:43:49 SAMT

Thread Name:Thread Group 1-1
Sample Start:2021-07-15 09:43:55 SAMT
Here we’ve looked at a couple of timer options, though there are other timers configurations available.
这里我们看了几个定时器选项,尽管还有其他的定时器配置可用。
6. Conclusion
6.结语
In this tutorial, we’ve seen how we can insert a custom delay between two requests in Apache JMeter and use Thread Group settings to add more flexibility for the created workload model.
在本教程中,我们已经看到如何在Apache JMeter中的两个请求之间插入自定义延迟,并使用线程组设置为创建的工作负载模型增加更多灵活性。
