1. Introduction
1.介绍
In our previous article, we looked at augmenting our dashboard to store and display individual events from the Avengers using DataStax Astra, a serverless DBaaS powered by Apache Cassandra using Stargate to offer additional APIs for working with it.
在我们的上一篇文章中,我们研究了使用DataStax Astra来增强我们的仪表板以存储和显示来自复仇者联盟的单个事件,这是一个无服务器DBaaS,由Apache Cassandra,使用Stargate来提供与之合作的额外 API。
In this article, we will be making use of the exact same data in a different way. We are going to allow the user to select which of the Avengers to display, the time period of interest, and then display these events on an interactive map. Unlike in the previous article, this will allow the user to see the data interacting with each other in both geography and time.
在这篇文章中,我们将以不同的方式利用完全相同的数据。我们将允许用户选择要显示的复仇者联盟、感兴趣的时间段,然后在交互式地图上显示这些事件。与前一篇文章不同,这将允许用户看到数据在地理和时间上相互作用。
In order to follow along with this article, it is assumed that you have already read the first and second articles in this series and that you have a working knowledge of Java 16, Spring, and at least an understanding of what Cassandra can offer for data storage and access. It may also be easier to have the code from GitHub open alongside the article to follow along.
为了继续阅读本文,假定您已经阅读了本系列文章中的第一篇和第二篇,并且您对 Java 16、Spring 有一定的了解,至少对 Cassandra 能够为数据存储和访问提供的功能有所了解。在文章旁边打开GitHub中的代码,也可能更容易跟上。
2. Service Setup
2.服务设置
We will be retrieving the data using the CQL API, using queries in the Cassandra Query Language. This requires some additional setup for us to be able to talk to the server.
我们将使用CQL API检索数据,使用Cassandra查询语言中的查询。这需要一些额外的设置,以便我们能够与服务器对话。
2.1. Download Secure Connect Bundle.
2.1.下载Secure Connect Bundle.
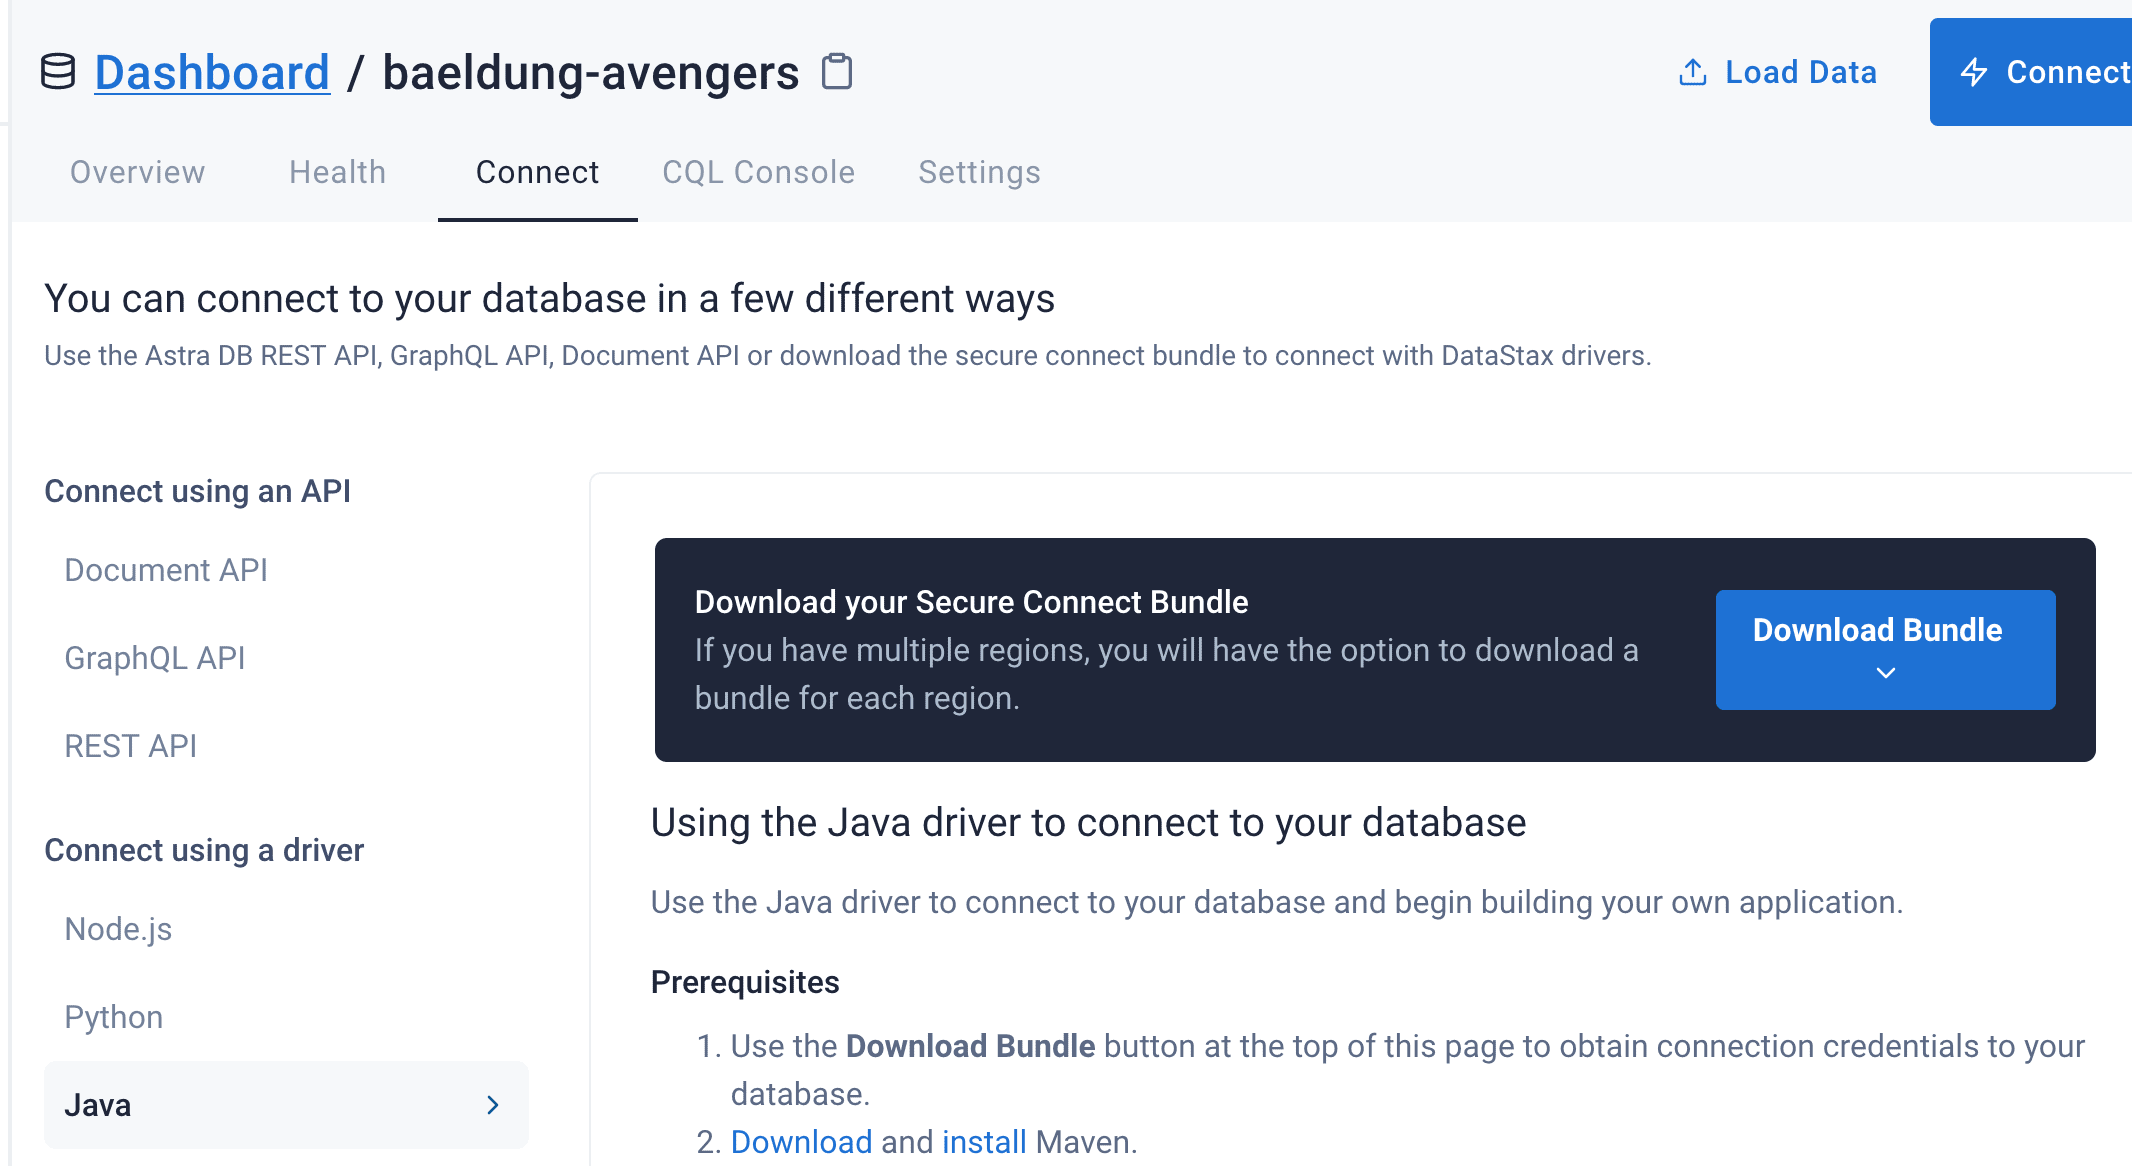
In order to connect to the Cassandra database hosted by DataStax Astra via CQL, we need to download the “Secure Connect Bundle”. This is a zip file containing SSL certificates and connection details for this exact database, allowing the connection to be made securely.
为了通过 CQL 连接到 DataStax Astra 托管的 Cassandra 数据库,我们需要下载 “安全连接包”。这是一个 zip 文件,包含 SSL 证书和该确切数据库的连接细节,允许安全地进行连接。
This is available from the Astra dashboard, found under the “Connect” tab for our exact database, and then the “Java” option under “Connect using a driver”:
这可以从Astra仪表板上找到,在 “连接 “标签下找到我们准确的数据库,然后在 “使用驱动程序连接 “下找到 “Java “选项。
For pragmatic reasons, we’re going to put this file into src/main/resources so that we can access it from the classpath. In a normal deployment situation, you would need to be able to provide different files to connect to different databases – for example, to have different databases for development and production environments.
出于务实的原因,我们将把这个文件放到src/main/resources中,这样我们就可以从classpath中访问它。在正常的部署情况下,你需要能够提供不同的文件来连接到不同的数据库–例如,为开发和生产环境提供不同的数据库。
2.2. Creating Client Credentials
2.2.创建客户凭证
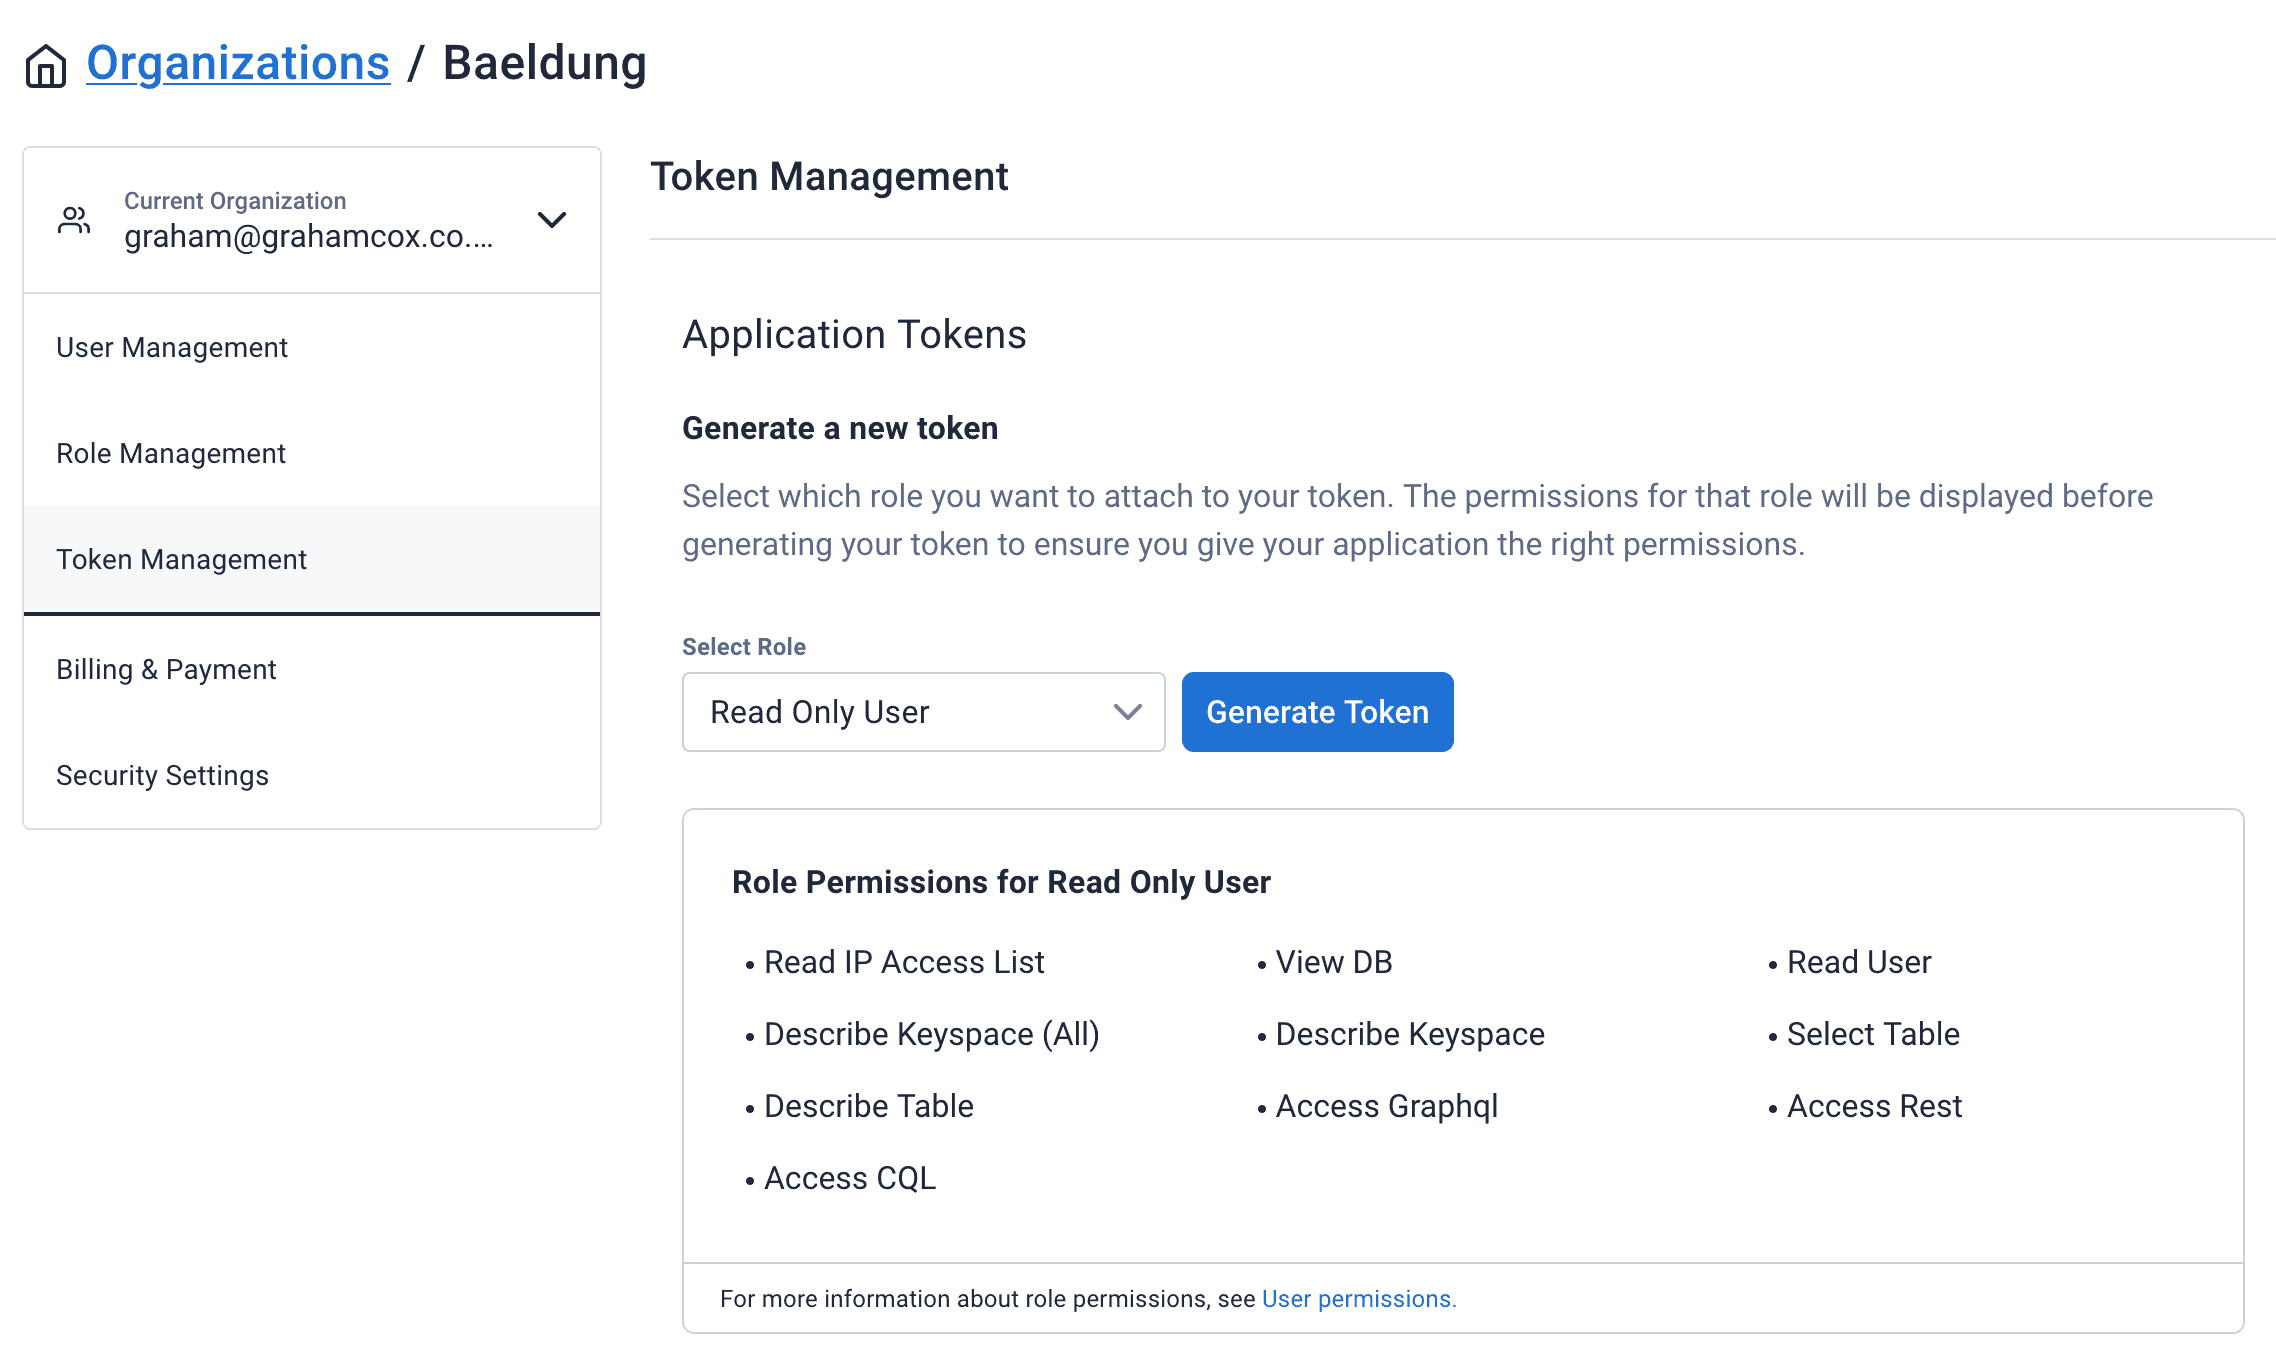
We also need to have some client credentials in order to connect to our database. Unlike the APIs that we’ve used in previous articles, which use an access token, the CQL API requires a “username” and “password”. These are actually a Client ID and Client Secret that we generate from the “Manage Tokens” section under “Organizations”:
我们还需要一些客户凭证,以便连接到我们的数据库。与我们在以前的文章中使用的API不同,它使用访问令牌,CQL API需要一个 “用户名 “和 “密码”。这些实际上是我们从 “组织 “下的 “管理令牌 “部分生成的客户ID和客户秘密。
Once this is done, we need to add the generated Client ID and Client Secret to our application.properties:
一旦完成,我们需要将生成的客户ID和客户秘密添加到我们的application.properties。
ASTRA_DB_CLIENT_ID=clientIdHere
ASTRA_DB_CLIENT_SECRET=clientSecretHere
2.3. Google Maps API Key
2.3.谷歌地图API密钥
In order to render our map, we are going to use Google Maps. This will then need a Google API key to be able to use this API.
为了呈现我们的地图,我们将使用谷歌地图。这将需要一个谷歌API密钥,以便能够使用该API。
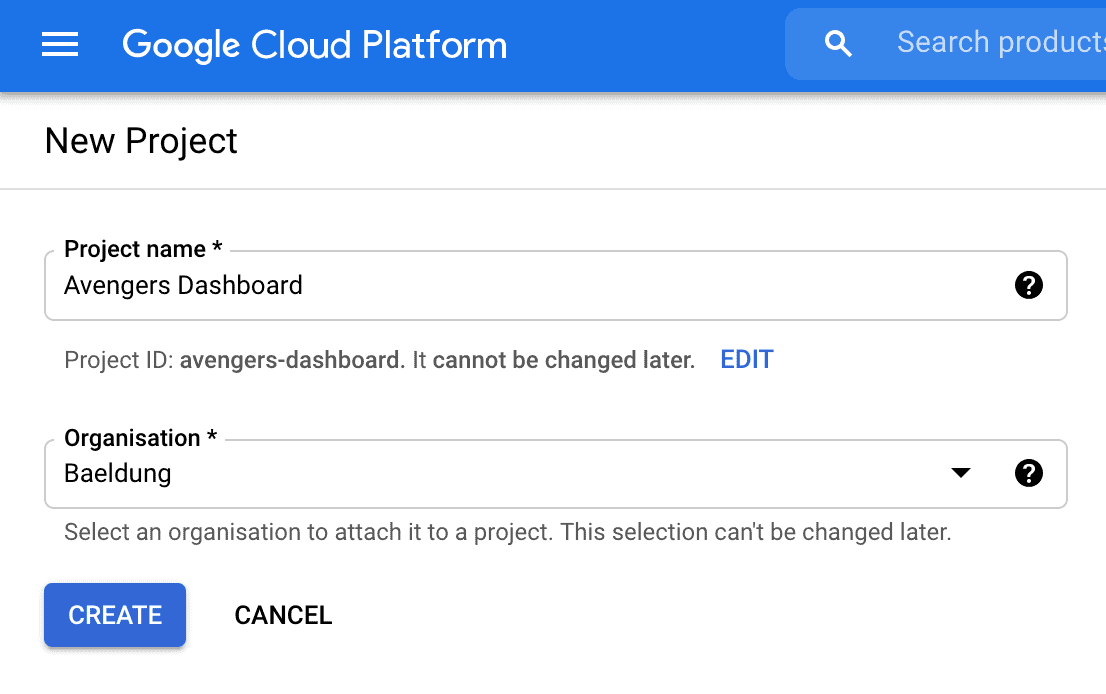
After signing up for a Google account, we need to visit the Google Cloud Platform Dashboard. Here we can create a new project:
在注册了谷歌账户后,我们需要访问谷歌云平台仪表板。在这里,我们可以创建一个新的项目。
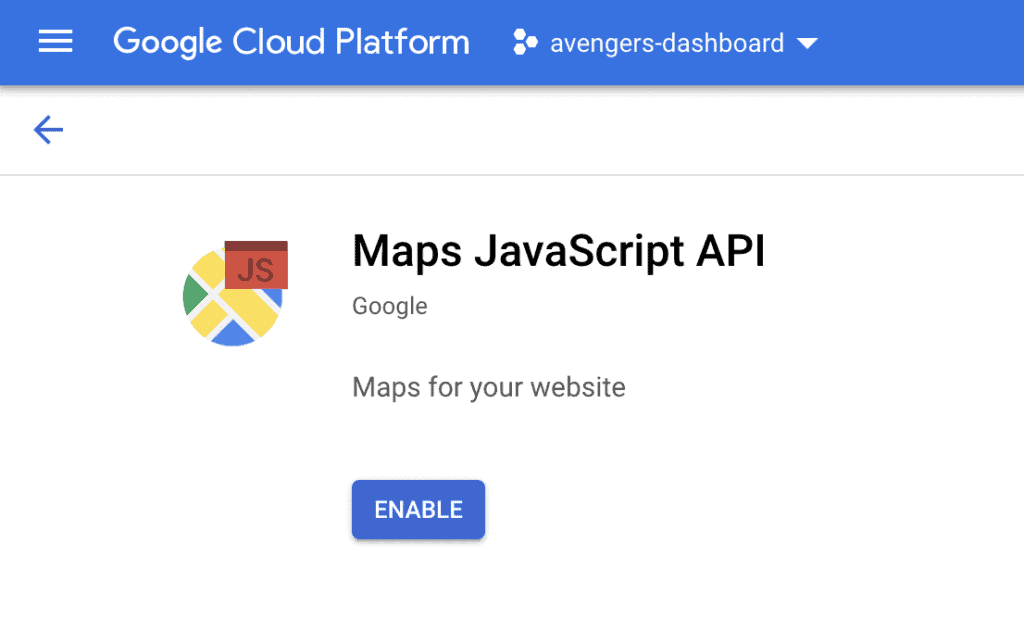
We then need to enable the Google Maps JavaScript API for this project. Search for this and enable this:
然后我们需要为这个项目启用谷歌地图的JavaScript API。搜索这个,并启用这个。
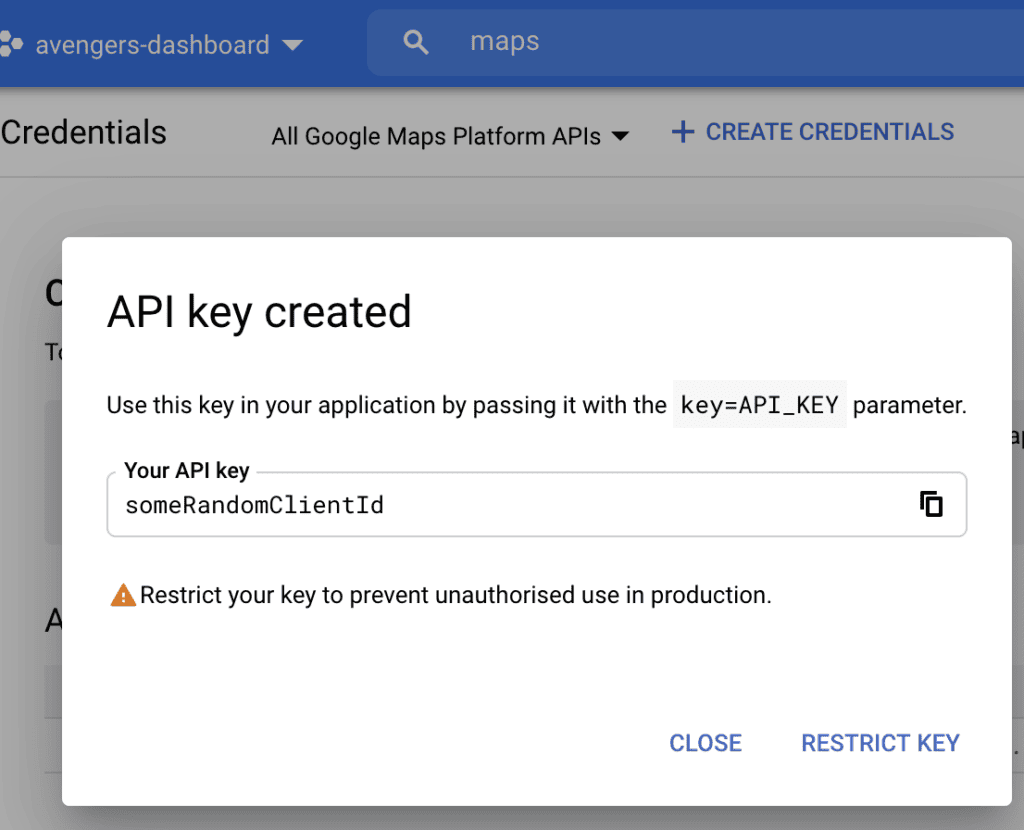
Finally, we need an API key to be able to use this. For this, we need to navigate to the “Credentials” pane on the sidebar, click on “Create Credentials” at the top and select API Key:
最后,我们需要一个API密钥以便能够使用它。为此,我们需要导航到侧边栏的 “证书 “窗格,点击顶部的 “创建证书 “并选择API密钥。
We now need to add this key to our application.properties file:
我们现在需要把这个键添加到我们的application.properties文件中。
GOOGLE_CLIENT_ID=someRandomClientId3. Building the Client Layer Using Astra and CQL
3.使用Astra和CQL构建客户层
In order to communicate with the database via CQL, we need to write our client layer. This will be a class called CqlClient that wraps the DataStax CQL APIs, abstracting away the connection details:
为了通过CQL与数据库进行通信,我们需要编写我们的客户层。这将是一个名为CqlClient的类,它封装了DataStax CQL APIs,抽象出了连接细节。
@Repository
public class CqlClient {
  @Value("${ASTRA_DB_CLIENT_ID}")
  private String clientId;

  @Value("${ASTRA_DB_CLIENT_SECRET}")
  private String clientSecret;

  public List<Row> query(String cql, Object... binds) {
    try (CqlSession session = connect()) {
      var statement = session.prepare(cql);
      var bound = statement.bind(binds);
      var rs = session.execute(bound);

      return rs.all();
    }
  }

  private CqlSession connect() {
    return CqlSession.builder()
      .withCloudSecureConnectBundle(CqlClient.class.getResourceAsStream("/secure-connect-baeldung-avengers.zip"))
      .withAuthCredentials(clientId, clientSecret)
      .build();
  }
}
This gives us a single public method that will connect to the database and execute an arbitrary CQL query, allowing for some bind values to be provided to it.
这给了我们一个单一的公共方法,它将连接到数据库并执行一个任意的CQL查询,允许向它提供一些绑定值。
Connecting to the database makes use of our Secure Connect Bundle and client credentials that we generated earlier. The Secure Connect Bundle needs to have been placed in src/main/resources/secure-connect-baeldung-avengers.zip, and the client ID and secret need to have been put into application.properties with the appropriate property names.
连接到数据库需要使用我们之前生成的安全连接包和客户端证书。安全连接包需要放在src/main/resources/secure-connect-baeldung-avengers.zip中,客户端ID和秘密需要放在application.properties中,并使用适当的属性名称。
Note that this implementation loads every row from the query into memory and returns them as a single list before finishing. This is only for the purposes of this article but is not as efficient as it otherwise could be. We could, for example, fetch and process each row individually as they are returned or even go as far as to wrap the entire query in a java.util.streams.Stream to be processed.
请注意,这个实现将查询中的每一行都加载到内存中,并在结束前将它们作为一个单一的列表返回。这只是为了本文的目的,但并不像其他方式那样有效。例如,我们可以在每个行被返回时单独获取和处理它们,或者甚至可以将整个查询包在一个java.util.streams.Stream中进行处理。
4. Fetching the Required Data
4.获取所需数据
Once we have our client to be able to interact with the CQL API, we need our service layer to actually fetch the data we are going to display.
一旦我们的客户端能够与CQL API互动,我们就需要我们的服务层来实际获取我们要显示的数据。
Firstly, we need a Java Record to represent each row we are fetching from the database:
首先,我们需要一个Java Record来代表我们从数据库中获取的每一条记录。
public record Location(String avenger,
  Instant timestamp,
  BigDecimal latitude,
  BigDecimal longitude,
  BigDecimal status) {}
And then we need our service layer to retrieve the data:
然后我们需要我们的服务层来检索数据。
@Service
public class MapService {
  @Autowired
  private CqlClient cqlClient;

  // To be implemented.
}
Into this, we’re going to write our functions to actually query the database – using the CqlClient that we’ve just written – and return the appropriate details.
在这里面,我们要编写我们的函数来实际查询数据库–使用我们刚刚编写的CqlClient–并返回适当的细节。
4.1. Generate a List of Avengers
4.1.生成一份复仇者名单
Our first function is to get a list of all the Avengers that we are able to display the details of:
我们的第一个功能是获得一个所有复仇者的列表,我们能够显示其细节。
public List<String> listAvengers() {
  var rows = cqlClient.query("select distinct avenger from avengers.events");

  return rows.stream()
    .map(row -> row.getString("avenger"))
    .sorted()
    .collect(Collectors.toList());
}
This just gets the list of distinct values in the avenger column from our events table. Because this is our partition key, it is incredibly efficient. CQL will only allow us to order the results when we have a filter on the partition key so we are instead doing the sorting in Java code. This is fine though because we know that we have a small number of rows being returned so the sorting will not be expensive.
这只是从我们的events表中获取avenger列中的独立值列表。因为这是我们的分区键,所以效率非常高。CQL只允许我们在分区键上有一个过滤器时对结果进行排序,所以我们要在Java代码中进行排序。这很好,因为我们知道我们有少量的行被返回,所以排序将不会很昂贵。
4.2. Generate Location Details
4.2.生成位置详情
Our other function is to get a list of all the location details that we wish to display on the map. This takes a list of avengers, and a start and end time and returns all of the events for them grouped as appropriate:
我们的另一个功能是获得一个我们希望在地图上显示的所有地点的详细信息的列表。这需要一个复仇者的列表,以及一个开始和结束时间,并返回他们的所有事件,并根据情况分组:。
public Map<String, List<Location>> getPaths(List<String> avengers, Instant start, Instant end) {
  var rows = cqlClient.query("select avenger, timestamp, latitude, longitude, status from avengers.events where avenger in ? and timestamp >= ? and timestamp <= ?",
    avengers, start, end);

  var result = rows.stream()
    .map(row -> new Location(
      row.getString("avenger"),
      row.getInstant("timestamp"),
      row.getBigDecimal("latitude"),
      row.getBigDecimal("longitude"),
      row.getBigDecimal("status")))
    .collect(Collectors.groupingBy(Location::avenger));

  for (var locations : result.values()) {
    Collections.sort(locations, Comparator.comparing(Location::timestamp));
  }

  return result;
}
The CQL binds automatically expand out the IN clause to handle multiple avengers correctly, and the fact that we are filtering by the partition and clustering key again makes this efficient to execute. We then parse these into our Location object, group them together by the avenger field and ensure that each grouping is sorted by the timestamp.
CQL绑定自动扩展出IN子句,以正确处理多个复仇者,而且我们再次通过分区和分组键进行过滤,这使得执行效率提高。然后我们将这些解析到我们的Location对象中,通过avenger字段将它们分组,并确保每个分组都是按时间戳排序的。
5. Displaying the Map
5.显示地图
Now that we have the ability to fetch our data, we need to actually let the user see it. This will first involve writing our controller for getting the data:
现在我们已经具备了获取数据的能力,我们需要真正让用户看到它。这将首先涉及编写获取数据的控制器。
5.1. Map Controller
5.1.地图控制器
@Controller
public class MapController {
  @Autowired
  private MapService mapService;

  @Value("${GOOGLE_CLIENT_ID}")
  private String googleClientId;

  @ModelAttribute("googleClientId")
  String getGoogleClientId() {
    return googleClientId;
  }

  @GetMapping("/map")
  public ModelAndView showMap(@RequestParam(name = "avenger", required = false) List<String> avenger,
  @RequestParam(required = false) String start, @RequestParam(required = false) String end) throws Exception {
    var result = new ModelAndView("map");
    result.addObject("inputStart", start);
    result.addObject("inputEnd", end);
    result.addObject("inputAvengers", avenger);

    result.addObject("avengers", mapService.listAvengers());

    if (avenger != null && !avenger.isEmpty() && start != null && end != null) {
      var paths = mapService.getPaths(avenger,
        LocalDateTime.parse(start).toInstant(ZoneOffset.UTC),
        LocalDateTime.parse(end).toInstant(ZoneOffset.UTC));

      result.addObject("paths", paths);
    }

    return result;
  }
}
This uses our service layer to get the list of avengers, and if we have inputs provided then it also gets the list of locations for those inputs. We also have a ModelAttribute that will provide the Google Client ID to the view for it to use.
这使用我们的服务层来获取复仇者的列表,如果我们提供了输入,那么它也会获取这些输入的位置列表。我们也有一个ModelAttribute,它将向视图提供Google客户端ID供其使用。
5.1. Map Template
5.1.地图模板
Once we’ve written our controller, we need a template to actually render the HTML. This will be written using Thymeleaf as in the previous articles:
一旦我们写好了控制器,我们需要一个模板来实际渲染HTML。这将使用Thymeleaf来编写,就像之前的文章一样。
<!doctype html>
<html lang="en">

<head>
  <meta charset="utf-8" />
  <meta name="viewport" content="width=device-width, initial-scale=1" />

  <link href="https://cdn.jsdelivr.net/npm/bootstrap@5.0.0-beta3/dist/css/bootstrap.min.css" rel="stylesheet"
    integrity="sha384-eOJMYsd53ii+scO/bJGFsiCZc+5NDVN2yr8+0RDqr0Ql0h+rP48ckxlpbzKgwra6" crossorigin="anonymous" />

  <title>Avengers Status Map</title>
</head>

<body>
  <nav class="navbar navbar-expand-lg navbar-dark bg-dark">
    <div class="container-fluid">
      <a class="navbar-brand" href="#">Avengers Status Map</a>
    </div>
  </nav>

  <div class="container-fluid mt-4">
    <div class="row">
      <div class="col-3">
        <form action="/map" method="get">
          <div class="mb-3">
            <label for="avenger" class="form-label">Avengers</label>
            <select class="form-select" multiple name="avenger" id="avenger" required>
              <option th:each="avenger: ${avengers}" th:text="${avenger}" th:value="${avenger}"
                th:selected="${inputAvengers != null && inputAvengers.contains(avenger)}"></option>
            </select>
          </div>
          <div class="mb-3">
            <label for="start" class="form-label">Start Time</label>
            <input type="datetime-local" class="form-control" name="start" id="start" th:value="${inputStart}"
              required />
          </div>
          <div class="mb-3">
            <label for="end" class="form-label">End Time</label>
            <input type="datetime-local" class="form-control" name="end" id="end" th:value="${inputEnd}" required />
          </div>
          <button type="submit" class="btn btn-primary">Submit</button>
        </form>
      </div>
      <div class="col-9">
        <div id="map" style="width: 100%; height: 40em;"></div>
      </div>
    </div>
  </div>

  <script src="https://cdn.jsdelivr.net/npm/bootstrap@5.0.0-beta3/dist/js/bootstrap.bundle.min.js"
    integrity="sha384-JEW9xMcG8R+pH31jmWH6WWP0WintQrMb4s7ZOdauHnUtxwoG2vI5DkLtS3qm9Ekf" crossorigin="anonymous">
    </script>
  <script type="text/javascript" th:inline="javascript">
    /*<![CDATA[*/
    let paths = /*[[${paths}]]*/ {};

    let map;
    let openInfoWindow;

    function initMap() {
      let averageLatitude = 0;
      let averageLongitude = 0;

      if (paths) {
        let numPaths = 0;

        for (const path of Object.values(paths)) {
          let last = path[path.length - 1];
          averageLatitude += last.latitude;
          averageLongitude += last.longitude;
          numPaths++;
        }

        averageLatitude /= numPaths;
        averageLongitude /= numPaths;
      } else {
        // We had no data, so lets just tidy things up:
        paths = {};
        averageLatitude = 40.730610;
        averageLongitude = -73.935242;
      }


      map = new google.maps.Map(document.getElementById("map"), {
        center: { lat: averageLatitude, lng: averageLongitude },
        zoom: 16,
      });

      for (const avenger of Object.keys(paths)) {
        const path = paths[avenger];
        const color = getColor(avenger);

        new google.maps.Polyline({
          path: path.map(point => ({ lat: point.latitude, lng: point.longitude })),
          geodesic: true,
          strokeColor: color,
          strokeOpacity: 1.0,
          strokeWeight: 2,
          map: map,
        });

        path.forEach((point, index) => {
          const infowindow = new google.maps.InfoWindow({
            content: "<dl><dt>Avenger</dt><dd>" + avenger + "</dd><dt>Timestamp</dt><dd>" + point.timestamp + "</dd><dt>Status</dt><dd>" + Math.round(point.status * 10000) / 100 + "%</dd></dl>"
          });

          const marker = new google.maps.Marker({
            position: { lat: point.latitude, lng: point.longitude },
            icon: {
              path: google.maps.SymbolPath.FORWARD_CLOSED_ARROW,
              strokeColor: color,
              scale: index == path.length - 1 ? 5 : 3
            },
            map: map,
          });

          marker.addListener("click", () => {
            if (openInfoWindow) {
              openInfoWindow.close();
              openInfoWindow = undefined;
            }

            openInfoWindow = infowindow;
            infowindow.open({
              anchor: marker,
              map: map,
              shouldFocus: false,
            });
          });

        });
      }
    }

    function getColor(avenger) {
      return {
        wanda: '#ff2400',
        hulk: '#008000',
        hawkeye: '#9370db',
        falcon: '#000000'
      }[avenger];
    }

    /*]]>*/
  </script>

  <script
    th:src="${'https://maps.googleapis.com/maps/api/js?key=' + googleClientId + '&callback=initMap&libraries=&v=weekly'}"
    async></script>
</body>

</html>
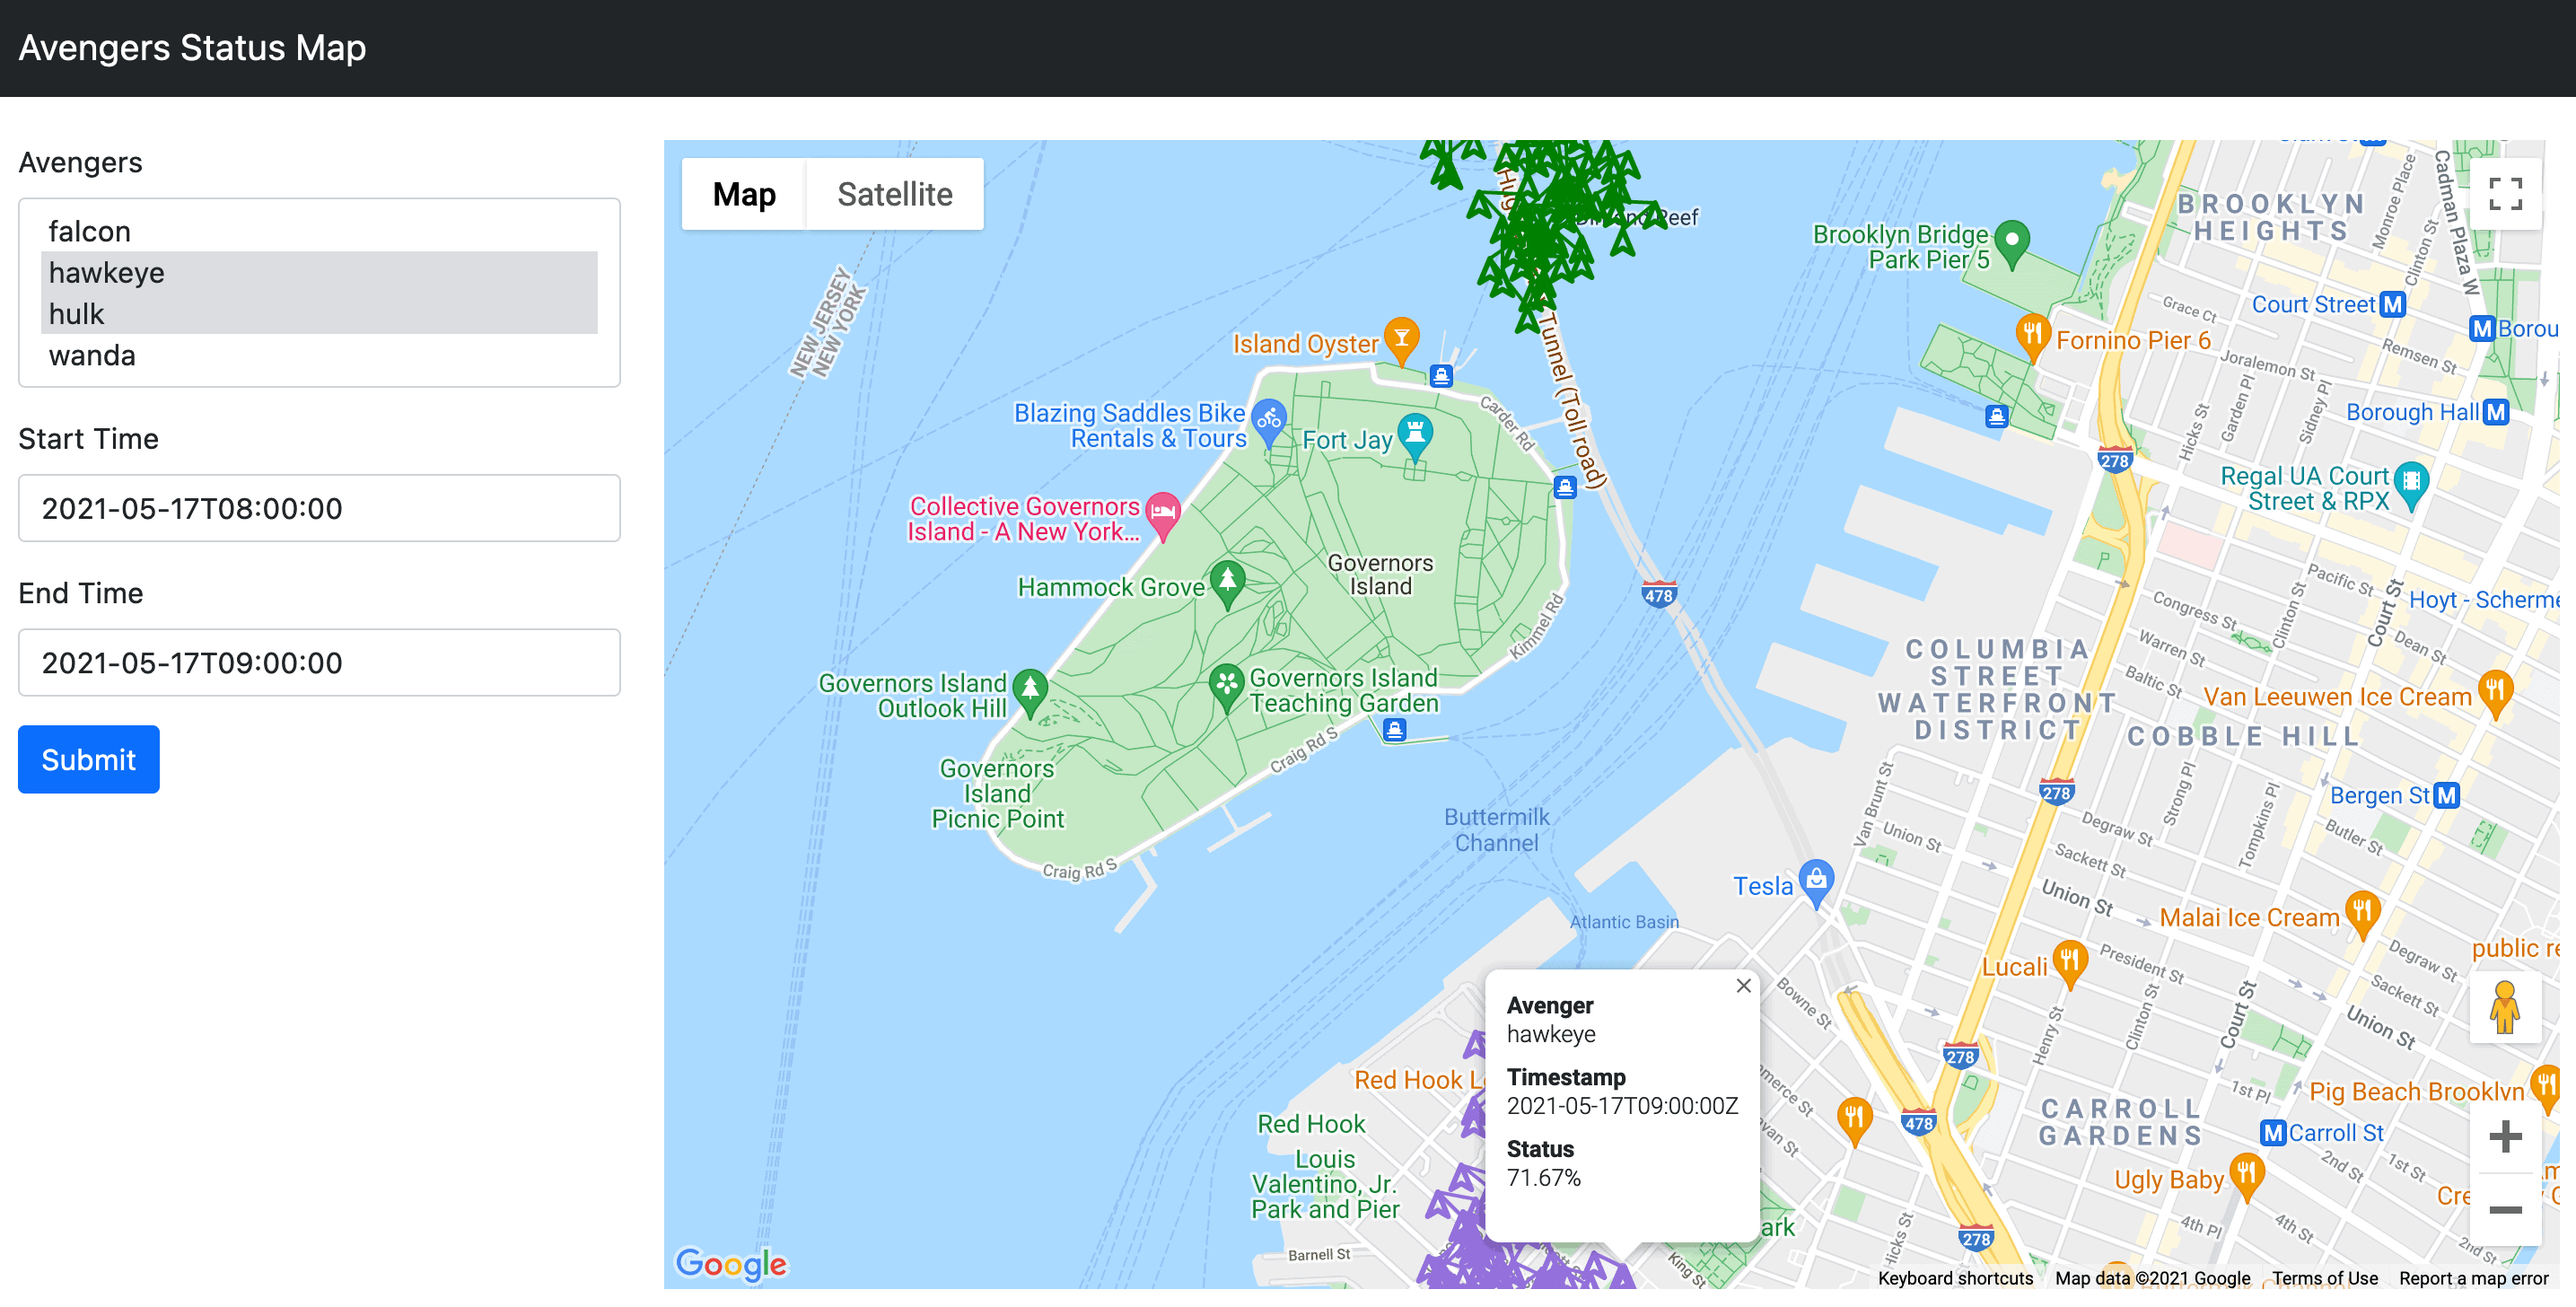
We are injecting the data retrieved from Cassandra, as well as some other details. Thymeleaf automatically handles converting the objects within the script block into valid JSON. Once this is done, our JavaScript then renders a map using the Google Maps API and adds some routes and markers onto it to show our selected data.
我们正在注入从Cassandra获取的数据,以及其他一些细节。Thymeleaf自动处理将script块中的对象转换为有效的JSON。一旦完成,我们的JavaScript就会使用谷歌地图API渲染一张地图,并在上面添加一些路线和标记,以显示我们选定的数据。
At this point, we have a fully working application. Into this we can select some avengers to display, date and time ranges of interest, and see what was happening with our data:
在这一点上,我们有一个完全工作的应用程序。在此,我们可以选择一些要显示的复仇者、感兴趣的日期和时间范围,并查看我们的数据发生了什么:。
6. Conclusion
6.结论
Here we have seen an alternative way to visualize data retrieved from our Cassandra database, and have shown the Astra CQL API in use to obtain this data.
在这里,我们看到了一种将从我们的Cassandra数据库中获取的数据可视化的另一种方式,并展示了用于获取这些数据的Astra CQL API。
All of the code from this article can be found over on GitHub.
本文的所有代码都可以在GitHub上找到over。
