1. Overview
1.概述
In this tutorial, we’ll discuss the commands that we most frequently use when working with Git.
在本教程中,我们将讨论在使用Git时最经常使用的命令。
We’ll start with installation and configuration and then create our first local repository. Next, we’ll learn how to commit changes and synchronize them with a remote repository.
我们将从安装和配置开始,然后创建我们的第一个本地版本库。接下来,我们将学习如何提交修改并与远程版本库同步。
Additionally, we’ll discuss branching and also learn some advanced techniques like amending commits and manipulating the commit history.
此外,我们将讨论分支问题,还将学习一些高级技术,如修改提交和操作提交历史。
2. What Is Git?
2.什么是Git?
Git is a version control system (VCS) that allows saving and tracking changes to files over time without overwriting previous snapshots. It helps developers collaborate on projects together.
Git i是一个版本控制系统(VCS),允许随着时间的推移保存和跟踪文件的变化,而不会覆盖以前的快照。它帮助开发人员一起协作完成项目。
Unlike its main competitor – SVN, Git also implements a distributed workflow system. It means that every developer working with Git has a local copy of the entire repository. Git also allows working asynchronously without a constant connection to the central repository.
与它的主要竞争对手–SVN不同,Git还实现了一个分布式工作流系统。这意味着每个使用Git工作的开发者都有整个仓库的本地拷贝。Git还允许异步工作,不需要持续连接到中央仓库。
3. Git Installation
3. git安装
We can install Git on the most common operating systems like Windows, Mac, and Linux. In fact, on most Mac and Linux machines, Git comes installed by default.
我们可以在Windows、Mac和Linux等最常见的操作系统上安装Git。事实上,在大多数Mac和Linux机器上,Git是默认安装的。
To see if we already have Git installed, let’s open up a terminal and execute:
为了看看我们是否已经安装了Git,让我们打开终端并执行。
$ git version
git version 2.24.3 (Apple Git-128)
Moreover, Git comes with built-in GUI tools for committing (git-gui) and browsing (gitk). There are also plenty of third-party tools or IDE plugins that enhance the experience.
此外,Git 还内置了用于提交(git-gui)和浏览(gitk)的 GUI 工具。还有大量的第三方工具或IDE插件可以增强体验。
4. git help – A Handy Manual
4.git帮助 – 便捷手册
Before we create our first repository, let’s run the git help command. It displays useful information about Git itself:
在我们创建第一个仓库之前,让我们运行git help命令。它显示关于Git本身的有用信息。
$ git help
usage: git [--version] [--help] [-C <path>] [-c <name>=<value>]
           [--exec-path[=<path>]] [--html-path] [--man-path] [--info-path]
           [-p | --paginate | -P | --no-pager] [--no-replace-objects] [--bare]
           [--git-dir=<path>] [--work-tree=<path>] [--namespace=<name>]
           <command> [<args>]
...
We can also check the manual for a specific command in multiple ways:
我们还可以通过多种方式查看特定命令的手册。
$ git --help init
$ git help init
$ git init --help
All the three variants above return identical output.
上述三个变体都返回相同的输出。
With the -g option, we can also access the list of internal guides to develop our skills:
通过-g 选项,我们还可以访问内部指南列表,以发展我们的技能。
$ git help -g
The common Git guides are:
   attributes          Defining attributes per path
   cli                 Git command-line interface and conventions
   core-tutorial       A Git core tutorial for developers
...
$ git help core-tutorial
To print the tutorial, we need to provide its name as a parameter.
要打印该教程,我们需要提供其名称作为参数。
5. git config – Configuring Git
5.git config – 配置 Git
Once we have Git installed, we can easily configure it with the gitconfig command, which allows managing options.
一旦我们安装了Git,我们就可以用gitconfig命令轻松配置它,该命令允许管理选项。
Git supports options at different levels like system, global, local, worktree, or file.
Git支持不同级别的选项,如系统、全局、本地、工作树或文件。
While the system settings are system-wide and are applied to every user and all of their repositories on the system, the global level refers to user-specific settings.
系统设置是全系统范围的,适用于每个用户和他们在系统上的所有存储库,而全局级指的是用户特定的设置。
The local configuration is specific to the single repository, and it is the default level that Git uses when we don’t pass any option to the git config command.
local配置是针对单个仓库的,当我们没有给git config命令传递任何选项时,它是 Git 使用的默认级别。
The worktree and file levels are more advanced configuration levels, which can be applied to a single branch or file in the repository.
工作树和文件级别是更高级的配置级别,可以应用于版本库的单个分支或文件。
Further, Git resolves the effective value of an option by checking the local level first and then goes until the system level if the option isn’t set.
此外,Git通过先检查local级,然后直到system级(如果该选项未被设置)来解决一个选项的有效值。
As an example, let’s configure our username used in the commit history:
作为一个例子,让我们配置一下提交历史中使用的用户名。
$ git config --global user.name "Baeldung User"We’ve just set our name globally.
我们刚刚在全球范围内设定了我们的名字。
To override an option for a single repository, we can use the –local flag in its directory.
要覆盖单个版本库的选项,我们可以在其目录中使用-local标志。
To print the list of effective options, we use:
为了打印有效选项的列表,我们使用。
$ git config -l
user.name=Baeldung User
We can execute the git –help config command to get details about all the available options.
我们可以执行git -help config命令来获得所有可用选项的细节。
6. Creating a Repository
6.创建一个存储库
Next, we need to create a repository. For this, we have two alternatives – a new repository can be either created locally from scratch, or an existing one can be cloned.
接下来,我们需要创建一个版本库。为此,我们有两种选择–可以在本地从头开始创建一个新的版本库,也可以克隆一个现有的版本库。
6.1. git init – Initialize a New Repository
6.1.git init – 初始化一个新的存储库
If we decide to initialize a new repository, we need to use the git init command. It turns the current directory into a Git repository and starts tracking its content:
如果我们决定初始化一个新的仓库,我们需要使用git init命令。它把当前目录变成了一个Git仓库并开始跟踪其内容。
$ mkdir simple-repo; cd simple-repo; git init
Initialized empty Git repository in /simple-repo/.git/
Git also creates a hidden directory called .git in it. This directory stores all the objects and refs that Git creates and uses as part of our project’s history. Those files are created during commits and point to specific revisions of our files.
Git还在其中创建了一个名为.git的隐藏目录。这个目录存储了所有的对象和refs,Git创建并使用这些文件作为我们项目历史的一部分。这些文件是在提交过程中创建的,并指向我们文件的特定修订版。
After that, in most cases, we want to connect our already created repository with a remote one. We use the git remote command to manage remote links for the current repository:
之后,在大多数情况下,我们想把我们已经创建的版本库与一个远程版本库连接起来。我们使用git remote命令来管理当前版本库的远程链接。
$ git remote add origin https://github.com/eugenp/tutorials.gitWe’ve just added a new remote called origin and connected it to the official Baeldung GitHub repository.
我们刚刚添加了一个名为origin的新远程,并将其连接到Baeldung GitHub官方仓库。
6.2. git clone – Clone an External Repository
6.2.git clone – 克隆一个外部仓库
Sometimes we want to contribute to an existing repository. First, we need to download the existing repository locally.
有时我们想为一个现有的版本库做贡献。首先,我们需要在本地下载现有的版本库。
The git clone command clones the repository into a new directory:
git clone命令将版本库克隆到一个新目录。
$ git clone https://github.com/eugenp/tutorials.git
Cloning into 'repo'...
When it finishes, the new directory created contains all the project’s files, branches, and history.
当它完成时,创建的新目录包含了项目的所有文件、分支和历史。
Additionally, the cloned repository is already configured and connected with the external source:
此外,克隆的版本库已经配置好,并与外部源连接。
$ cd tutorials
$ git remote -v
origin	https://github.com/eugenp/tutorials.git (fetch)
origin	https://github.com/eugenp/tutorials.git (push)
Git will use those origin links to manage any further changes.
Git将使用这些原点链接来管理任何进一步的变化。
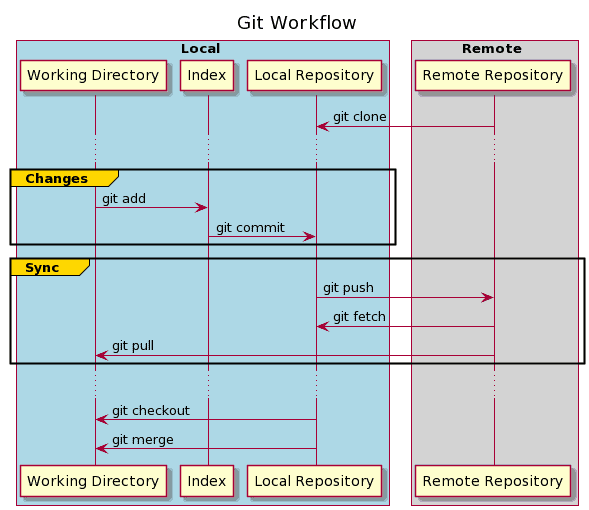
7. Git Workflow
7.Git工作流程
After we have configured our local repository, we are ready to apply the first changes. But before we do that, let’s check how Git tracks those changes.
配置好本地仓库后,我们就可以开始应用第一次修改了。但在这之前,我们先看看Git是如何跟踪这些改动的。
Our local repository consists of three different trees maintained by Git.
我们的本地仓库由三个不同的树组成,由Git维护。
The first one is the Working Directory, which holds the actual version of files.
第一个是工作目录,它保存着文件的实际版本。
After making our changes to the files, we can move the files into Index, which acts as a staging area. We do this using the git add command. Files in Index begin to be tracked by Git.
在对文件进行修改后,我们可以将文件移到Index,中,它作为一个暂存区。我们使用git add命令来做这件事。在Index中的文件开始被Git追踪。
Finally, we can apply and save our changes into the Local Repository using the git commit command. Committing the changes updates the repository’s HEAD, which always points to the last commit we’ve made.
最后,我们可以使用git commit命令将我们的修改应用并保存到本地仓库中。提交修改会更新仓库的 HEAD,它总是指向我们最后的提交。
Those three steps are used to maintain the local changes. But as we know, the repository may also contain an external source. The last step is to synchronize both repositories and publish our changes.
这三个步骤是用来维护本地修改的。但正如我们所知,存储库也可能包含一个外部源。最后一步是同步两个存储库,并发布我们的变化。
 8. Making Changes

8. 进行改动
Now that we know how Git’s tracking system works, we’re ready to apply our first changes to our repository.
现在我们知道了Git的跟踪系统是如何工作的,我们准备将我们的第一个改动应用到我们的仓库。
8.1. git status – Show Current Changes
8.1.git status – 显示当前更改
Let’s create a simple file and add it to our repository. Afterward, we execute the git status command and analyze its output:
让我们创建一个简单的文件,并把它添加到我们的版本库中。之后,我们执行git status命令并分析其输出。
$ "Hello World" >> myfile.txt
$ git status
On branch master
Your branch is up to date with 'origin/master'.

Untracked files:
  (use "git add <file>..." to include in what will be committed)
	myfile.txt

nothing added to commit but untracked files present (use "git add" to track)
The command prints the current detailed status of our changes. The first part shows if the local and remote branches are synchronized.
该命令打印了我们当前修改的详细状态。第一部分显示本地和远程分支是否同步。
Next, the output shows the status of the working tree – the list of currently modified files with their maintenance status. As we see, the myfile.txt file is currently in the Working Directory area and not tracked by Git.
接下来,输出显示了工作树的状态–当前修改的文件列表及其维护状态。如我们所见,myfile.txt文件目前在工作目录区域,没有被Git跟踪。
8.2. git add – Track the Changes
8.2.git add – 追踪变化
To start tracking the changes, we need to move them to the Index by using the git add command:
为了开始跟踪这些变化,我们需要通过使用git add命令将它们移到Index。
$ git add myfile.txt
$ git stage *
We can specify multiple files at once by separating them with a space. We can also specify all files using the asterisk sign.
我们可以一次指定多个文件,用空格隔开它们。我们还可以用星号指定所有文件。
Alternatively, we can also use the git stage command, which is a synonym for the git add command.
另外,我们也可以使用git stage命令,它是git add命令的同义词。。
Let’s now verify the status:
现在我们来验证一下状态。
$ git status
On branch master
Your branch is up to date with 'origin/master'.

Changes to be committed:
  (use "git restore --staged <file>..." to unstage)
	new file:   myfile.txt
As we can see, Git has started tracking our files.
我们可以看到,Git已经开始跟踪我们的文件了。
8.3. git restore & gitignore – Untrack the Changes
8.3.git restore & gitignore – 取消跟踪更改
Git allows removing files from the Index. If we moved our changes into it by mistake and want to temporarily disable tracking them, we use git restore:
Git允许从索引中删除文件。如果我们错误地将我们的修改移入其中,并且想要暂时禁止跟踪它们,我们可以使用git restore:。
$ git restore -S myfile.txt
$ git status
On branch master
Your branch is up to date with 'origin/master'.

Untracked files:
  (use "git add <file>..." to include in what will be committed)
	myfile.txt
We’ve just moved our file once again to the Working Area and excluded it from further commits until we stage it again. The -S (–staged) flag tells Git to restore only the repository’s Index.
我们刚刚把我们的文件再次移到了工作区,并排除了它的进一步提交,直到我们再次把它分阶段。-S(-staged)标志告诉 Git 只恢复仓库的索引。
We can also permanently exclude files and disable tracking them. To do this, we need to create a .gitignore file. This file contains filename patterns and is applied to all the files in the current directory and its child directories. Any further add actions will ignore files matching those patterns.
我们还可以永久地排除文件,禁止跟踪它们。要做到这一点,我们需要创建一个.gitignore文件。这个文件包含文件名模式,并应用于当前目录及其子目录中的所有文件。任何进一步的添加操作都会忽略与这些模式匹配的文件。
8.4. git commit – Save the Changes
8.4.git commit – 保存更改
Let’s revert the last changes and move our file once again to the Staging Area:
让我们恢复最后的修改,再次将我们的文件移到暂存区。
$ git add myfile.txt
$ git add myfile.txt
Now, it’s time to save our work, so we need to do a commit.
现在,是时候保存我们的工作了,所以我们需要做一个提交。
The commit is a Git object, which is like a snapshot of our repository at a specific time.
提交是一个Git对象,它就像我们的仓库在某一特定时间的快照。
To commit changes, let’s use the git commit command:
要提交更改,让我们使用git commit命令。
$ git commit -m "My first commit"
[master 8451901] My first commit
 1 file changed, 1 insertion(+)
 create mode 100644 myfile.txt
We’ve just created our first commit locally.
我们刚刚在本地创建了我们的第一个提交。
The git commit command contains many additional options to perform more complex operations, which we can inspect with the git commit –help command.
git commit命令包含许多额外的选项,以执行更复杂的操作,我们可以用git commit -help命令来检查。
The most useful is the -m flag, which specifies a commit message describing changes done in the current snapshot.
最有用的是-m标志,它指定了一个提交信息,描述在当前快照中所做的修改。
Finally, let’s check the status:
最后,让我们检查一下状态。
$ git status
On branch master
Your branch is ahead of 'origin/master' by 1 commit.
  (use "git push" to publish your local commits)

nothing to commit, working tree clean
Now, our working tree doesn’t contain any additional changes, but the local repository contains more commits than its external source. Therefore, to publish our changes, we should synchronize local changes with the origin.
现在,我们的工作树不包含任何额外的修改,但本地仓库比它的外部源包含更多的提交。因此,为了发布我们的修改,我们应该将本地修改与原点同步。
8.5. git log & git show – Inspect Commits
8.5.git log & git show– 检查提交的内容
Once we’ve created the commit, we can check its details. Commits include lots of additional metadata, like the author, timestamp, and more.
一旦我们创建了提交,我们就可以检查其细节。提交包括很多额外的元数据,如作者、时间戳等等。
To print the list of commits of the current branch, we use the git log command:
为了打印当前分支的提交列表,我们使用git log命令。
$ git log
commit 845190154ed7a491a6143669c4ce88058fb93f8a (HEAD -> master)
Author: ...
Date: ...

    My first commit

commit 9a1e11ec981b41e4b4b9c245a7a96cd6707f4705 (origin/master, origin/HEAD)
...
The list shows the commit history of the current branch in reverse chronological order by default.
列表中显示的是当前分支的提交历史,默认情况下是按时间倒序排列。
Each entry contains the general metadata like the commit’s id (a unique SHA-1 checksum), author, date, and given message.
每个条目都包含一般的元数据,如提交的ID(唯一的SHA-1校验)、作者、日期和给出的信息。
When we want to go deeper into a single commit, we print its details using the git show command followed by the requested commit id:
当我们想深入了解一个单独的提交时,我们使用git show命令来打印它的细节,后面跟上所要求的提交ID。
$ git show 845190154ed7a491a6143669c4ce88058fb93f8a
commit 845190154ed7a491a6143669c4ce88058fb93f8a (HEAD -> master)
Author: ...
Date:...

    My first commit

diff --git a/myfile.txt b/myfile.txt
new file mode 100644
index 0000000..557db03
--- /dev/null
+++ b/myfile.txt
@@ -0,0 +1 @@
+Hello World
This time, the output also displays the differences done by the commit versus the previous snapshot using the git diff command.
这一次,输出还显示了提交与之前快照的差异,使用git diff命令。
8.6. git stash – Shelve the Changes
8.6.git stash-搁置更改
The git stash command temporarily shelves changes we’ve made, reverting the Working Directory to match the HEAD commit. This allows us to quickly switch context and start working on something else.
git stash命令暂时搁置我们所做的修改,将工作目录还原为与HEAD提交相匹配。这使得我们可以快速切换上下文,开始做别的事情。
Let’s create another file and add it to the Staging Area. After that, let’s execute the git stash:
让我们创建另一个文件,并将其添加到Staging Area。之后,让我们执行git stash。
$ touch myfile-2.txt; git add *
$ git stash push
Saved working directory and index state WIP on master: 8451901 My first commit
Now, let’s try to list the file:
现在,让我们试着列出该文件。
$ ls myfile-2.txt
$ ls myfile-2.txt
ls: myfile-2.txt: No such file or directory
ls: myfile-2.txt:没有这样的文件或目录。
We can see that now the file isn’t present. This is because all pending changes have been removed from the Working Directory and saved in the stash.
我们可以看到,现在这个文件并不存在。这是因为所有悬而未决的修改都已经从工作目录中删除,并保存在储藏室。
We can print all the stashed away modifications using the list option:
我们可以使用list选项来打印所有被藏起来的修改。
$ git stash list
stash@{0}: WIP on master: 8451901 My first commit
Since we didn’t provide its description, the stash is by default listed as WIP on… . We can change the default value into a more descriptive message using the -m flag on the command line.
由于我们没有提供它的描述,储藏室被默认为WIP on… …。我们可以使用命令行上的-m标志将默认值改为一个更具描述性的信息。
To inspect its details, we use the show option:
要检查其细节,我们使用show选项。
$ git stash show
 myfile-2.txt | 0
 1 file changed, 0 insertions(+), 0 deletions(-)
The output prints information about changes stored in the latest stash.
输出打印的是关于存储在最新储藏室的变化的信息。
Finally, if we want to restore the changes, we use the pop option:
最后,如果我们想恢复变化,我们使用pop选项。
$ git stash pop
...
$ ls myfile-2.txt
myfile-2.txt
We’ve just removed a single stashed state from the stash list and applied it on top of the current state.
我们刚刚从存储列表中删除了一个单一的存储状态,并将其应用在当前状态之上。
9. Manipulating the Commit History
9.操纵提交历史
Now that we’ve learned how to save changes in the repository, let’s modify previously saved commits. In the following sections, we’ll cover the most common use cases.
现在我们已经学会了如何在版本库中保存更改,让我们来修改之前保存的提交。在下面的章节中,我们将介绍最常见的使用情况。
9.1. git commit –amend – Add Additional Changes to the Commit
9.1.git commit -amend – 在提交中添加额外的更改
Suppose we forgot to include a file when committing a change. Of course, we can create another commit on top of the last one, but it might make the changes history messy.
假设我们在提交修改时忘记了包含一个文件。当然,我们可以在上一次提交的基础上再创建一次提交,但这可能会使修改历史变得混乱。
In such cases, we may want Git to rewrite our last commit and include the file we forgot using the amend option.
在这种情况下,我们可能希望Git重写我们的最后一次提交,并使用amend选项包括我们忘记的文件。
Let’s review the last commit:
让我们回顾一下上次的提交。
$ git show --summary
commit 845190154ed7a491a6143669c4ce88058fb93f8a (HEAD -> master)
Author: ...
Date: ...

    My first commit

 create mode 100644 myfile.txt
Having our my-file2.txt popped from the stash, let’s commit it using the amend option:
当我们的my-file2.txt从储藏室出来后,让我们使用amend选项提交它。
$ git commit --amend
[master 0ed9f03] My first commit
 2 files changed, 1 insertion(+)
 create mode 100644 myfile-2.txt
 create mode 100644 myfile.txt
We can notice that Git added the file to our last commit combining the changes.
我们可以注意到,Git将该文件添加到了我们的最后一次提交中,结合了这些变化。
9.2. git rebase – Reapply Commits
9.2.git rebase – 重新应用承诺
A more advanced technique for modifying commits is through the git rebase command. It reapplies commits from the history on top of another base, allowing us to change them on the fly.
修改提交的一个更高级的技术是通过git rebase命令。它将历史上的提交重新应用到另一个基础之上,允许我们即时改变它们。
Let’s create another commit in our repository:
让我们在我们的版本库中创建另一个提交。
$ touch myfile-3.txt
$ git add *
$ git commit -m "My second commit"
Now, we should have two single commits – My first commit and My second commit.
现在,我们应该有两个单一的提交–我的第一次提交和我的第二次提交。
Let’s start to rebase both commits in an interactive mode:
让我们在交互式模式下开始重新建立这两个提交。
git rebase -i HEAD~2This opens an editor, where we can manipulate the history using commands:
这将打开一个编辑器,在那里我们可以用命令来操作历史。
pick 82d8635 My first commit
pick 6d58108 My second commit

# Rebase 9a1e11e..82d8635 onto 9a1e11e (2 commands)
#
# Commands:
# p, pick <commit> = use commit
# r, reword <commit> = use commit, but edit the commit message
# e, edit <commit> = use commit, but stop for amending
# s, squash <commit> = use commit, but meld into previous commit
# d, drop <commit> = remove commit
...
On the top, we have the list of rebasing commits followed by the manual. We have plenty of options here. We can change the order by swapping the lines, or reword the commit message, or squash them into one, edit, or even drop a single commit. The instruction lines will be applied from top to bottom.
在顶部,我们有重新发布的提交列表,后面是手册。我们在这里有很多选择。我们可以通过交换行来改变顺序,或者重写提交信息,或者将它们拼成一个,编辑,甚至删除单个提交。指令行将从上到下应用。
9.3. git reset – Rollback to the Specific State
9.3.git reset – 回滚至特定状态
Sometimes, we might want to drop the current state and revert to a historical snapshot. To do this, we use the git reset option:
有时,我们可能想放弃当前状态,恢复到历史快照。要做到这一点,我们使用git reset选项:
$ git reset 82d8635It undoes all commits after the specified commit, preserving changes locally and moving them to the Staging Area. But, if we want to drop all working changes, we can use –hard flag.
它撤销了指定提交后的所有提交,保留了本地的修改,并将它们移到暂存区。但是,如果我们想放弃所有的工作变化,我们可以使用-hard标志。
10. Synchronizing the Repository
10.同步存储库
After working locally on the repository till now, it’s finally time to publish our changes.
在本地工作到现在,终于到了发布我们的变化的时候了。
Before uploading them, we should always synchronize our local copy with the remote to avoid conflicts during publishing.
在上传之前,我们应该始终将我们的本地副本与远程同步,以避免在发布过程中发生冲突。
10.1. git fetch – Update References
10.1.git fetch – 更新参考资料
While we’re implementing our changes, others may have published changes to the same branch. So we should check and sync them with our local repository.
当我们在执行我们的修改时,其他人可能已经在同一个分支上发布了修改。所以我们应该检查并将它们与我们的本地仓库同步。
The git fetch command helps us to do so:
git fetch命令帮助我们这样做。
$ git fetchThis downloads objects and refs from the origin repository.
这是从源码库中下载对象和参考文献。
We should note that this action never modifies the current working tree. This is because we can only inspect the updated commit history for our repository. If we find any pending changes, we must go further.
我们应该注意到,这个动作永远不会修改当前工作树。这是因为我们只能检查我们版本库的更新提交历史。如果我们发现有任何未完成的修改,我们必须进一步行动。
10.2. git merge – Apply Incoming Changes
10.2.git merge – 应用传入的更改
We must merge any incoming changes on the same branch before we publish our code. If we don’t do this, the publishing process could fail.
在我们发布代码之前,我们必须将任何传入的修改合并到同一分支上。如果我们不这样做,发布过程可能会失败。
Let’s update our branch:
让我们来更新我们的分支。
$ git merge origin/masterThe git merge command is a very powerful tool. It downloads all new changes from the given reference and combines them with the current working tree choosing the right merge strategy. Many changes will be applied automatically, even if modifications exist on the same files.
git merge命令是一个非常强大的工具。它从给定的参考文献中下载所有新的修改,并将它们与当前的工作树相结合,选择正确的合并策略。许多变化将被自动应用,即使在相同的文件上存在修改。
But sometimes, there is no easy way to merge changes. In that case, we have a merge conflict, and we have to resolve it manually before moving on. We need to edit the failed file, prepare a final version, and commit the changes.
但有时,没有简单的方法来合并变化。在这种情况下,我们有一个合并冲突,我们必须在继续前进之前手动解决它。我们需要编辑失败的文件,准备一个最终版本,并提交修改。
10.3. git pull – Update and Apply at Once
10.3.git pull – 一次性更新和应用
The git pull command is nothing more than git fetch and git merge combined into one:
git pull命令只不过是git fetch和git merge合二为一。
$ git pull origin/master
$ git pull origin/master
It checks a given branch for the latest changes and merges them with the current branch, in the same way as git fetch and git merge do. It’s the most common way to update the current branch.
它检查给定分支的最新修改,并将其与当前分支合并,与git fetch和git merge的方式相同。这是最常见的更新当前分支的方法。
Furthermore, pulling changes might also require an additional manual action to resolve merge conflicts.
此外,拉动变化可能还需要额外的手动操作来解决合并冲突。
10.4. git push – Publishing Local Commits
10.4.git push – 发布本地承诺
Once we synchronize our local repository and fix pending merge conflicts, we are finally ready to publish our commits. We need to choose the remote target and the local branch.
一旦我们同步了本地仓库并修复了悬而未决的合并冲突,我们就终于可以发布我们的提交了。我们需要选择远程目标和本地分支。
Let’s execute the git push command:
让我们执行git push命令。
$ git push origin master
$ git push origin master
This updates the master branch of the remote repository with all commits made locally.
这将用本地的所有提交更新远程版本库的master分支。
Finally, we check the history:
最后,我们检查历史。
$ git log
commit 6d5810884c3ce63ca08084959e3a21405a1187df (HEAD -> master, origin/master, origin/HEAD)
Author: ...
Date: ...
    My second commit
We’re done! We’ve just sent our changes to the remote repository.
我们完成了!我们刚刚把我们的修改发送到了远程仓库。
11. Git Branching
11.Git 分支
Now, let’s talk about branches. Previously, we intentionally skipped any branch operations. All changes were done on the master branch, which is the default one for each Git repository.
现在,让我们来谈一谈分支。以前,我们有意跳过任何分支操作。所有的修改都是在master分支上完成的,这是每个Git仓库的默认分支。
Branches are used to develop features isolated from each other. We use other branches for development and merge them back to the master branch upon completion.
分支是用来开发相互隔离的功能的。我们使用其他分支进行开发,并在完成后将其合并到master分支。
11.1. git branch – Manage Branches
11.1.git分支– 管理分支
The git branch helps us manage branches. To create a new one, we simply specify its name:
git分支可以帮助我们管理分支。要创建一个新的分支,我们只需指定其名称。
$ git branch new-branchA local branch is not available to others until we push it to the remote repository.
在我们推送到远程仓库之前,本地分支对其他人是不可用的。
We can now see the newly created branch by listing all of them:
现在我们可以看到新创建的分支,将其全部列出。
$ git branch --list --all
* master
  new-branch
  remotes/origin/HEAD -> origin/master
  remotes/origin/master
If we want to delete a local branch, we execute:
如果我们想删除一个本地分支,我们执行。
$ git branch -d new-branch
$ git branch -d new-branch
11.2. git checkout – Change Current Branch
11.2.git checkout – 更改当前分支
If we want to switch current branch, we use the git checkout or git switch functions:
如果我们想切换当前分支,我们使用git checkout或git switch函数。
$ git switch new-branch
Switched to branch 'new-branch'
$ git checkout master
Switched to branch 'master'
We’ve just changed from the master to the new-branch and then back to master again using both the commands.
我们刚刚从master改变到 new-branch,然后再次使用这两个命令返回到master。
Although both work similarly, the git switch command simply allows switching branches. In contrast, the git checkout is a more complex command enabling us to additionally manage working tree files, resetting branches, or reverting files to specific versions.
虽然两者的工作原理相似,但git switch命令只是允许切换分支。相比之下,git checkout是一个更复杂的命令,使我们能够额外管理工作树文件,重置分支,或将文件恢复到特定的版本。
12. Conclusion
12.结语
In this article, we covered all the Git basics and discussed most of the common operations which every developer should know while working with Git. Through practical examples, we learned how to work with this Version Control System.
在这篇文章中,我们介绍了所有的Git基础知识,并讨论了每个开发者在使用Git时应该知道的大部分常见操作。通过实际例子,我们了解了如何使用这个版本控制系统。
We started by installing and configuring Git and then created the first repository. After that, we made some changes and learned how to modify the commit history. Finally, we published the changes by synchronizing both repositories and learned how to work with Git branches.
我们先是安装和配置了Git,然后创建了第一个仓库。之后,我们做了一些改动,并学习了如何修改提交历史。最后,我们通过同步两个仓库来发布修改,并学习如何使用 Git 分支。