1. Introduction
1.绪论
Apache POI is an open-source library for software developers to create and manipulate Microsoft Office documents. Among other features, it allows developers to change document formatting programmatically.
Apache POI是一个开源库,供软件开发人员创建和操纵 Microsoft Office 文档。除其他功能外,它允许开发人员以编程方式更改文档格式。
In this article, we’ll discuss how to change cells’ style in Microsoft Excel when using a class called CellStyle. That is to say, using this class, we can write code to modify the style of cells in a Microsoft Excel document. Firstly, it is a feature provided by the Apache POI library that allows a style with multiple formatting properties to be created inside a workbook. Secondly, the style can then be applied to multiple cells in that workbook.
在这篇文章中,我们将讨论如何在Microsoft Excel中使用一个名为CellStyle的类来改变单元格的样式。也就是说,使用这个类,我们可以编写代码来修改Microsoft Excel文档中单元格的样式。首先,这是Apache POI库提供的一个功能,它允许在一个工作簿内创建一个具有多种格式属性的样式。其次,该样式可以被应用于该工作簿中的多个单元格。
Besides that, we’ll also look at common pitfalls of using the CellStyle class.
除此之外,我们还将看看使用CellStyle类的常见误区。
2. Apache POI and Maven Dependency
2.Apache POI和Maven的依赖性
Let’s add Apache POI as a dependency to our project pom.xml file:
让我们把Apache POI作为一个依赖项添加到我们的项目pom.xml文件。
<dependency>
    <groupId>org.apache.poi</groupId>
    <artifactId>poi</artifactId>
    <version>5.2.0</version>
</dependency>
3. Creating CellStyle
3.创建CellStyle
Let’s start with instantiating CellStyle:
让我们从实例化CellStyle开始。
Workbook workbook = new XSSFWorkbook(fileLocation);
CellStyle cellStyle = wb.createCellStyle();
Next, well set the needed formatting property. For instance, the code below will set it to have a date format:
接下来,好设置需要的格式化属性。例如,下面的代码将把它设置为日期格式。
cellStyle.setDataFormat(createHelper.createDataFormat().getFormat("m/d/yy h:mm"));Most importantly, we can set multiple formatting properties of a CellStyle to get desired style combination. For instance, we’re applying the below code to the same CellStyle object. Therefore, it has a date-formatted style as well as center-aligned text style:
最重要的是,我们可以设置一个CellStyle的多个格式化属性来获得所需的样式组合。例如,我们将下面的代码应用于同一个CellStyle对象。因此,它有一个日期格式化的样式,以及居中对齐的文本样式。
cellStyle.setAlignment(HorizontalAlignment.CENTER);
Take note that CellStyle has several formatting properties that we can modify:
请注意,CellStyle有几个格式化属性,我们可以修改。
| Property | Description |
|---|---|
| DataFormat | Data format for the cell, such as date |
| Alignment | Type of horizontal alignment for the cell |
| Hidden | Whether the cell is to be hidden |
| Indention | Number of spaces to indent the text in the cell |
| BorderBottom,
BorderLeft, BorderLeft。 BorderRight, BorderRight。 BorderTop 边界顶部 |
Type of border to use for the bottom, left, right, and top border of the cell |
| Font | Font property for this style, such as font color |
We’ll be looking at the Font property again later when we use it to change the font style.
稍后我们将再次查看Font属性,届时我们将用它来改变字体样式。
4. Using CellStyle to Format the Font
4.使用CellStyle来格式化字体
The Font property of a CellStyle is where we set font-related formatting. For instance, we can set the font name, color, and size. We can set whether the font is bold or italic. Both properties of Font can either be true or false. We can also set underline style to:
CellStyle的Font属性是我们设置字体相关格式的地方。例如,我们可以设置字体名称、颜色和大小。我们可以设置字体是粗体还是斜体。Font的两个属性都可以是true或false。 我们还可以将下划线样式设置为。
| Value | Property |
|---|---|
| U_NONE | Text without underline |
| U_SINGLE | Single underline text where only the word is underlined |
| U_SINGLE_ACCOUNTING | Single underline text where almost the entire cell width is underlined |
| U_DOUBLE | Double underline text where only the word is underlined |
| U_DOUBLE_ACCOUNTING | Double underline text where almost the entire cell width is underlined |
Let’s continue from the previous example. We’ll write a class called CellStyler with a method that creates a style for warning text:
让我们继续前面的例子。我们将编写一个名为CellStyler的类,其中有一个方法可以为警告文本创建一个样式。
public class CellStyler {
    public CellStyle createWarningColor(Workbook workbook) {
        CellStyle style = workbook.createCellStyle();
        Font font = workbook.createFont();
        font.setFontName("Courier New");
        font.setBold(true);
        font.setUnderline(Font.U_SINGLE);
        font.setColor(HSSFColorPredefined.DARK_RED.getIndex());
        style.setFont(font);

        style.setAlignment(HorizontalAlignment.CENTER);
        style.setVerticalAlignment(VerticalAlignment.CENTER);
        return style;
    }
}
Now, let’s create an Apache POI workbook and get the first worksheet:
现在,让我们创建一个Apache POI工作簿并获得第一个工作表。
Workbook workbook = new XSSFWorkbook(fileLocation);
Sheet sheet = workbook.getSheetAt(0);
Note that we’re setting row height so that we can see the effect of text alignment:
请注意,我们正在设置行高,以便我们可以看到文本对齐的效果。
Row row1 = sheet.createRow(0);
row1.setHeightInPoints((short) 40);
Let’s instantiate the class and use it to set the style
让我们实例化这个类并使用它来设置样式
CellStyler styler = new CellStyler();
CellStyle style = styler.createWarningColor(workbook);

Cell cell1 = row1.createCell(0);
cell1.setCellStyle(style);
cell1.setCellValue("Hello");

Cell cell2 = row1.createCell(1);
cell2.setCellStyle(style);
cell2.setCellValue("world!");
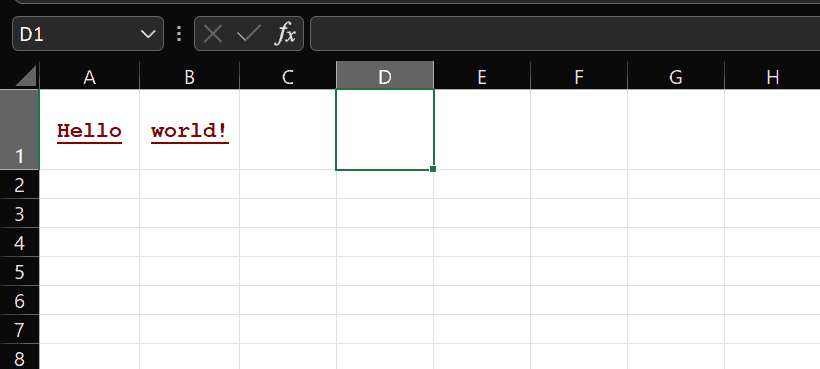
Now, let’s save this workbook to a file and open the file in Microsoft Excel to view the font styling effect, where we should see:
现在,让我们把这个工作簿保存到一个文件中,并在Microsoft Excel中打开这个文件,查看字体样式效果,在这里我们应该看到。
5. Common Pitfalls
5.常见的陷阱
Let’s look at two common mistakes made when using CellStyle.
让我们来看看使用CellStyle时的两个常见错误。
5.1. Accidentally Modify All Cell Styles
5.1.意外地修改了所有单元格样式
Firstly, it’s a common mistake to get CellStyle from a cell and start to modify it. Apache POI documentation for the getCellStyle method mentions that a cell’s getCellStyle method will always return a non-null value. This means that the cell has a default value, which is also the default style that is initially being used by all cells in the workbook. Therefore, the below code will make all cells have date format:
首先,从一个单元格获得CellStyle并开始修改它是一个常见的错误。Apache POI的getCellStyle方法的文档提到,一个单元格的getCellStyle方法将总是返回一个非空值。这意味着该单元格有一个默认值,这也是工作簿中所有单元格最初使用的默认样式。因此,下面的代码将使所有单元格都具有日期格式。
cell.setCellValue(rdf.getEffectiveDate());
cell.getCellStyle().setDataFormat(HSSFDataFormat.getBuiltinFormat("d-mmm-yy"));
5.2. Create New Style for Each Cell
5.2.为每个单元格创建新的样式
Another common mistake is to have too many similar styles in a workbook:
另一个常见的错误是在一个工作簿中拥有太多的类似样式。
CellStyle style1 = codeToCreateCellStyle();
Cell cell1 = row1.createCell(0);
cell1.setCellStyle(style1);

CellStyle style2 = codeToCreateCellStyle();
Cell cell2 = row1.createCell(1);
cell2.setCellStyle(style2);
A CellStyle is scoped to a workbook. Because of this, a similar style should be shared by multiple cells. In the above example, the style should be created only once and shared between cell1 and cell2:
一个CellStyle是针对一个工作簿的。正因为如此,一个类似的样式应该被多个单元格所共享。在上面的例子中,该样式应该只被创建一次,并在cell1和cell2之间共享。
CellStyle style1 = codeToCreateCellStyle();
Cell cell1 = row1.createCell(0);
cell1.setCellStyle(style1);
cell1.setCellValue("Hello");

Cell cell2 = row1.createCell(1);
cell2.setCellStyle(style1);
cell2.setCellValue("world!");
6. Summary
6.归纳总结
In this article, we’ve learned how to use CellStyle and its Font property to style a cell in Apache POI. Styling a cell is relatively straightforward if we manage to avoid pitfalls, as described in this article.
在这篇文章中,我们学习了如何使用CellStyle及其Font属性来为Apache POI中的单元格设置样式。如果我们设法避免陷阱,如本文所述,为单元格设置样式是相对简单的。
In the code example, we have shown how to programmatically style spreadsheet documents as needed, as if we were using the Excel application itself. This is most important when there are requirements to generate a spreadsheet with a nice-looking presentation of data.
在代码示例中,我们展示了如何根据需要以编程方式对电子表格文件进行样式设计,就像我们使用Excel应用程序本身一样。当有要求生成具有漂亮的数据表现形式的电子表格时,这是最重要的。
As always, the source code for the article is available over on GitHub.
一如既往,该文章的源代码可在GitHub上获取。
