1. Overview
1.概述
In this tutorial, we’ll demonstrate how to use Swagger annotations to make our documentation more descriptive. First, we’ll learn how to add a description to different parts of the APIs, like methods, parameters, and error codes. Then we’ll see how to add request/response examples.
在本教程中,我们将演示如何使用Swagger注释来使我们的文档更具描述性。首先,我们将学习如何为API的不同部分添加描述,如方法、参数和错误代码。然后我们将看到如何添加请求/响应的例子。
2. Project Setup
2.项目设置
We’ll create a simple Products API that provides methods to create and get products.
我们将创建一个简单的产品API,提供创建和获取产品的方法。
To create a REST API from scratch, we can follow this tutorial from Spring Docs to create a RESTful web service using Spring Boot.
要从头开始创建一个REST API,我们可以按照Spring Docs的这个教程来使用Spring Boot创建一个RESTful Web服务。。
The next step will be to set up the dependencies and configurations for the project. We can follow the steps in this article for setting up Swagger 2 with a Spring REST API.
下一步将是为该项目设置依赖和配置。我们可以按照本文中的步骤来设置Swagger 2与Spring REST API。
3. Creating the API
3.创建API
Let’s create our Products API and check the documentation generated.
让我们创建我们的产品API并检查生成的文档。
3.1. Model
3.1. 模型
Let’s define our Product class:
让我们来定义我们的Product类。
public class Product implements Serializable {
    private long id;
    private String name;
    private String price;

    // constructor and getter/setters
}
3.2. Controller
3.2. 控制器
Let’s define the two API methods:
让我们来定义这两个API方法。
@RestController
@ApiOperation("Products API")
public class ProductController {

    @PostMapping("/products")
    public ResponseEntity<Void> createProduct(@RequestBody Product product) {
        //creation logic
        return new ResponseEntity<>(HttpStatus.CREATED);
    }

    @GetMapping("/products/{id}")
    public ResponseEntity<Product> getProduct(@PathVariable Long id) {
        //retrieval logic
        return ResponseEntity.ok(new Product(1, "Product 1", "$21.99"));
    }
}
When we run the project, the library will read all the paths being exposed and create documentation corresponding to them.
当我们运行该项目时,该库将读取所有被暴露的路径并创建与之对应的文档。
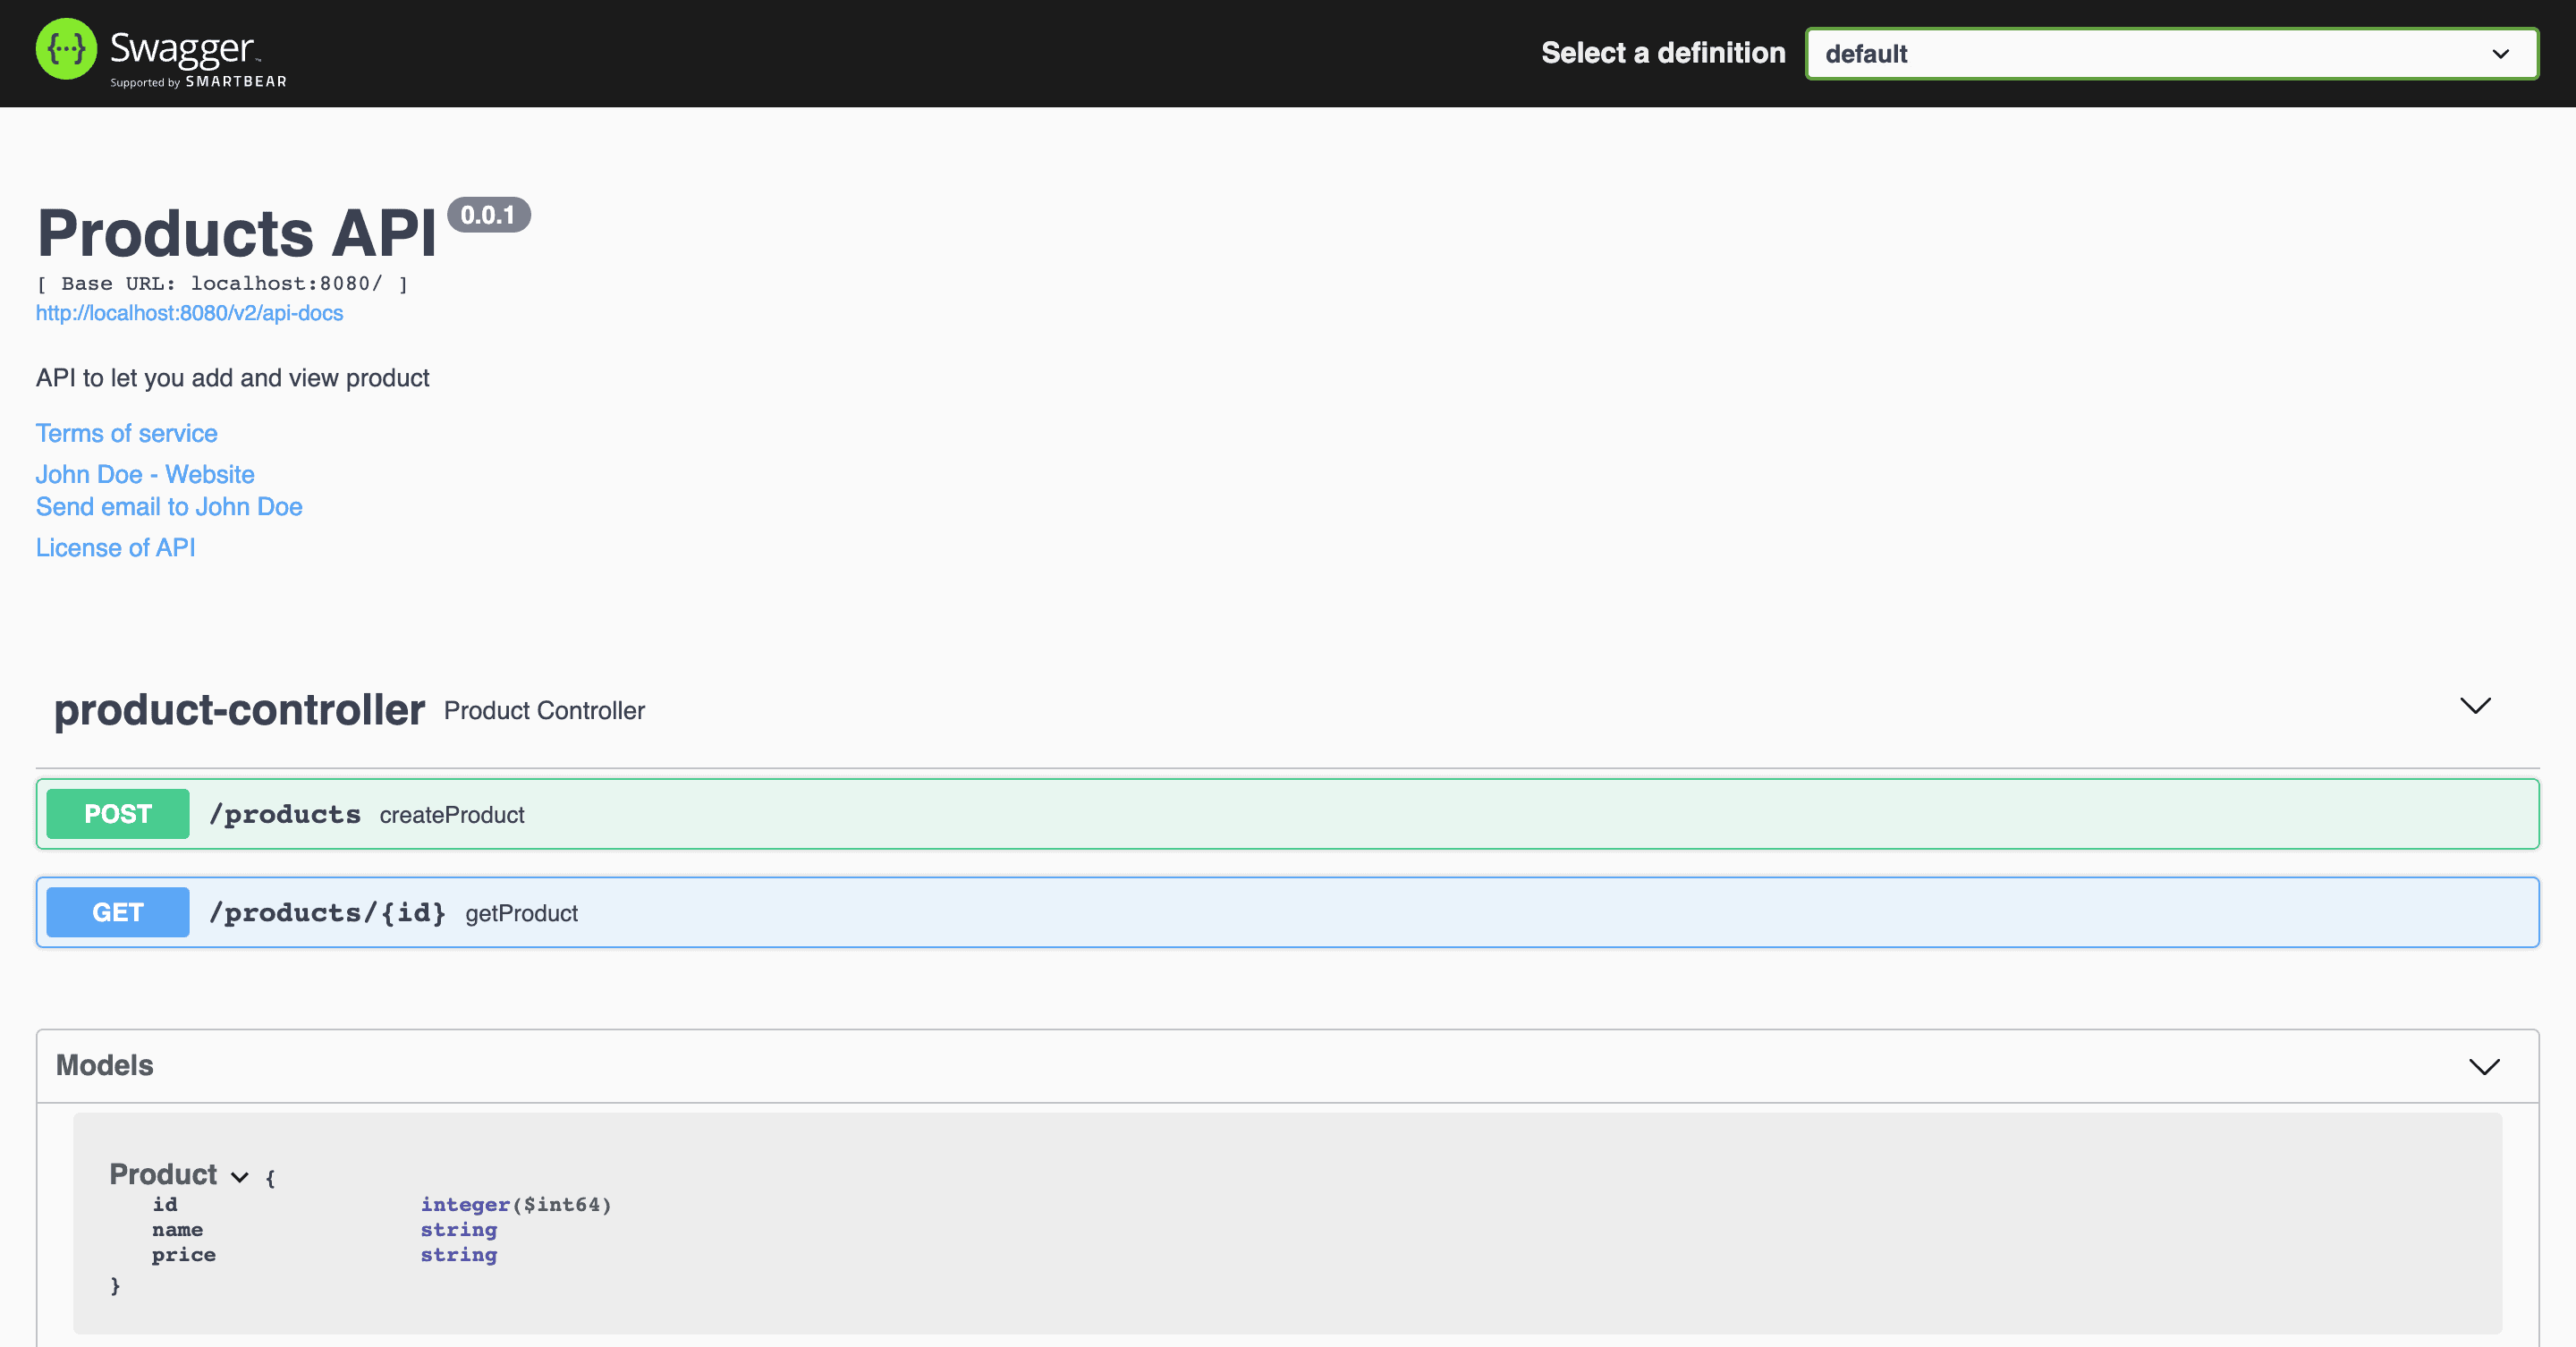
Let’s view the documentation at the default URL http://localhost:8080/swagger-ui/index.html:
让我们在默认的URLhttp://localhost:8080/swagger-ui/index.html上查看文档。
We can further expand the controller methods to look at their respective documentation. Next, we’ll look at them in detail.
我们可以进一步扩展控制器的方法,看看它们各自的文档。接下来,我们将详细了解它们。
4. Making Our Documentation Descriptive
4.使我们的文件具有描述性
Now let’s make our documentation more descriptive by adding descriptions to different parts of the methods.
现在让我们通过为方法的不同部分添加描述,使我们的文档更具描述性。
4.1. Add Description to Methods and Parameters
4.1.为方法和参数添加描述
Let’s look at a few ways to make the methods descriptive. We’ll add descriptions to the methods, parameters, and response codes. Let’s start with the getProduct() method:
让我们看一下使方法具有描述性的几种方法。我们将为方法、参数和响应代码添加描述。让我们从getProduct() 方法开始。
@ApiOperation(value = "Get a product by id", notes = "Returns a product as per the id")
@ApiResponses(value = {
  @ApiResponse(code = 200, message = "Successfully retrieved"),
  @ApiResponse(code = 404, message = "Not found - The product was not found")
})
@GetMapping("/products/{id}")
public ResponseEntity<Product> getProduct(@PathVariable("id") @ApiParam(name = "id", value = "Product id", example = "1") Long id) {
    //retrieval logic
    return ResponseEntity.ok(new Product(1, "Product 1", "$21.99"));
}
@ApiOperation defines the properties of an API method. We added a name to the operation using the value property, and a description using the notes property.
@ApiOperation定义了一个API方法的属性。我们使用value属性为操作添加了一个名称,并使用notes属性添加了描述。
@ApiResponses is used to override the default messages that accompany the response codes. For each response message we want to change, we need to add an @ApiResponse object.
@ApiResponses用于覆盖伴随响应代码的默认消息。对于我们想要改变的每个响应消息,我们需要添加一个@ApiResponse对象。
For example, let’s say the product isn’t found, and our API returns an HTTP 404 status in this scenario. If we don’t add a custom message, the original message “Not found” can be hard to understand. The caller may interpret it as the URL is wrong. However, adding a description that “The product was not found” makes it clearer.
例如,假设产品没有找到,在这种情况下,我们的API返回一个HTTP 404状态。如果我们不添加一个自定义消息,原始消息 “未找到 “可能很难理解。调用者可能会把它理解为URL是错误的。然而,添加一个 “没有找到产品 “的描述会让它更清晰。
@ApiParam defines the properties of method parameters. It can be used along with the path, query, header, and form parameters. We added a name, a value (description), and an example for the “id” parameter. If we don’t add the customization, the library will only pick up the name and type of the parameter, as we can see in the first image.
@ApiParam定义了方法参数的属性。它可以和路径、查询、头和表单参数一起使用。我们为 “id “参数添加了一个名称、一个值(描述)和一个例子。如果我们不添加自定义,库将只拾取参数的名称和类型,正如我们在第一张图片中看到的那样。
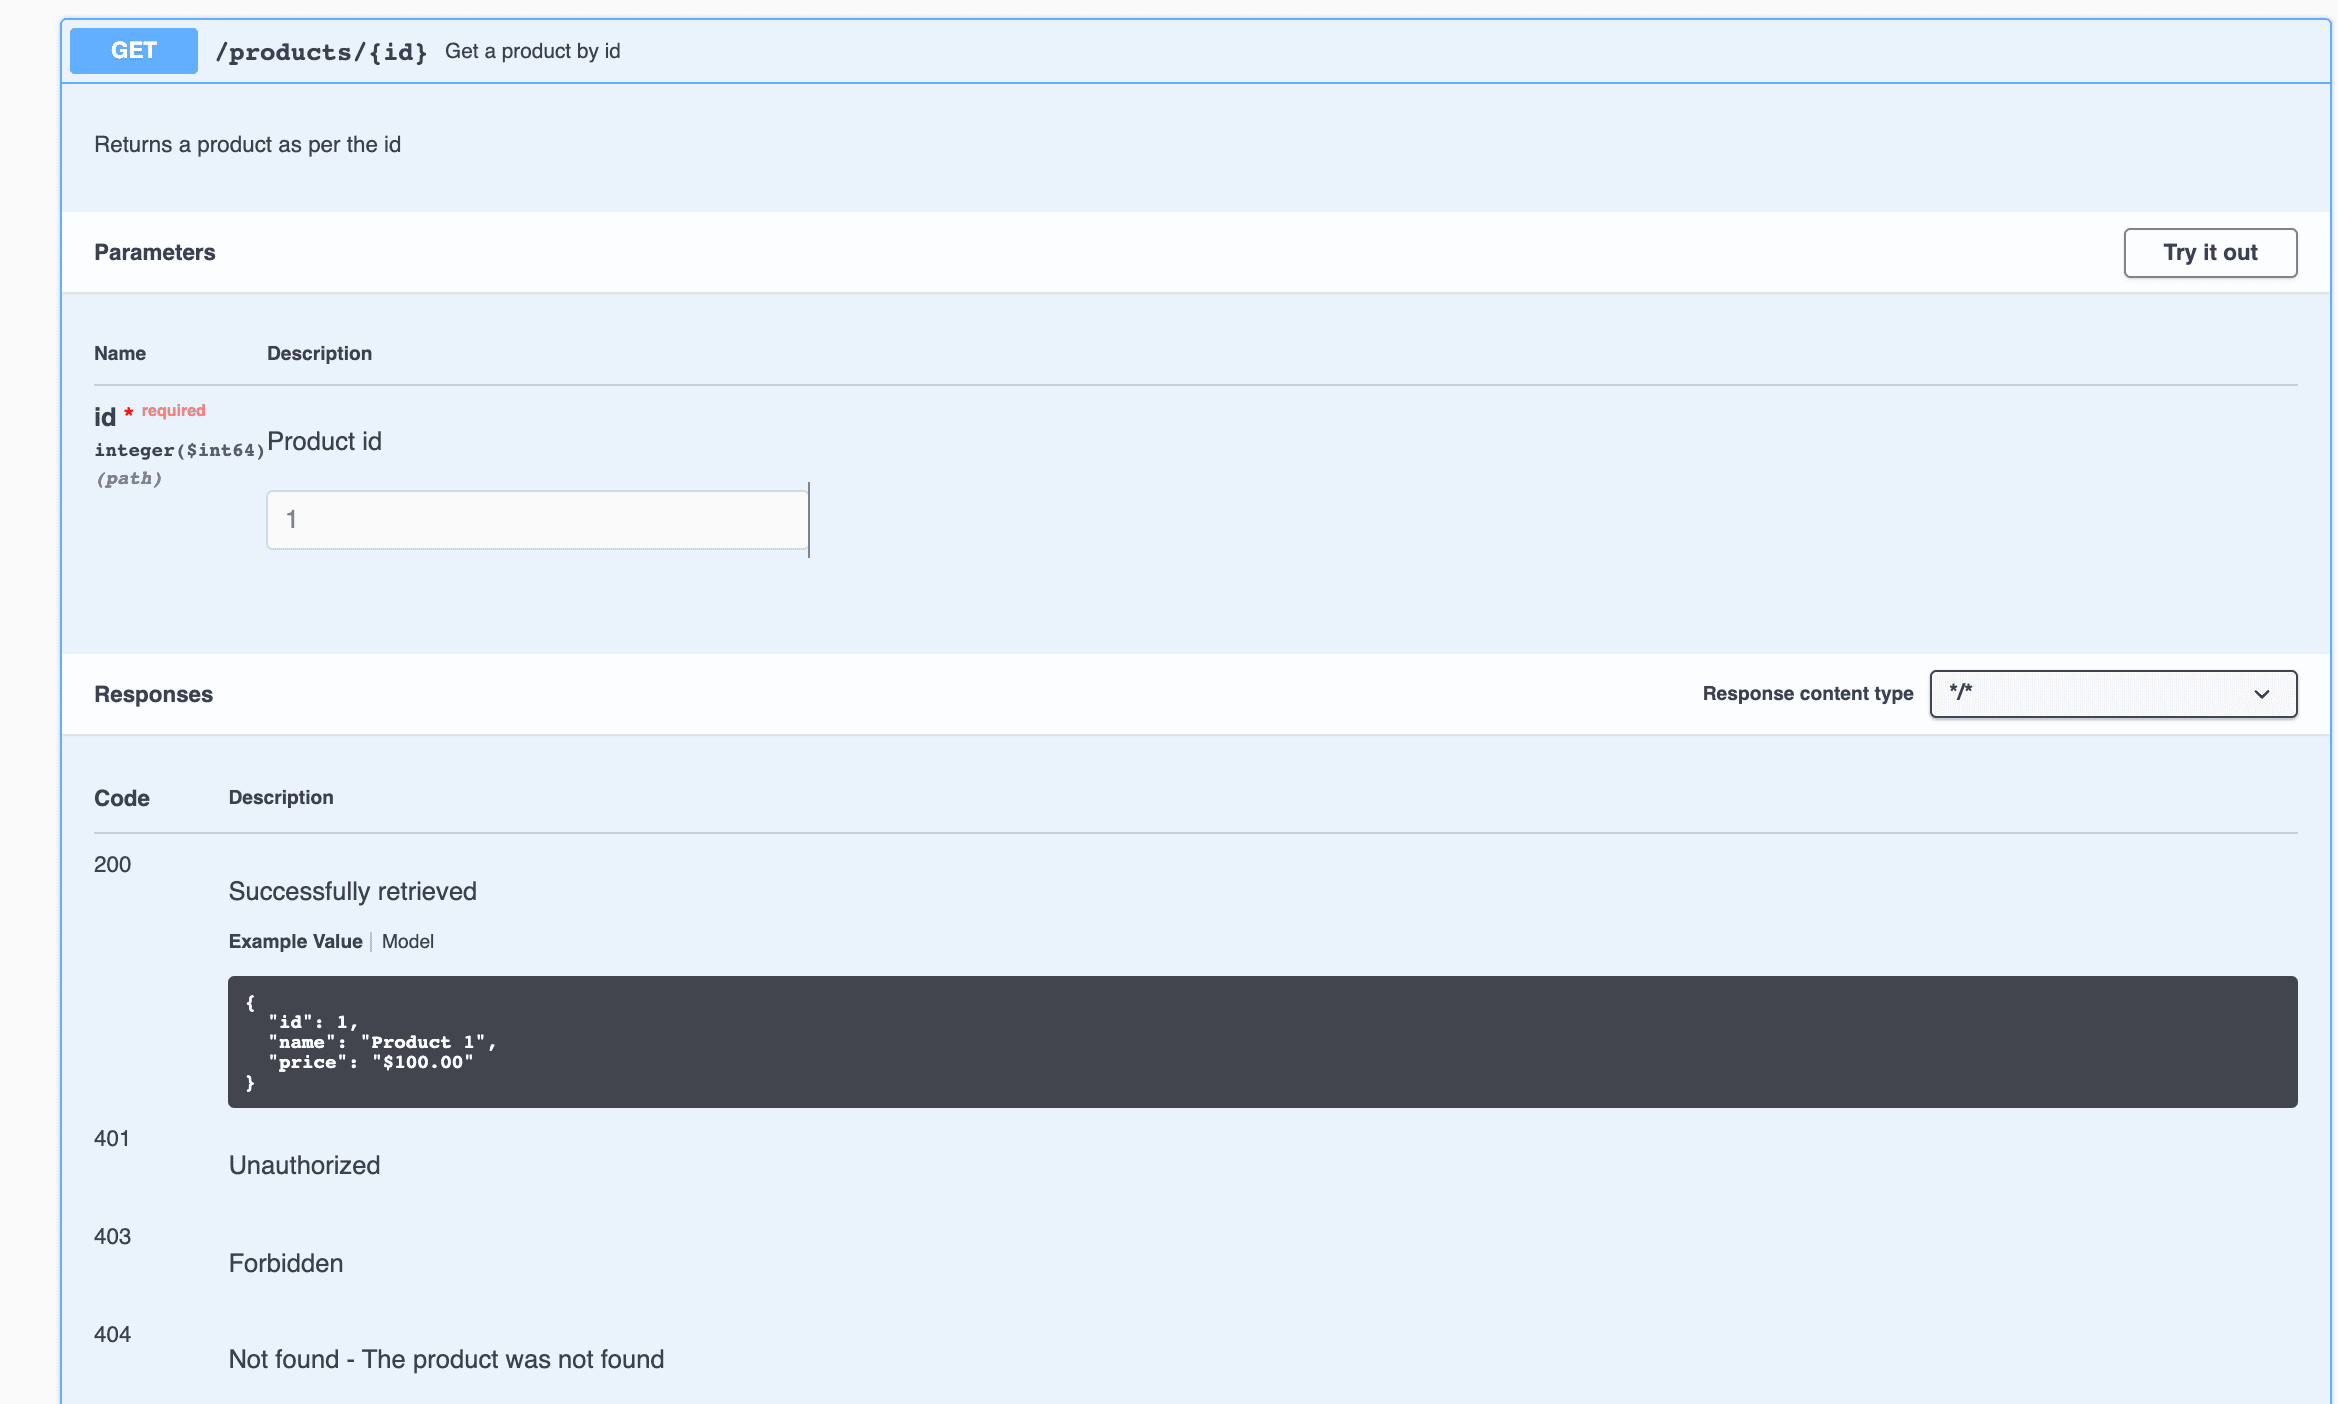
Let’s see how this changes the documentation:
让我们看看这如何改变文件的内容。
Here we can see the name “Get a product id” alongside the API path /products/{id}. We can also see the description just below it. Additionally, in the Parameters section, we have a description and an example for the field id. Finally, in the Responses section, we can see how the error descriptions for the 200 and 404 codes have changed.
在这里,我们可以看到名称 “获取产品ID”,以及API路径/products/{id}。我们还可以看到它下面的描述。 此外,在参数部分,我们有一个描述和一个关于id字段的例子。最后,在响应部分,我们可以看到200和404代码的错误描述已经改变。
4.2. Add Description and Examples to the Model
4.2.为模型添加描述和实例
We can make similar improvements in our createProduct() method. Since the method accepts a Product object, it makes more sense to provide the description and examples in the Product class itself.
我们可以在我们的createProduct() 方法中进行类似的改进。由于该方法接受一个Product对象,在Product类本身中提供描述和示例更为合理。
Let’s make some changes in the Product class to achieve this:
让我们在Product类中做一些改变来实现这个目标。
@ApiModelProperty(notes = "Product ID", example = "1", required = true)
private Long id;
@ApiModelProperty(notes = "Product name", example = "Product 1", required = false)
private String name;
@ApiModelProperty(notes = "Product price", example = "$100.00", required = true)
private String price;
The @ApiModelProperty annotation defines the properties of the fields. We used this annotation on each field to set its notes (description), example, and required properties.
@ApiModelProperty注解定义了字段的属性。我们在每个字段上使用这个注解来设置其notes(描述)、example和required属性。
Let’s restart the application and take a look at the documentation of our Product model again:
让我们重新启动应用程序,再次看看我们的产品模型的文档。
If we compare this to the original documentation image, we’ll find that the new image contains examples, descriptions, and red asterisks(*) to identify the required parameters.
如果我们将其与原始的文档图像相比较,我们会发现新的图像包含了例子、描述和红色的星号(*)来标识所需的参数。
By adding examples to models, we can automatically create example responses in every method which uses the model as an input or output. For example, from the image corresponding to the getProduct() method, we can see that the response contains an example containing the same values we provided in our model.
通过向模型添加示例,我们可以在每个使用模型作为输入或输出的方法中自动创建示例响应。例如,从getProduct()方法对应的图片中,我们可以看到响应中包含一个与我们在模型中提供的值相同的示例。
Adding examples to our documentation is important because it makes value formats even more precise. If our models contain fields like date, time, or price, an exact value format is necessary. Defining the format beforehand makes the development process more effective for both the API provider and the API clients.
在我们的文档中添加例子是很重要的,因为它使值格式更加精确。如果我们的模型包含像日期、时间或价格这样的字段,准确的值格式是必要的。事先定义格式使开发过程对API提供者和API客户都更有效。
5. Conclusion
5.总结
In this article, we explored different ways to improve the readability of our API documentation. We learned how to document methods, parameters, error messages, and models using the annotations @ApiParam, @ApiOperation, @ApiResponses, @ApiResponse, and @ApiModelProperty.
在这篇文章中,我们探讨了提高API文档可读性的不同方法。我们学习了如何使用注释@ApiParam、@ApiOperation、@ApiResponses、@ApiResponse和@ApiModelProperty来记录方法、参数、错误信息和模型。
As always, the code for these examples is available over on GitHub.
像往常一样,这些例子的代码可以在GitHub上找到over。


