1. Overview
1.概述
The Buffer classes are the foundation upon which Java NIO is built. However, in these classes, the ByteBuffer class is most preferred. That’s because the byte type is the most versatile one. For example, we can use bytes to compose other non-boolean primitive types in JVM. Also, we can use bytes to transfer data between JVM and external I/O devices.
Buffer类是构建Java NIO的基础。然而,在这些类中,ByteBuffer类是最受欢迎的。这是因为byte类型是最通用的一种。例如,我们可以在JVM中使用字节来组成其他非boolean的原始类型。此外,我们还可以使用字节在JVM和外部I/O设备之间传输数据。
In this tutorial, we’ll inspect different aspects of the ByteBuffer class.
在本教程中,我们将检查ByteBuffer类的不同方面。
2. ByteBuffer Creation
2.ByteBuffer创建
The ByteBuffer is an abstract class, so we can’t construct a new instance directly. However, it provides static factory methods to facilitate instance creation. Briefly, there are two ways to create a ByteBuffer instance, either by allocation or wrapping:
ByteBuffer是一个抽象类,所以我们不能直接构造一个新实例。然而,它提供了静态的工厂方法来促进实例的创建。简而言之,有两种方法可以创建 ByteBuffer 实例,可以通过分配或包装。
2.1. Allocation
2.1.拨款
Allocation will create an instance and allocate private space with a specific capacity. To be precise, the ByteBuffer class has two allocation methods: allocate and allocateDirect.
分配将创建一个实例并分配具有特定容量的私有空间。准确地说,ByteBuffer类有两个分配方法。allocate和allocateDirect。
Using the allocate method, we’ll get a non-direct buffer – that is, a buffer instance with an underlying byte array:
使用allocate方法,我们将得到一个非直接缓冲区–也就是说,一个有底层字节数组的缓冲区实例。
ByteBuffer buffer = ByteBuffer.allocate(10);When we use the allocateDirect method, it’ll generate a direct buffer:
当我们使用allocateDirect方法时,它将生成一个直接缓冲区。
ByteBuffer buffer = ByteBuffer.allocateDirect(10);For simplicity, let’s focus on the non-direct buffer and leave the direct buffer discussion for later.
为了简单起见,我们把重点放在非直接缓冲区上,把直接缓冲区的讨论留到后面。
2.2. Wrapping
2.2 包裹
Wrapping allows an instance to reuse an existing byte array:
封装允许一个实例重复使用现有的字节数组。
byte[] bytes = new byte[10];
ByteBuffer buffer = ByteBuffer.wrap(bytes);
And the above code is equivalent to:
而上面的代码相当于。
ByteBuffer buffer = ByteBuffer.wrap(bytes, 0, bytes.length);Any changes made to the data elements in the existing byte array will be reflected in the buffer instance, and vice versa.
对现有byte数组中的数据元素所做的任何改变都将反映在缓冲器实例中,反之亦然。
2.3. Onion Model
2.3 洋葱模型
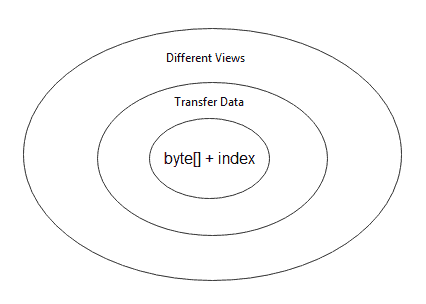
Now, we know how to get a ByteBuffer instance. Next, let’s treat the ByteBuffer class as a three-layer onion model and understand it layer by layer from the inside out:
现在,我们知道如何获得一个ByteBuffer实例。接下来,让我们把ByteBuffer类当作一个三层洋葱模型,从里到外一层层地理解它。
- Data and Indices Layer
- Transferring Data Layer
- View Layer
At the innermost layer, we regard the ByteBuffer class as a container for a byte array with extra indices. In the middle layer, we focus on using a ByteBuffer instance to transfer data from/to other data types. We inspect the same underlying data with different buffer-based views at the outermost layer.
在最内层,我们将ByteBuffer类视为具有额外索引的byte数组的容器。在中间层,我们专注于使用ByteBuffer实例来从/到其他数据类型传输数据。我们在最外层用不同的基于缓冲区的视图来检查相同的底层数据。
3. ByteBuffer Indices
3.ByteBuffer 指数
Conceptually, the ByteBuffer class is a byte array wrapped inside an object. It provides lots of convenient methods to facilitate reading or writing operations from/to underlying data. And, these methods are highly dependent on the indices maintained.
从概念上讲,ByteBuffer类是一个包裹在对象中的byte数组。它提供了许多方便的方法,以方便从/到底层数据的读或写操作。而且,这些方法高度依赖于所维护的索引。
Now, let’s deliberately simplify the ByteBuffer class into a container of byte array with extra indices:
现在,让我们故意将ByteBuffer类简化为一个带有额外索引的byte数组的容器。
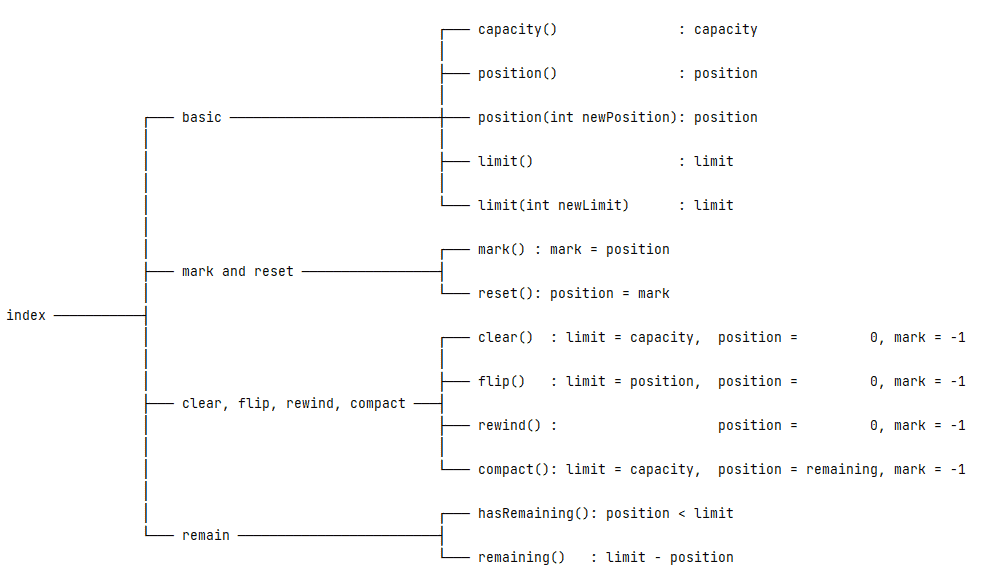
ByteBuffer = byte array + indexWith this concept in mind, we can classify index-related methods into four categories:
考虑到这个概念,我们可以把与指数有关的方法分为四类。
- Basic
- Mark and Reset
- Clear, Flip, Rewind, and Compact
- Remain
3.1. Four Basic Indices
3.1.四个基本指数
There are four indices defined in the Buffer class. These indices record the state of the underlying data elements:
在Buffer类中定义了四个索引。这些索引记录了底层数据元素的状态。
- Capacity: the maximum number of data elements the buffer can hold
- Limit: an index to stop read or write
- Position: the current index to read or write
- Mark: a remembered position
Also, there is an invariant relationship between these indices:
另外,这些指数之间存在着一种不变的关系。
0 <= mark <= position <= limit <= capacityAnd, we should note that all index-related methods revolve around these four indices.
而且,我们应该注意到,所有与指数相关的方法都是围绕这四个指数展开的。
When we create a new ByteBuffer instance, the mark is undefined, the position holds 0, and the limit is equal to the capacity. For example, let’s allocate a ByteBuffer with 10 data elements:
当我们创建一个新的ByteBuffer实例时,mark是未定义的,position保持0,而limit等于capacity。例如,让我们分配一个有10个数据元素的ByteBuffer。
ByteBuffer buffer = ByteBuffer.allocate(10);Or, let’s wrap an existing byte array with 10 data elements:
或者,让我们把一个现有的有10个数据元素的字节数组包起来。
byte[] bytes = new byte[10];
ByteBuffer buffer = ByteBuffer.wrap(bytes);
As a result, the mark will be -1, the position will be 0, and both the limit and capacity will be 10:
因此,标记将是-1,位置将是0,而限制和容量都将是10。
int position = buffer.position(); // 0
int limit = buffer.limit();       // 10
int capacity = buffer.capacity(); // 10
The capacity is read-only and can’t be changed. But, we can use the position(int) and limit(int) methods to change the corresponding position and limit:
capacity是只读的,不能被改变。但是,我们可以使用position(int)和limit(int)方法来改变相应的position和limit。
buffer.position(2);
buffer.limit(5);
Then, the position will be 2, and the limit will be 5.
然后,位置将是2,而限制将是5。
3.2. Mark and Reset
3.2 标记和重置
The mark() and reset() methods allow us to remember a particular position and return to it later.
mark()和reset()方法允许我们记住一个特定的位置并在以后返回。
When we first create a ByteBuffer instance, the mark is undefined. Then, we can call the mark() method, and the mark is set to the current position. After some operations, calling the reset() method will change the position back to the mark.
当我们第一次创建一个ByteBuffer实例时,mark是未定义的。然后,我们可以调用mark()方法,mark被设置为当前位置。经过一些操作后,调用reset()方法将把位置改回mark。
ByteBuffer buffer = ByteBuffer.allocate(10); // mark = -1, position = 0
buffer.position(2);                          // mark = -1, position = 2
buffer.mark();                               // mark = 2,  position = 2
buffer.position(5);                          // mark = 2,  position = 5
buffer.reset();                              // mark = 2,  position = 2
One thing to note: If the mark is undefined, calling the reset() method will lead to InvalidMarkException.
有一点需要注意:如果标记是未定义的,调用reset()方法将导致InvalidMarkException。
3.3. Clear, Flip, Rewind, and Compact
3.3.清除、翻转、倒带和压缩
The clear(), flip(), rewind(), and compact() methods have some common parts and slight differences:
clear()、flip()、rewind()和compact()方法有一些共同的部分和轻微的区别。

To compare these methods, let’s prepare a code snippet:
ByteBuffer buffer = ByteBuffer.allocate(10); // mark = -1, position = 0, limit = 10
buffer.position(2);                          // mark = -1, position = 2, limit = 10
buffer.mark();                               // mark = 2,  position = 2, limit = 10
buffer.position(5);                          // mark = 2,  position = 5, limit = 10
buffer.limit(8);                             // mark = 2,  position = 5, limit = 8
The clear() method will change the limit to the capacity, the position to 0, and the mark to -1:
clear()方法将把limit改为capacity,position改为0,而mark改为-1。
buffer.clear(); // mark = -1, position = 0, limit = 10The flip() method will change the limit to the position, the position to 0, and the mark to -1:
flip()方法将把limit改为position,position改为0,而mark改为-1。
buffer.flip(); // mark = -1, position = 0, limit = 5The rewind() method keeps the limit unchanged and changes the position to 0, and the mark to -1:
rewind()方法保持limit不变,将position改为0,mark改为-1。
buffer.rewind(); // mark = -1, position = 0, limit = 8The compact() method will change the limit to the capacity, the position to remaining (limit – position), and the mark to -1:
compact()方法将把limit改为capacity,position改为剩余(limit – position),而mark改为-1。
buffer.compact(); // mark = -1, position = 3, limit = 10The above four methods have their own use cases:
上述四种方法有各自的使用情况。
- To reuse a buffer, the clear() method is handy. It will set the indices to the initial state and be ready for new writing operations.
- After calling the flip() method, the buffer instance switches from write-mode to read-mode. But, we should avoid calling the flip() method twice. That’s because a second call will set the limit to 0, and no data elements can be read.
- If we want to read the underlying data more than once, the rewind() method comes in handy.
- The compact() method is suited for partial reuse of a buffer. For example, suppose we want to read some, but not all, of the underlying data, and then we want to write data to the buffer. The compact() method will copy the unread data to the beginning of the buffer and change the buffer indices to be ready for writing operations.
3.4. Remain
3.4.剩余
The hasRemaining() and remaining() methods calculate the relationship of the limit and the position:
hasRemaining()和remaining()方法计算limit与position的关系。
When the limit is greater than the position, hasRemaining() will return true. Also, the remaining() method returns the difference between the limit and the position.
当limit大于position时,hasRemaining()将返回true。另外,remaining()方法返回limit和position之间的差值。
For example, if a buffer has a position of 2 and a limit of 8, then its remaining will be 6:
例如,如果一个缓冲区的位置是2,极限是8,那么它的剩余将是6。
ByteBuffer buffer = ByteBuffer.allocate(10); // mark = -1, position = 0, limit = 10
buffer.position(2);                          // mark = -1, position = 2, limit = 10
buffer.limit(8);                             // mark = -1, position = 2, limit = 8
boolean flag = buffer.hasRemaining();        // true
int remaining = buffer.remaining();          // 6
4. Transfer Data
4.传输数据
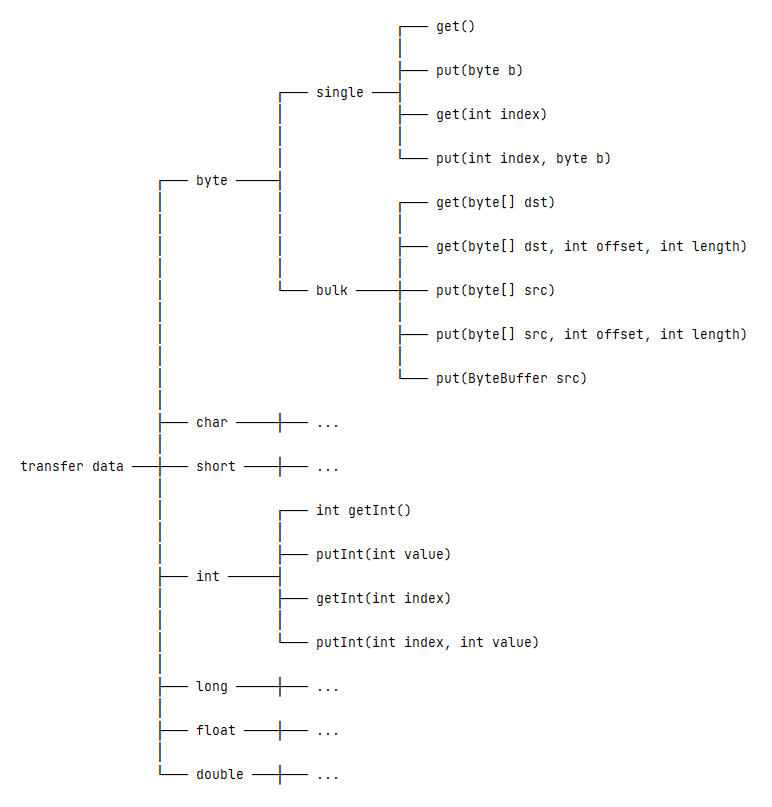
The second layer of the Onion Model is concerned with transferring data. Specifically, the ByteBuffer class provides methods to transfer data from/to other data types (byte, char, short, int, long, float, and double):
洋葱模型的第二层是关于传输数据的。具体来说,ByteBuffer类提供了从/到其他数据类型(byte、char、short、int、long、float、double)传输数据的方法。
4.1. Transfer byte Data
4.1.传输字节数据
To transfer byte data, the ByteBuffer class provides single and bulk operations.
为了传输字节数据,ByteBuffer类提供了单一和批量操作。
We can read or write a single byte from/to the buffer’s underlying data in single operations. These operations include:
我们可以在单个操作中从/向缓冲区的底层数据读取或写入一个字节。这些操作包括。
public abstract byte get();
public abstract ByteBuffer put(byte b);
public abstract byte get(int index);
public abstract ByteBuffer put(int index, byte b);
We may notice two versions of the get()/put() methods from the above methods: One has no parameters, and the other accepts an index. So, what’s the difference?
我们可能会注意到上述方法中的两个版本的get()/put()方法。一个没有参数,另一个接受一个index。那么,有什么区别呢?
The one with no index is a relative operation, which operates on the data element in the current position and later increments the position by 1. However, the one with an index is a whole operation, which operates on the data elements at the index and won’t change the position.
没有索引的是一个相对操作,它对当前位置的数据元素进行操作,随后将位置增加1。然而,有index的是一个整体操作,它对index的数据元素进行操作,不会改变位置。
In contrast, the bulk operations can read or write multiple bytes from/to the buffer’s underlying data. These operations include:
相比之下,批量操作可以从/到缓冲区的基础数据中读取或写入多个字节。这些操作包括。
public ByteBuffer get(byte[] dst);
public ByteBuffer get(byte[] dst, int offset, int length);
public ByteBuffer put(byte[] src);
public ByteBuffer put(byte[] src, int offset, int length);
The above methods all belong to relative operations. That is to say, they will read or write from/to the current position and change the position value, respectively.
上述方法都属于相对操作。也就是说,它们将分别从/向当前位置读取或写入,并改变位置值。
There is also another put() method, which accepts a ByteBuffer parameter:
还有一个put()方法,它接受一个ByteBuffer参数。
public ByteBuffer put(ByteBuffer src);4.2. Transfer int Data
4.2.转移int数据
Besides reading or writing byte data, the ByteBuffer class also supports the other primitive types except for the boolean type. Let’s take the int type as an example. The related methods include:
除了读写字节数据外,ByteBuffer类还支持除boolean类型外的其它原始类型。让我们以int类型为例。相关的方法包括。
public abstract int getInt();
public abstract ByteBuffer putInt(int value);
public abstract int getInt(int index);
public abstract ByteBuffer putInt(int index, int value);
Similarly, the getInt() and putInt() methods with an index parameter are absolute operations, otherwise relative operations.
同样,带有index参数的getInt()和putInt()方法是绝对操作,否则是相对操作。
5. Different Views
5.不同的观点
The third layer of the Onion Model is about reading the same underlying data with different perspectives.
洋葱模型的第三层是关于以不同的视角阅读相同的基础数据。
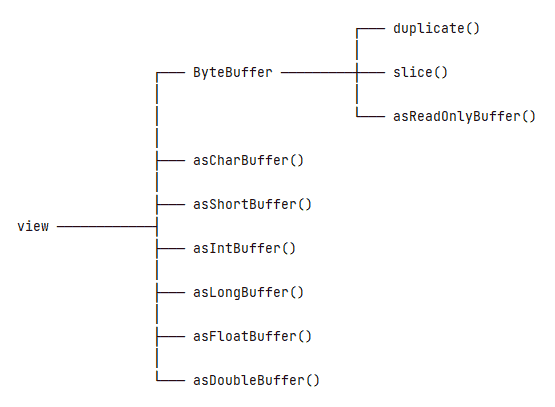
Each method in the above picture will generate a new view that shares the same underlying data with the original buffer. To understand a new view, we should be concerned about two problems:

上图中的每个方法都会生成一个新的视图,与原缓冲区共享相同的底层数据。要理解一个新的视图,我们应该关注两个问题。
- How will the new view parse the underlying data?
- How will the new view record its indices?
5.1. ByteBuffer View
5.1.ByteBuffer视图
To read a ByteBuffer instance as another ByteBuffer view, it has three methods: duplicate(), slice(), and asReadOnlyBuffer().
要将一个ByteBuffer实例读取为另一个ByteBuffer视图,它有三个方法。duplicate(), slice(), 和asReadOnlyBuffer()。
Let’s have a look at the illustration of those differences:
让我们来看看这些差异的说明。
ByteBuffer buffer = ByteBuffer.allocate(10); // mark = -1, position = 0, limit = 10, capacity = 10
buffer.position(2);                          // mark = -1, position = 2, limit = 10, capacity = 10
buffer.mark();                               // mark = 2,  position = 2, limit = 10, capacity = 10
buffer.position(5);                          // mark = 2,  position = 5, limit = 10, capacity = 10
buffer.limit(8);                             // mark = 2,  position = 5, limit = 8,  capacity = 10
The duplicate() method creates a new ByteBuffer instance just like the original one. But, each of the two buffers will have its independent limit, position, and mark:
duplicate()方法创建了一个新的ByteBuffer实例,就像原来的那个。但是,两个缓冲区中的每一个都将有其独立的limit、position和mark。
ByteBuffer view = buffer.duplicate(); // mark = 2, position = 5, limit = 8, capacity = 10The slice() method creates a shared sub-view of the underlying data. The view’s position will be 0, and its limit and capacity will be the remaining of the original buffer:
slice()方法创建了一个底层数据的共享子视图。该视图的位置将为0,其限制和容量将为原始缓冲区的剩余部分。
ByteBuffer view = buffer.slice(); // mark = -1, position = 0, limit = 3, capacity = 3Compared to the duplicate() method, the asReadOnlyBuffer() method works similarly but produces a read-only buffer. That means we can’t use this read-only view to change the underlying data:
与duplicate()方法相比,asReadOnlyBuffer()方法的工作方式类似,但会产生一个只读的缓冲区。这意味着我们不能使用这个只读的视图来改变底层数据。
ByteBuffer view = buffer.asReadOnlyBuffer(); // mark = 2, position = 5, limit = 8, capacity = 105.2. Other View
5.2.其他观点
The ByteBuffer also provides other views: asCharBuffer(), asShortBuffer(), asIntBuffer(), asLongBuffer(), asFloatBuffer(), and asDoubleBuffer(). These methods are similar to the slice() method, i.e. they provide a sliced view corresponding to the underlying data’s current position and limit. The main difference between them is interpreting the underlying data into other primitive type values.
ByteBuffer还提供其他视图。asCharBuffer(), asShortBuffer(), asIntBuffer(), asLongBuffer(), asFloatBuffer(), 和asDoubleBuffer()。这些方法类似于slice()方法,也就是说,它们提供一个与底层数据的当前位置和限制相对应的切分视图。它们之间的主要区别是将底层数据解释为其他原始类型的值。
The questions we should care about are:
我们应该关心的问题是。
- How to interpret the underlying data
- Where to begin the interpretation
- How many elements will be presented in the new generated view
The new view will compose multiple bytes into the target primitive type, and it starts the interpretation from the current position of the original buffer. The new view will have a capacity equal to the number of remaining elements in the original buffer divided by the number of bytes comprising the view’s primitive type. Any remaining bytes at the end will not be visible in the view.
新视图将把多个字节组成目标原始类型,并从原缓冲区的当前位置开始解释。新视图的容量等于原始缓冲区的剩余元素数除以构成视图原始类型的字节数。最后的任何剩余字节都不会在视图中看到。
Now, let’s take the asIntBuffer() as an example:
现在,让我们以asIntBuffer()为例。
byte[] bytes = new byte[]{
  (byte) 0xCA, (byte) 0xFE, (byte) 0xBA, (byte) 0xBE, // CAFEBABE ---> cafebabe
  (byte) 0xF0, (byte) 0x07, (byte) 0xBA, (byte) 0x11, // F007BA11 ---> football
  (byte) 0x0F, (byte) 0xF1, (byte) 0xCE               // 0FF1CE   ---> office
};
ByteBuffer buffer = ByteBuffer.wrap(bytes);
IntBuffer intBuffer = buffer.asIntBuffer();
int capacity = intBuffer.capacity();                         // 2
In the above code snippet, the buffer has 11 data elements, and the int type takes 4 bytes. So, the intBuffer will have 2 data elements (11 / 4 = 2) and leave out the extra 3 bytes (11 % 4 = 3).
在上面的代码片段中,buffer有11个数据元素,而int类型需要4个字节。因此,intBuffer将有2个数据元素(11 / 4 = 2),并省去额外的3个字节(11 % 4 = 3)。
6. Direct Buffer
6.直接缓冲区
What is a direct buffer? A direct buffer refers to a buffer’s underlying data allocated on a memory area where OS functions can directly access it. A non-direct buffer refers to a buffer whose underlying data is a byte array that is allocated in the Java heap area.
什么是直接缓冲区?直接缓冲区是指一个缓冲区的底层数据被分配在一个操作系统函数可以直接访问的内存区域。非直接缓冲区指的是一个缓冲区,它的底层数据是一个字节数组,被分配在Java堆区。
Then, how can we create a direct buffer? A direct ByteBuffer is created by calling the allocateDirect() method with the desired capacity:
那么,我们怎样才能创建一个直接缓冲区呢?一个直接的ByteBuffer是通过调用allocateDirect()方法来创建的,其容量是需要的。
ByteBuffer buffer = ByteBuffer.allocateDirect(10);Why do we need a direct buffer? The answer is simple: a non-direct buffer always incurs unnecessary copying operations. When sending a non-direct buffer’s data to I/O devices, the native code has to “lock” the underlying byte array, copy it outside the Java heap, and then call the OS function to flush the data. However, the native code can access the underlying data directly and call OS functions to flush the data without any additional overhead by using a direct buffer.
为什么我们需要一个直接缓冲区?答案很简单:非直接缓冲区总是会产生不必要的复制操作。当向I/O设备发送非直接缓冲区的数据时,本地代码必须 “锁定 “底层字节数组,将其复制到Java堆之外,然后调用OS函数来刷新数据。然而,通过使用直接缓冲区,本地代码可以直接访问底层数据,并调用操作系统函数来刷新数据,而没有任何额外的开销。
In light of the above, is a direct buffer perfect? No. The main problem is that it’s expensive to allocate and deallocate a direct buffer. So, in reality, does a direct buffer always run faster than a non-direct buffer? Not necessarily. That’s because many factors are at play. And, the performance tradeoffs can vary widely by JVM, operating system, and code design.
鉴于上述情况,直接缓冲区是否完美?不,主要问题是分配和取消直接缓冲区的费用很高。那么,在现实中,直接缓冲区是否总是比非直接缓冲区运行得快呢?不一定。这是因为有很多因素在起作用。而且,性能的权衡会因JVM、操作系统和代码设计而有很大的不同。
Finally, there is a practical software maxim to follow: First, make it work, then, make it fast. That means, let’s first concentrate on code correctness. If the code doesn’t run fast enough, then let’s do the corresponding optimization.
最后,有一条实用的软件格言可以遵循。首先,让它工作,然后,让它快速。这意味着,让我们首先集中精力在代码的正确性上。如果代码的运行速度不够快,那我们就做相应的优化。
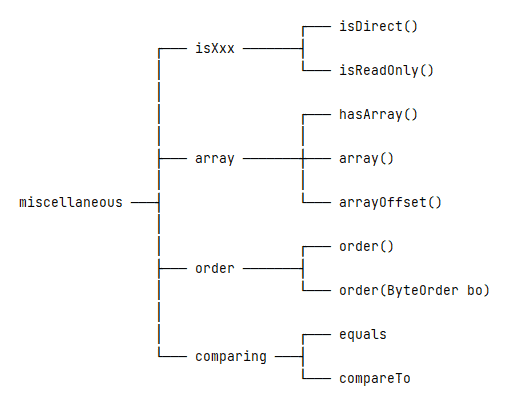
7. Miscellaneous
7.杂项
The ByteBuffer class also provides some auxiliary methods:
ByteBuffer类还提供一些辅助方法。
7.1. Is-Related Methods
7.1.与 “Is “相关的方法
The isDirect() method can tell us whether a buffer is a direct buffer or a non-direct buffer. Note that wrapped buffers – those created with the wrap() method – are always non-direct.
isDirect()方法可以告诉我们一个缓冲区是一个直接缓冲区还是一个非直接缓冲区。请注意,被包裹的缓冲区–那些用wrap()方法创建的缓冲区–总是非直接的。
All buffers are readable, but not all are writable. The isReadOnly() method indicates whether we can write to the underlying data.
所有的缓冲区都是可读的,但不是所有的都是可写的。isReadOnly()方法表明我们是否可以写到底层数据。
To compare these two methods, the isDirect() method cares about where the underlying data exists, in Java heap or memory area. However, the isReadOnly() method cares about whether the underlying data elements can be changed.
比较一下这两种方法,isDirect()方法关心的是底层数据存在的位置,在Java堆或内存区域。然而,isReadOnly()方法关心的是底层数据元素是否可以被改变。
If an original buffer is direct or read-only, the new generated view will inherit those attributes.
如果原始缓冲区是直接或只读的,新生成的视图将继承这些属性。
7.2. Array-Related Methods
7.2.阵列相关的方法
If a ByteBuffer instance is direct or read-only, we can’t get its underlying byte array. But, if a buffer is non-direct and not read-only, that doesn’t necessarily mean its underlying data is accessible.
如果一个ByteBuffer实例是直接的或只读的,我们就不能获得其底层的字节数组。但是,如果一个缓冲区不是直接的,也不是只读的,这并不一定意味着它的底层数据可以被访问。
To be precise, the hasArray() method can tell us if a buffer has an accessible backing array or not. If the hasArray() method returns true, then we can use the array() and arrayOffset() methods to get more relevant information.
准确地说,hasArray()方法可以告诉我们一个缓冲区是否有一个可访问的支持数组。如果hasArray()方法返回true,那么我们可以使用array()和arrayOffset()方法来获取更多相关信息。
7.3. Byte Order
7.3 字节顺序
By default, the byte order of the ByteBuffer class is always ByteOrder.BIG_ENDIAN. And, we can use the order() and order(ByteOrder) methods to respectively get and set the current byte order.
默认情况下,ByteBuffer类的字节顺序总是ByteOrder.BIG_ENDIAN。而且,我们可以使用order()和order(ByteOrder)方法来分别获取和设置当前的字节顺序。
The byte order influences how to interpret the underlying data. For example, suppose we have a buffer instance:
字节顺序影响到如何解释基础数据。例如,假设我们有一个buffer实例。
byte[] bytes = new byte[]{(byte) 0xCA, (byte) 0xFE, (byte) 0xBA, (byte) 0xBE};
ByteBuffer buffer = ByteBuffer.wrap(bytes);
Using ByteOrder.BIG_ENDIAN, the val will be -889275714 (0xCAFEBABE):
使用ByteOrder.BIG_ENDIAN,val将是-889275714(0xCAFEBABE)。
buffer.order(ByteOrder.BIG_ENDIAN);
int val = buffer.getInt();
However, using ByteOrder.LITTLE_ENDIAN, the val will be -1095041334 (0xBEBAFECA):
然而,使用ByteOrder.LITTLE_ENDIAN,val将是-1095041334(0xBEBAFECA)。
buffer.order(ByteOrder.LITTLE_ENDIAN);
int val = buffer.getInt();
7.4. Comparing
7.4.比较
The ByteBuffer class provides the equals() and compareTo() methods to compare two buffer instances. Both these methods perform the comparison based on the remaining data elements, which are in the range of [position, limit).
ByteBuffer类提供了equals()和compareTo()方法来比较两个缓冲器实例。这两个方法都是基于剩余的数据元素进行比较,这些数据元素在[position, limit)的范围内。
For example, two buffer instances with different underlying data and indices can be equal:
例如,两个具有不同基础数据和指数的缓冲区实例可以是相等的。
byte[] bytes1 = "World".getBytes(StandardCharsets.UTF_8);
byte[] bytes2 = "HelloWorld".getBytes(StandardCharsets.UTF_8);

ByteBuffer buffer1 = ByteBuffer.wrap(bytes1);
ByteBuffer buffer2 = ByteBuffer.wrap(bytes2);
buffer2.position(5);

boolean equal = buffer1.equals(buffer2); // true
int result = buffer1.compareTo(buffer2); // 0
8. Conclusion
8.结语
In this article, we tried to treat the ByteBuffer class as an onion model. At first, we simplified it into a container of byte array with extra indices. Then, we talked about how to use the ByteBuffer class to transfer data from/to other data types.
在这篇文章中,我们试图将ByteBuffer类作为一个洋葱模型。首先,我们将其简化为一个带有额外索引的byte数组容器。然后,我们谈到了如何使用ByteBuffer类从/向其他数据类型传输数据。
Next, we looked at the same underlying data with different views. Finally, we discussed direct buffer and some various methods.
接下来,我们用不同的观点看了相同的基础数据。最后,我们讨论了直接缓冲器和一些不同的方法。
As usual, the source code for this tutorial can be found over on GitHub.
像往常一样,本教程的源代码可以在GitHub上找到超过。

