1. Overview
1.概述
In this article, we’ll focus on the main use cases for X.509 certificate authentication – verifying the identity of a communication peer when using the HTTPS (HTTP over SSL) protocol.
在本文中,我们将重点讨论X.509证书认证的主要用例–在使用HTTPS(HTTP over SSL)协议时验证通信对等体的身份。
Simply put – while a secure connection is established, the client verifies the server according to its certificate (issued by a trusted certificate authority).
简单地说–在建立安全连接的同时,客户端根据服务器的证书(由受信任的证书机构颁发)对其进行验证。
But beyond that, X.509 in Spring Security can be used to verify the identity of a client by the server while connecting. This is called “mutual authentication”, and we’ll look at how that’s done here as well.
但除此之外,Spring Security中的X.509可用于在连接时由服务器验证客户的身份。这被称为“相互认证”,,我们也将在这里看看如何做到这一点。
Finally, we’ll touch on when it makes sense to use this kind of authentication.
最后,我们将谈谈什么时候使用这种认证有意义。
To demonstrate server verification, we’ll create a simple web application and install a custom certificate authority in a browser.
为了演示服务器验证,我们将创建一个简单的Web应用程序,并在浏览器中安装一个自定义的证书授权。
Moreover, for mutual authentication, we’ll create a client certificate and modify our server to allow only verified clients.
此外,对于相互认证,我们将创建一个客户证书,并修改我们的服务器,只允许经过验证的客户。
It’s highly recommended to follow the tutorial step by step and create the certificates, as well as the keystore and the truststore, yourself, according to the instructions presented in the following sections. However, all the ready to use files can be found in our GitHub repository.
强烈建议按照教程的步骤,根据以下章节的说明,自己创建证书以及钥匙库和信任库。然而,在我们的GitHub 仓库中可以找到所有可使用的文件。
2. Self Signed Root CA
2.自签的根CA
To be able to sign our server-side and client-side certificates, we need to create our own self-signed root CA certificate first. This way we’ll act as our own certificate authority.
为了能够签署我们的服务器端和客户端的证书,我们需要首先创建我们自己的自签名根CA证书。这样,我们将作为我们自己的证书机构。
For this purpose we’ll use openssl library, so we need to have it installed prior to following the next step.
为此,我们将使用openssl库,所以在进行下一步之前,我们需要安装它。
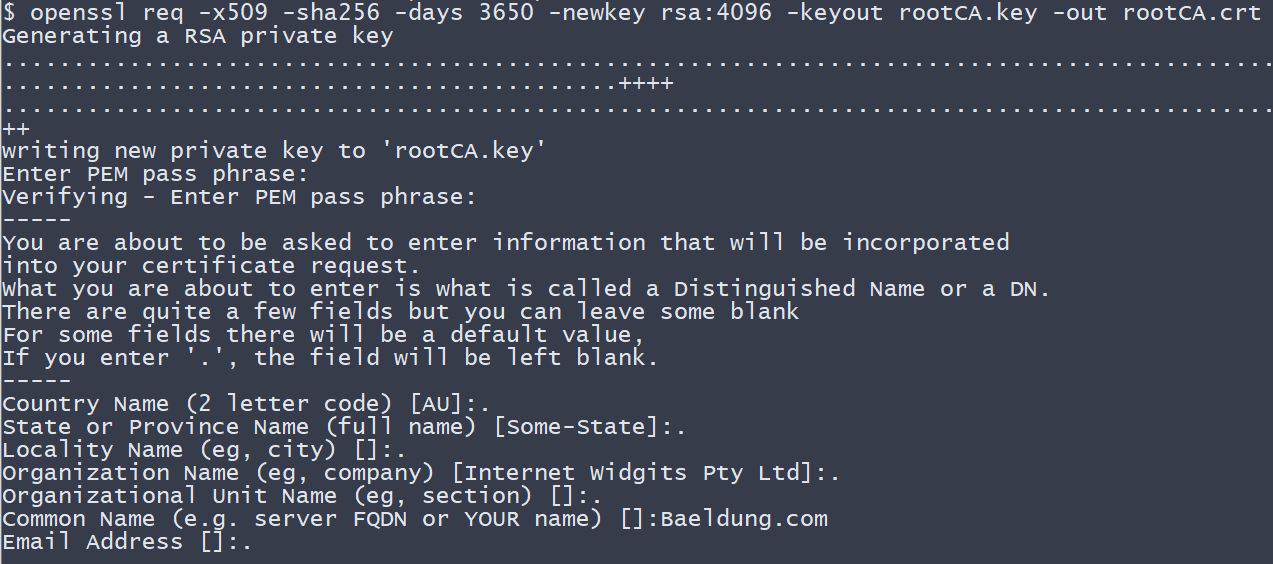
Let’s now create the CA certificate:
现在我们来创建CA证书。
openssl req -x509 -sha256 -days 3650 -newkey rsa:4096 -keyout rootCA.key -out rootCA.crtWhen we execute the above command, we need to provide the password for our private key. For the purpose of this tutorial, we use changeit as a passphrase.
当我们执行上述命令时,我们需要提供私钥的密码。为了本教程的目的,我们使用changeit作为口令。
Additionally, we need to enter information that forms a so-called distinguished name. Here, we only provide the CN (Common Name) – Baeldung.com – and leave other parts empty.
此外,我们需要输入形成所谓的区分名称的信息。这里,我们只提供CN(通用名称)–Baeldung.com,其他部分留空。
3. Keystore
3.钥匙库
Optional Requirement: To use cryptographically strong keys together with encryption and decryption features we’ll need the “Java Cryptography Extension (JCE) Unlimited Strength Jurisdiction Policy Files” installed in our JVM.
可选的要求:为了在加密和解密功能中使用加密的强密钥,我们需要在我们的JVM中安装”Java Cryptography Extension (JCE) Unlimited Strength Jurisdiction Policy Files“。
These can be downloaded for example from Oracle (follow the installation instructions included in the download). Some Linux distributions also provide an installable package through their package managers.
例如,可以从Oracle下载(按照下载中包含的安装说明操作)。一些Linux发行版也通过其软件包管理器提供了一个可安装的软件包。
A keystore is a repository that our Spring Boot application will use to hold our server’s private key and certificate. In other words, our application will use the keystore to serve the certificate to the clients during the SSL handshake.
密钥库是一个存储库,我们的Spring Boot应用程序将用它来保存我们服务器的私钥和证书。换句话说,我们的应用程序将使用钥匙库在SSL握手期间向客户提供证书。
In this tutorial, we use the Java Key-Store (JKS) format and a keytool command-line tool.
在本教程中,我们使用Java密钥存储(JKS)格式和keytool>命令行工具。。
3.1. Server-side Certificate
3.1.服务器端证书
To implement the server-side X.509 authentication in our Spring Boot application, we first need to create a server-side certificate.
为了在我们的Spring Boot应用程序中实现服务器端X.509认证,我们首先需要创建一个服务器端的证书。
Let’s start with creating a so-called certificate signing request (CSR):
让我们从创建一个所谓的证书签署请求(CSR)开始。
openssl req -new -newkey rsa:4096 -keyout localhost.key –out localhost.csrSimilarly, as for the CA certificate, we have to provide the password for the private key. Additionally, let’s use localhost as a common name (CN).
同样地,对于CA证书,我们必须提供私钥的密码。此外,让我们使用localhost作为公共名称(CN)。
Before we proceed, we need to create a configuration file – localhost.ext. It’ll store some additional parameters needed during signing the certificate.
在我们继续之前,我们需要创建一个配置文件 – localhost.ext。它将存储签署证书时需要的一些额外参数。
authorityKeyIdentifier=keyid,issuer
basicConstraints=CA:FALSE
subjectAltName = @alt_names
[alt_names]
DNS.1 = localhost
A ready to use file is also available here.
也可以在这里获得一个即用型文件。
Now, it’s time to sign the request with our rootCA.crt certificate and its private key:
现在,是时候用我们的rootCA.crt证书和它的私钥签署请求了。
openssl x509 -req -CA rootCA.crt -CAkey rootCA.key -in localhost.csr -out localhost.crt -days 365 -CAcreateserial -extfile localhost.extNote that we have to provide the same password we used when we created our CA certificate.
请注意,我们必须提供我们在创建CA证书时使用的相同密码。
At this stage, we finally have a ready to use localhost.crt certificate signed by our own certificate authority.
在这个阶段,我们终于有了一个可以使用的localhost.crt证书,由我们自己的证书颁发机构签署。
To print our certificate’s details in a human-readable form we can use the following command:
为了以人类可读的形式打印我们的证书细节,我们可以使用以下命令。
openssl x509 -in localhost.crt -text3.2. Import to the Keystore
3.2.导入到钥匙库
In this section, we’ll see how to import the signed certificate and the corresponding private key to the keystore.jks file.
在本节中,我们将看到如何将签名的证书和相应的私钥导入keystore.jks文件。
We’ll use the PKCS 12 archive, to package our server’s private key together with the signed certificate. Then we’ll import it to the newly created keystore.jks.
我们将使用PKCS 12档案,将我们的服务器的私钥与签名的证书一起打包。然后我们将它导入到新创建的keystore.jks.中。
We can use the following command to create a .p12 file:
我们可以使用以下命令来创建一个.p12文件。
openssl pkcs12 -export -out localhost.p12 -name "localhost" -inkey localhost.key -in localhost.crtSo we now have the localhost.key and the localhost.crt bundled in the single localhost.p12 file.
因此,我们现在有localhost.key和localhost.crt捆绑在单个localhost.p12文件中。
Let’s now use keytool to create a keystore.jks repository and import the localhost.p12 file with a single command:
现在让我们用keytool来创建一个keystore.jks资源库,并用一条命令导入localhost.p12文件。
keytool -importkeystore -srckeystore localhost.p12 -srcstoretype PKCS12 -destkeystore keystore.jks -deststoretype JKSAt this stage, we have everything in place for the server authentication part. Let’s proceed with our Spring Boot application configuration.
在这个阶段,我们已经为服务器认证部分做好了一切准备。让我们继续进行我们的Spring Boot应用配置。
4. Example Application
4.应用实例
Our SSL secured server project consists of a @SpringBootApplication annotated application class (which is a kind of @Configuration), an application.properties configuration file and a very simple MVC-style front-end.
我们的SSL安全服务器项目包括一个@SpringBootApplication注释的应用程序类(这是一种@Configuration)/em>,一个application.属性配置文件和一个非常简单的MVC风格的前端。
All, the application has to do, is to present an HTML page with a “Hello {User}!” message. This way we can inspect the server certificate in a browser to make sure, that the connection is verified and secured.
应用程序所要做的,就是呈现一个带有“Hello {User}!”消息的HTML页面。这样,我们就可以在浏览器中检查服务器证书,以确保连接是经过验证和安全的。
4.1. Maven Dependencies
4.1.Maven的依赖性
First, we create a new Maven project with three Spring Boot Starter bundles included:
首先,我们创建一个新的Maven项目,其中包含三个Spring Boot Starter捆绑包。
<dependency>
    <groupId>org.springframework.boot</groupId>
    <artifactId>spring-boot-starter-security</artifactId>
</dependency>
<dependency>
    <groupId>org.springframework.boot</groupId>
    <artifactId>spring-boot-starter-web</artifactId>
</dependency>
<dependency>
    <groupId>org.springframework.boot</groupId>
    <artifactId>spring-boot-starter-thymeleaf</artifactId>
</dependency>
For reference: we can find the bundles on Maven Central (security, web, thymeleaf).
供参考:我们可以在Maven中心找到这些软件包(security, web, thymeleaf)。
4.2. Spring Boot Application
4.2.Spring Boot应用程序
As the next step, we create the main application class and the user-controller:
作为下一步,我们创建主应用程序类和用户控制器。
@SpringBootApplication
public class X509AuthenticationServer {
    public static void main(String[] args) {
        SpringApplication.run(X509AuthenticationServer.class, args);
    }
}

@Controller
public class UserController {
    @RequestMapping(value = "/user")
    public String user(Model model, Principal principal) {

        UserDetails currentUser
          = (UserDetails) ((Authentication) principal).getPrincipal();
        model.addAttribute("username", currentUser.getUsername());
        return "user";
    }
}
Now, we tell the application where to find our keystore.jks and how to access it. We set SSL to an “enabled” status and change the standard listening port to indicate a secured connection.
现在,我们告诉应用程序在哪里可以找到我们的keystore.jks以及如何访问它。我们将SSL设置为 “启用 “状态,并将标准监听端口改为表示安全连接。
Additionally, we configure some user-details for accessing our server via Basic Authentication:
此外,我们还配置了一些用户细节,以便通过基本认证访问我们的服务器。
server.ssl.key-store=../store/keystore.jks
server.ssl.key-store-password=${PASSWORD}
server.ssl.key-alias=localhost
server.ssl.key-password=${PASSWORD}
server.ssl.enabled=true
server.port=8443
spring.security.user.name=Admin
spring.security.user.password=admin
This will be the HTML template, located at the resources/templates folder:
这将是HTML模板,位于resources/templates文件夹。
<!DOCTYPE html>
<html xmlns:th="http://www.thymeleaf.org">
<head>
    <title>X.509 Authentication Demo</title>
</head>
<body>
    <h2>Hello <span th:text="${username}"/>!</h2>
</body>
</html>
4.3. Root CA Installation
4.3.根CA的安装
Before we finish this section and look at the site, we need to install our generated root certificate authority as a trusted certificate in a browser.
在我们完成本节并查看网站之前,我们需要在浏览器中安装我们生成的根证书授权作为可信的证书。
An exemplary installation of our certificate authority for Mozilla Firefox would look like follows:
为Mozilla Firefox安装我们的证书颁发机构的一个范例看起来如下。
- Type about:preferences in the address bar
- Open Advanced -> Certificates -> View Certificates -> Authorities
- Click on Import
- Locate the Baeldung tutorials folder and its subfolder spring-security-x509/keystore
- Select the rootCA.crt file and click OK
- Choose “Trust this CA to identify websites” and click OK
Note: If you don’t want to add our certificate authority to the list of trusted authorities, you’ll later have the option to make an exception and show the website tough, even when it is mentioned as insecure. But then you’ll see a ‘yellow exclamation mark’ symbol in the address bar, indicating the insecure connection!
注意:如果你不想把我们的证书机构添加到受信任的机构列表中,你以后可以选择做一个例外,并显示网站艰难,即使它被提到是不安全的。但随后你会在地址栏中看到一个’黄色感叹号’符号,表示不安全的连接!
Afterward, we will navigate to the spring-security-x509-basic-auth module and run:
之后,我们将导航到spring-security-x509-basic-auth模块并运行。
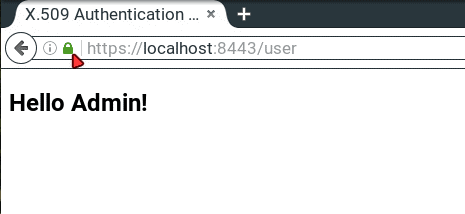
mvn spring-boot:runFinally, we hit https://localhost:8443/user, enter our user credentials from the application.properties and should see a “Hello Admin!” message. Now we’re able to inspect the connection status by clicking the “green lock” symbol in the address bar, and it should be a secured connection.
最后,我们点击https://localhost:8443/user,从application.properties中输入我们的用户凭证,应该看到“Hello Admin!”消息。现在我们能够通过点击地址栏中的 “绿色锁 “符号来检查连接状态,它应该是一个安全连接。
5. Mutual Authentication
5.相互认证
In the previous section, we presented how to implement the most common SSL authentication schema – server-side authentication. This means, only a server authenticated itself to clients.
在上一节中,我们介绍了如何实现最常见的SSL认证模式–服务器端认证。这意味着,只有服务器向客户认证自己。
In this section, we’ll describe how to add the other part of the authentication – client-side authentication. This way, only clients with valid certificates signed by the authority that our server trusts, can access our secured website.
在本节中,我们将描述如何添加认证的另一部分 – 客户端认证。这样,只有持有由我们服务器信任的权威机构签署的有效证书的客户才能访问我们的安全网站。
But before we continue, let’s see what are the pros and cons of using the mutual SSL authentication.
但在我们继续之前,让我们看看使用交互式SSL认证的优点和缺点是什么。
Pros:
优点:
- The private key of an X.509 client certificate is stronger than any user-defined password. But it has to be kept secret!
- With a certificate, the identity of a client is well-known and easy to verify.
- No more forgotten passwords!
Cons:
缺点:
- We need to create a certificate for each new client.
- The client’s certificate has to be installed in a client application. In fact: X.509 client authentication is device-dependent, which makes it impossible to use this kind of authentication in public areas, for example in an internet-café.
- There must be a mechanism to revoke compromised client certificates.
- We must maintain the clients’ certificates. This can easily become costly.
5.1. Truststore
5.1 信托商店
A trustsore in some way is the opposite of a keystore. It holds the certificates of the external entities that we trust.
信任库在某种程度上是钥匙库的反面。它持有我们信任的外部实体的证书。
In our case, it’s enough to keep the root CA certificate in the truststore.
在我们的案例中,将根 CA 证书保留在信任库中就足够了。
Let’s see how to create a truststore.jks file and import the rootCA.crt using keytool:
让我们看看如何使用密钥工具创建一个truststore.jks文件并导入rootCA.crt。
keytool -import -trustcacerts -noprompt -alias ca -ext san=dns:localhost,ip:127.0.0.1 -file rootCA.crt -keystore truststore.jksNote, we need to provide the password for the newly created trusstore.jks. Here, we again used the changeit passphrase.
注意,我们需要为新创建的trusstore.jks提供密码。这里,我们再次使用了changeit密码。
That’s it, we’ve imported our own CA certificate, and the truststore is ready to be used.
就这样,我们已经导入了我们自己的CA证书,信任商店已经可以使用了。
5.2. Spring Security Configuration
5.2.Spring安全配置
To continue, we are modifying our X509AuthenticationServer to configure HttpSecurity by creating a SecurityFilterChain Bean. Here we configure the x.509 mechanism to parse the Common Name (CN) field of a certificate for extracting usernames.
继续,我们正在修改我们的X509AuthenticationServer,通过创建一个SecurityFilterChainBean来配置HttpSecurity。在这里,我们配置x.509机制来解析证书的通用名称(CN)字段,以提取用户名。
With this extracted usernames, Spring Security is looking up in a provided UserDetailsService for matching users. So we also implement this service interface containing one demo user.
有了这些提取的用户名,Spring Security在提供的UserDetailsService中查找匹配的用户。所以我们也实现了这个包含一个演示用户的服务接口。
Tip: In production environments, this UserDetailsService can load its users for example from a JDBC Datasource.
提示:在生产环境中,这个UserDetailsService可以从JDBC Datasource加载其用户。
You have to notice that we annotate our class with @EnableWebSecurity and @EnableGlobalMethodSecurity with enabled pre-/post-authorization.
你必须注意到,我们用@EnableWebSecurity和@EnableGlobalMethodSecurity注释了我们的类,并启用了前/后授权。
With the latter we can annotate our resources with @PreAuthorize and @PostAuthorize for fine-grained access control:
有了后者,我们可以用@PreAuthorize和@PostAuthorize注释我们的资源,以实现细粒度的访问控制。
@SpringBootApplication
@EnableWebSecurity
@EnableGlobalMethodSecurity(prePostEnabled = true)
public class X509AuthenticationServer {
    ...

    @Bean
    public SecurityFilterChain filterChain(HttpSecurity http) throws Exception {
        http.authorizeRequests()
            .anyRequest()
            .authenticated()
            .and()
            .x509()
            .subjectPrincipalRegex("CN=(.*?)(?:,|$)")
            .userDetailsService(userDetailsService());
        return http.build();
    }

    @Bean
    public UserDetailsService userDetailsService() {
        return new UserDetailsService() {
            @Override
            public UserDetails loadUserByUsername(String username) throws UsernameNotFoundException {
                if (username.equals("Bob")) {
                    return new User(username, "",
                     AuthorityUtils.commaSeparatedStringToAuthorityList("ROLE_USER"));
                }
                throw new UsernameNotFoundException("User not found!");
            }
        };
    }
}
As said previously, we are now able to use Expression-Based Access Control in our controller. More specifically, our authorization annotations are respected because of the @EnableGlobalMethodSecurity annotation in our @Configuration:
如前所述,我们现在可以在控制器中使用基于表达式的访问控制。更具体地说,我们的授权注释得到了尊重,因为我们的@EnableGlobalMethodSecurity注释在我们的@Configuration中。
@Controller
public class UserController {
    @PreAuthorize("hasAuthority('ROLE_USER')")
    @RequestMapping(value = "/user")
    public String user(Model model, Principal principal) {
        ...
    }
}
An overview of all possible authorization options can be found in the official documentation.
关于所有可能的授权选项的概述可以在官方文档中找到。
As a final modification step, we have to tell the application where our truststore is located and that SSL client authentication is necessary (server.ssl.client-auth=need).
作为最后的修改步骤,我们必须告诉应用程序我们的truststore的位置,以及SSL客户认证是必要的(server.ssl.client-auth=need)。
So we put the following into our application.properties:
所以我们把以下内容放入我们的application.properties。
server.ssl.trust-store=store/truststore.jks
server.ssl.trust-store-password=${PASSWORD}
server.ssl.client-auth=need
Now, if we run the application and point our browser to https://localhost:8443/user, we become informed that the peer cannot be verified and it denies to open our website.
现在,如果我们运行应用程序并将我们的浏览器指向https://localhost:8443/user,我们会被告知该对等体无法被验证,它拒绝打开我们的网站。
5.3. Client-side Certificate
5.3.客户端证书
Now it’s time to create the client-side certificate. The steps we need to take, are pretty much the same as for the server-side certificate we already created.
现在是创建客户端证书的时候了。我们需要采取的步骤,与我们已经创建的服务器端证书基本相同。
First, we have to create a certificate signing request:
首先,我们必须创建一个证书签署请求。
openssl req -new -newkey rsa:4096 -nodes -keyout clientBob.key -out clientBob.csrWe’ll have to provide information that will be incorporated into the certificate. For this exercise, let’s only enter the common name (CN) – Bob. It’s important as we use this entry during the authorization and only Bob is recognized by our sample application.
我们必须提供将被纳入证书的信息。在这个练习中,我们只输入通用名称(CN) – Bob。这很重要,因为我们在授权过程中使用这个条目,而且只有Bob能被我们的示例应用程序识别。
Next, we need to sign the request with our CA:
接下来,我们需要用我们的CA签署请求。
openssl x509 -req -CA rootCA.crt -CAkey rootCA.key -in clientBob.csr -out clientBob.crt -days 365 -CAcreateserialThe last step we need to take is to package the signed certificate and the private key into the PKCS file:
我们需要做的最后一步是将签名的证书和私钥打包成PKCS文件。
openssl pkcs12 -export -out clientBob.p12 -name "clientBob" -inkey clientBob.key -in clientBob.crtFinally, we’re ready to install the client certificate in the browser.
最后,我们准备在浏览器中安装客户证书。
Again, we’ll use Firefox:
同样,我们将使用Firefox。
- Type about:preferences in the address bar
- Open Advanced -> View Certificates -> Your Certificates
- Click on Import
- Locate the Baeldung tutorials folder and its subfolder spring-security-x509/store
- Select the clientBob.p12 file and click OK
- Input the password for your certificate and click OK
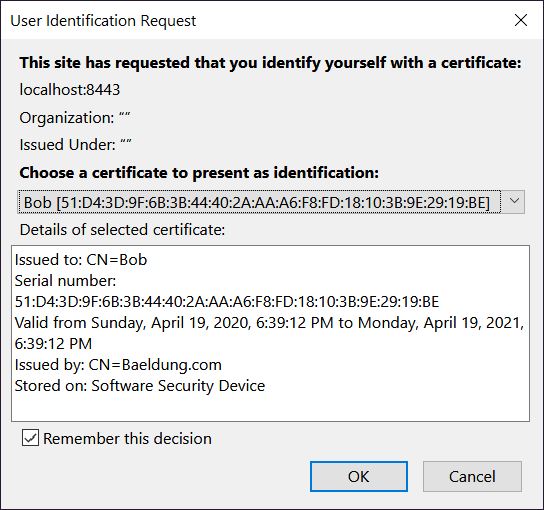
Now, when we refresh our website, we’ll be prompted to select the client certificate we’d like to use:
现在,当我们刷新我们的网站时,我们会被提示选择我们想使用的客户证书。
If we see a welcome message like “Hello Bob!”, that means everything works as expected!
如果我们看到像“Hello Bob!”这样的欢迎信息,那就意味着一切都按预期的那样进行了!这就是我们的工作。
6. Mutual Authentication With XML
6.用XML进行相互认证
Adding X.509 client authentication to an http security configuration in XML is also possible:
在http安全配置中XML添加X.509客户端认证也是可能的。
<http>
    ...
    <x509 subject-principal-regex="CN=(.*?)(?:,|$)"
      user-service-ref="userService"/>

    <authentication-manager>
        <authentication-provider>
            <user-service id="userService">
                <user name="Bob" password="" authorities="ROLE_USER"/>
            </user-service>
        </authentication-provider>
    </authentication-manager>
    ...
</http>
To configure an underlying Tomcat, we have to put our keystore and our truststore into its conf folder and edit the server.xml:
为了配置底层的Tomcat,我们必须把我们的keystore和truststore放入其conf文件夹,并编辑server.xml。
<Connector port="8443" protocol="HTTP/1.1" SSLEnabled="true" scheme="https" secure="true"
    clientAuth="true" sslProtocol="TLS"
    keystoreFile="${catalina.home}/conf/keystore.jks"
    keystoreType="JKS" keystorePass="changeit"
    truststoreFile="${catalina.home}/conf/truststore.jks"
    truststoreType="JKS" truststorePass="changeit"
/>
Tip: With clientAuth set to “want”, SSL is still enabled, even if the client doesn’t provide a valid certificate. But in this case, we have to use a second authentication mechanism, for example, a login-form, to access the secured resources.
提示:当clientAuth设置为“want”时,SSL仍然被启用,即使客户端没有提供有效的证书。但在这种情况下,我们必须使用第二个认证机制,例如,登录表,来访问安全的资源。
7. Conclusion
7.结论
In summary, we’ve learned how to create a self-signed CA certificate and how to use it to sign other certificates.
综上所述,我们已经学会了如何创建一个自签名的CA证书,以及如何用它来签署其他证书。
Additionally, we’ve created both, server-side and client-side certificates. Then we’ve presented how to import them into a keystore and a truststore accordingly.
此外,我们已经创建了服务器端和客户端的证书。然后,我们介绍了如何将它们导入钥匙库和信任库的相应方法。
Furthermore, you now should be able to package a certificate together with its private key into the PKCS12 format.
此外,你现在应该能够将证书连同其私钥打包成PKCS12格式。
We’ve also discussed when it makes sense to use Spring Security X.509 client authentication, so it is up to you, to decide, whether to implement it into your web application, or not.
我们还讨论了什么时候使用Spring Security X.509客户端认证是有意义的,所以由你来决定是否在你的Web应用中实施它。
And to wrap up, find the source code to this article on Github.
最后,请在Github上找到这篇文章的源代码。


