1. Introduction
1.绪论
In this article, we’ll explore AWS AppSync with Spring Boot. AWS AppSync is a fully-managed, enterprise-level GraphQL service with real-time data synchronization and offline programming features.
在本文中,我们将探讨AWS AppSync与Spring Boot。AWS AppSync 是一个完全受管理的企业级GraphQL服务,具有实时数据同步和离线编程功能。
2. Setup AWS AppSync
2.设置AWS AppSync
First, we need to have an active AWS account. Once that is taken care of, we can search for AppSync from the AWS console. Then we’ll click the Getting Started with AppSync link.
首先,我们需要有一个活跃的AWS 账户。一旦解决了这个问题,我们就可以从AWS控制台中搜索到AppSync。然后我们将点击开始使用AppSync链接。
2.1. Create AppSync API
2.1.创建AppSync API
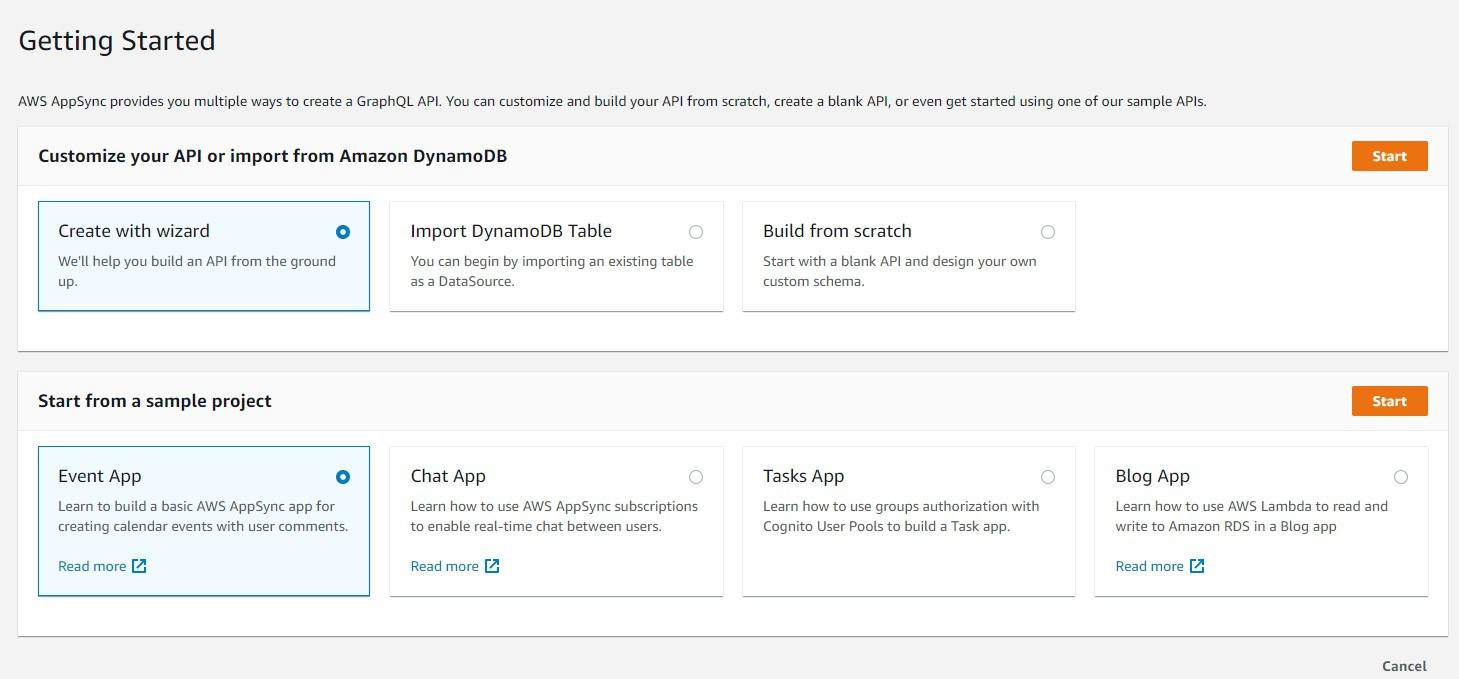
Following the quick start instructions to create our API, we’ll use the Event App sample project. Then click Start to name and create the app:
按照快速启动说明来创建我们的API,我们将使用Event App示例项目。然后点击Start来命名和创建该应用程序。
This will bring us to our AppSync app console. Now let’s take a look at our GraphQL model.
这将把我们带到我们的AppSync应用控制台。现在让我们看一下我们的GraphQL模型。
2.2. GraphQL Event Model
2.2.GraphQL事件模型
GraphQL uses a schema to define what data is available to clients and how to interact with the GraphQL server. The schema contains queries, mutations, and a variety of declared types.
GraphQL使用一个模式来定义哪些数据可供客户使用,以及如何与GraphQL服务器互动。该模式包含查询、突变和各种声明类型。
For simplicity, let’s take a look at part of the default AWS AppSync GraphQL schema, our Event model:
为了简单起见,让我们看看默认的AWS AppSync GraphQL模式的一部分,即我们的Event model。
type Event {
  id: ID!
  name: String
  where: String
  when: String
  description: String
  # Paginate through all comments belonging to an individual post.
  comments(limit: Int, nextToken: String): CommentConnection
}
Event is a declared type with some String fields and a CommentConnection type. Notice the exclamation point on the ID field. This means it is a required/non-null field.
Event是一个声明的类型,有一些String字段和一个CommentConnection类型。注意到ID字段上的惊叹号。这意味着它是一个必须的/非空的字段。。
This should be enough to understand the basics of our schema. However, for more information, head over to the GraphQL site.
这应该足以让我们了解我们的模式的基本情况。然而,要了解更多信息,请前往GraphQL网站。
3. Spring Boot
3.Spring启动
Now that we’ve set up everything on the AWS side, let’s look at our Spring Boot client application.
现在我们已经在AWS方面设置好了一切,让我们看看我们的Spring Boot客户端应用程序。
3.1. Maven Dependencies
3.1.Maven的依赖性
To access our API, we will be using the Spring Boot Starter WebFlux library for access to WebClient, Spring’s new alternative to RestTemplate:
为了访问我们的API,我们将使用Spring Boot Starter WebFlux库来访问WebClient,Spring对RestTemplate的新替代。
    <dependency>
      <groupId>org.springframework.boot</groupId>
      <artifactId>spring-boot-starter-webflux</artifactId>
    </dependency>
Check out our article on WebClient for more information.
请查看我们关于WebClient的文章,了解更多信息。
3.2. GraphQL Client
3.2 GraphQL客户端
To make a request to our API, we’ll start by creating our RequestBodySpec using the WebClient builder, providing the AWS AppSync API URL and API key:
为了向我们的API发出请求,我们将首先使用WebClient构建器创建我们的RequestBodySpec,提供AWS AppSync API URL和API密钥。
WebClient.RequestBodySpec requestBodySpec = WebClient
    .builder()
    .baseUrl(apiUrl)
    .defaultHeader("x-api-key", apiKey)
    .build()
    .method(HttpMethod.POST)
    .uri("/graphql");
Don’t forget the API key header, x-api-key. The API key authenticates to our AppSync app.
不要忘记API密钥头,x-api-key。API密钥可以验证我们的AppSync应用程序。
4. Working With GraphQL Types
4.使用GraphQL类型的工作
4.1. Queries
4.1. 查询
Setting up our query involves adding it to a query element in the message body:
设置我们的查询包括将其添加到消息正文中的query元素。
Map<String, Object> requestBody = new HashMap<>();
requestBody.put("query", "query ListEvents {"
  + " listEvents {"
  + "   items {"
  + "     id"
  + "     name"
  + "     where"
  + "     when"
  + "     description"
  + "   }"
  + " }"
  + "}");
Using our requestBody, let’s invoke our WebClient to retrieve the response body:
使用我们的requestBody,让我们调用我们的WebClient来检索响应体。
WebClient.ResponseSpec response = requestBodySpec
    .body(BodyInserters.fromValue(requestBody))
    .accept(MediaType.APPLICATION_JSON, MediaType.APPLICATION_XML)
    .acceptCharset(StandardCharsets.UTF_8)
    .retrieve();
Finally, we can get the body as a String:
最后,我们可以得到作为String的body。
String bodyString = response.bodyToMono(String.class).block();
assertNotNull(bodyString);
assertTrue(bodyString.contains("My First Event"));
4.2. Mutations
4.2.突变
GraphQL allows for updating and deleting data through the use of mutations. Mutations modify the server-side data as needed and follow a similar syntax to queries.
GraphQL允许通过使用突变来更新和删除数据。突变根据需要修改服务器端的数据,并遵循与查询类似的语法。
Let’s add a new event with an add mutation query:
让我们用add突变查询添加一个新事件。
String queryString = "mutation add {"
  + "    createEvent("
  + "        name:\"My added GraphQL event\""
  + "        where:\"Day 2\""
  + "        when:\"Saturday night\""
  + "        description:\"Studying GraphQL\""
  + "    ){"
  + "        id"
  + "        name"
  + "        description"
  + "    }"
  + "}";

requestBody.put("query", queryString);
One of the greatest advantages of AppSync, and of GraphQL in general, is that one endpoint URL provides all CRUD functionality across the entire schema.
AppSync以及一般的GraphQL的最大优势之一是,一个端点URL提供整个模式的所有CRUD功能。
We can reuse the same WebClient to add, update, and delete data. We will simply get a new response based on the callback in the query or mutation.
我们可以重复使用同一个WebClient来添加、更新和删除数据。 我们将简单地根据查询或突变中的回调获得一个新的响应。
assertNotNull(bodyString);
assertTrue(bodyString.contains("My added GraphQL event"));
assertFalse(bodyString.contains("where"));
5. Conclusion
5.总结
In this article, we looked at how quickly we can set up a GraphQL app with AWS AppSync and access it with a Spring Boot client.
在这篇文章中,我们看了如何快速地用AWS AppSync设置GraphQL应用,并使用Spring Boot客户端访问它。
AppSync provides developers with a powerful GraphQL API through a single endpoint. For more information, have a look at our tutorial on creating a GraphQL Spring Boot server.
AppSync通过一个端点为开发人员提供了强大的GraphQL API。欲了解更多信息,请查看我们关于创建GraphQL Spring Boot服务器的教程。
And, as always, the code is available over on GitHub.
而且,像往常一样,代码可以在GitHub上获得。
