1. Introduction
1.绪论
In this tutorial, we’re going to integrate BIRT (Business Intelligence and Reporting Tools) with Spring Boot MVC, to serve static and dynamic reports in HTML and PDF format.
在本教程中,我们将把BIRT(商业智能和报告工具)与Spring Boot MVC整合起来,以HTML和PDF格式提供静态和动态报告。
2. What Is BIRT?
2.什么是BIRT?
BIRT is an open source engine to create data visualizations that can be integrated into Java web applications.
BIRT是一个创建数据可视化的开源引擎,可以集成到Java网络应用中。
It’s a top-level software project within the Eclipse Foundation and leverages contributions by IBM and Innovent Solutions. It was started and sponsored by Actuate at the end of 2004.
它是Eclipse基金会内的一个顶级软件项目,利用了IBM和Innovent Solutions的贡献。它是由Actuate在2004年底启动和赞助的。
The framework allows creating reports integrated with a wide range of data sources.
该框架允许创建与广泛的数据源集成的报告。
3. Maven Dependencies
3.Maven的依赖性
BIRT has two main components: a visual report designer to create report design files, and a runtime component for interpreting and rendering those designs.
BIRT有两个主要组件:一个是用于创建报告设计文件的可视化报告设计器,另一个是用于解释和呈现这些设计的运行时组件。
In our example web application, we’re going to use both on top of Spring Boot.
在我们的示例Web应用中,我们将在Spring Boot的基础上使用这两者。
3.1. BIRT Framework Dependencies
3.1.BIRT框架的依赖性
As we’re used to thinking in terms of dependency management, the first choice would be to look for BIRT in Maven Central.
由于我们习惯于从依赖性管理的角度考虑问题,因此首选是在Maven中心寻找BIRT。
However, the latest official version of the core library available is 4.6 from 2016, while on the Eclipse download page, we can find links for at least two newer versions (the current is 4.8).
然而,现有核心库的最新官方版本是2016年的4.6,而在Eclipse下载页面,我们可以找到至少两个更新版本的链接(目前是4.8)。
If we choose to go for the official build, the easiest way to have the code up and running is to download the BIRT Report Engine package, which is a complete web application also useful for learning. We then need to copy its lib folder into our project (about 68MB in size) and tell the IDE to include all the jars in it.
如果我们选择官方构建,最简单的方法是下载BIRT Report Engine包,它是一个完整的网络应用程序,对学习也很有用。然后我们需要将其lib文件夹复制到我们的项目中(大小约为68MB),并告诉IDE包括其中的所有jars。
It goes without saying that, using this approach, we’ll be able to compile only through the IDE, as Maven won’t find those jars unless we configure and install them manually (more than 100 files!) in our local repo.
不言而喻,使用这种方法,我们只能通过IDE进行编译,因为Maven找不到这些jars,除非我们在本地repo中手动配置和安装它们(100多个文件!)。
Fortunately, Innovent Solutions has decided to take matters in its hands and published on Maven Central its own builds of the latest BIRT dependencies, which is great, as it manages for us all the needed dependencies.
幸运的是,Innovent Solutions已决定将问题掌握在自己手中,并在Maven Central上发布了自己构建的最新BIRT依赖项,这很好,因为它为我们管理了所有需要的依赖项。
Reading through comments in online forums, it’s unclear whether these artifacts are production-ready, but Innovent Solutions worked on the project next to the Eclipse team since the start, so our project relies on them.
通过阅读网上论坛的评论,我们不清楚这些工件是否可以用于生产,但Innovent Solutions从一开始就在Eclipse团队旁边工作,所以我们的项目依赖于它们。
Including BIRT is now very easy:
包括BIRT现在非常容易。
<dependency>
    <groupId>com.innoventsolutions.birt.runtime</groupId>
    <artifactId>org.eclipse.birt.runtime_4.8.0-20180626</artifactId>
    <version>4.8.0</version>
</dependency>
3.2. Spring Boot Dependencies
3.2.Spring Boot的依赖性
Now that BIRT is imported into our project, we just need to add the standard Spring Boot dependencies in our pom file.
现在BIRT已经被导入我们的项目,我们只需要在pom文件中添加标准的Spring Boot依赖项。
There’s one pitfall, though, because the BIRT jar contains its own implementation of Slf4J, which doesn’t play nice with Logback and throws a conflict exception during startup.
但是有一个陷阱,因为BIRT jar包含它自己的Slf4J的实现,它与Logback不兼容,在启动时抛出一个冲突异常。
As we can’t remove it from the jar, in order to fix this problem, we need to exclude Logback:
由于我们无法从jar中删除它,为了解决这个问题,我们需要排除Logback。
<dependency>
    <groupId>org.springframework.boot</groupId>
    <artifactId>spring-boot-starter-logging</artifactId>
    <exclusions>
        <exclusion>
            <groupId>ch.qos.logback</groupId>
            <artifactId>logback-classic</artifactId>
        </exclusion>
    </exclusions>
</dependency>
Now we’re finally ready to start!
现在我们终于准备好开始了!
4. BIRT Reports
4.BIRT报告
In the BIRT framework, a report is a long XML configuration file, identified by the extension rptdesign.
在BIRT框架中,一个报告是一个长的XML配置文件,由扩展名rptdesign标识。
It tells the Engine what to draw and where, from the style of a title up to the required properties to connect to a data source.
它告诉引擎要画什么和在哪里画,从标题的样式到连接到数据源的所需属性。
For a basic dynamic report, we need to configure three things:
对于一个基本的动态报告,我们需要配置三样东西。
- the data source (in our example we use a local CSV file, but it could easily be a database table)
- the elements we want to display (charts, tables, etc)
- the page design
The report is structured like an HTML page, with header, body, footer, scripts, and styles.
报告的结构像一个HTML页面,有标题、正文、页脚、脚本和样式。
The framework provides an extensive set of components to choose from out-of-the-box, including integration to mainstream data sources, layouts, charts, and tables. And, we can extend it to add our own!
该框架提供了一套广泛的组件供开箱即用选择,包括与主流数据源、布局、图表和表格的集成。而且,我们还可以对其进行扩展,添加我们自己的组件!
There are two ways to generate a report file: visual or programmatic.
有两种方法来生成报告文件:可视化或程序化。
5. The Eclipse Report Designer
5.Eclipse报告设计器
To ease the creation of reports, the Eclipse team built a report design tool plugin for its popular IDE.
为了简化报告的创建,Eclipse团队为其流行的IDE建立了一个报告设计工具插件。
This tool features an easy drag & drop interface from the Palette on the left, which automatically opens the setup window for the new component we add to the page. We can also see the all customizations available for each component by clicking on it on the page and then on the Property Editor button (highlighted in the image below).
这个工具有一个简单的拖放界面,从左边的调色板,它自动为我们添加到页面的新组件打开设置窗口。我们还可以通过点击页面上的组件,然后点击属性编辑器按钮(如下图所示),看到每个组件的所有自定义功能。
To visualize the entire page structure in a tree view, we just need to click on the Outline button.
要在树状视图中可视化整个页面结构,我们只需要点击Outline按钮。
The Data Explorer tab also contains the data sources defined for our report:
数据资源管理器标签还包含为我们的报告定义的数据源:

The sample report displayed in the image can be found at the path <project_root>/reports/csv_data_report.rptdesign
图片中显示的报告样本可以在<project_root>/reports/csv_data_report.rptdesign路径中找到。
Another advantage of going for the visual designer is the online documentation, which focuses more on this tool instead of the programmatic approach.
选择视觉设计器的另一个好处是在线文档,它更注重这个工具而不是程序化方法。
If we’re already using Eclipse, we just need to install the BIRT Report Design plugin, which includes a predefined perspective and the visual editor.
如果我们已经在使用Eclipse,我们只需要安装BIRT报告设计插件,它包括一个预定义的视角和可视化编辑器。
For those developers who are not currently using Eclipse and don’t want to switch, there’s an Eclipse Report Designer package, which consists of a portable Eclipse installation with the BIRT plugin pre-installed.
对于那些目前没有使用Eclipse并且不想转换的开发人员,有一个Eclipse Report Designer包,它包括一个预装了BIRT插件的便携式Eclipse安装包。
Once the report file is finalized, we can save it in our project and go back to coding in our preferred environment.
一旦报告文件确定下来,我们就可以把它保存在我们的项目中,然后回到我们喜欢的环境中进行编码。
6. The Programmatic Approach
6.计划性方法
We can also design a report using only code, but this approach is a lot harder due to the poor documentation available, so be prepared to dig into source code and online forums.
我们也可以只用代码设计一个报告,但由于现有的文档很差,这种方法难度很大,所以要准备好挖掘源代码和在线论坛。
Also worth considering is that all the tedious design details like size, length, and grid position are a lot easier to deal with using the designer.
另外值得考虑的是,所有繁琐的设计细节,如尺寸、长度和网格位置,使用设计器处理起来要容易得多。
To prove this point, here’s an example of how to define a simple static page with an image and a text:
为了证明这一点,这里有一个例子,说明如何定义一个有图片和文字的简单静态页面。
DesignElementHandle element = factory.newSimpleMasterPage("Page Master");
design.getMasterPages().add(element);

GridHandle grid = factory.newGridItem(null, 2, 1);
design.getBody().add(grid);

grid.setWidth("100%");

RowHandle row0 = (RowHandle) grid.getRows().get(0);

ImageHandle image = factory.newImage(null);
CellHandle cell = (CellHandle) row0.getCells().get(0);
cell.getContent().add(image);
image.setURL("\"https://www.baeldung.com/wp-content/themes/baeldung/favicon/favicon-96x96.png\"");

LabelHandle label = factory.newLabel(null);
cell = (CellHandle) row0.getCells().get(1);
cell.getContent().add(label);
label.setText("Hello, Baeldung world!");
This code will generate a simple (and ugly) report:
这段代码将生成一个简单的(而且很丑)报告。

The sample report displayed in the image above can be found at this path: <project_root>/reports/static_report.rptdesign.
上图中显示的报告样本可以在这个路径上找到。<project_root>/reports/static_report.rptdesign.。
Once we’ve coded how the report should look and what data it should display, we can generate the XML file by running our ReportDesignApplication class.
一旦我们编好了报告的外观和显示的数据,我们就可以通过运行ReportDesignApplication类来生成XML文件。
7. Attaching a Data Source
7.附上一个数据源
We mentioned earlier that BIRT supports many different data sources.
我们前面提到,BIRT支持许多不同的数据源。
For our example project, we used a simple CSV file with three entries. It can be found in the reports folder and consists of three simple rows of data, plus headers:
在我们的示例项目中,我们使用了一个有三个条目的简单CSV文件。它可以在reports文件夹中找到,由三行简单的数据,加上标题组成。
Student, Math, Geography, History
Bill, 10,3,8
Tom, 5,6,5
Anne, 7, 4,9
7.1. Configuring the Data Source
7.1.配置数据源
To let BIRT use our file (or any other type of source), we have to configure a Data Source.
为了让BIRT使用我们的文件(或任何其他类型的源),我们必须配置一个数据源。
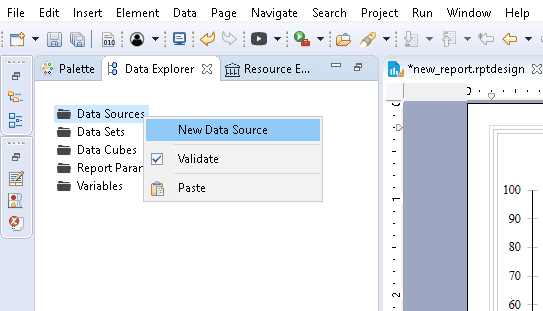
For our file, we created a Flat File Data Source with the report designer, all in just a few steps:
对于我们的文件,我们用报告设计器创建了一个平面文件数据源,所有这些只需几个步骤。
- Open the designer perspective and look at the outline on the right.
- Right-click on the Data Sources icon.
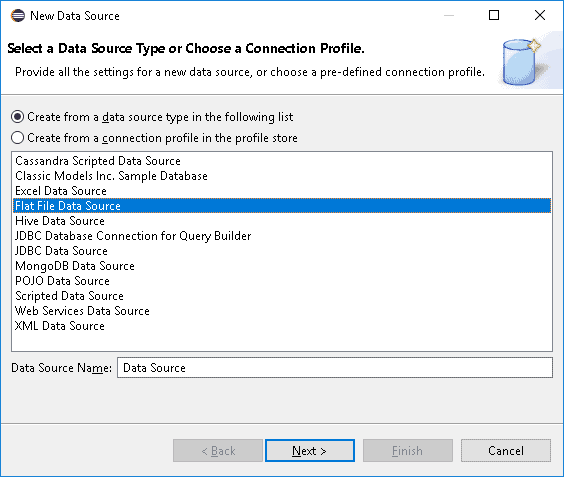
- Select the desired source type (in our case the flat file source).
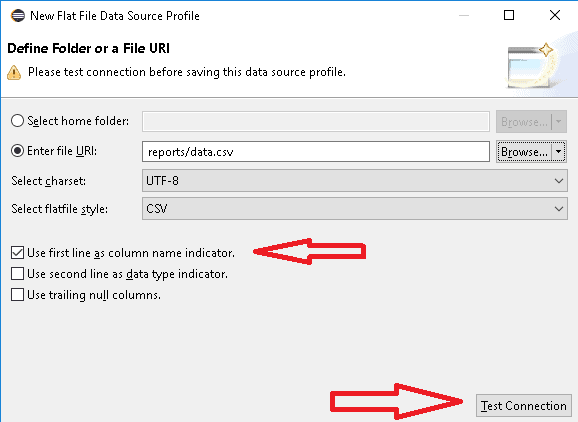
- We can now choose either to load an entire folder or just one file. We used the second option (if our data file is in CSV format, we want to make sure to use the first line as column name indicator).
- Test the connection to make sure the path is correct.
We attached some pictures to show each step:
我们附上了一些图片来显示每个步骤。

7.2. The Data Set
7.2.数据集
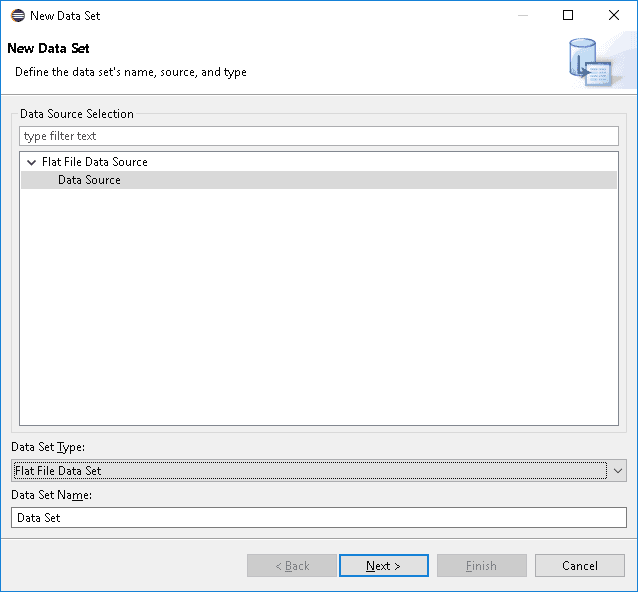
The data source is ready, but we still need to define our Data Set, which is the actual data shown in our report:
数据源已经准备好了,但是我们仍然需要定义我们的数据集,也就是我们报告中显示的实际数据。
- Open the designer perspective and look at the outline on the right.
- Right-click on the Data Sets icon.
- Select the desired Data Source and the type (in our case there’s only one type).
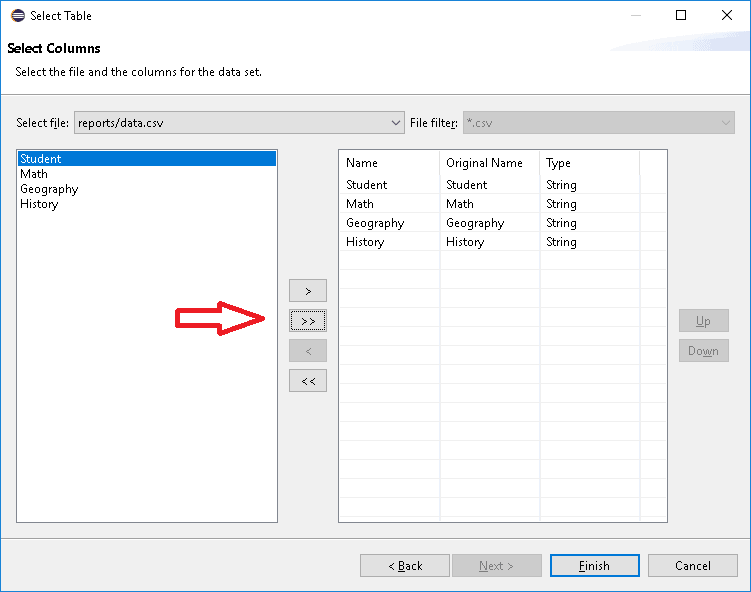
- The next screen depends on the type of data source and data set we’re selected: in our case, we see a page where we can select the columns to include.
- Once the setup is complete, we can open the configuration at any time by double-clicking on our data set.
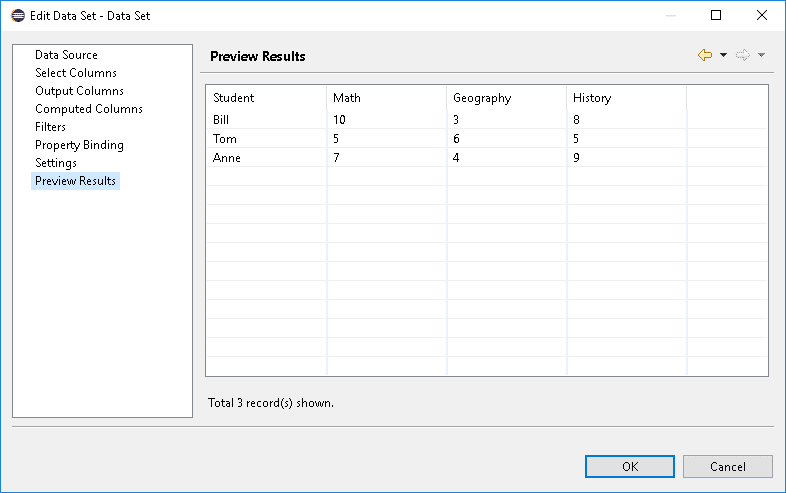
- In Output Columns, we can set the right type of the data displayed.
- We can then look at a preview by clicking on Preview Results.
Again, some pictures to clarify these steps:
同样,一些图片可以澄清这些步骤。

7.3. Other Data Source Types
7.3.其他数据源类型
As mentioned in step 4 of the Data Set configuration, the options available may change depending on the Data Source referred.
正如在数据集配置的第4步中提到的,可用的选项可能会根据所指的数据源而改变。
For our CSV file, BIRT gives options related to which columns to show, the data type, and if we want to load the entire file. On the other hand, if we had a JDBC data source, we may have to write an SQL query or a stored procedure.
对于我们的CSV文件,BIRT给出了与显示哪些列、数据类型以及我们是否要加载整个文件有关的选项。另一方面,如果我们有一个JDBC数据源,我们可能要写一个SQL查询或一个存储过程。
From the Data Sets menu, we can also join two or more data sets in a new data set.
从数据集菜单中,我们也可以在一个新的数据集中连接两个或多个数据集。
8. Rendering the Report
8.提交报告
Once the report file is ready, we have to pass it to the engine for rendering. To do this, there are a few things to implement.
一旦报告文件准备好了,我们必须把它传递给引擎进行渲染。要做到这一点,有几件事需要实现。
8.1. Initializing the Engine
8.1.初始化引擎
The ReportEngine class, which interprets the design files and generates the final result, is part of the BIRT runtime library.
解释设计文件并生成最终结果的ReportEngine类,是BIRT运行库的一部分。
It uses a bunch of helpers and tasks to do the job, making it quite resource-intensive:
它使用了一堆助手和任务来完成这项工作,使之成为相当的资源密集型。

Image source: Eclipse BIRT documentation
图片来源。Eclipse BIRT文档
There is a significant cost associated with creating an engine instance, due primarily to the cost of loading extensions. Therefore, we should create just one ReportEngine instance and use it to run multiple reports.
创建一个引擎实例有很大的成本,主要是由于加载扩展的成本。因此,我们应该只创建一个ReportEngine实例,用它来运行多个报告。
The report engine is created through a factory supplied by the Platform. Before creating the engine, we have to start the Platform, which will load the appropriate plug-ins:
报告引擎是通过一个由Platform提供的工厂创建的。在创建引擎之前,我们必须先启动Platform,它将加载适当的插件。
@PostConstruct
protected void initialize() throws BirtException {
    EngineConfig config = new EngineConfig();
    config.getAppContext().put("spring", this.context);
    Platform.startup(config);
    IReportEngineFactory factory = (IReportEngineFactory) Platform
      .createFactoryObject(IReportEngineFactory.EXTENSION_REPORT_ENGINE_FACTORY);
    birtEngine = factory.createReportEngine(config);
    imageFolder = System.getProperty("user.dir") + File.separatorChar + reportsPath + imagesPath;
    loadReports();
}
When we don’t need it anymore, we can destroy it:
当我们不再需要它时,我们可以销毁它。
@Override
public void destroy() {
    birtEngine.destroy();
    Platform.shutdown();
}
8.2. Implementing the Output Format
8.2.实现输出格式
BIRT already supports multiple output formats: HTML, PDF, PPT, and ODT, to name a few.
BIRT已经支持多种输出格式: HTML、PDF、PPT和ODT,仅此而已。
For the sample project, we implemented two of them with the methods generatePDFReport and generateHTMLReport.
对于示例项目,我们用generatePDFReport和generateHTMLReport方法实现了其中两个。
They differ slightly depending on the specific properties needed, such as output format and image handlers.
它们略有不同,取决于所需的具体属性,如输出格式和图像处理程序。
In fact, PDFs embed images together with text, while HTML reports need to generate them and/or link them.
事实上,PDF将图像与文本一起嵌入,而HTML报告需要生成它们和/或链接它们。
Thus, the PDF rendering function is quite straightforward:
因此,PDF的渲染功能是非常直接的。
private void generatePDFReport(IReportRunnable report, HttpServletResponse response,
  HttpServletRequest request) {
    IRunAndRenderTask runAndRenderTask = birtEngine.createRunAndRenderTask(report);
    response.setContentType(birtEngine.getMIMEType("pdf"));
    IRenderOption options = new RenderOption();
    PDFRenderOption pdfRenderOption = new PDFRenderOption(options);
    pdfRenderOption.setOutputFormat("pdf");
    runAndRenderTask.setRenderOption(pdfRenderOption);
    runAndRenderTask.getAppContext().put(EngineConstants.APPCONTEXT_PDF_RENDER_CONTEXT, request);

    try {
        pdfRenderOption.setOutputStream(response.getOutputStream());
        runAndRenderTask.run();
    } catch (Exception e) {
        throw new RuntimeException(e.getMessage(), e);
    } finally {
        runAndRenderTask.close();
    }
}
While the HTML rendering function needs more settings:
而HTML渲染功能则需要更多的设置:。
private void generateHTMLReport(IReportRunnable report, HttpServletResponse response,
  HttpServletRequest request) {
    IRunAndRenderTask runAndRenderTask = birtEngine.createRunAndRenderTask(report);
    response.setContentType(birtEngine.getMIMEType("html"));
    IRenderOption options = new RenderOption();
    HTMLRenderOption htmlOptions = new HTMLRenderOption(options);
    htmlOptions.setOutputFormat("html");
    htmlOptions.setBaseImageURL("/" + reportsPath + imagesPath);
    htmlOptions.setImageDirectory(imageFolder);
    htmlOptions.setImageHandler(htmlImageHandler);
    runAndRenderTask.setRenderOption(htmlOptions);
    runAndRenderTask.getAppContext().put(
      EngineConstants.APPCONTEXT_BIRT_VIEWER_HTTPSERVET_REQUEST, request);

    try {
        htmlOptions.setOutputStream(response.getOutputStream());
        runAndRenderTask.run();
    } catch (Exception e) {
        throw new RuntimeException(e.getMessage(), e);
    } finally {
        runAndRenderTask.close();
    }
}
Most noteworthy, we set the HTMLServerImageHandler instead of leaving the default handler. This small difference has a big impact on the generated img tag:
最值得注意的是,我们设置了HTMLServerImageHandler,而不是留下默认的处理程序。这个小小的差别对生成的img标签有很大影响。
- the default handler links the img tag to the file system path, blocked for security by many browsers
- the HTMLServerImageHandler links to the server URL
With the setImageDirectory method, we specify where the engine will save the generated image file.
通过setImageDirectory方法,我们指定引擎将在哪里保存生成的图像文件。
By default, the handler generates a new file at every request, so we could add a caching layer or a deletion policy.
默认情况下,处理程序在每次请求时都会生成一个新的文件,所以我们可以添加一个缓存层或一个删除策略。
8.3. Publishing the Images
8.3.发布图像
In the HTML report case, image files are external, so they need to be accessible on the server path.
在HTML报告的情况下,图像文件是外部的,所以它们需要在服务器路径上能够被访问。
In the code above, with the setBaseImageURL method, we tell the engine what relative path should be used in the img tag link, so we need to make sure that the path is actually accessible!
在上面的代码中,通过setBaseImageURL方法,我们告诉引擎应该在img标签链接中使用什么相对路径,所以我们需要确保该路径实际上是可以访问的!
For this reason, in our ReportEngineApplication, we configured Spring to publish the images folder:
出于这个原因,在我们的ReportEngineApplication中,我们配置了Spring来发布images文件夹。
@SpringBootApplication
@EnableWebMvc
public class ReportEngineApplication implements WebMvcConfigurer {
    @Value("${reports.relative.path}")
    private String reportsPath;
    @Value("${images.relative.path}")
    private String imagesPath;

    ...

    @Override
    public void addResourceHandlers(ResourceHandlerRegistry registry) {
        registry
          .addResourceHandler(reportsPath + imagesPath + "/**")
          .addResourceLocations("file:///" + System.getProperty("user.dir") + "/"
            + reportsPath + imagesPath);
    }
}
Whatever the path we choose, we have to make sure the same path is used here and in the htmlOptions of the previous snippet, or our report won’t be able to display images.
无论我们选择什么路径,我们必须确保这里和前面片段的htmlOptions中使用相同的路径,否则我们的报告将无法显示图片。
9. Displaying the Report
9.显示报告
The last component needed to get our application ready is a Controller to return the rendered result:
让我们的应用程序准备好的最后一个组件是一个Controller来返回渲染的结果。
@RequestMapping(method = RequestMethod.GET, value = "/report/{name}")
@ResponseBody
public void generateFullReport(HttpServletResponse response, HttpServletRequest request,
  @PathVariable("name") String name, @RequestParam("output") String output)
  throws EngineException, IOException {
    OutputType format = OutputType.from(output);
    reportService.generateMainReport(name, format, response, request);
}
With the output parameter, we can let the user choose the desired format — HTML or PDF.
通过output参数,我们可以让用户选择想要的格式–HTML或PDF。
10. Testing the Report
10.测试报告
We can start the application by running the ReportEngineApplication class.
我们可以通过运行ReportEngineApplication类来启动该应用程序。
During startup, the BirtReportService class will load all the reports found in the <project_root>/reports folder.
在启动期间,BirtReportService类将加载在<project_root>/reports文件夹中发现的所有报告。
To see our reports in action, we just need to point our browser to:
要看到我们的报告在运行,我们只需要将浏览器指向。
- /report/csv_data_report?output=pdf
- /report/csv_data_report?output=html
- /report/static_report?output=pdf
- /report/static_report?output=html
Here is how the csv_data_report report looks:
下面是csv_data_report报告的样子。
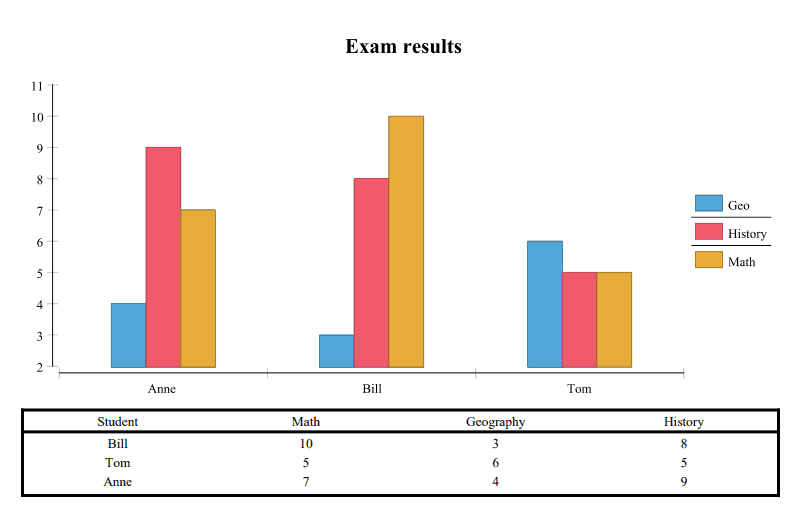
To reload a report after changing the design file, we just point our browser to /report/reload.
要在改变设计文件后重新加载报告,我们只需将浏览器指向/report/reload.。
11. Conclusion
11.结语
In this article, we integrated BIRT with Spring Boot, exploring the pitfalls and challenges, but also its power and flexibility.
在这篇文章中,我们将BIRT与Spring Boot集成在一起,探讨了陷阱和挑战,但也探讨了它的力量和灵活性。
The source code for the article is available over on GitHub.
该文章的源代码可在GitHub上获得。