1. Overview
1.概述
A WebSocket provides an event-driven, bi-directional, and full-duplex connection between a client and the server. WebSocket communication involves a handshake, messaging (sending and receiving messages), and closing the connection.
WebSocket在客户端和服务器之间提供了一个事件驱动的、双向的、全双工的连接。WebSocket通信涉及握手、消息传递(发送和接收消息)以及关闭连接。
In this tutorial, we’ll learn to debug WebSockets using browsers and other popular tools.
在本教程中,我们将学习使用浏览器和其他流行工具来调试WebSockets。
2. Building a WebSocket
2.构建一个WebSocket
Let’s start by building a WebSocket server that pushes stock ticker updates to the clients.
让我们从建立一个WebSocket服务器开始,将股票行情的更新推送给客户端。
2.1. Maven Dependencies
2.1.Maven的依赖性
Firstly, let’s declare the Spring WebSocket dependency:
首先,让我们声明Spring WebSocket依赖性。
<dependency>
    <groupId>org.springframework.boot</groupId>
    <artifactId>spring-boot-starter-websocket</artifactId>
    <version>2.5.4</version>
</dependency>
2.2. Spring Boot Configuration
2.2.Spring Boot配置
Next, let’s define the required @Configurations to enable WebSocket support:
接下来,让我们定义所需的@Configurations来启用WebSocket支持。
@Configuration
@EnableWebSocketMessageBroker
public class WebsocketConfiguration implements WebSocketMessageBrokerConfigurer {
    @Override
    public void configureMessageBroker(MessageBrokerRegistry config) {
        config.enableSimpleBroker("/topic");
        config.setApplicationDestinationPrefixes("/app");
    }
    @Override
    public void registerStompEndpoints(StompEndpointRegistry registry) {
        registry.addEndpoint("/stock-ticks").withSockJS();
    }
}
Note that this configuration provides a message broker-based WebSocket and registers STOMP endpoints.
注意,该配置提供了一个基于消息代理的WebSocket并注册了STOMP端点。
Additionally, let’s create a controller that sends mock stock updates to the subscribers:
此外,让我们创建一个控制器,向订阅者发送模拟的股票更新。
private SimpMessagingTemplate simpMessagingTemplate;

public void sendTicks() {
    simpMessagingTemplate.convertAndSend("/topic/ticks", getStockTicks());
}
2.3. Client – A User Interface
2.3 客户端 – 一个用户界面
Let’s build an HTML5 page that displays the updates from the server:
让我们建立一个HTML5页面,显示来自服务器的更新。
<div class="spinner-border text-primary" role="status">
    <span class="visually-hidden">Loading ...</span>
</div>
Next, let’s connect to a WebSocket server using SockJS:
接下来,让我们使用SockJS连接到一个WebSocket服务器。
function connect() {
    let socket = new SockJS('/stock-ticks');
    stompClient = Stomp.over(socket);
    stompClient.connect({}, function (frame) {
        stompClient.subscribe('/topic/ticks', function (ticks) {
            ...
        });
    });
}
Here, we open a WebSocket using SockJS and then subscribe to the topic /topic/ticks. Eventually, the client consumes and displays the messages on the user interface when the server produces the messages.
在这里,我们使用SockJS打开一个WebSocket,然后订阅主题/topic/ticks.最终,当服务器产生消息时,客户端消费并在用户界面上显示这些消息。
2.4. Demonstration
2.4.示范
Let’s start the server and open the application in a browser:
让我们启动服务器并在浏览器中打开该应用程序。
mvn spring-boot:runAs a result, we see the stock ticks changing every three seconds without a page refresh or a server poll:
结果是,我们看到股票的刻度每三秒就会变化一次,而不需要刷新页面或进行服务器轮询。
So far, we’ve built an application that receives stock ticks on a WebSocket. Next, let’s learn how to debug this application.
到目前为止,我们已经建立了一个在WebSocket上接收股票行情的应用程序。接下来,我们来学习如何调试这个应用程序。
3. Mozilla Firefox
3.火狐浏览器
Mozilla Firefox has a WebSocket inspector along with other web developer tools. In Firefox, we can enable the developer tools in several ways:
Mozilla Firefox有一个WebSocket检查器,以及其他网络开发工具。在Firefox中,我们可以通过几种方式启用开发者工具。
- Windows and Linux: Ctrl + Shift + I or F12 or Application Menu → More Tools → Web Developer Tools
- macOS: Cmd + Opt + I
Next, click on Network Monitor → WS to open the WebSockets pane:
接下来,点击Network Monitor → WS,打开WebSockets窗格。
With the WebSocket inspector active, let’s explore it further.
随着WebSocket检查器的激活,让我们进一步探索它。
3.1. Handshake
3.1 握手
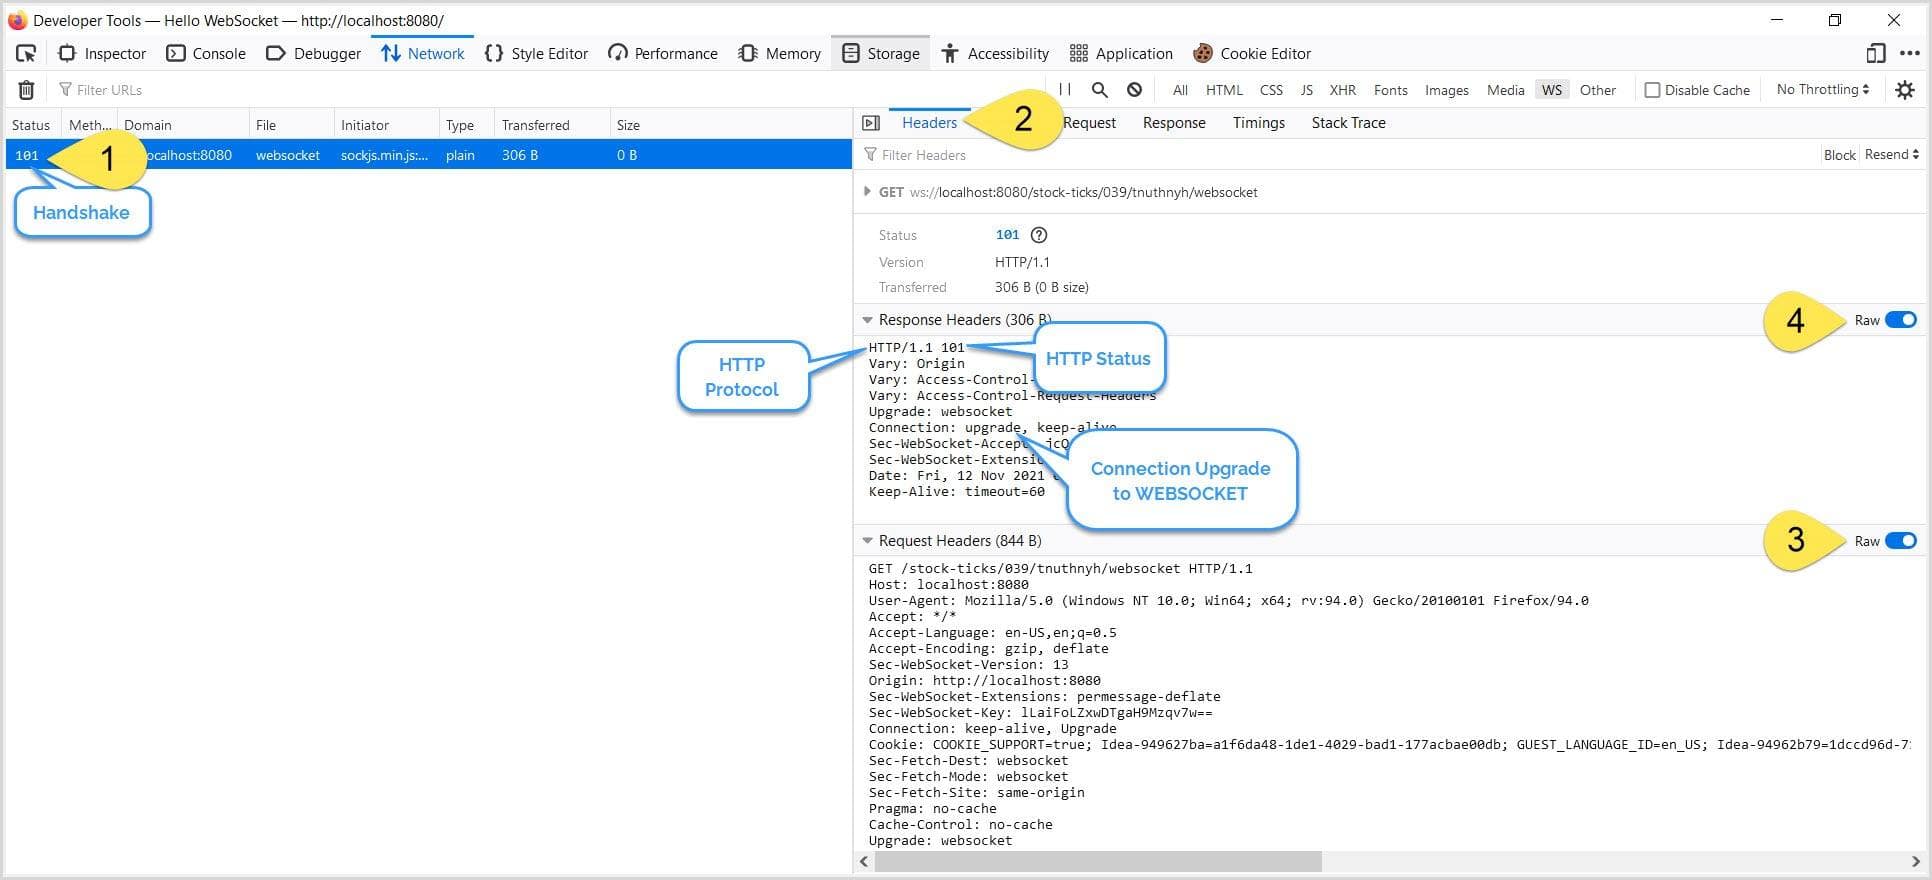
Open the URL http://localhost:8080 in Firefox. With the developer tools open, we now see an HTTP handshake. Click on the request to analyze the handshake:
在 Firefox 中打开 URL http://localhost:8080 。随着开发者工具的打开,我们现在看到一个HTTP握手。点击该请求,分析握手过程。
Under the Headers tab, we see request and response headers with protocol upgrades and other WebSocket headers.
在头信息标签下,我们看到了具有协议升级的请求和响应头信息以及其他WebSocket头信息。
3.2. Message Exchange
3.2.信息交换
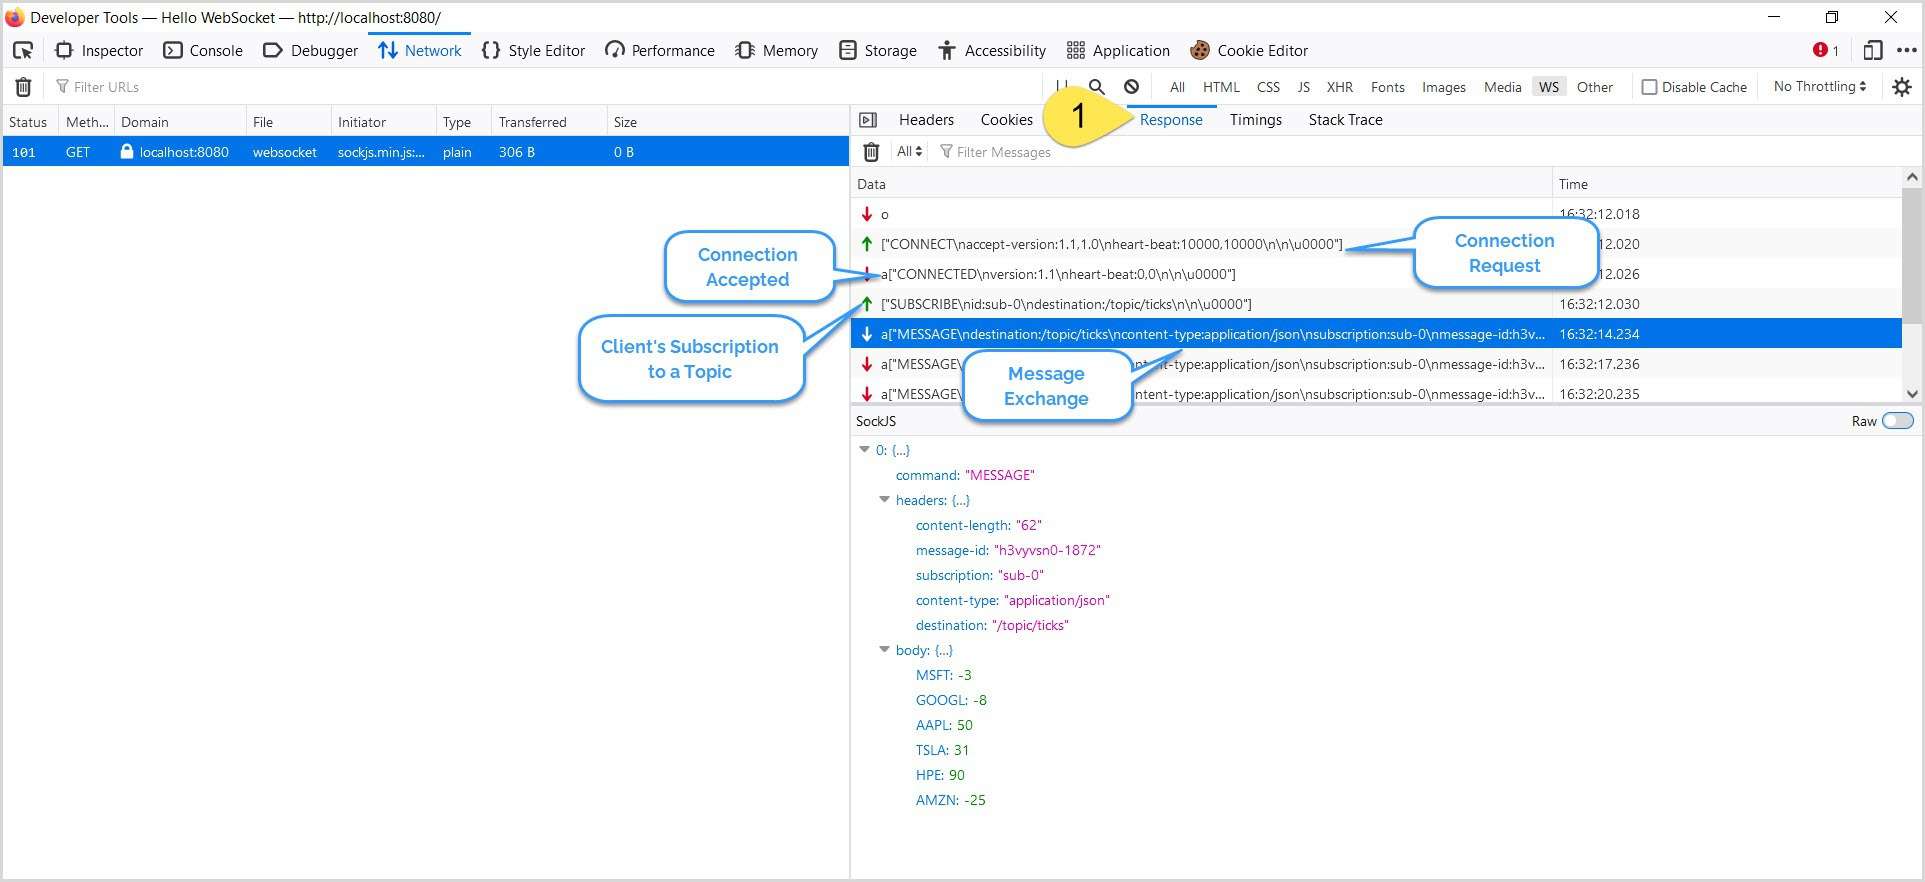
Subsequently, after the handshake, the message exchange begins. Click on the Response tab to view the message exchange:
随后,握手后,开始进行信息交换。点击Response 标签查看消息交换。
In the Response pane, a ![]() shows a client request and a
shows a client request and a ![]()
 represents the server response.
在Response窗格中,一个![]() 显示一个客户端请求和一个
显示一个客户端请求和一个![]()
 代表服务器响应。
3.3. Connection Termination
3.3.连接终止
In WebSockets, either a client or a server can close the connection.
在WebSockets中,客户端或服务器都可以关闭连接。
First, let’s emulate client-side connection termination. Click on the Disconnect button on the HTML page and view the Response tab:
首先,让我们模拟一下客户端的连接终止。点击HTML页面上的Disconnect按钮,查看Response标签。
Here, we’ll see a connection termination request from the client.
在这里,我们将看到一个来自客户端的连接终止请求。
Next, let’s shut down the server to emulate server-side connection closure. The connection closes as the server is not reachable:
接下来,让我们关闭服务器来模拟服务器端的连接关闭。由于服务器无法到达,连接关闭。
RFC6455 – The WebSocket Protocol specifies:
- 1000 – A normal closure
- 1001 – A server is down, or the user has navigated away from the page
4. Google Chrome
4.谷歌浏览器
Google Chrome has a WebSocket inspector, a part of developer tools, that is similar to Firefox. We can activate the WebSocket inspector in a couple of ways:
Google Chrome有一个WebSocket检查器,它是开发者工具的一部分,与Firefox类似。我们可以通过几种方式激活WebSocket检查器。
- Windows and Linux: Ctrl + Shift + I or Ctrl + Shift + J or F12 or Application Menu → More Tools → Developer Tools
- macOS: Cmd + Opt + I
Next, click on the Network → WS panel to open the WebSocket pane:
接下来,点击Network → WS面板,打开WebSocket窗格。
4.1. Handshake
4.1 握手
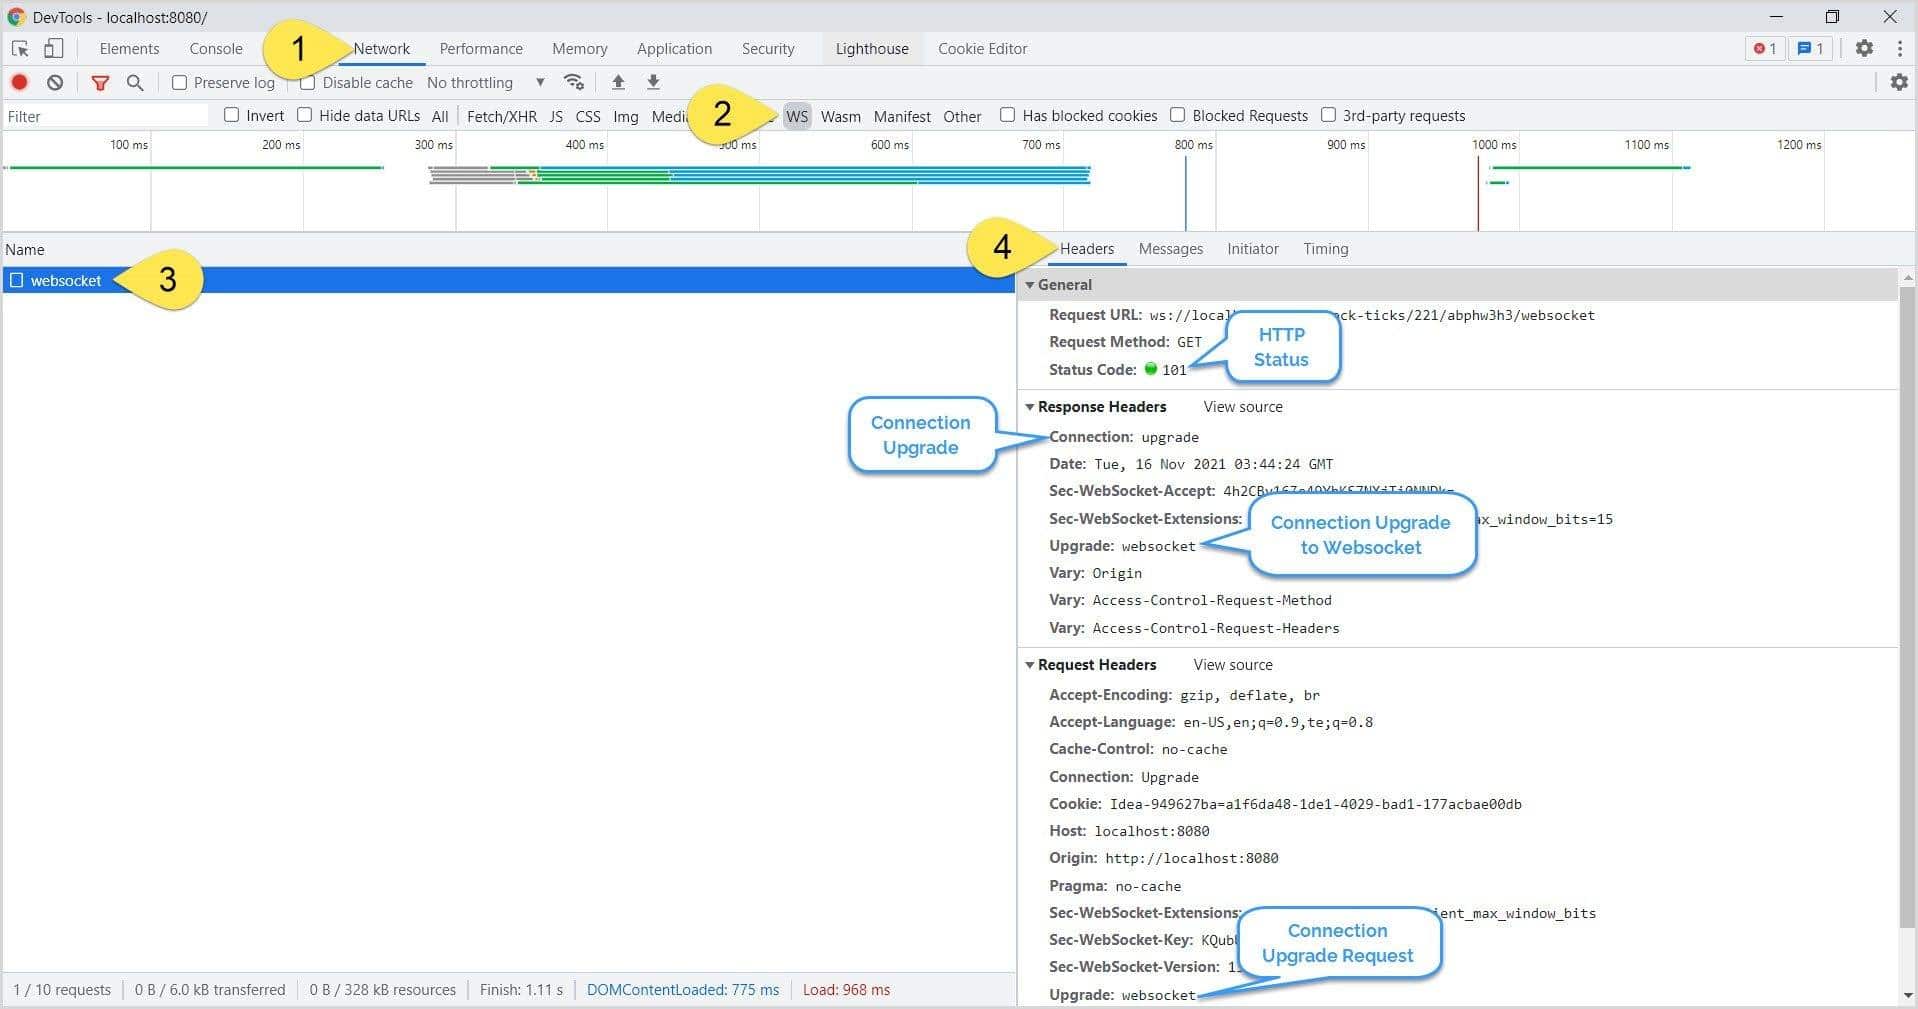
Now, open the URL http://localhost:8080 in Chrome and click on the request in the developer tools:
现在,在Chrome浏览器中打开URL http://localhost:8080 ,并在开发者工具中点击请求。
Under the Headers tab, we notice all the WebSocket headers, including the handshake.
在头信息标签下,我们注意到所有WebSocket头信息,包括握手。
4.2. Message Exchange
4.2.信息交换
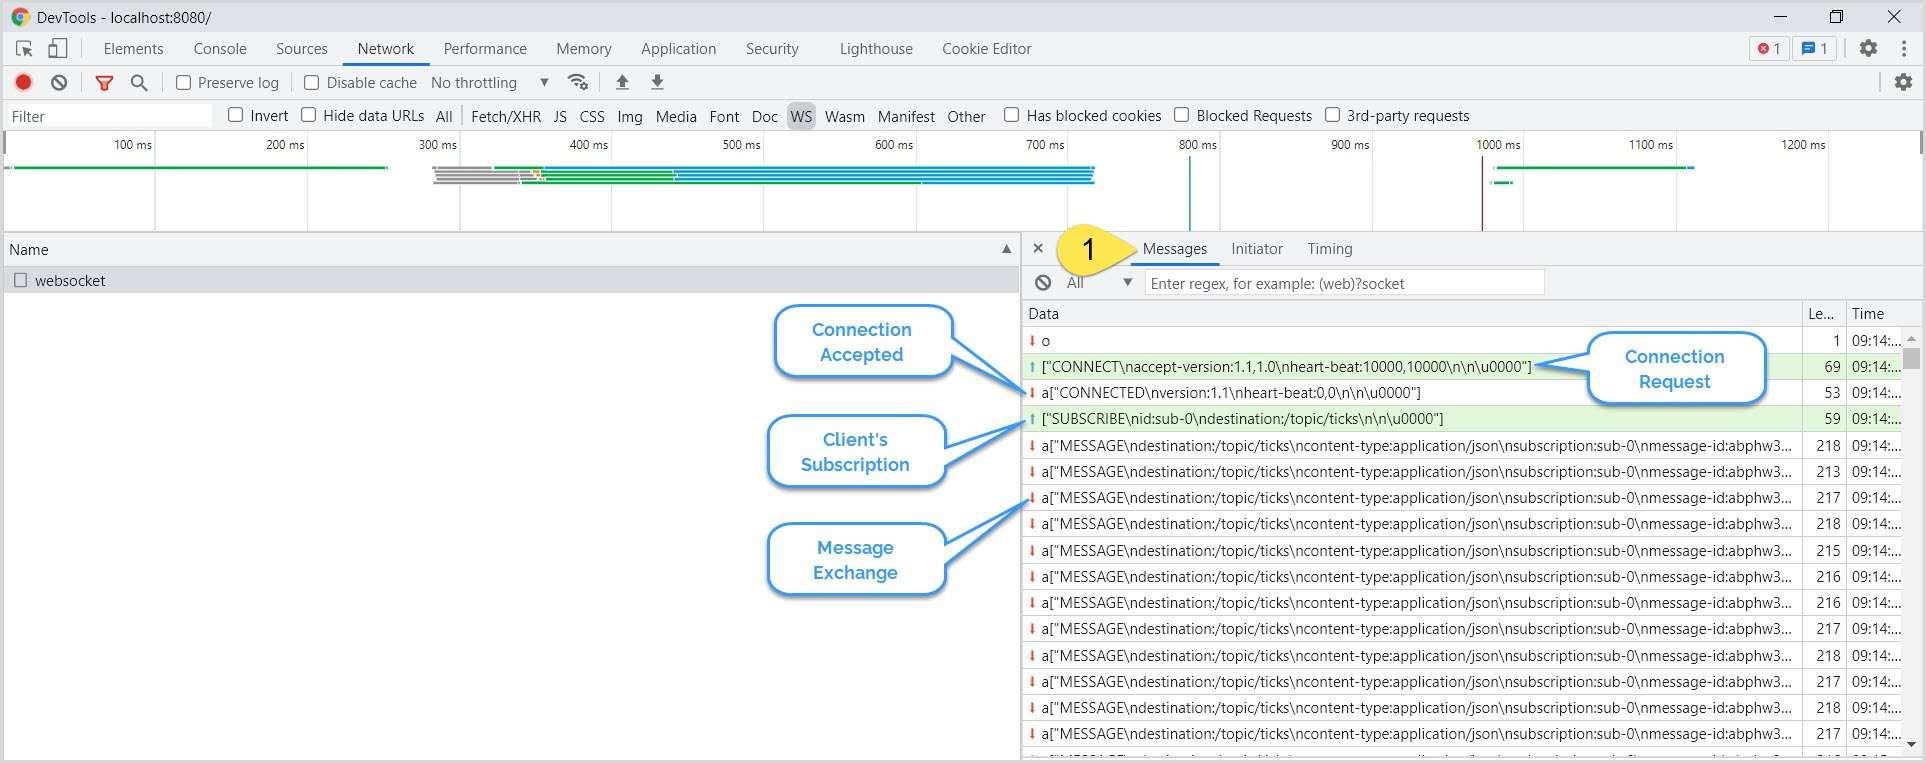
Next, let’s check the message exchange between the client and the server. On the developer tools, click on the Messages tab:
接下来,让我们检查一下客户端和服务器之间的消息交换情况。在开发者工具中,点击信息标签。
Like in Firefox, we can view the message exchange, including the CONNECT request, SUBSCRIBE request, and MESSAGE exchange.
像在Firefox中一样,我们可以查看消息交换,包括CONNECT 请求,SUBSCRIBE 请求,以及MESSAGE 交换。
4.3. Connection Termination
4.3.连接终止
Finally, we’ll debug both the client-side and server-side connection termination. But, first, let’s close the client-side connection:
最后,我们将对客户端和服务器端的连接终止进行调试。但是,首先,让我们关闭客户端的连接。
We can see a graceful connection termination between the client and the server. Next, let’s emulate a server terminating the connection:
我们可以看到客户端和服务器之间有一个优雅的连接终止。接下来,让我们模拟一下服务器终止连接的情况。
A successful connection termination ends the message exchange between the client and the server.
一个成功的连接终止结束了客户端和服务器之间的消息交换。
5. Wireshark
5.线路跟踪器
Wireshark is the most popular, extensive, and widely-used network protocol sniffing tool. So next, let’s see how to sniff and analyze the WebSocket traffic using Wireshark.
Wireshark是最流行、最广泛和最常用的网络协议嗅探工具。因此,接下来让我们看看如何使用Wireshark嗅探和分析WebSocket流量。
5.1. Capturing the Traffic
5.1.捕获流量
Unlike other tools, we have to capture the traffic for Wireshark and then analyze it. So, let’s begin with capturing the traffic.
与其他工具不同,我们必须为Wireshark捕获流量,然后进行分析。因此,让我们从捕获流量开始。
In Windows, when we open Wireshark, it displays all the available network interfaces with live network traffic. Therefore, selecting the correct network interface to capture the network packets is essential.
在Windows中,当我们打开Wireshark时,它会显示所有可用的网络接口和实时网络流量。因此,选择正确的网络接口来捕获网络数据包是至关重要的。
Typically, the network interface will be a loopback adapter if the WebSocket server runs as localhost (127.0.0.1):
通常情况下,如果WebSocket服务器以localhost(127.0.0.1)方式运行,网络接口将是一个环回适配器。
Next, to start capturing the packets, double-click on the interface. Once the correct interface is selected, we can further filter the packets based on the protocol.
接下来,为了开始捕获数据包,双击接口。一旦选择了正确的接口,我们可以根据协议进一步过滤数据包。
In Linux, use the tcpdump command to capture the network traffic. For example, open a shell terminal and use this command to generate a packet capture file, websocket.pcap:
在Linux中,使用tcpdump命令来捕获网络流量。例如,打开一个shell终端,使用该命令生成一个数据包捕获文件,websocket.cap。
tcpdump -w websocket.pcap -s 2500 -vv -i loThen, use Wireshark to open the websocket.pcap file.
然后,使用Wireshark打开websocket.cap文件。
5.2. Handshake
5.2 握手
Let’s try to analyze the network packets captured so far. First, since the initial handshake is on HTTP protocol, let’s filter the packets for http protocol:
让我们试着分析一下到目前为止捕获的网络数据包。首先,由于最初的握手是在HTTP协议上,让我们过滤一下httpprotocol的数据包。
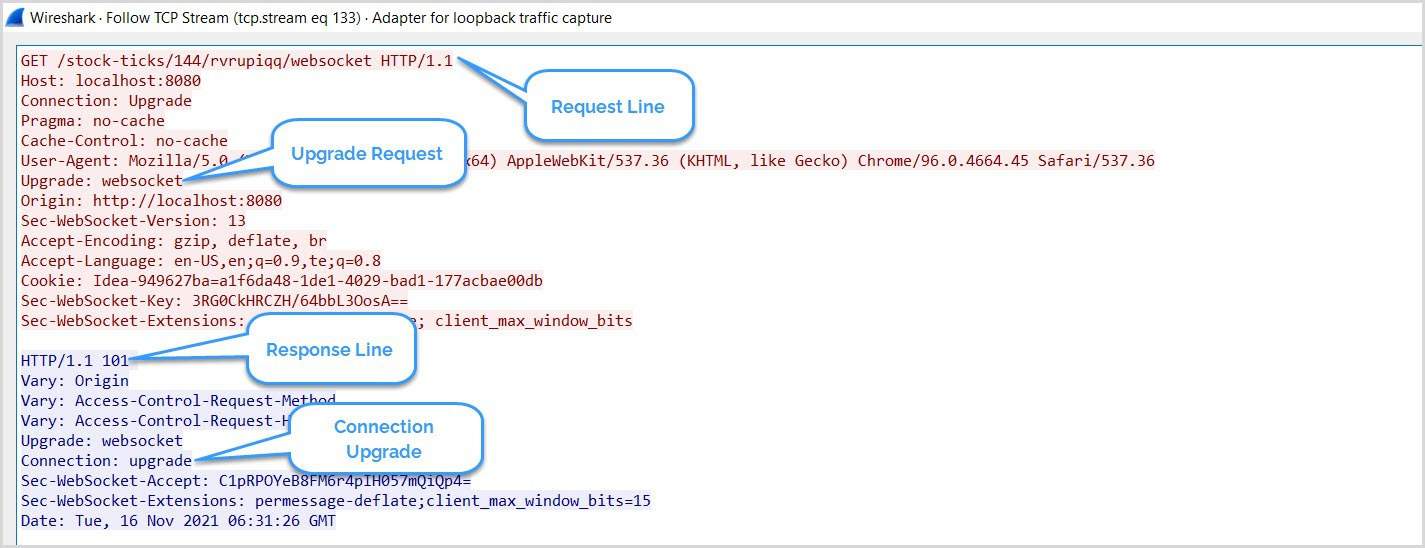
Next, to get a detailed view of the handshake, right-click on the packet → Follow → TCP Stream:
接下来,为了获得握手的详细情况,右击数据包→Follow→TCP Stream。
5.3. Message Exchange
5.3.信息交换
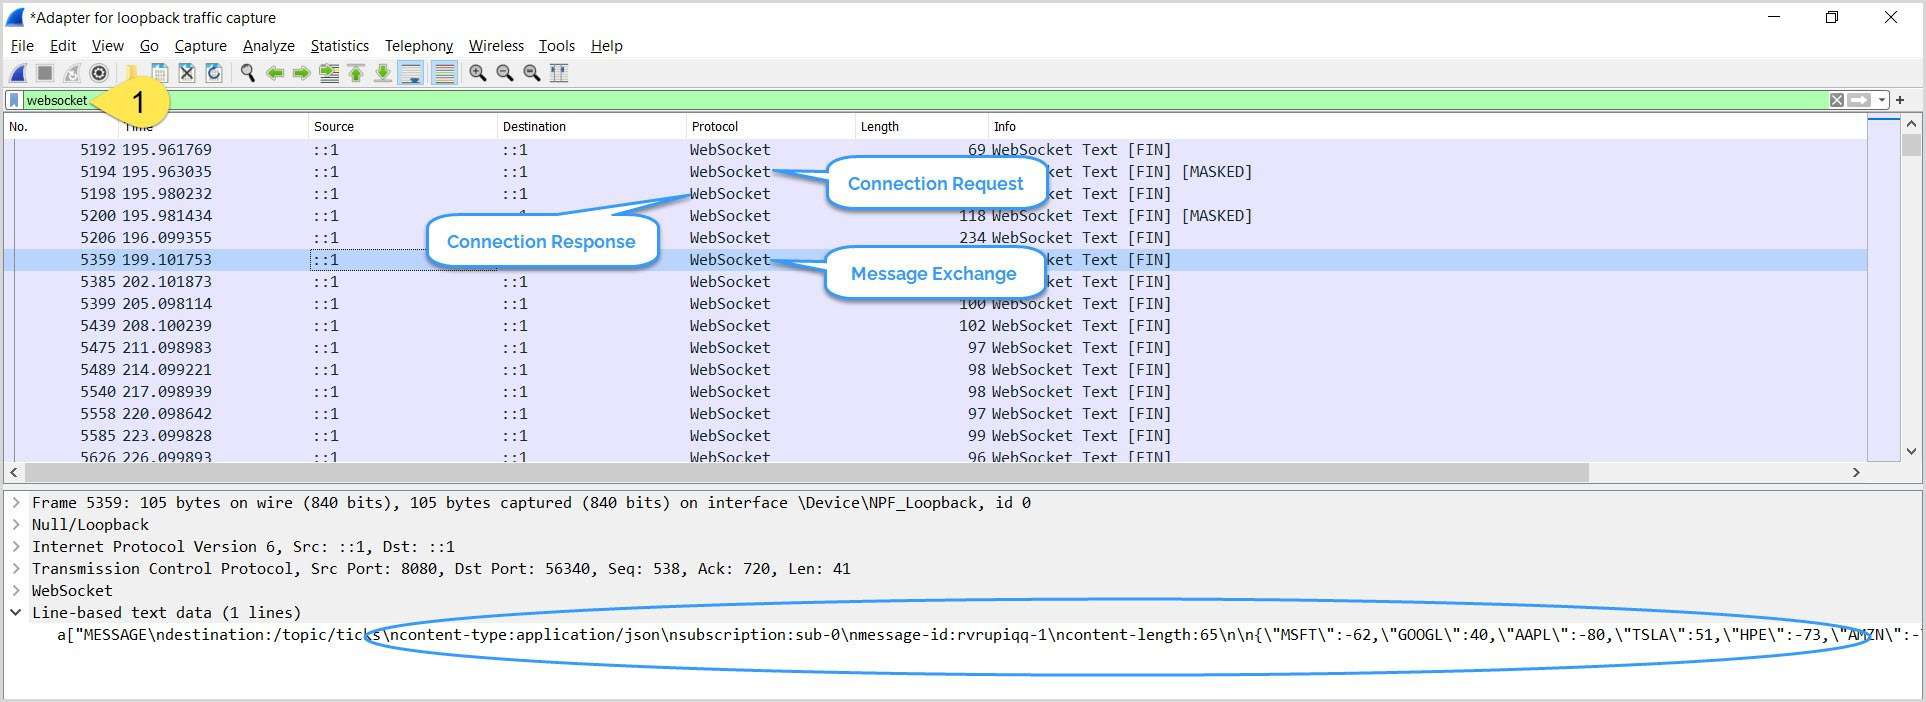
Recall that, after the initial handshake, the client and the server communicate via the websocket protocol. So, let’s filter the packets for websocket. The remaining packets shown reveal the connection and message exchange:
回顾一下,在初始握手之后,客户端和服务器通过websocket协议进行通信。因此,让我们过滤一下websocket的数据包。显示的其余数据包揭示了连接和消息交换的情况。
5.4. Connection Termination
5.4.连接终止
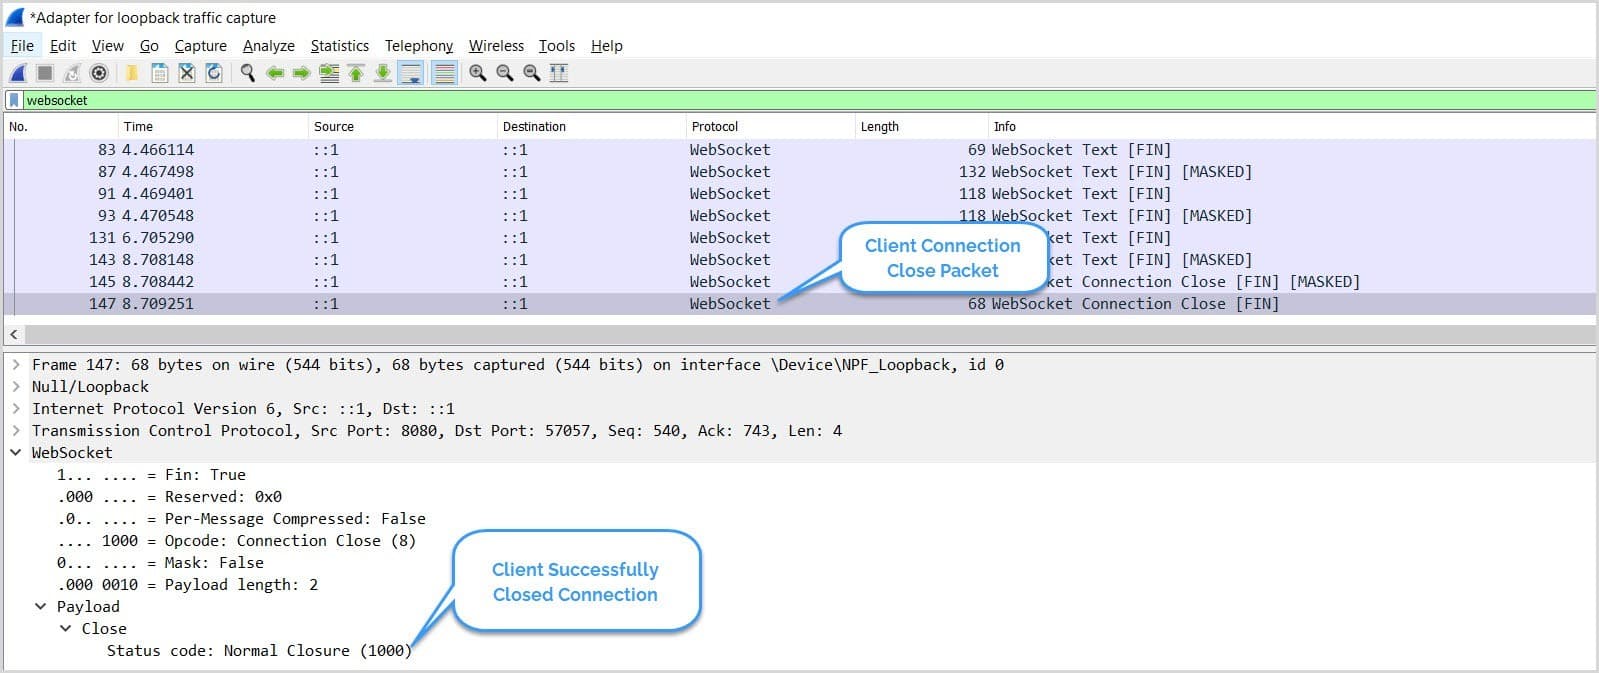
First, let’s debug client-side connection termination. Start the Wireshark capture and click the Disconnect button on the HTML page and check the network packets:
首先,我们来调试一下客户端的连接终止。启动Wireshark捕获,点击HTML页面上的Disconnect按钮,检查网络数据包。
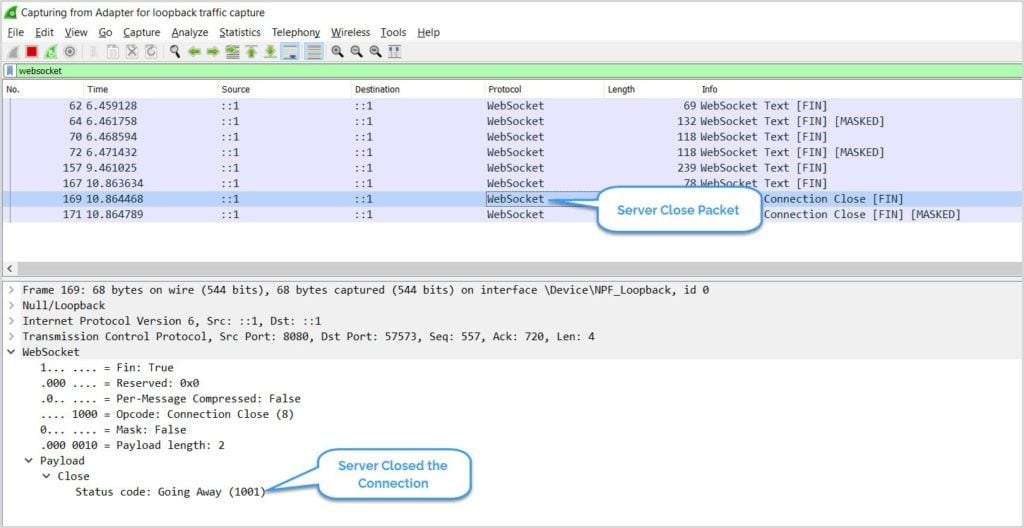
Similarly, let’s emulate server-side connection termination. First, start the packet capture and then shutdown the WebSocket server:
同样地,让我们来模拟服务器端的连接终止。首先,启动数据包捕获,然后关闭WebSocket服务器。
6. Postman
6.邮递员
As of date, Postman‘s support for WebSockets is still in Beta. However, we can still use it for debugging our WebSockets:
截至目前,Postman对 WebSockets 的支持仍处于 Beta 状态。然而,我们仍然可以使用它来调试我们的WebSockets。
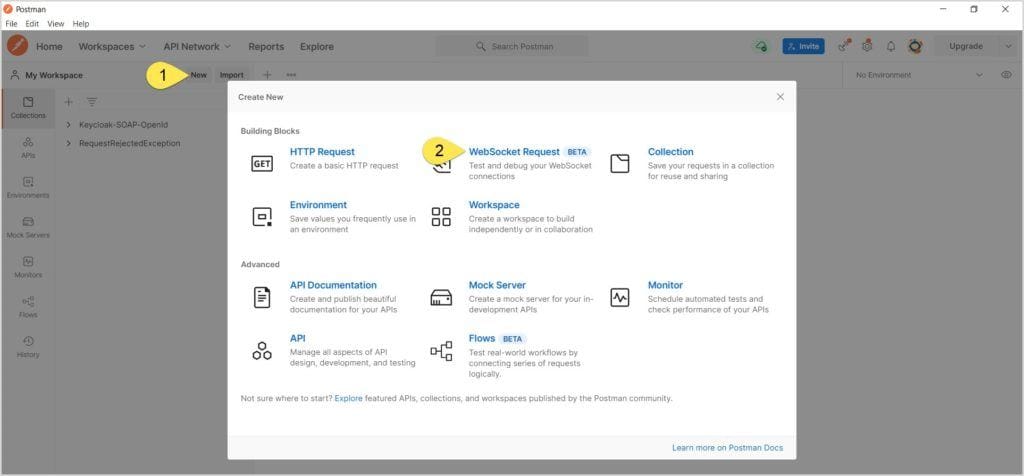
Open Postman and press Ctrl + N or New → WebSocket Request:
打开Postman,按Ctrl+N或New→WebSocket Request:
Next, in the Enter Server URL textbox, enter the WebSocket URL and click on Connect:
接下来,在输入服务器URL文本框中,输入WebSocket URL并点击连接。
6.1. Handshake
6.1 握手
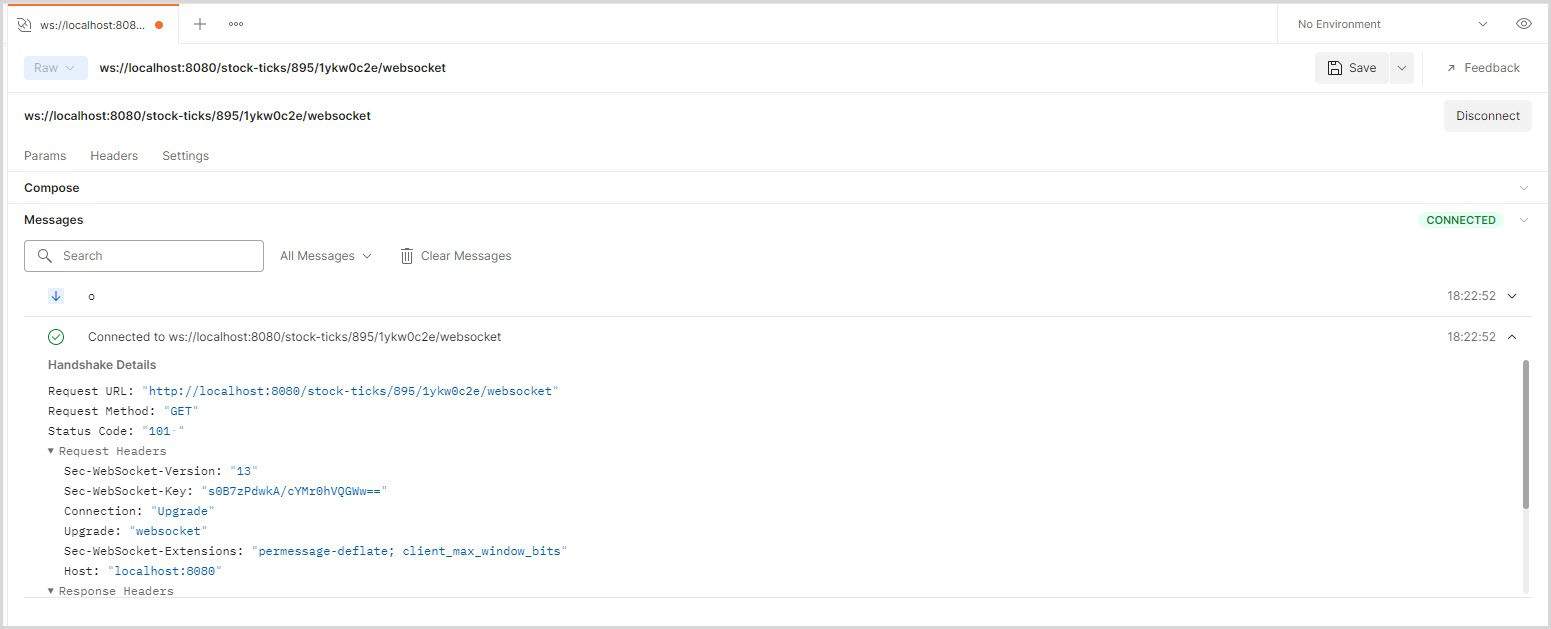
Once the connection is successful, on the Messages section, click on the connection request to view the handshake details:
一旦连接成功,在Messages部分,点击连接请求,查看握手细节。
6.2. Message Exchange
6.2.信息交换
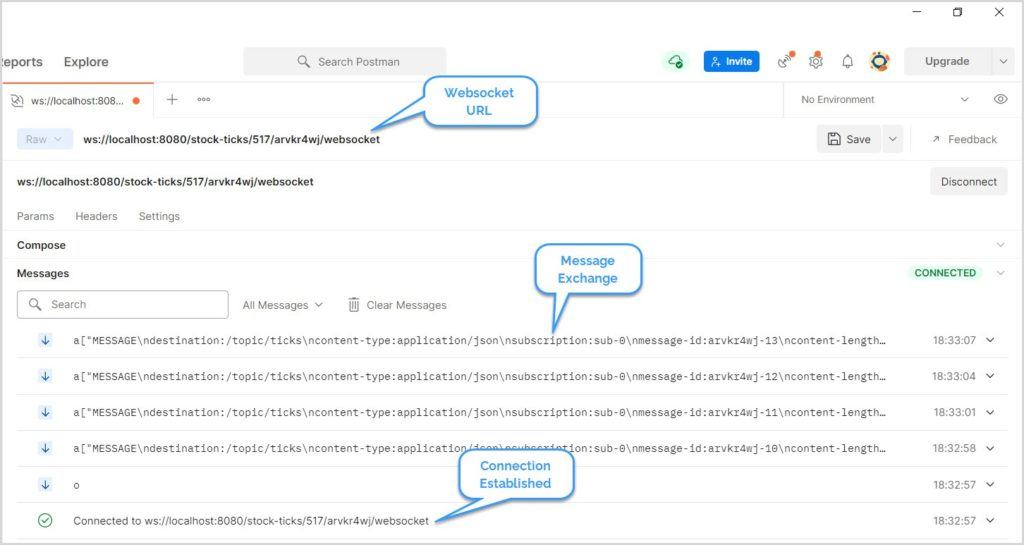
Now, let’s check the message exchange between the client and server:
现在,让我们检查一下客户端和服务器之间的消息交换。
Once the client subscribes to the topic, we can see message flow between the client and the server.
一旦客户端订阅了该主题,我们就可以看到客户端和服务器之间的消息流。
6.3. Connection Termination
6.3.连接终止
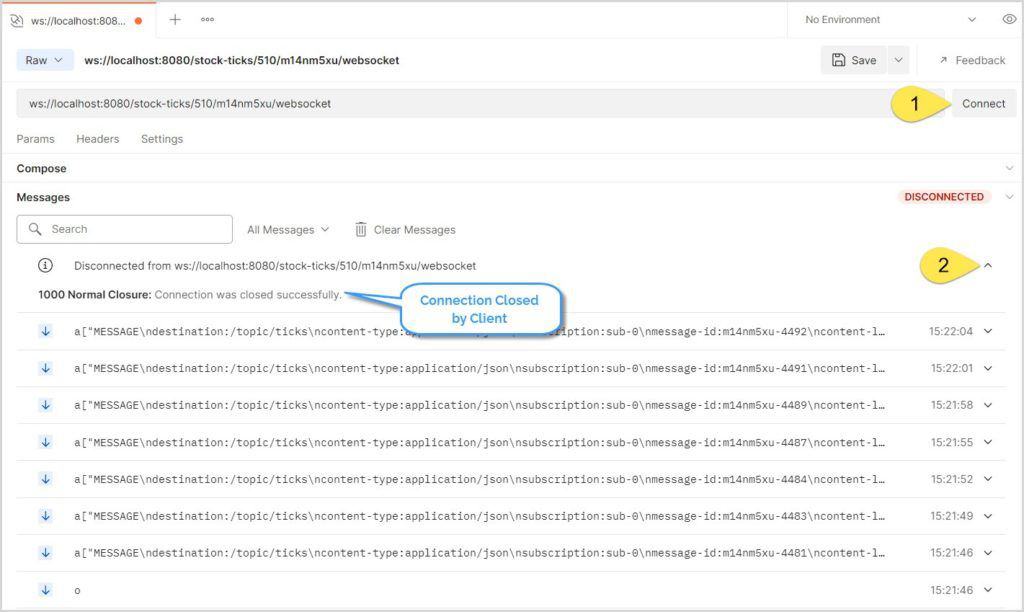
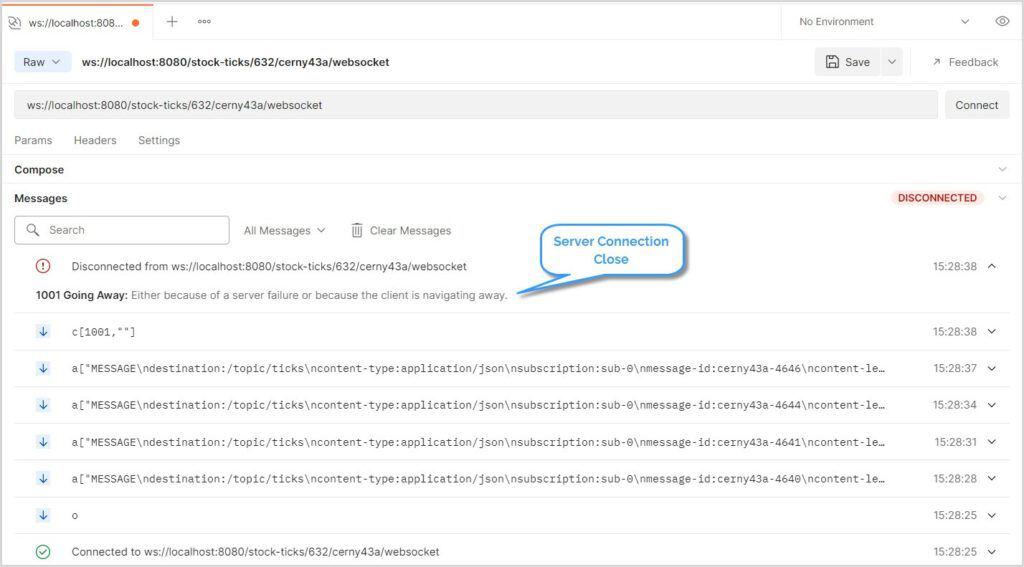
Further, let’s see how to debug connection termination, both by the client and server. First, click the Disconnect button in Postman to close the connection from the client-side:
此外,让我们看看如何调试连接终止,包括客户端和服务器。首先,点击Postman中的Disconnect按钮,从客户端关闭连接。
Similarly, to check the server connection termination, shut down the server:
同样,要检查服务器的连接终止,请关闭服务器。
7. Spring WebSocket Client
7.Spring WebSocket客户端
Finally, let’s debug WebSockets using a Spring-based Java client:
最后,让我们使用基于Spring的Java客户端来调试WebSockets。
WebSocketClient client = new StandardWebSocketClient();
WebSocketStompClient stompClient = new WebSocketStompClient(client);
stompClient.setMessageConverter(new MappingJackson2MessageConverter());
StompSessionHandler sessionHandler = new StompClientSessionHandler();
stompClient.connect(URL, sessionHandler);
This creates a WebSocket client and then registers a STOMP client session handler.
这将创建一个WebSocket客户端,然后注册一个STOMP客户端会话处理程序。
Next, let’s define a handler that extends the StompSessionHandlerAdapter. Intentionally, the StompSessionHandlerAdapter class does not provide implementations except for the method getPayloadType. Hence, let’s give a meaningful implementation to these methods:
接下来,让我们定义一个扩展了StompSessionHandlerAdapter的处理程序。故意的,StompSessionHandlerAdapter类没有提供实现,除了方法getPayloadType。因此,让我们给这些方法一个有意义的实现。
public class StompClientSessionHandler extends StompSessionHandlerAdapter {

    @Override
    public void afterConnected(StompSession session, StompHeaders connectedHeaders) {
        session.subscribe("/topic/ticks", this);
    }

    // other methods ...
}
Next, when we run this client, we get logs similar to:
接下来,当我们运行这个客户端时,我们得到类似的日志。
16:35:49.135 [WebSocketClient-AsyncIO-8] INFO StompClientSessionHandler - Subscribed to topic: /topic/ticks
16:35:50.291 [WebSocketClient-AsyncIO-8] INFO StompClientSessionHandler - Payload -> {MSFT=17, GOOGL=48, AAPL=54, TSLA=73, HPE=89, AMZN=-5}
In the logs, we can see the connection and the message exchange. Moreover, while the client is up and running, we can use Wireshark to sniff the WebSocket packets:
在日志中,我们可以看到连接和消息交换。此外,在客户端启动和运行时,我们可以使用Wireshark来嗅探WebSocket数据包。
8. Conclusion
8.结语
In this tutorial, we learned how to debug WebSockets using some of the most popular and widely-used tools. As the usage and popularity of WebSockets are increasing by the day, we can expect the debug tools to increase in number and become more advanced.
在本教程中,我们学习了如何使用一些最流行和最广泛使用的工具来调试WebSockets。随着WebSockets的使用和普及与日俱增,我们可以预期调试工具会越来越多,越来越先进。
As always, the complete source code is available over on GitHub.
一如既往,完整的源代码可在GitHub上获得,。

