1. Overview
1.概述
On refactoring.com, we read that “refactoring is a disciplined technique for restructuring an existing body of code, altering its internal structure without changing its external behavior.”
在refactoring.com上,我们读到 “重构是一种有规律的技术,用于重组现有的代码体,改变其内部结构而不改变其外部行为。”
Typically, we might want to rename variables or methods, or we may want to make our code more object-oriented by introducing design patterns. Modern IDEs have many built-in features to help us achieve these kinds of refactoring objectives and many others.
通常情况下,我们可能想重命名变量或方法,或者想通过引入设计模式使我们的代码更加面向对象。现代集成开发环境有许多内置的功能,可以帮助我们实现这些类型的重构目标和其他许多目标。
In this tutorial, we’ll focus on refactoring in Eclipse, a free popular Java IDE.
在本教程中,我们将重点介绍Eclipse中的重构,Eclipse是一个免费的流行的Java IDE。
Before we start any refactoring, it’s advisable to have a solid suite of tests so as to check that we didn’t break anything while refactoring.
在我们开始任何重构之前,最好有一套可靠的测试,以便检查我们在重构时没有破坏任何东西。
2. Renaming
2.重新命名
2.1. Renaming Variables and Methods
2.1.重命名变量和方法
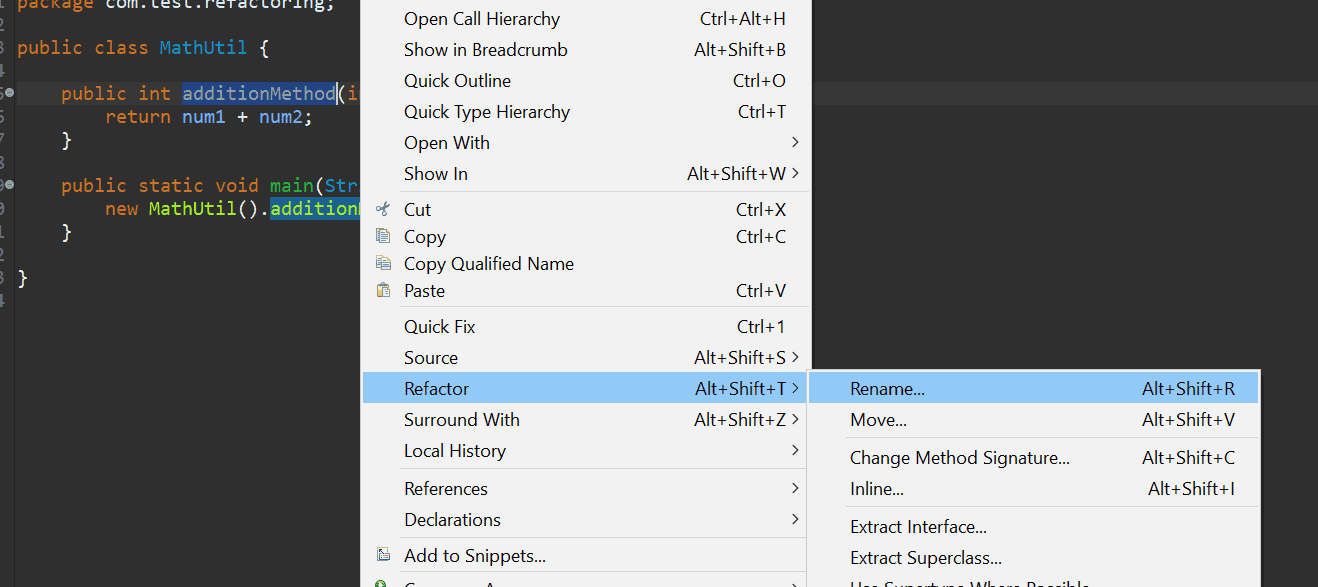
We can rename variables and methods by following these simple steps:
我们可以通过以下简单步骤重命名变量和方法。
-
- Select the element
- Right-click the element
- Click the Refactor > Rename option
- Type the new name
- Press Enter
We can also perform the second and third steps by using the shortcut key, Alt+Shift+R.
我们也可以通过使用快捷键,Alt+Shift+R来执行第二和第三步。
When the above action is performed, Eclipse will find every usage of that element in that file and replace them all in place.
当执行上述操作时,Eclipse将在该文件中找到该元素的所有用法,并将它们全部替换到位。
We can also use an advanced feature to update the reference in other classes by hovering over the item when the refactor is on and clicking on Options:
我们还可以使用一个高级功能来更新其他类中的引用,方法是在重构时将鼠标悬停在该项目上,点击Options。
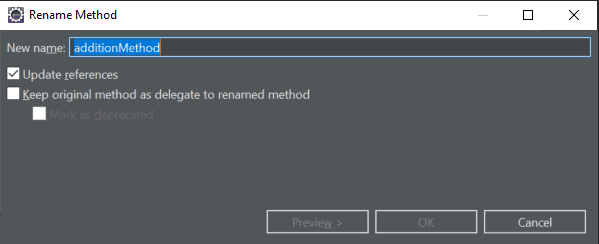
This will open up a pop-up where we can both rename the variable or method and have the option to update the reference in other classes:
这将打开一个弹出窗口,我们既可以重命名该变量或方法,又可以选择更新其他类中的引用。
2.2. Renaming Packages
2.2.重命名软件包
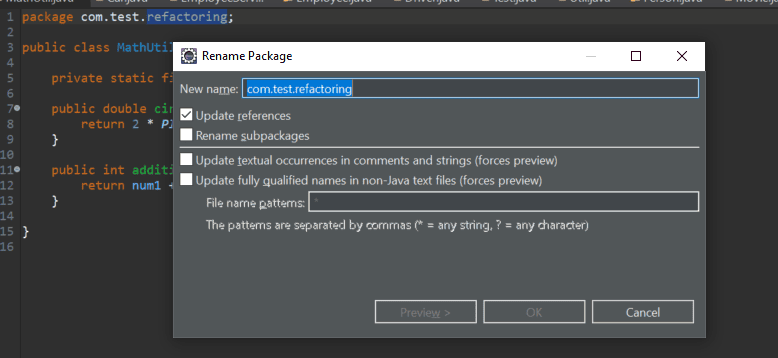
We can rename a package by selecting the package name and performing the same actions as in the previous example. A pop-up will appear right away where we can rename the package, with options like updating references and renaming subpackages.
我们可以通过选择包的名称并执行与前面例子相同的操作来重命名一个包。一个弹出窗口会马上出现,在这里我们可以重命名包,并有更新引用和重命名子包等选项。
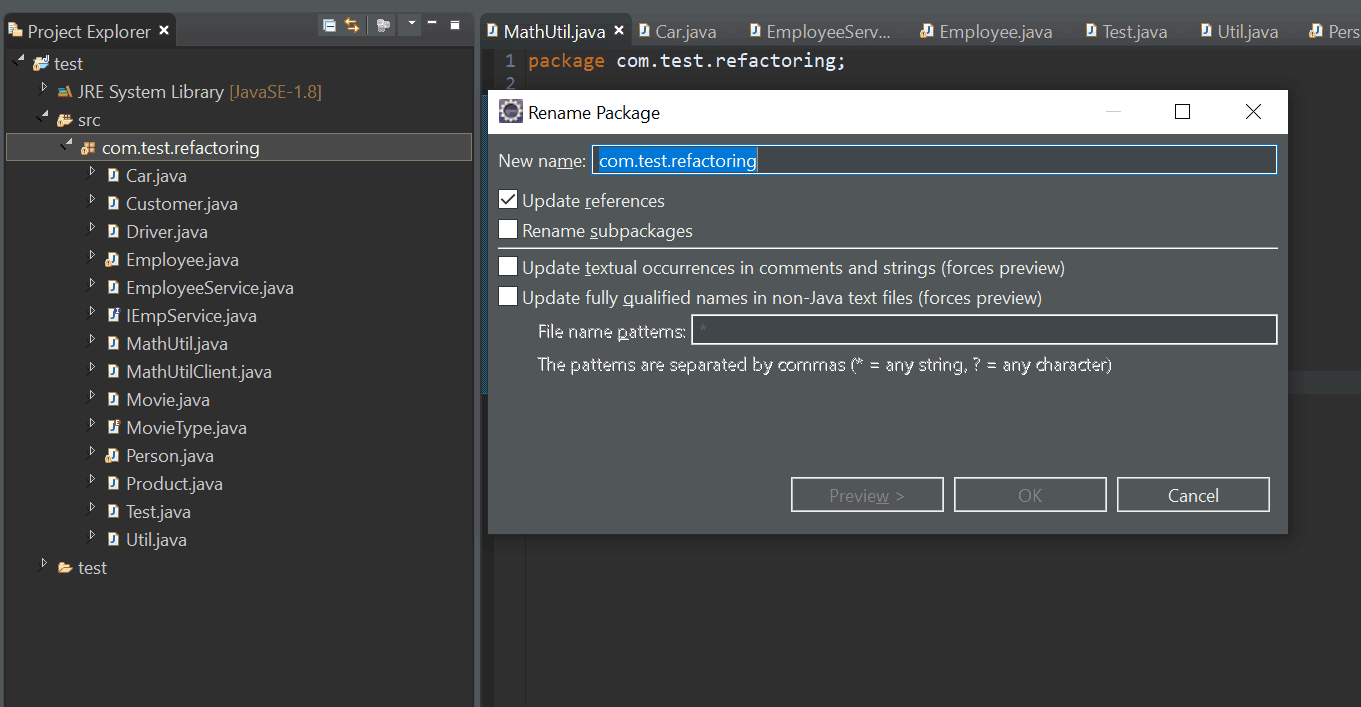
We can also rename the package from the Project Explorer view by pressing F2:
我们也可以在项目资源管理器视图中按F2来重命名该包。
2.3. Renaming Classes and Interfaces
2.3.重命名类和接口
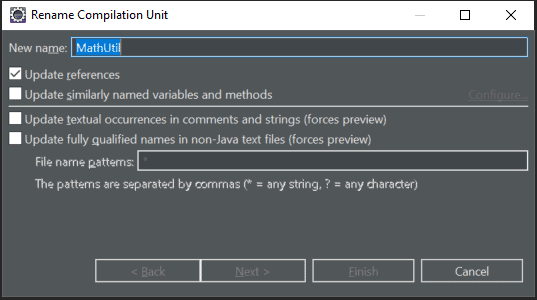
We can rename a class or interface by using the same actions or just by pressing F2 from Project Explorer. This will open up a pop-up with options to update references, along with a few advanced options:
我们可以通过使用相同的操作来重命名一个类或接口,或者直接在项目资源管理器中按下F2。这将打开一个弹出窗口,里面有更新引用的选项,以及一些高级选项。
3. Extracting
3.提取
Now, let’s talk about extraction. Extracting code means taking a piece of code and moving it.
现在,让我们来谈一谈提取。提取代码是指取一段代码并移动它。
For example, we can extract code into a different class, superclass or interface. We could even extract code to a variable or method in the same class.
例如,我们可以将代码提取到一个不同的类、超类或接口中。我们甚至可以将代码提取到同一个类中的一个变量或方法。
Eclipse provides a variety of ways to achieve extractions, which we’ll demonstrate in the following sections.
Eclipse提供了多种实现提取的方法,我们将在下面几节中演示。
3.1. Extract Class
3.1.提取类
Suppose we have the following Car class in our codebase:
假设我们的代码库中有以下Car类。
public class Car {

    private String licensePlate;
    private String driverName;
    private String driverLicense;

    public String getDetails() {
        return "Car [licensePlate=" + licensePlate + ", driverName=" + driverName
          + ", driverLicense=" + driverLicense + "]";
    }

    // getters and setters
}
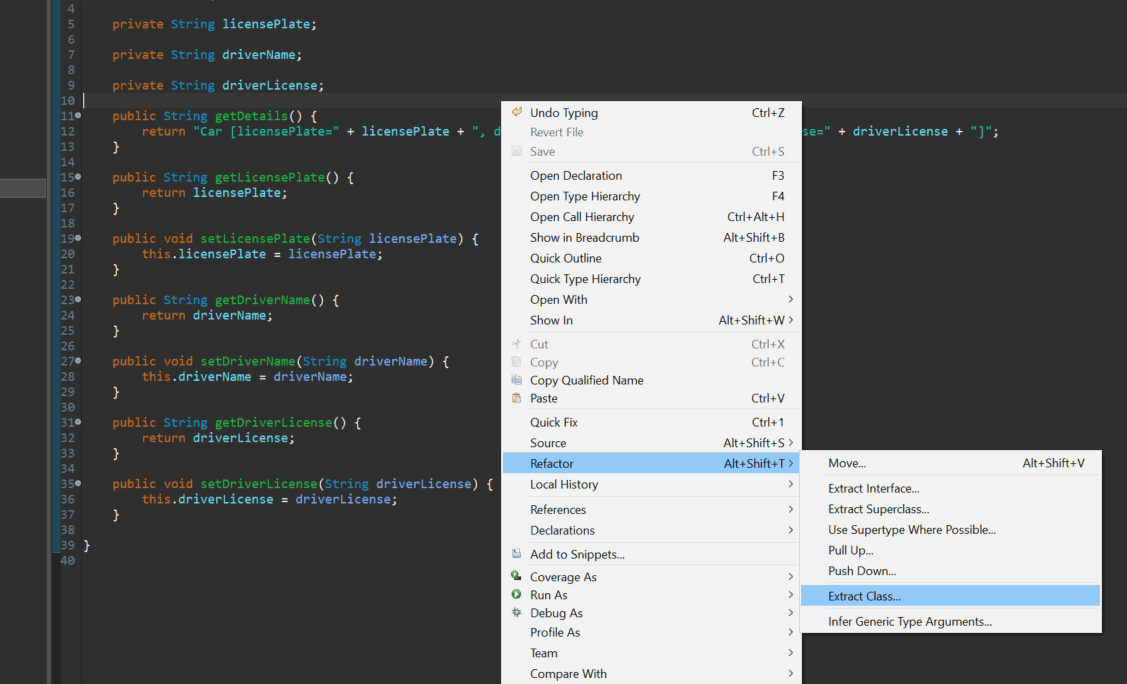
Now, suppose we want to extract out the driver details to a different class. We can do this by right-clicking anywhere within the class and choosing the Refactor > Extract Class option:
现在,假设我们想把驱动程序的细节提取到一个不同的类中。我们可以通过右键点击类中的任何地方,选择Refactor > Extract Class选项来实现。
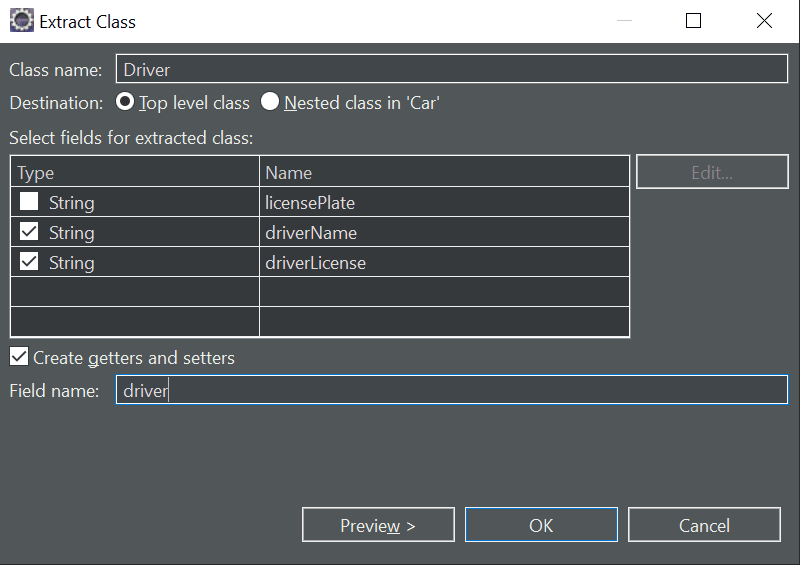
This will open up a pop-up where we can name the class and select which fields we want to move, along with few other options:
这将打开一个弹出窗口,我们可以为该类命名,并选择我们想要移动的字段,以及其他一些选项。
We can also preview the code before moving forward. When we click OK, Eclipse will create a new class named Driver, and the previous code will be refactored to:
我们还可以在前进之前预览代码。当我们点击OK时,Eclipse将创建一个名为Driver的新类,而之前的代码将被重构为。
public class Car {

    private String licensePlate;

    private Driver driver = new Driver();

    public String getDetails() {
        return "Car [licensePlate=" + licensePlate + ", driverName=" + driver.getDriverName()
          + ", driverLicense=" + driver.getDriverLicense() + "]";
    }

    //getters and setters
}
3.2. Extract Interface
3.2.提取接口
We can also extract an interface in a similar fashion. Suppose we have the following EmployeeService class:
我们也可以用类似的方式提取一个接口。假设我们有以下EmployeeService类。
public class EmployeeService {

    public void save(Employee emp) {
    }

    public void delete(Employee emp) {
    }

    public void sendEmail(List<Integer> ids, String message) {
    }
}
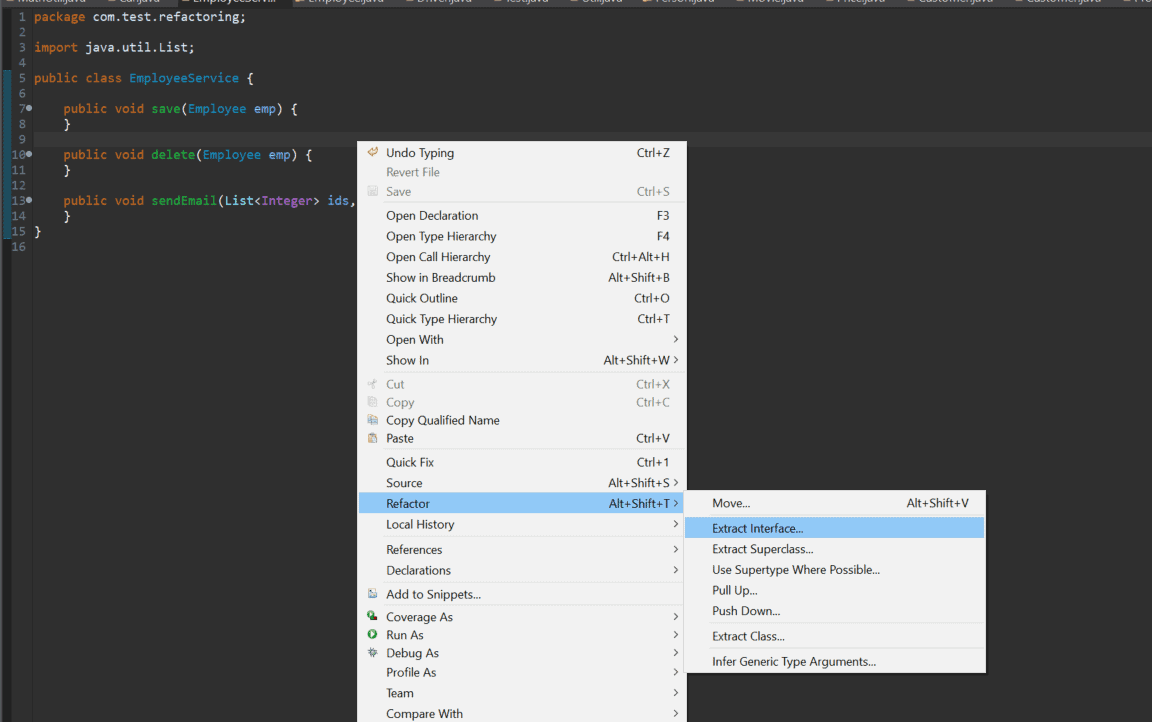
We can extract an interface by right-clicking anywhere within the class and choosing the Refactor > Extract Interface option, or we can use the Alt+Shift+T shortcut key command to bring up the menu directly:
我们可以通过右键单击类中的任何地方,选择Refactor > Extract Interface选项来提取接口,或者我们可以使用Alt+Shift+T快捷键命令直接调出菜单。
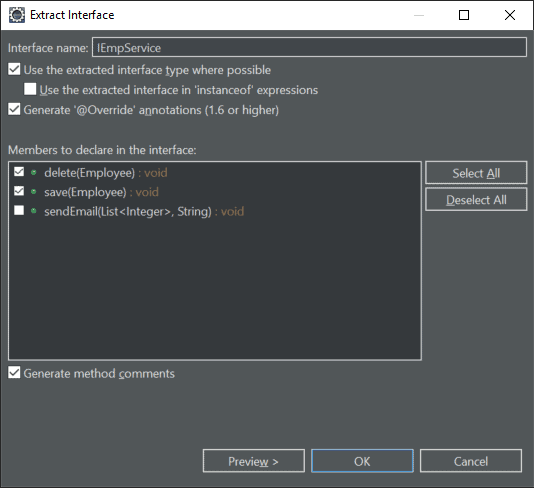
This will open up a pop-up where we can enter the interface name and decide which members to declare in the interface:
这将打开一个弹出窗口,我们可以输入接口名称并决定在接口中声明哪些成员。
As a result of this refactoring, we’ll have an interface IEmpService, and our EmployeeService class will be changed as well:
作为这次重构的结果,我们将有一个接口IEmpService,而我们的EmployeeService类也将被改变。
public class EmployeeService implements IEmpService {

    @Override
    public void save(Employee emp) {
    }

    @Override
    public void delete(Employee emp) {
    }

    public void sendEmail(List<Integer> ids, String message) {
    }
}
3.3. Extract Superclass
3.3.提取超类
Suppose we have an Employee class containing several properties that aren’t necessarily about the person’s employment:
假设我们有一个Employee类,其中包含几个不一定是关于这个人的工作的属性。
public class Employee {

    private String name;

    private int age;

    private int experienceInMonths;

    public String getName() {
        return name;
    }

    public int getAge() {
        return age;
    }

    public int getExperienceInMonths() {
        return experienceInMonths;
    }
}
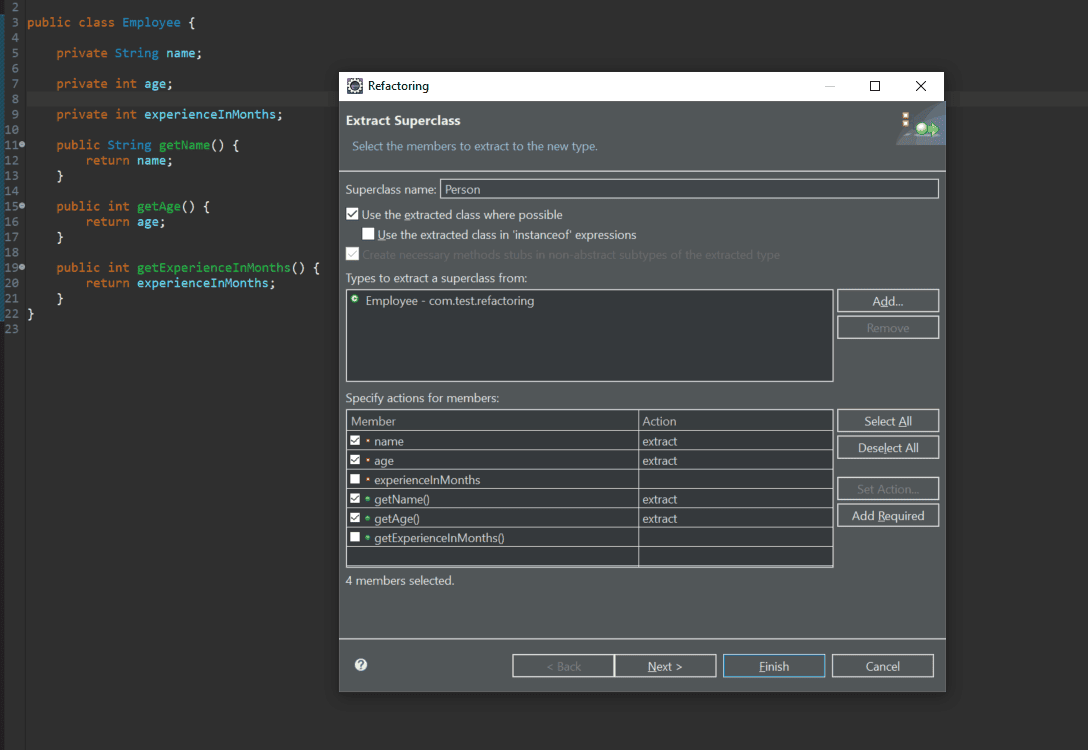
We may want to extract the non-employment-related properties to a Person superclass. To extract items to a superclass, we can right-click anywhere in the class and choose the Refactor > Extract Superclass option, or use Alt+Shift+T to bring up the menu directly:
我们可能想把非就业相关的属性提取到一个Person超类中。要将项目提取到超类中,我们可以在类的任何地方点击右键,选择Refactor > Extract Superclass选项,或者使用Alt+Shift+T来直接调出菜单。
This will create a new Person class with our selected variables and method, and the Employee class will be refactored to:
这将创建一个新的Person类,带有我们选定的变量和方法,而Employee类将被重构为。
public class Employee extends Person {

    private int experienceInMonths;

    public int getExperienceInMonths() {
        return experienceInMonths;
    }
}
3.4. Extract Method
3.4.提取方法
Sometimes, we might want to extract a certain piece of code inside our method to a different method to keep our code clean and easy to maintain.
有时,我们可能想把方法中的某段代码提取到不同的方法中,以保持我们的代码整洁和易于维护。
Let’s say, for example, that we have a for loop embedded in our method:
比方说,我们的方法中嵌入了一个for循环。
public class Test {
    public static void main(String[] args) {
        for (int i = 0; i < args.length; i++) {
            System.out.println(args[i]);
        }
    }
}
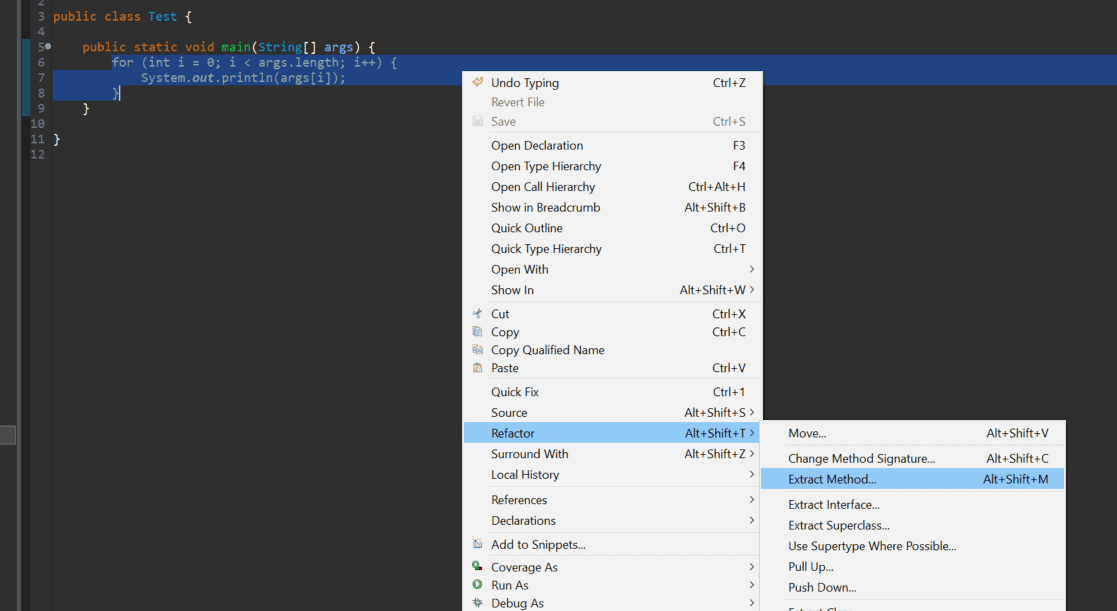
To invoke the Extract Method wizard, we need to perform the following steps:
为了调用提取方法向导,我们需要执行以下步骤。
- Select the lines of code we want to extract
- Right-click the selected area
- Click the Refactor > Extract Method option
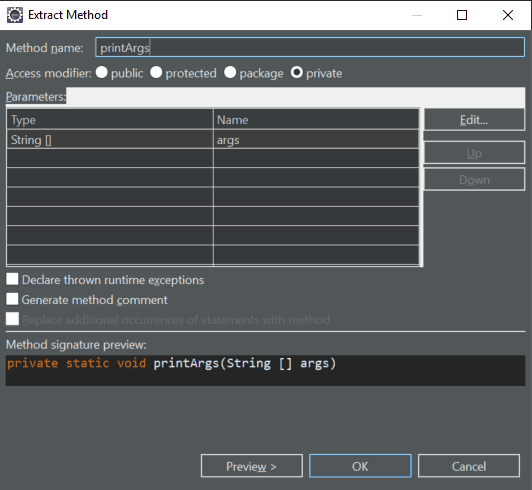
The last two steps can also be achieved by keyboard shortcut Alt+Shift+M. Let’s see the Extract Method dialog:
最后两步也可以通过键盘快捷键Alt+Shift+M实现。让我们看看提取方法对话框。
This will refactor our code to:
这将把我们的代码重构为。
public class Test {

    public static void main(String[] args) {
        printArgs(args);
    }

    private static void printArgs(String[] args) {
        for (int i = 0; i < args.length; i++) {
            System.out.println(args[i]);
        }
    }
}
3.5. Extract Local Variables
3.5.提取局部变量
We can extract certain items as local variables to make our code more readable.
我们可以提取某些项目作为局部变量,使我们的代码更容易阅读。
This is handy when we have a String literal:
当我们有一个String字头时,这很方便。
public class Test {

    public static void main(String[] args) {
        System.out.println("Number of Arguments passed =" + args.length);
    }
}
and we want to extract it to a local variable.
而我们想把它提取到一个局部变量中。
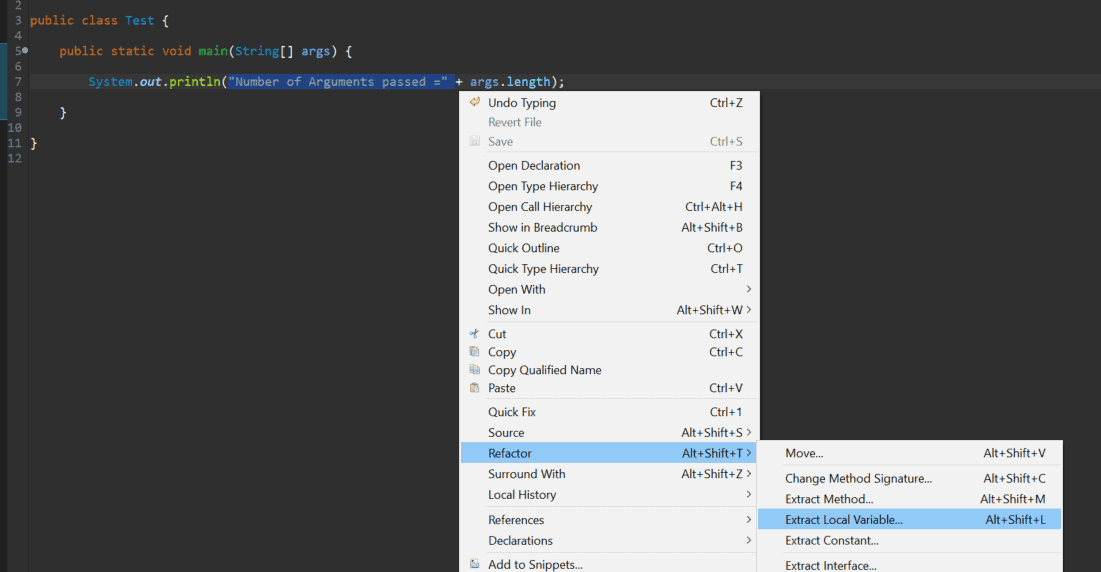
To do this, we need to:
要做到这一点,我们需要。
- Select the item
- Right-click and choose Refactor > Extract Local Variable
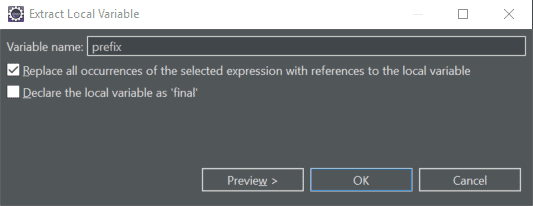
The last step can also be achieved by the keyboard shortcut Alt+Shift+L. Now, we can extract our local variable:
最后一步也可以通过键盘快捷键Alt+Shift+L实现。现在,我们可以提取我们的局部变量。
And here’s the result of this refactoring:
下面是这次重构的结果。
public class Test {

    public static void main(String[] args) {
        final String prefix = "Number of Arguments passed =";
        System.out.println(prefix + args.length);
    }
}
3.6. Extract Constant
3.6.提取常数
Or, we can extract expressions and literal values to static final class attributes.
或者,我们可以提取表达式和字面价值到static final类属性。
We could extract the 3.14 value into a local variable, as we just saw:
我们可以将3.14值提取到一个局部变量中,正如我们刚才看到的那样。
public class MathUtil {

    public double circumference(double radius) {
        return 2 * 3.14 * radius;
    }
}
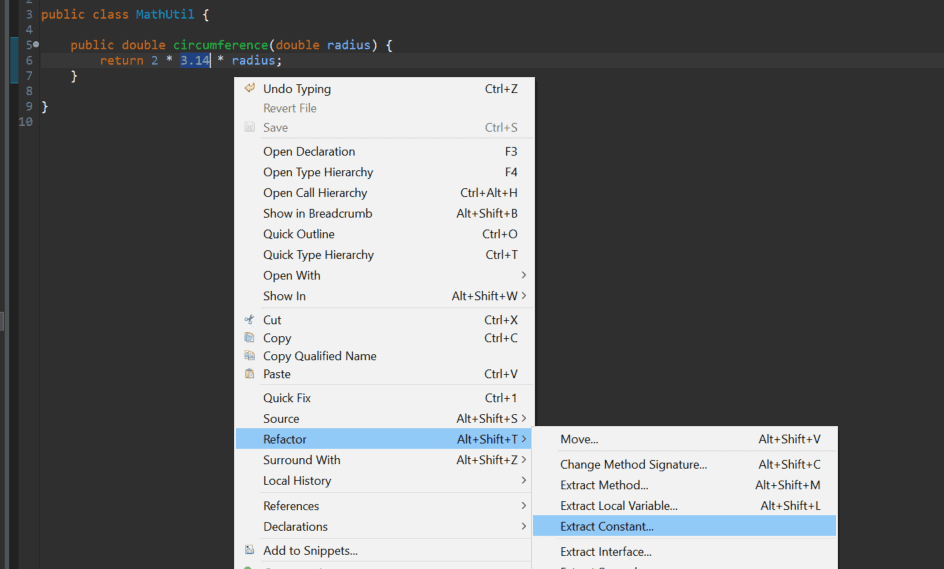
But, it might be better to extract it as a constant, for which we need to:
但是,把它作为一个常数来提取可能会更好,为此我们需要。
- Select the item
- Right-click and choose Refactor > Extract Constant
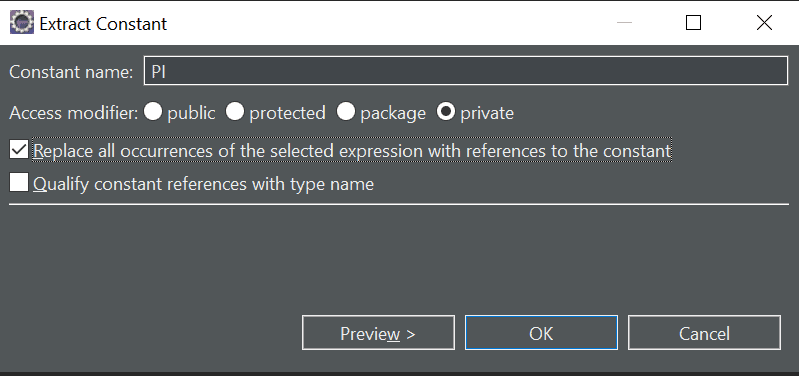
This will open a dialog where we can give the constant a name and set its visibility, along with a couple of other options:
这将打开一个对话框,我们可以给常量起个名字,设置它的可见性,以及其他一些选项。
Now, our code looks a little more readable:
现在,我们的代码看起来更有可读性了。
public class MathUtil {

    private static final double PI = 3.14;

    public double circumference(double radius) {
        return 2 * PI * radius;
    }
}
4. Inlining
4.内衬
We can also go the other way and inline code.
我们也可以反其道而行之,内联代码。
Consider a Util class that has a local variable that’s only used once:
考虑一个Util类,它有一个只使用一次的局部变量。
public class Util {

    public void isNumberPrime(int num) {
        boolean result = isPrime(num);
        if (result) {
            System.out.println("Number is Prime");
        } else {
            System.out.println("Number is Not Prime");
        }
    }

    // isPrime method
}
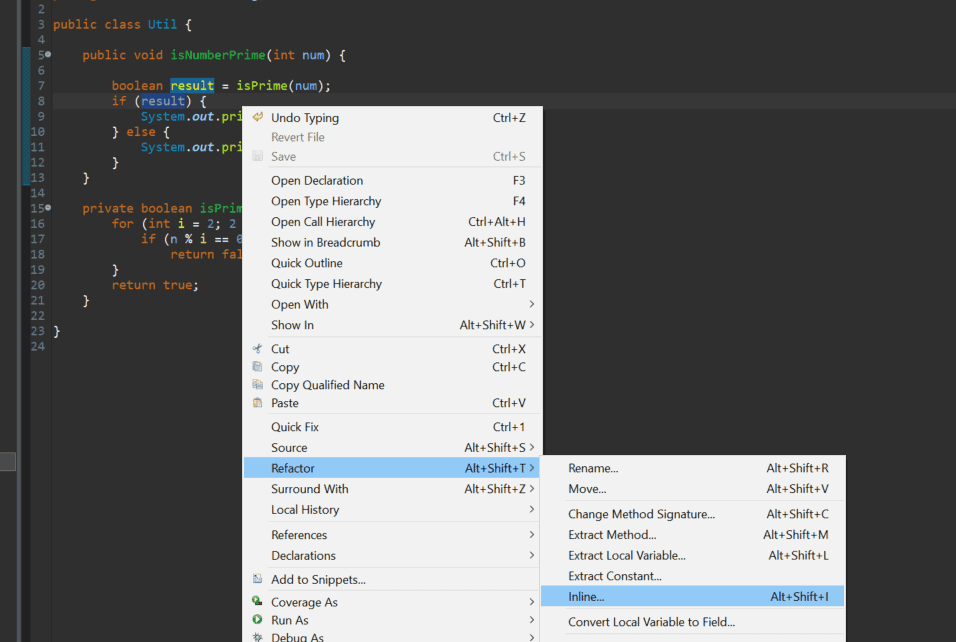
We want to remove the result local variable and inline the isPrime method call. To do this, we follow these steps:
我们想删除result局部变量,并内联isPrime方法调用。要做到这一点,我们遵循以下步骤。
- Select the item we want to inline
- Right-click and choose the Refactor > Inline option
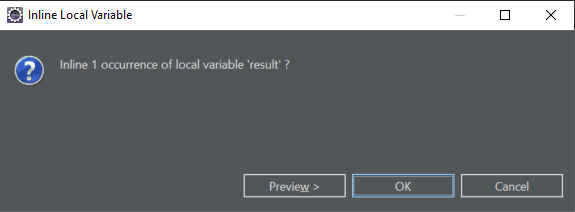
The last step can also be achieved by keyboard shortcut Alt+Shift+I:
最后一步也可以通过键盘快捷键Alt+Shift+I实现:。
Afterward, we have one less variable to keep track of:
之后,我们就少了一个需要跟踪的变量。
public class Util {

    public void isNumberPrime(int num) {
        if (isPrime(num)) {
            System.out.println("Number is Prime");
        } else {
            System.out.println("Number is Not Prime");
        }
    }

    // isPrime method
}
5. Push Down and Pull Up
5.推倒和拉起
If we have a parent-child relationship (like our previous Employee and Person example) between our classes, and we want to move certain methods or variables among them, we can use the push/pull options provided by Eclipse.
如果我们的类之间有父子关系(就像我们之前的Employee和Person例子),并且我们想在它们之间移动某些方法或变量,我们可以使用 Eclipse 提供的推/拉选项。
As the name suggests, the Push Down option moves methods and fields from a parent class to all child classes, while Pull Up moves methods and fields from a particular child class to parent, thus making that method available to all the child classes.
顾名思义,Push Down选项将方法和字段从父类移动到所有子类,而Pull Up将方法和字段从某个子类移动到父类,从而使该方法对所有子类可用。
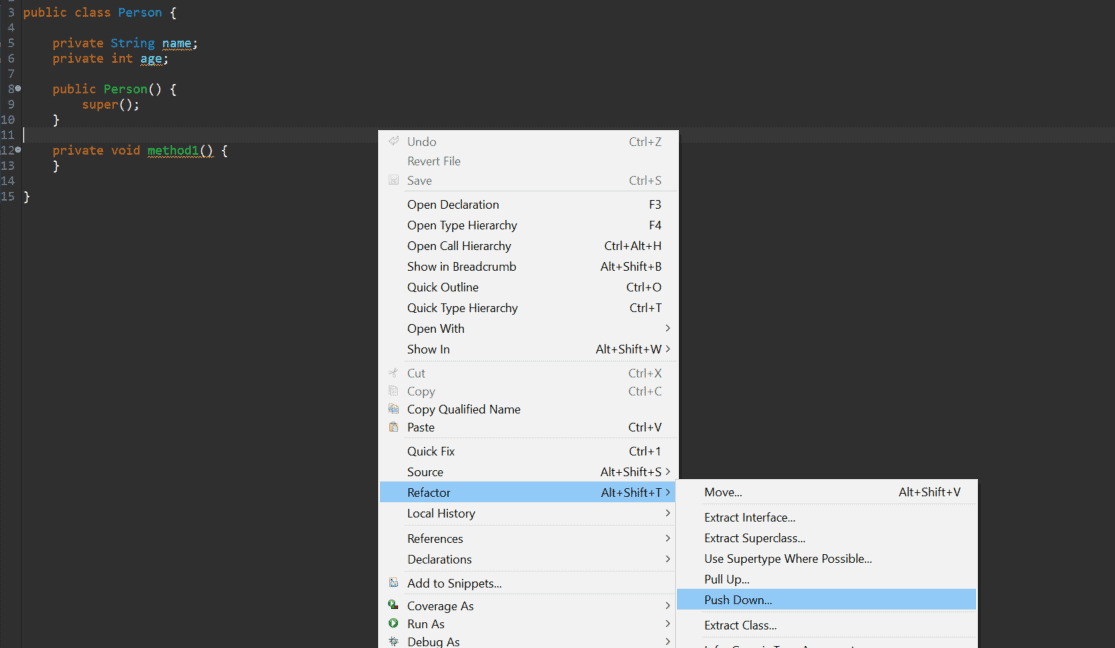
For moving methods down to child classes, we need to right-click anywhere in the class and choose the Refactor > Push Down option:
对于将方法下移到子类,我们需要在类的任何地方点击右键,选择Refactor > Push Down选项。
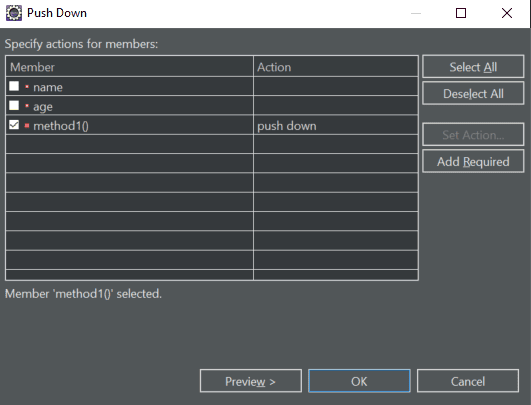
This will open up a wizard where we can select items to push down:
这将打开一个向导,我们可以选择要推倒的项目。
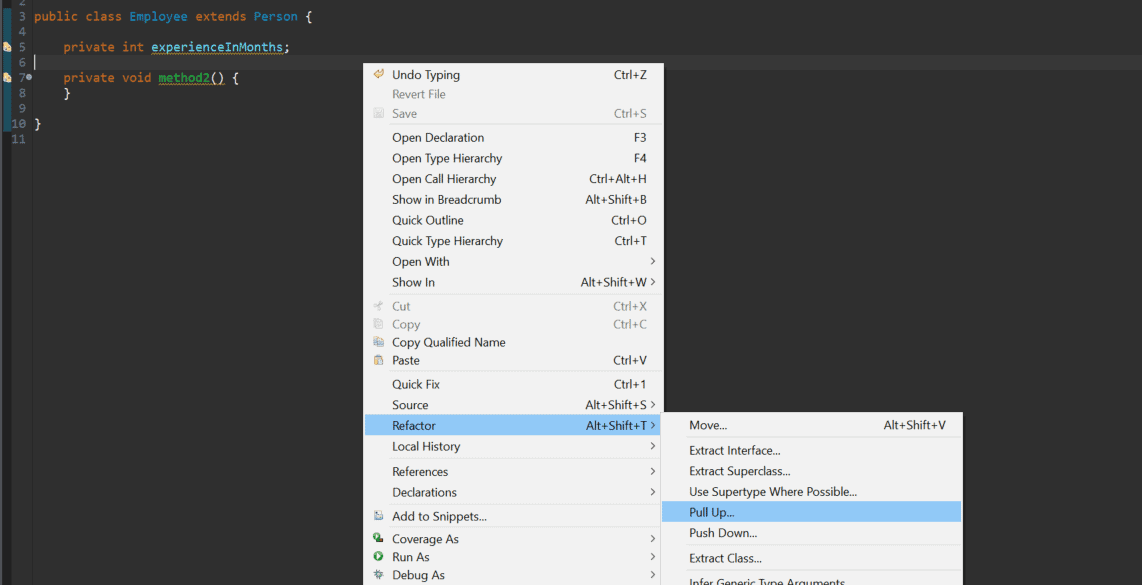
Similarly, for moving methods from a child class to parent class, we need to right-click anywhere in the class and choose Refactor > Pull Up:
同样地,要把方法从子类移到父类,我们需要在类的任何地方右键单击,选择Refactor > Pull Up。
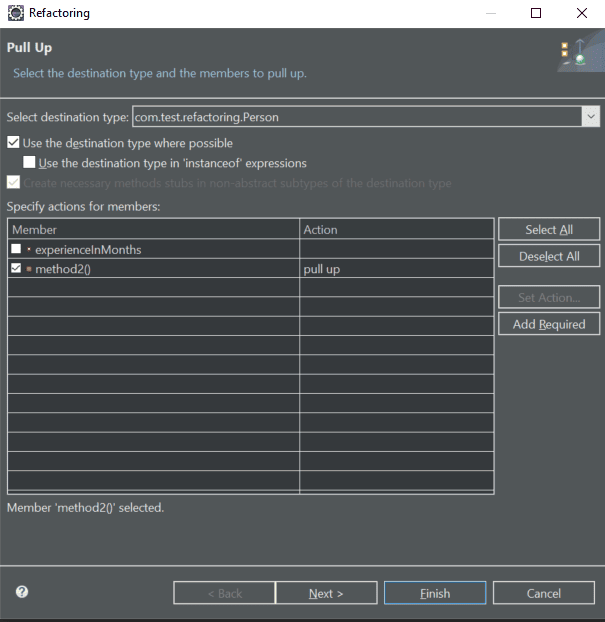
This will open up a similar wizard where we can select items to pull up:
这将打开一个类似的向导,在那里我们可以选择要调出的项目。
6. Changing a Method Signature
6.改变一个方法的签名
To change the method signature of an existing method, we can follow a few simple steps:
要改变一个现有方法的方法签名,我们可以遵循几个简单的步骤。
- Select the method or place the cursor somewhere inside
- Right-click and choose Refactor > Change Method Signature
The last step can also be achieved by keyboard shortcut Alt+Shift+C.
最后一步也可以通过键盘快捷键 Alt+Shift+C.实现。
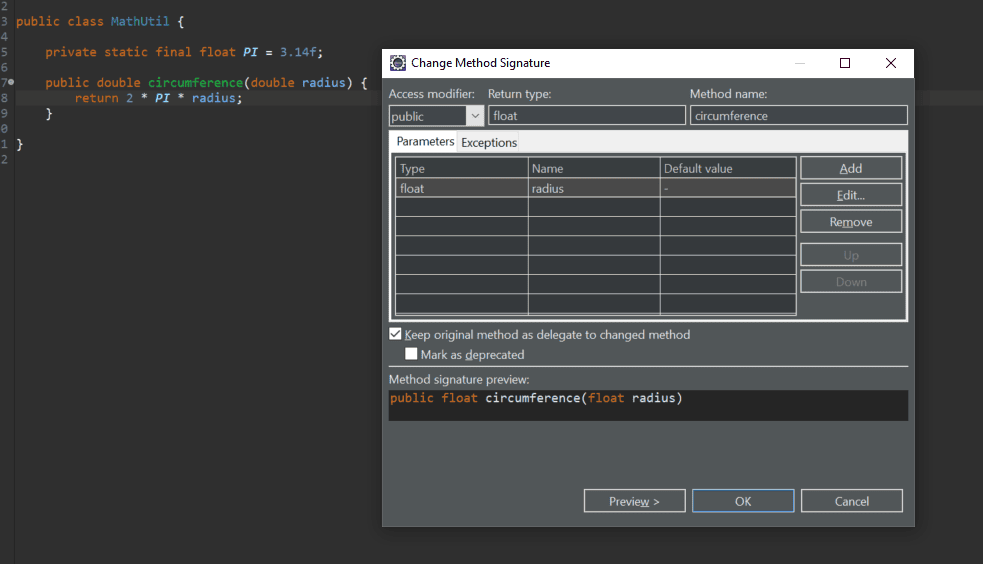
This will open a popup where you can change the method signature accordingly:
这将打开一个弹出窗口,你可以相应地改变方法签名。
7. Moving
7.搬家
Sometimes, we simply want to move methods to another existing class to make our code more object-oriented.
有时,我们只是想将方法移到另一个现有的类中,使我们的代码更加面向对象。
Consider the scenario where we have a Movie class:
考虑一下我们有一个Movie类的情况。
public class Movie {

    private String title;
    private double price;
    private MovieType type;

    // other methods
}
And MovieType is a simple enum:
而MovieType是一个简单的枚举。
public enum MovieType {
    NEW, REGULAR
}
Suppose also that we have a requirement that if a Customer rents a movie that is NEW, it will be charged two dollars more, and that our Customer class has the following logic to calculate the totalCost():
还假设我们有一个要求,如果一个客户租用的电影是新的,将被多收两美元,我们的客户类有以下逻辑来计算总成本()。
public class Customer {

    private String name;
    private String address;
    private List<Movie> movies;

    public double totalCost() {
        double result = 0;
        for (Movie movie : movies) {
            result += movieCost(movie);
        }
        return result;
    }

    private double movieCost(Movie movie) {
        if (movie.getType()
            .equals(MovieType.NEW)) {
            return 2 + movie.getPrice();
        }
        return movie.getPrice();
    }

    // other methods
}
Clearly, the calculation of the movie cost based on the MovieType would be more appropriately placed in the Movie class and not the Customer class. We can easily move this calculation logic in Eclipse:
显然,基于 MovieType 的电影成本计算应该放在 Movie 类而不是 Customer 类中更合适。我们可以在 Eclipse 中轻松地移动这个计算逻辑。
- Select the lines you want to move
- Right-click and choose the Refactor > Move option
The last step can also be achieved by keyboard shortcut Alt+Shift+V:
最后一步也可以通过键盘快捷键Alt+Shift+V实现:。
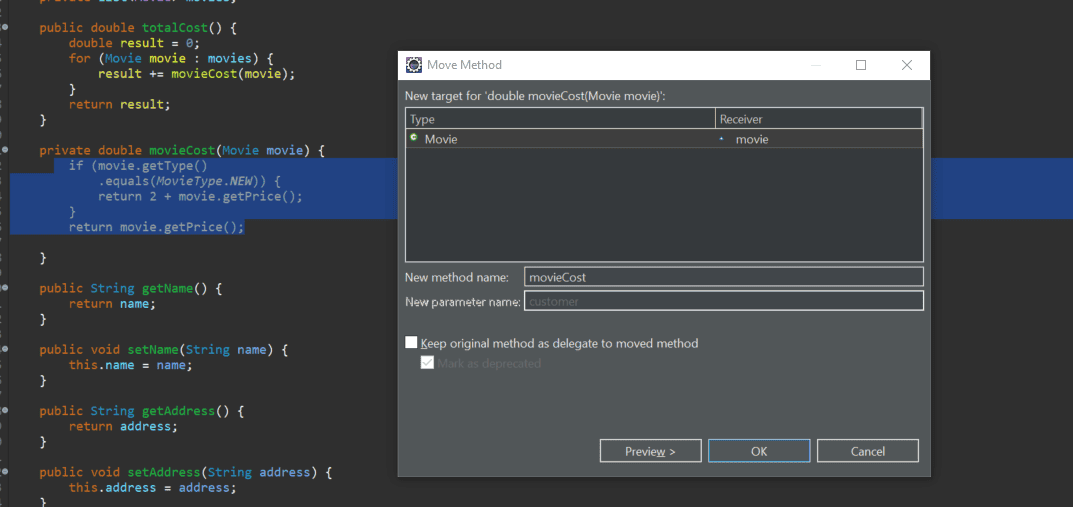
Eclipse is smart enough to realize that this logic should be in our Movie class. We can change the method name if we want, along with other advanced options.
Eclipse很聪明,它意识到这个逻辑应该在我们的Movie类中。如果我们愿意,我们可以改变方法的名称,以及其他高级选项。
The final Customer class code will be refactored to:
最终的Customer类代码将被重构为。
public class Customer {

    private String name;
    private String address;
    private List<Movie> movies;

    public double totalCost() {
        double result = 0;
        for (Movie movie : movies) {
            result += movie.movieCost();
        }
        return result;
    }

    // other methods
}
As we can see, the movieCost method has been moved to our Movie class and is being used in the refactored Customer class.
我们可以看到,movieCost方法已经被移到我们的Movie类中,并被用于重构的Customer类中。
8. Conclusion
8.结语
In this tutorial, we looked into some of the main refactoring techniques provided by Eclipse. We started with some basic refactoring like renaming and extracting. Later on, we saw moving methods and fields around different classes.
在本教程中,我们研究了Eclipse提供的一些主要重构技术。我们从一些基本的重构开始,比如重命名和提取。后来,我们看到在不同的类中移动方法和字段。
To learn more, we can always refer to the official Eclipse documentation on refactoring.
要了解更多信息,我们可以随时参考关于重构的Eclipse官方文档。
