1. Introduction
1.绪论
Over the past few years, IntelliJ from JetBrains has quickly become the top IDE for Java developers. In our most recent State of Java report, IntelliJ was the IDE of choice for 61% of respondents, up from 55% the year before.
在过去几年中,来自 JetBrains 的 IntelliJ 已迅速成为 Java 开发人员的顶级 IDE。在我们最近的Java 状况报告中,IntelliJ 是 61% 受访者的首选 IDE,比前一年的 55% 高。
One feature that makes IntelliJ so appealing to Java developers is the ability to extend and create new functionality using plugins.
使得IntelliJ对Java开发者如此有吸引力的一个特点是使用插件扩展和创建新功能的能力。
In this tutorial, we’ll look at writing an IntelliJ plugin using the new recommended way with Gradle to demonstrate a few ways we can extend the IDE. This article is a re-mix of a previous one that describes the creation of the same plugin using the Plugin Devkit.
在本教程中,我们将使用新的推荐方式与Gradle一起编写一个IntelliJ插件,以展示我们可以扩展IDE的一些方法。本文是对前一篇的重新混合,后者介绍了使用插件开发工具包创建相同插件的情况。
2. Main Types of Plugins
2.插件的主要类型
The most common types of plugins include functionality for:
最常见的插件类型包括以下功能。
- Custom language support: the ability to write, interpret, and compile code written in different languages
- Framework integration: support for third-party frameworks such as Spring
- Tool integration: integration with external tools such as Gradle
- User interface add-ons: new menu items, tool windows, progress bars, and more
Plugins will often fall into multiple categories. For example, the Git plugin that ships with IntelliJ interacts with the git executable installed on the system. The plugin provides its tool window and popup menu items, while also integrating into the project creation workflow, preferences window, and more.
插件通常属于多个类别。例如,随 IntelliJ 提供的 Git 插件可与系统中安装的 git 可执行程序进行交互。该插件提供了其工具窗口和弹出式菜单项,同时还集成到项目创建工作流程、偏好窗口等。
3. Create a Plugin
3.创建一个插件
There are two supported ways of creating plugins. We’ll use the recommended way for new projects with Gradle instead of using their Plugin Devkit.
有两种支持的创建插件的方式。我们将在新项目中使用Gradle的推荐方式,而不是使用其Plugin Devkit。
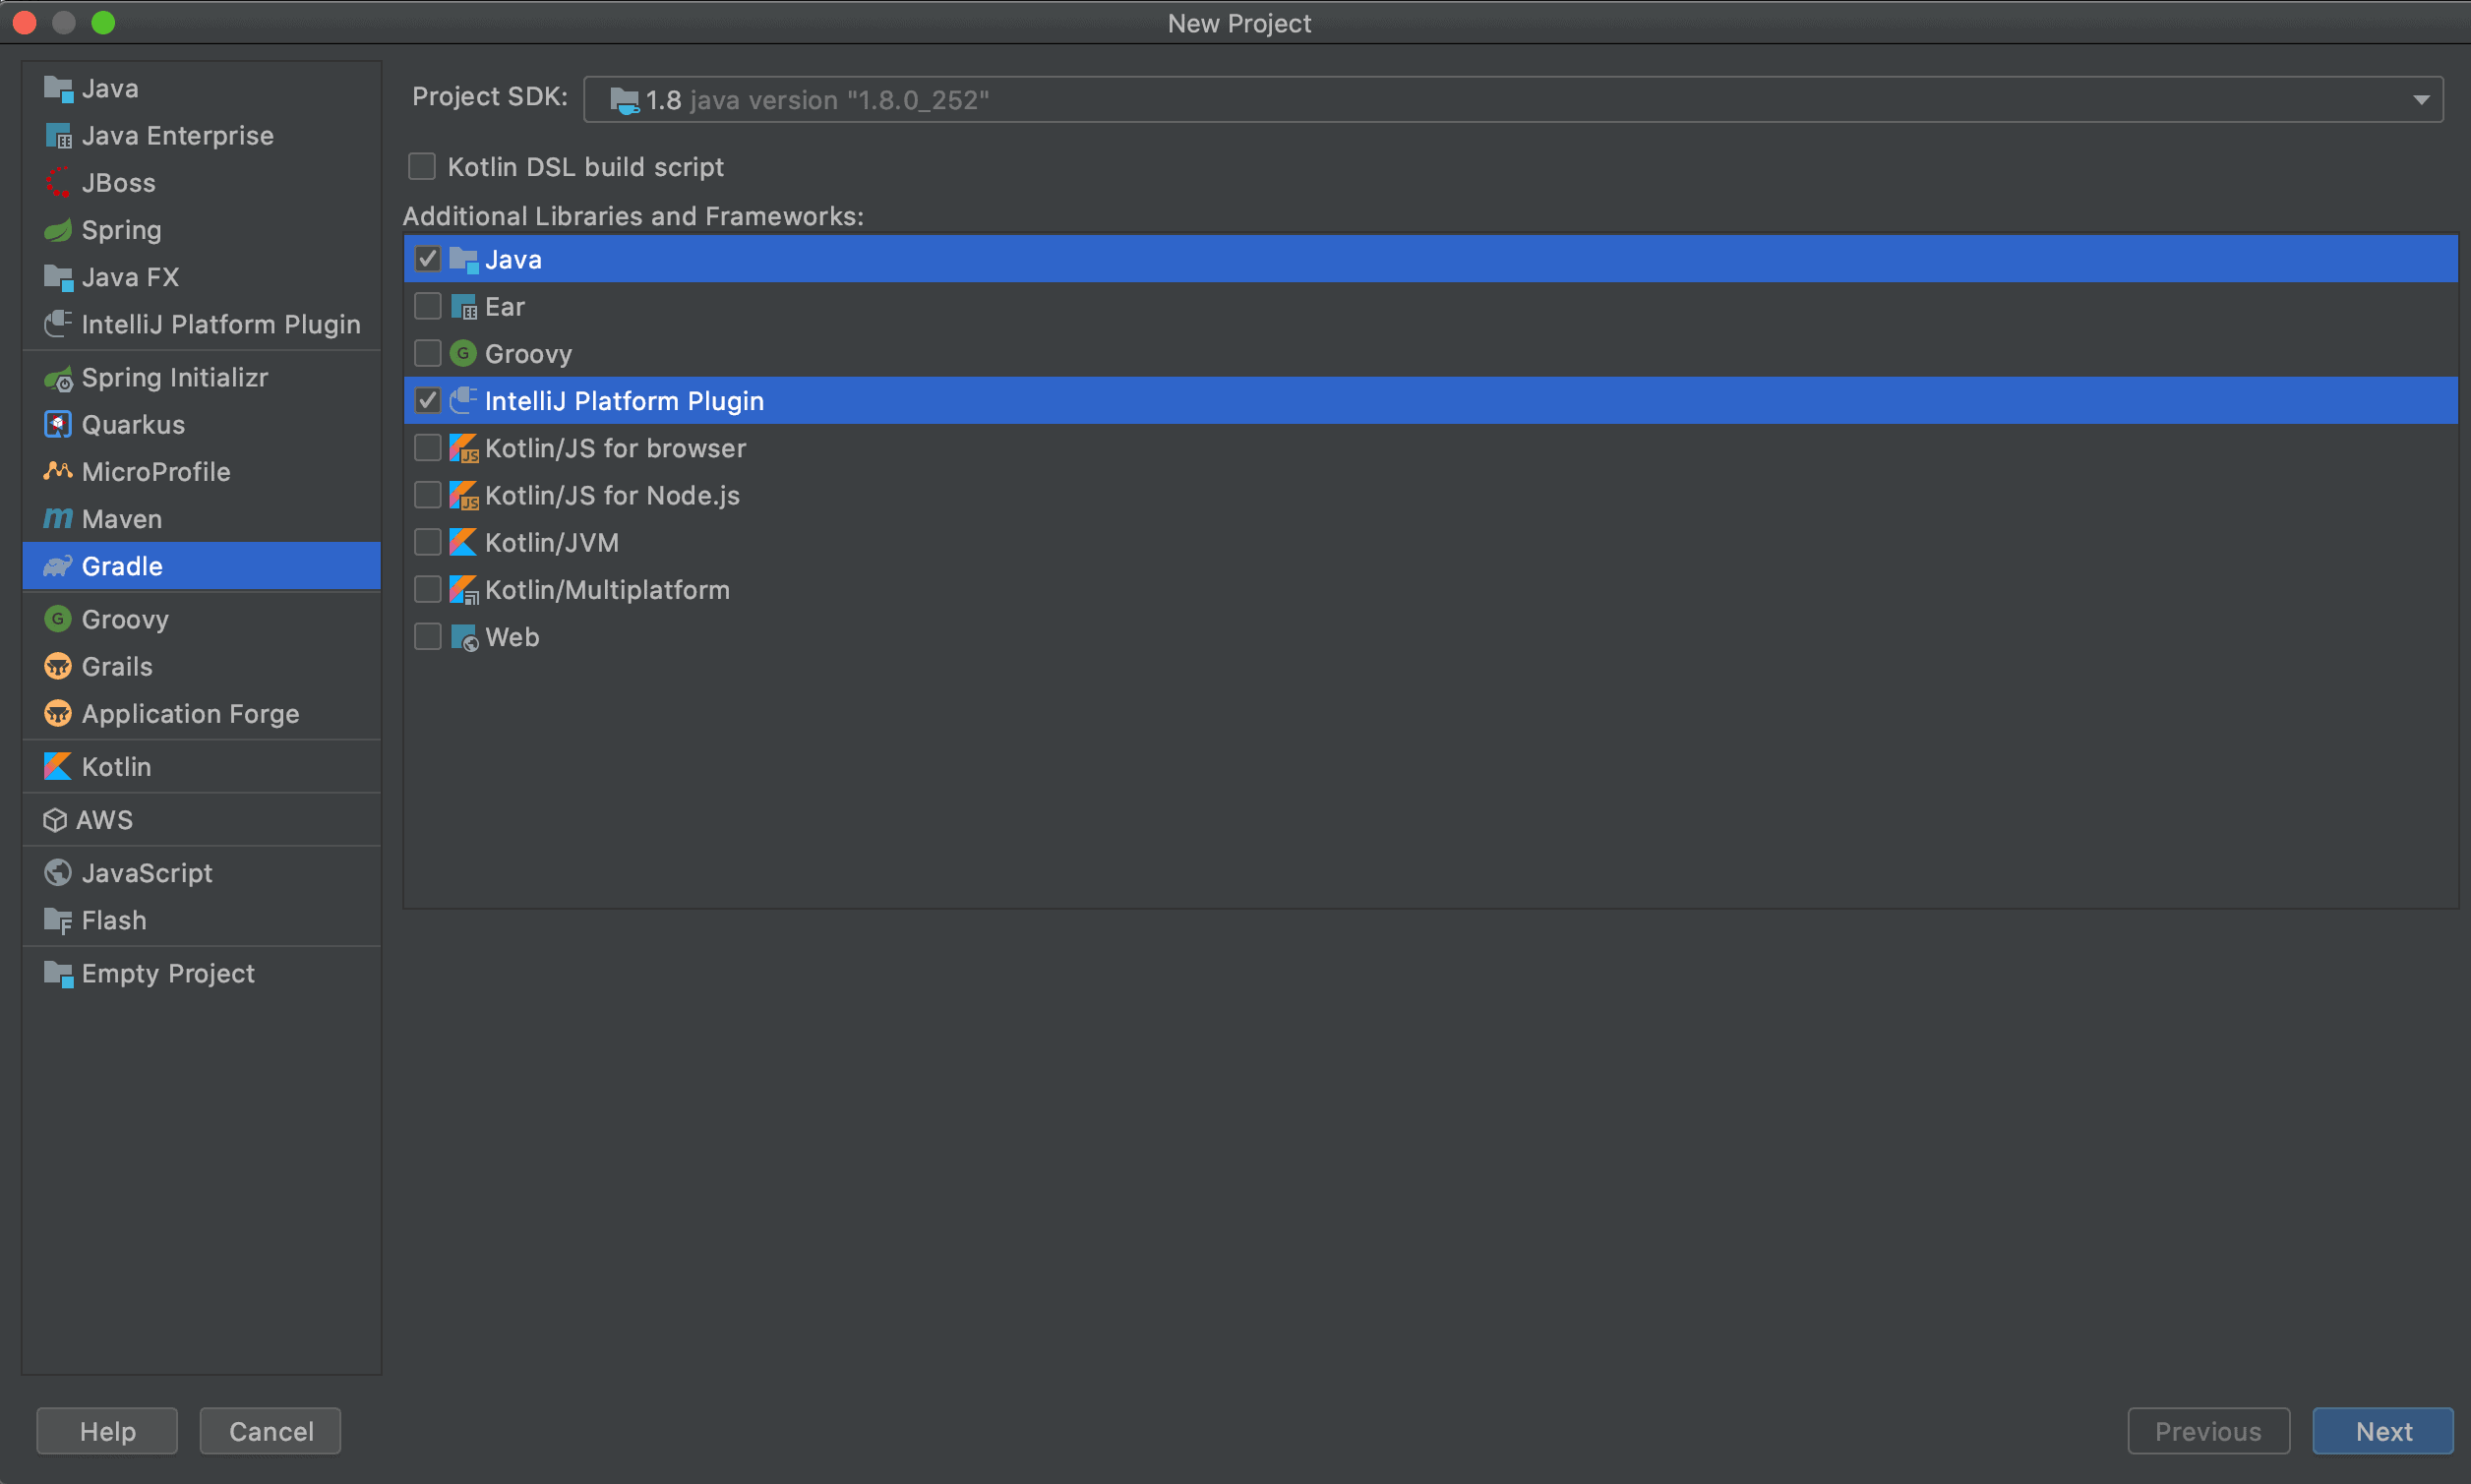
Creating a Gradle-based plugin is done by using the New > Project menu.
创建一个基于Gradle的插件是通过使用New > Project菜单完成的。
Note that we must include Java and the IntelliJ Platform Plugin to ensure the required plugin classes are available on the classpath.
注意,我们必须包括Java和IntelliJ平台插件以确保所需的插件类在classpath上可用。
As of this writing, we can only use JDK 8 for writing IntelliJ plugins.
截至目前,我们只能使用JDK 8来编写IntelliJ插件。
4. Example Plugin
4.插件实例
We’ll create a plugin that provides quick access to the popular Stack Overflow website from multiple areas in the IDE. It’ll include:
我们将创建一个插件,提供从IDE的多个区域快速访问流行的Stack Overflow网站。它将包括
- a Tools menu item to visit the Ask a Question page
- a popup menu item in both text editor and console output to search Stack Overflow for highlighted text
4.1. Creating Actions
4.1.创建行动
Actions are the most common way to access a plugin. Actions get triggered by events in the IDE, such as clicking a menu item or a toolbar button.
动作是访问一个插件的最常见的方式。行动是由IDE中的事件触发的,比如点击菜单项或工具栏按钮。
The first step in creating an action is to create a Java class that extends AnAction. For our Stack Overflow plugin, we’ll create two actions.
创建一个动作的第一步是创建一个扩展AnAction的Java类。对于我们的Stack Overflow插件,我们将创建两个动作。
The first action opens the Ask a Question page in a new browser window:
第一个动作是在一个新的浏览器窗口中打开 “提问 “页面。
public class AskQuestionAction extends AnAction {
    @Override
    public void actionPerformed(AnActionEvent e) {
        BrowserUtil.browse("https://stackoverflow.com/questions/ask");
    }
}
We use the built-in BrowserUtil class to handle all the nuances of opening a web page on different operating systems and browsers.
我们使用内置的BrowserUtil类来处理在不同操作系统和浏览器上打开网页的所有细微差别。
We need two parameters to perform a search on StackOverflow: the language tag and the text to search for.
我们需要两个参数来执行StackOverflow上的搜索:语言标签和要搜索的文本。
To get the language tag, we’ll use the Program Structure Interface (PSI). This API parses all the files in a project and provides a programmatic way to inspect them.
为了获得语言标签,我们将使用程序结构接口(PSI)。该API解析了项目中的所有文件,并提供了一种检查这些文件的编程方式。
In this case, we use the PSI to determine the programming language of a file:
在这种情况下,我们使用PSI来确定一个文件的编程语言。
Optional<PsiFile> psiFile = Optional.ofNullable(e.getData(LangDataKeys.PSI_FILE));
String languageTag = psiFile.map(PsiFile::getLanguage)
  .map(Language::getDisplayName)
  .map(String::toLowerCase)
  .map(lang -> "[" + lang + "]")
  .orElse("");
To get the text to search for, we’ll use the Editor API to retrieve highlighted text on the screen:
为了获得要搜索的文本,我们将使用Editor API来检索屏幕上的高亮文本。
Editor editor = e.getRequiredData(CommonDataKeys.EDITOR);
CaretModel caretModel = editor.getCaretModel();
String selectedText = caretModel.getCurrentCaret().getSelectedText();
Even though this action is the same for both editor and console windows, accessing the selected text works the same way.
尽管这个动作对编辑器和控制台窗口都是一样的,访问所选文本的方式也是一样的。
Now, we can put this all together in an actionPerformed declaration:
现在,我们可以把这一切放在一个actionPerformed声明中。
@Override
public void actionPerformed(@NotNull AnActionEvent e) {
    Optional<PsiFile> psiFile = Optional.ofNullable(e.getData(LangDataKeys.PSI_FILE));
    String languageTag = psiFile.map(PsiFile::getLanguage)
      .map(Language::getDisplayName)
      .map(String::toLowerCase)
      .map(lang -> "[" + lang + "]")
      .orElse("");

    Editor editor = e.getRequiredData(CommonDataKeys.EDITOR);
    CaretModel caretModel = editor.getCaretModel();
    String selectedText = caretModel.getCurrentCaret().getSelectedText();

    BrowserUtil.browse("https://stackoverflow.com/search?q=" + languageTag + selectedText);
}
This action also overrides a second method named update, which allows us to enable or disable the action under different conditions. In this case, we disable the search action if there is no selected text:
这个动作也覆盖了第二个名为update的方法,它允许我们在不同条件下启用或禁用该动作。在这种情况下,如果没有选中的文本,我们就禁用搜索动作。
Editor editor = e.getRequiredData(CommonDataKeys.EDITOR);
CaretModel caretModel = editor.getCaretModel();
e.getPresentation().setEnabledAndVisible(caretModel.getCurrentCaret().hasSelection());
4.2. Registering Actions
4.2.注册行动
Once we have our actions written, we need to register them with the IDE. There are two ways to do this.
一旦我们写好了动作,我们需要在IDE中注册它们。有两种方法可以做到这一点。
The first way is using the plugin.xml file, which is created for us when we start a new project.
第一种方法是使用plugin.xml文件,当我们开始一个新项目时,它会为我们创建。
By default, the file will have an empty <actions> element, which is where we’ll add our actions:
默认情况下,该文件将有一个空的<actions>元素,这就是我们要添加动作的地方。
<actions>
    <action
      id="StackOverflow.AskQuestion.ToolsMenu"
      class="com.baeldung.intellij.stackoverflowplugin.AskQuestionAction"
      text="Ask Question on Stack Overflow"
      description="Ask a Question on Stack Overflow">
        <add-to-group group-id="ToolsMenu" anchor="last"/>
    </action>
    <action
      id="StackOverflow.Search.Editor"
      class="com.baeldung.intellij.stackoverflowplugin.SearchAction"
      text="Search on Stack Overflow"
      description="Search on Stack Overflow">
        <add-to-group group-id="EditorPopupMenu" anchor="last"/>
    </action>
    <action
      id="StackOverflow.Search.Console"
      class="com.baeldung.intellij.stackoverflowplugin.SearchAction"
      text="Search on Stack Overflow"
      description="Search on Stack Overflow">
        <add-to-group group-id="ConsoleEditorPopupMenu" anchor="last"/>
    </action>
</actions>
Using the XML file to register actions will ensure they register during IDE startup, which is usually preferable.
使用XML文件来注册动作将确保它们在IDE启动时注册,这通常是最好的。
The second way to register actions is programmatically using the ActionManager class:
注册动作的第二种方式是通过编程使用ActionManager类。
ActionManager.getInstance().registerAction("StackOverflow.SearchAction", new SearchAction());This has the advantage of letting us dynamically register actions. For example, if we write a plugin to integrate with a remote API, we might want to register a different set of actions based on the version of the API that we call.
这样做的好处是让我们动态地注册动作。例如,如果我们写一个插件来集成一个远程API,我们可能想根据我们调用的API的版本来注册一组不同的动作。
The disadvantage of this approach is that actions do not register at startup. We have to create an instance of ApplicationComponent to manage actions, which requires more coding and XML configuration.
这种方法的缺点是,动作在启动时不会注册。我们必须创建一个ApplicationComponent的实例来管理动作,这需要更多的编码和XML配置。
5. Testing the Plugin
5.测试该插件
As with any program, writing an IntelliJ plugin requires testing. For a small plugin like the one we’ve written, it’s sufficient to ensure the plugin compiles and that the actions we created work as expected when we click them.
与任何程序一样,编写IntelliJ插件需要测试。对于像我们写的这个小插件来说,只要保证插件的编译和我们创建的动作在我们点击它们时能按预期工作就足够了。
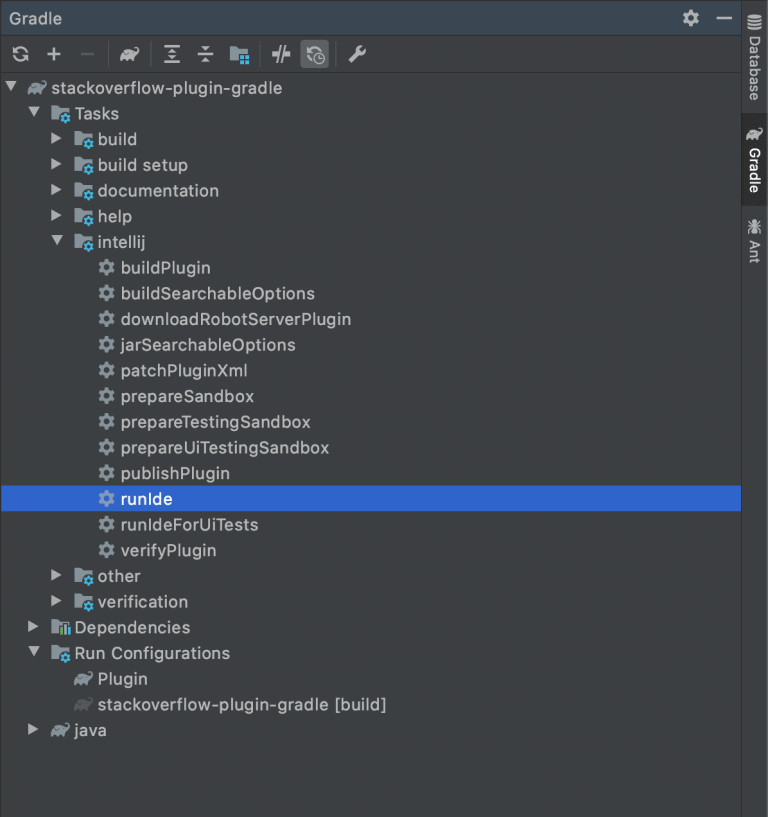
We can manually test (and debug) our plugin by opening the Gradle tool window and executing the runIde task:
我们可以通过打开Gradle工具窗口并执行runIde任务来手动测试(和调试)我们的插件。
This will launch a new instance of IntelliJ with our plugin activated. Doing so allows us to click the different menu items we created and ensure the proper Stack Overflow pages open up.
这将启动一个新的IntelliJ实例,并激活我们的插件。这样做允许我们点击我们创建的不同的菜单项,并确保打开适当的Stack Overflow页面。
If we wish to do more traditional unit testing, IntelliJ provides a headless environment to run unit tests. We can write tests using any test framework we want, and the tests run using real, unmocked components from the IDE.
如果我们希望进行更传统的单元测试,IntelliJ 提供了一个无头环境来运行单元测试。我们可以使用任何我们想要的测试框架来编写测试,而测试则使用IDE中真实的、未模拟的组件来运行。
6. Deploying the Plugin
6.部署插件
The Gradle Plugin provides a simple way to package plugins so we can install and distribute them. Simply open the Gradle tool window and execute the buildPlugin task. This will generate a ZIP file inside the build/distributions directory.
Gradle插件提供了一个简单的方法来打包插件,以便我们能够安装和分发它们。只需打开Gradle工具窗口,执行buildPlugin任务。这将在build/distributions目录下生成一个ZIP文件。
The generated ZIP file contains the code and configuration files needed to load into IntelliJ. We can install it locally, or publish it to a plugin repository for use by others.
生成的ZIP文件包含加载到IntelliJ所需的代码和配置文件。我们可以在本地安装它,也可以将它发布到插件库,供他人使用。
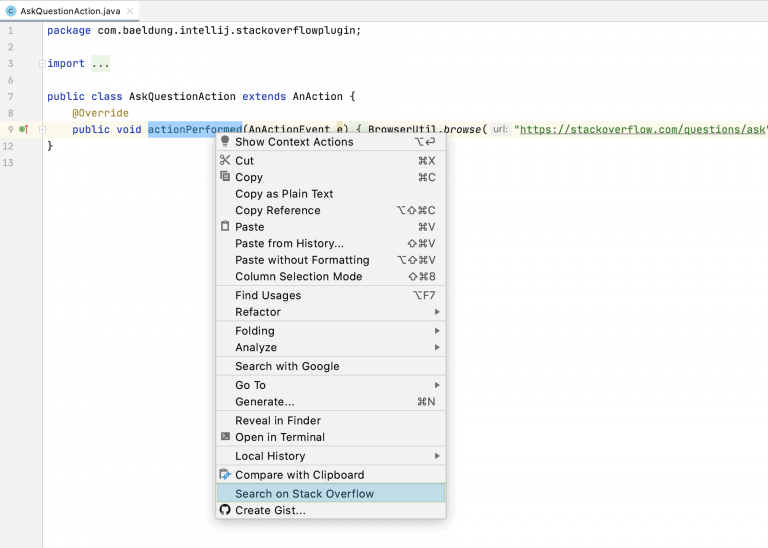
The screenshot below shows one of the new Stack Overflow menu items in action:
下面的截图显示了新的Stack Overflow菜单项目之一的运作情况。
7. Conclusion
7.结语
In this article, we developed a simple plugin that highlights how we can enhance the IntelliJ IDE.
在这篇文章中,我们开发了一个简单的插件,强调了我们如何增强IntelliJ IDE。
While we primarily work with actions, the IntelliJ plugin SDK offers several ways to add new functionality to the IDE. For further reading, check out their official getting started guide.
虽然我们主要使用动作,但 IntelliJ 插件 SDK 提供了几种向 IDE 添加新功能的方法。如需进一步阅读,请查看其官方入门指南。
As always, the full code for our sample plugin can be found over on GitHub.
一如既往,我们的示例插件的完整代码可以在GitHub上找到。


