1. Introduction
1.绪论
Remote debugging gives developers the ability to diagnose unique bugs on a server or another process. It provides the means to track down those annoying runtime bugs and identify performance bottlenecks and resource sinks.
远程调试使开发人员有能力诊断服务器或另一个进程上的独特错误。它提供了追踪那些恼人的运行时错误的手段,并识别性能瓶颈和资源汇。
In this tutorial, we’ll take a look at remote debugging using JetBrains IntelliJ IDEA. Let’s prepare our sample application first by altering the JVM.
在本教程中,我们将看看使用JetBrains IntelliJ IDEA进行远程调试的情况。首先,让我们通过改变JVM来准备我们的示例应用程序。
2. Configure the JVM
2.配置JVM
We’ll use a Spring scheduler sample application to easily connect and add breakpoints to a regularly scheduled task.
我们将使用Spring调度器示例应用程序来轻松连接并向定期安排的任务添加断点。
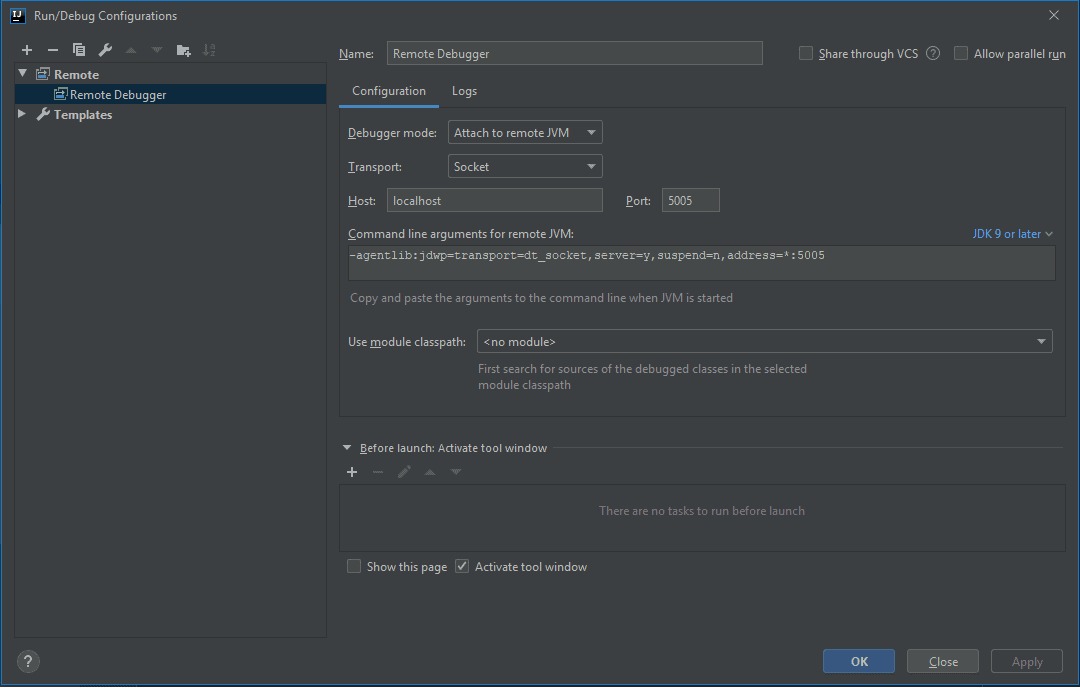
Furthermore, IntelliJ IDEA provides our JVM parameters as part of the configuration:
此外,IntelliJ IDEA提供我们的JVM参数作为配置的一部分。
-agentlib:jdwp=transport=dt_socket,server=y,suspend=n,address=*:50052.1. JVM Parameters
2.1 JVM参数
Besides the Java Debug Wire Protocol (JDWP) configuration – jdwp=transport=dt_socket – we see the server, suspend, and address parameters.
除了Java Debug Wire Protocol(JDWP)配置–jdwp=transport=dt_socket –我们看到server、suspend和address参数。
The server parameter configures the JVM as the target for our debugger. The suspend parameter tells the JVM to wait for a debugger client to connect before startup. Finally, the address parameter uses a wildcard host and a declared port.
server参数将JVM配置为我们调试器的目标。suspend参数告诉JVM在启动前等待调试器客户端的连接。最后,address参数使用一个通配符的主机和一个声明的端口。
So, let’s build the scheduler application:
因此,让我们建立一个调度程序。
mvn clean packageAnd now let’s start up the application, including the -agentlib:jdwp parameter:
现在让我们启动应用程序,包括-agentlib:jdwp参数:。
java -jar -agentlib:jdwp=transport=dt_socket,server=y,suspend=n,address=*:5005 \
  target/gs-scheduling-tasks-0.1.0.jar
Open up any terminal and run the command. With our application started up, let’s now switch over to IntelliJ.
打开任何终端并运行该命令。随着我们的应用程序的启动,现在让我们切换到IntelliJ。
3. Run Configuration in IntelliJ IDEA
3.在IntelliJ IDEA中运行配置
Next, in IntelliJ, we create a new Run Configuration for remote debugging:
接下来,在IntelliJ中,我们为远程调试创建一个新的运行配置。
Now that our application is running, let’s start the remote debugging session by clicking the Debug button.
现在我们的应用程序正在运行,让我们通过点击Debug按钮开始远程调试会话。
4. Remote Debugging
4.远程调试
Next, we open the ScheduleTask file and place a breakpoint at line 36 shown here:
接下来,我们打开ScheduleTask文件,在第36行放置一个断点,如图所示。
public void reportCurrentTime() {
  log.info("The time is now {}", dateFormat.format(new Date()));
}
Since the task executes every five seconds, it will stop soon after it’s added. As a result, we can now step through the entire application.
由于该任务每五秒执行一次,所以它在加入后很快就会停止。因此,我们现在可以逐步完成整个应用程序。
For application startup issues, we change the suspend flag to n and place a breakpoint in the main method of Application.
对于应用程序的启动问题,我们将suspend标志改为n,并在Application.的main方法中放置一个中断点。
4.1. Limitations
4.1.限制条件
Sometimes logging and output confuse us when remote debugging. The logs will not be sent to the IDE console, so an external log file can be used and mapped into the IDE for more robust debugging ability.
在远程调试时,有时日志和输出让我们感到困惑。日志不会被发送到IDE控制台,所以可以使用一个外部日志文件,并映射到IDE中,以获得更强大的调试能力。
Also remember that while remote debugging is a very powerful tool, a production environment is not a suitable target for debugging.
还要记住,虽然远程调试是一个非常强大的工具,但生产环境并不是一个适合调试的目标。
5. Conclusion
5.总结
As we covered in this article, remote debugging with IntelliJ is easy to set up and use in a few short steps.
正如我们在这篇文章中所介绍的,用IntelliJ进行远程调试很容易设置和使用,只需几个简单的步骤。
We looked at how to configure our application JVM for debugging as well as some limitations of this important tool in our developer toolbox.
我们研究了如何配置我们的应用程序JVM进行调试,以及这个重要工具在我们的开发者工具箱中的一些限制。
The sample application can be found over on GitHub.
可以在GitHub上找到样本应用程序。
