1. Introduction
1.绪论
In this tutorial, we’ll learn what’s required when creating data pipelines for IoT applications.
在本教程中,我们将学习为物联网应用创建数据管道时的要求。
Along the way, we’ll understand the characteristics of IoT architecture and see how to leverage different tools like MQTT broker, NiFi, and InfluxDB to build a highly scalable data pipeline for IoT applications.
一路走来,我们将了解物联网架构的特点,看看如何利用不同的工具,如MQTT经纪人、NiFi和InfluxDB,为物联网应用构建一个高度可扩展的数据管道。
2. IoT and Its Architecture
2.物联网及其架构
First, let’s go through some of the basic concepts and understand an IoT application’s general architecture.
首先,让我们通过一些基本概念,了解一个物联网应用的一般架构。
2.1. What Is IoT?
2.1.什么是物联网?
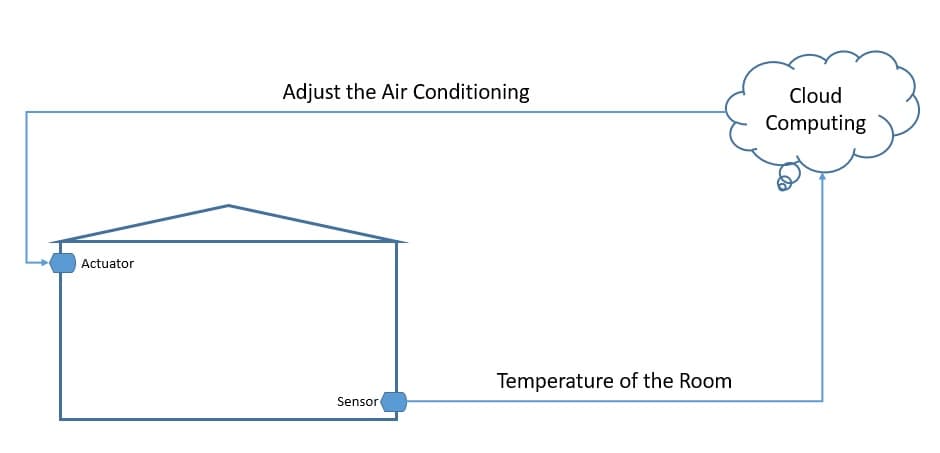
The Internet of Things (IoT) broadly refers to the network of physical objects, known as “things”. For example, things can include anything from common household objects, like a light bulb, to sophisticated industrial equipment. Through this network, we can connect a wide array of sensors and actuators to the internet for exchanging data:
物联网(IoT)广义上是指物理物体的网络,被称为 “物”。例如,物可以包括任何东西,从普通的家用物品,如灯泡,到复杂的工业设备。通过这个网络,我们可以将各种各样的传感器和执行器连接到互联网上,进行数据交换。
Now, we can deploy things in very different environments — for example, the environment can be our home or something quite different, like a moving freight truck. However, we can’t really make any assumptions about the quality of the power supply and network that will be available to these things. Consequently, this gives rise to unique requirements for IoT applications.
现在,我们可以将东西部署在非常不同的环境中–例如,环境可以是我们的家,也可以是非常不同的东西,比如移动的货运卡车。然而,我们真的不能对这些东西可用的电源和网络的质量做出任何假设。因此,这就产生了对物联网应用的独特要求。
2.2. Introduction to IoT Architecture
2.2.物联网架构介绍
A typical IoT architecture usually structures itself into four different layers. Let’s understand how the data actually flow through these layers:
一个典型的物联网架构通常结构为四个不同的层。让我们了解一下数据究竟是如何在这些层中流动的。
First, the sensing layer is comprised primarily of the sensors that gather measurements from the environment. Then, the network layer helps aggregate the raw data and send it over the Internet for processing. Further, the data processing layer filters the raw data and generates early analytics. Finally, the application layer employs powerful data processing capabilities to perform deeper analysis and management of data.
首先,传感层主要由从环境中收集测量数据的传感器组成。然后,网络层帮助汇总原始数据,并通过互联网将其发送出去进行处理。此外,数据处理层过滤原始数据并生成早期分析。最后,应用层采用强大的数据处理能力,对数据进行更深入的分析和管理。
3. Introduction to MQTT, NiFi, and InfluxDB
3.MQTT、NiFi和InfluxDB简介
Now, let’s examine a few products that we widely use in the IoT setup today. These all provide some unique features that make them suitable for the data requirements of an IoT application.
现在,让我们研究一下今天我们在物联网设置中广泛使用的几个产品。这些产品都提供了一些独特的功能,使它们适合于物联网应用的数据要求。
3.1. MQTT
3.1. MQTT
Message Queuing Telemetry Transport (MQTT) is a lightweight publish-subscribe network protocol. It’s now an OASIS and ISO standard. IBM originally developed it for transporting messages between devices. MQTT is suitable for constrained environments where memory, network bandwidth, and power supply are scarce.
消息队列遥测传输(MQTT)是轻量级发布-订阅网络协议。它现在是OASIS和ISO标准。IBM最初开发它是为了在设备之间传输消息。MQTT适用于内存、网络带宽和电源不足的受限环境。
MQTT follows a client-server model, where different components can act as clients and connect to a server over TCP. We know this server as an MQTT broker. Clients can publish messages to an address known as the topic. They can also subscribe to a topic and receive all messages published to it.
MQTT遵循客户-服务器模型,不同的组件可以作为客户,通过TCP连接到一个服务器。我们把这个服务器称为MQTT代理。客户端可以向一个被称为主题的地址发布消息。他们也可以订阅一个主题并接收所有发布到该主题的消息。
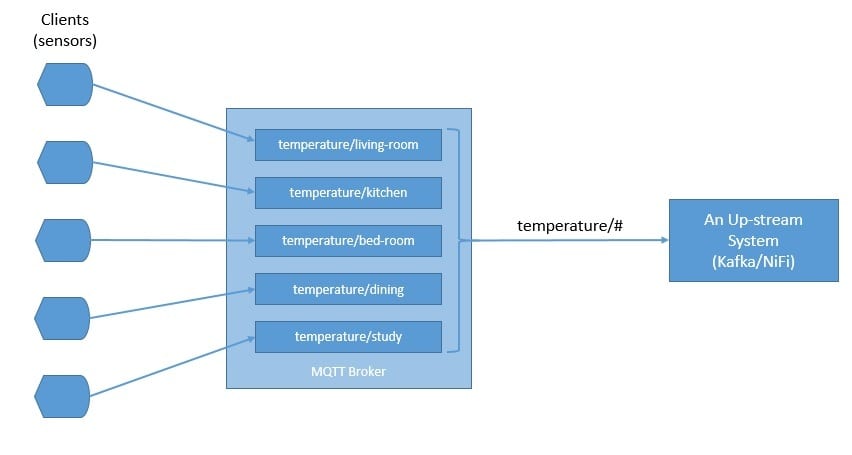
In a typical IoT setup, sensors can publish measurements like temperature to an MQTT broker, and upstream data processing systems can subscribe to these topics to receive the data:
在一个典型的物联网设置中,传感器可以向MQTT代理发布温度等测量数据,而上游数据处理系统可以订阅这些主题以接收数据。
As we can see, the topics in MQTT are hierarchical. A system can easily subscribe to a whole hierarchy of topics by using a wildcard.
正如我们所看到的,MQTT中的主题是分层次的。一个系统可以通过使用通配符轻松订阅整个层次的主题。
MQTT supports three levels of Quality of Service (QoS). These are “delivered at most once”, “delivered at least once”, and “delivered exactly once”. QoS defines the level of agreement between the client and the server. Each client can choose the level of service that suits its environment.
MQTT 支持三个级别的服务质量(QoS)。它们是 “最多送一次”、”至少送一次 “和 “正好送一次”。QoS定义了客户和服务器之间的协议水平。每个客户可以选择适合其环境的服务水平。
The client can also request the broker to persist a message while publishing. In some setups, an MQTT broker may require a username and password authentication from clients in order to connect. Further, for privacy, the TCP connection may be encrypted with SSL/TLS.
客户端也可以要求经纪商在发布消息时保持消息的持续性。在一些设置中,MQTT代理可能需要客户的用户名和密码认证,以便连接。此外,为了保护隐私,TCP连接可以用SSL/TLS进行加密。
There are several MQTT broker implementations and client libraries available for use — for example, HiveMQ, Mosquitto, and Paho MQTT. We’ll be using Mosquitto in our example in this tutorial. Mosquitto is part of the Eclipse Foundation, and we can easily install it on a board like Raspberry Pi or Arduino.
有几个MQTT 代理实现和客户端库可供使用 – 例如,HiveMQ、Mosquitto和Paho MQTT。在本教程中,我们将在我们的示例中使用Mosquitto。Mosquitto是Eclipse基金会的一部分,我们可以很容易地将其安装在Raspberry Pi或Arduino这样的板子上。
3.2. Apache NiFi
3.2.Apache NiFi
Apache NiFi was originally developed as NiagaraFiles by NSA. It facilitates automation and management of data flow between systems and is based on the flow-based-programming model that defines applications as a network of black-box processes.
Apache NiFi最初由NSA开发为NiagaraFiles。它促进了系统间数据流的自动化和管理,并且基于基于流程的编程模型,该模型将应用程序定义为黑盒流程的网络。
Let’s go through some of the basic concepts first. An object moving through the system in NiFi is called a FlowFile. FlowFile Processors actually perform useful work like routing, transformation, and mediation of FlowFiles. The FlowFile Processors are connected with Connections.
让我们先了解一些基本概念。一个在NiFi系统中移动的对象被称为FlowFile。FlowFile处理器实际上执行有用的工作,如FlowFiles的路由、转换和调解。FlowFile处理器与连接相连。
A Process Group is a mechanism to group components together to organize a dataflow in NiFi. A Process Group can receive data via Input Ports and send data via Output Ports. A Remote Process Group (RPG) provides a mechanism to send data to or receive data from a remote instance of NiFi.
过程组是一种机制,将组件组合在一起,组织NiFi中的数据流。一个进程组可以通过输入端口接收数据,通过输出端口发送数据。远程进程组(RPG)提供了一个机制,以发送数据到NiFi的一个远程实例或从其接收数据。
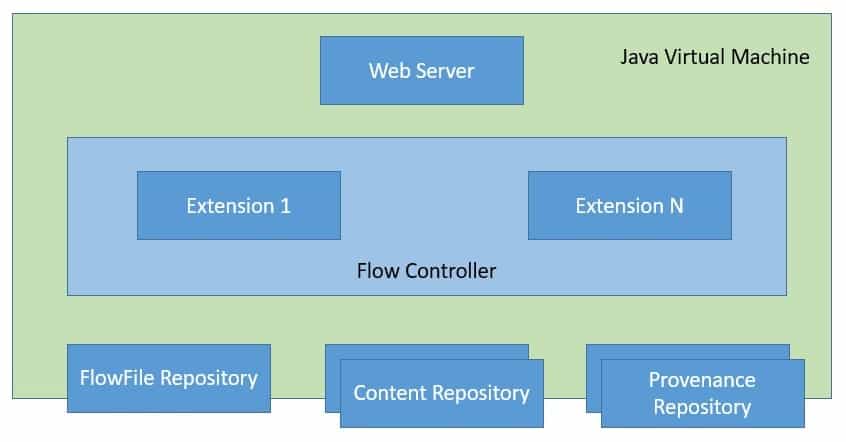
Now, with that knowledge, let’s go through the NiFi architecture:
现在,有了这些知识,让我们去看看NiFi的架构。
NiFi is a Java-based program that runs multiple components within a JVM. Web-server is the component that hosts the command and control API. Flow Controller is the core component of NiFi that manages the schedule of when extensions receive resources to execute. Extensions allow NiFi to be extensible and support integration with different systems.
NiFi是一个基于Java的程序,在一个JVM内运行多个组件。Web-server是承载命令和控制API的组件。流量控制器是NiFi的核心组件,它管理着扩展程序何时接收资源的时间表执行。扩展允许NiFi具有可扩展性,并支持与不同系统的集成。
NiFi keeps track of the state of a FlowFile in the FlowFile Repository. The actual content bytes of the FlowFile reside in the Content Repository. Finally, the provenance event data related to the FlowFile resides in the Provenance Repository.
NiFi 在 FlowFile Repository 中跟踪 FlowFile 的状态。FlowFile 的实际内容字节位于内容库中。最后,与FlowFile相关的出处事件数据位于Provenance Repository中。
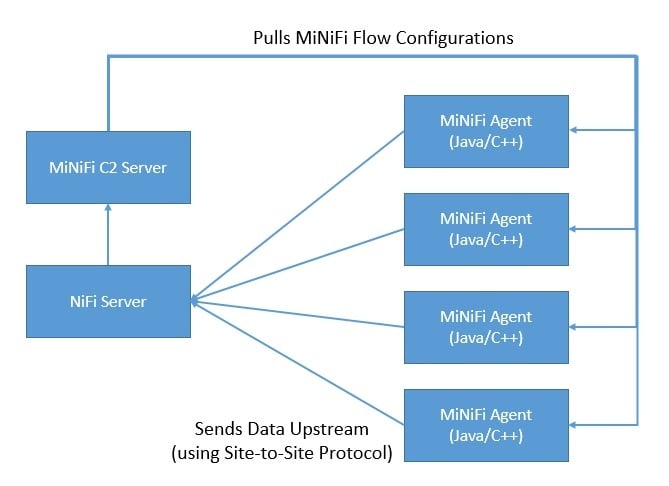
As data collection at source may require a smaller footprint and low resource consumption, NiFi has a subproject known as MiNiFi. MiNiFi provides a complementary data collection approach for NiFi and easily integrates with NiFi through Site-to-Site (S2S) protocol:
由于在源头收集数据可能需要较小的足迹和低资源消耗,NiFi有一个子项目,称为MiNiFi。MiNiFi为NiFi提供了一种补充性的数据收集方法,并通过现场对现场(S2S)协议与NiFi轻松整合。
Moreover, it enables central management of agents through MiNiFi Command and Control (C2) protocol. Further, it helps in establishing the data provenance by generating a full chain of custody information.
此外,它通过MiNiFi指挥与控制(C2)协议实现了对代理的集中管理。此外,它还有助于通过生成完整的监管链信息来建立数据的来源。
3.3. InfluxDB
3.3.InfluxDB
InfluxDB is a time-series database written in Go and developed by InfluxData. It’s designed for fast and high-availability storage and retrieval of time-series data. This is especially suitable for handling application metrics, IoT sensor data, and real-time analytics.
InfluxDB是用Go编写的时间序列数据库,由InfluxData开发。它被设计用于快速和高可用性的时间序列数据的存储和检索。这特别适用于处理应用指标、IoT传感器数据和实时分析。
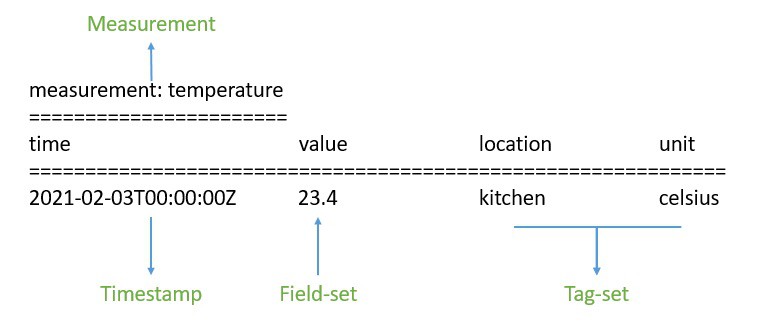
To begin with, data in InfluxDB is organized by time-series. A time-series can contain zero or many points. A point represents a single data record that has four components —measurement, tag-set, field-set, and timestamp:
首先,InfluxDB中的数据是按时间序列组织的。一个时间序列可以包含零个或多个点。一个点代表一条数据记录,它有四个组成部分 – 测量、标签集、字段集和时间戳。
First, the timestamp shows the UTC date and time associated with a particular point. Field-set is comprised of one or more field-key and field-value pairs. They capture the actual data with labels for a point. Similarly, tag-set is comprised of tag-key and tag-value pairs, but they are optional. They basically act as metadata for a point and can be indexed for faster query responses.
首先,时间戳显示与特定点相关的UTC日期和时间。字段集是由一个或多个字段键和字段值对组成的。它们为一个点捕获带有标签的实际数据。同样地,标签集由标签键和标签值对组成,但它们是可选的。它们基本上充当了一个点的元数据,并且可以被编入索引,以获得更快的查询响应。
The measurement acts as a container for tag-set, field-set, and timestamp. Additionally, every point in InfluxDB can have a retention policy associated with it. The retention policy describes how long InfluxDB will keep the data and how many copies it’ll create through replication.
测量作为标签集、字段集和时间戳的容器。此外,InfluxDB的每个点都可以有一个与之相关的保留策略。保留策略描述了InfluxDB将保留数据多长时间,以及它将通过复制创建多少副本。
Finally, a database acts as a logical container for users, retention policies, continuous queries, and time-series data. We can understand the database in InfluxDB to be loosely similar to a traditional relational database.
最后,数据库充当了用户、保留策略、连续查询和时间序列数据的逻辑容器。我们可以把InfluxDB中的数据库理解为与传统的关系型数据库松散相似。
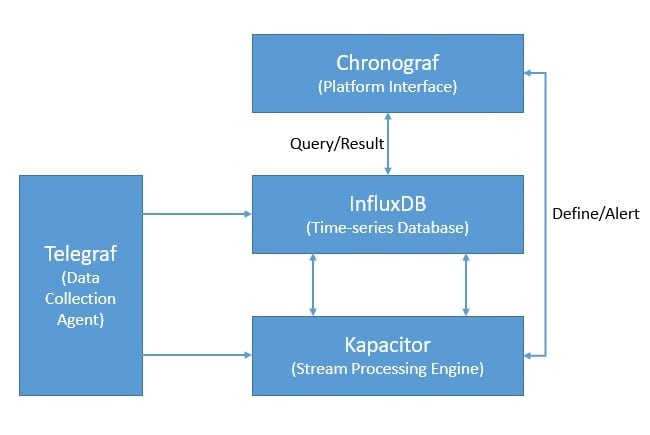
Moreover, InfluxDB is part of the InfluxData platform that offers several other products to efficiently handle time-series data. InfluxData now offers it as InfluxDB OSS 2.0, an open-source platform, and InfluxDB Cloud, a commercial offering:
此外,InfluxDB是InfluxData平台的一部分,该平台提供了其他几种有效处理时间序列数据的产品。InfluxData现在提供的是InfluxDB OSS 2.0(一个开源平台)和InfluxDB Cloud(一个商业产品)。
Apart from InfluxDB, the platform includes Chronograf, which offers a complete interface for the InfluxData platform. Further, it includes Telegraf, an agent for collecting and reporting metrics and events. Finally, there is Kapacitor, a real-time streaming data processing engine.
除InfluxDB外,该平台还包括Chronograf,它为InfluxData平台提供了完整的界面。此外,它还包括Telegraf,一个用于收集和报告指标和事件的代理。最后,还有Kapacitor,这是一个实时流数据处理引擎。
4. Hands-on with IoT Data Pipeline
4.物联网数据管道的实践
Now, we’ve covered enough ground to use these products together to create a data-pipeline for our IoT application. We’ll assume that we are gathering air-quality-related measurements from multiple observation stations across multiple cities for this tutorial. For example, the measurements include ground-level ozone, carbon monoxide, sulfur dioxide, nitrogen dioxide, and aerosols.
现在,我们已经覆盖了足够的领域,可以一起使用这些产品来为我们的物联网应用创建一个数据管道。在本教程中,我们将假设我们正在从多个城市的多个观测站收集与空气质量相关的测量数据。例如,测量结果包括地面臭氧、一氧化碳、二氧化硫、二氧化氮和气溶胶。
4.1. Setting Up the Infrastructure
4.1.建立基础设施
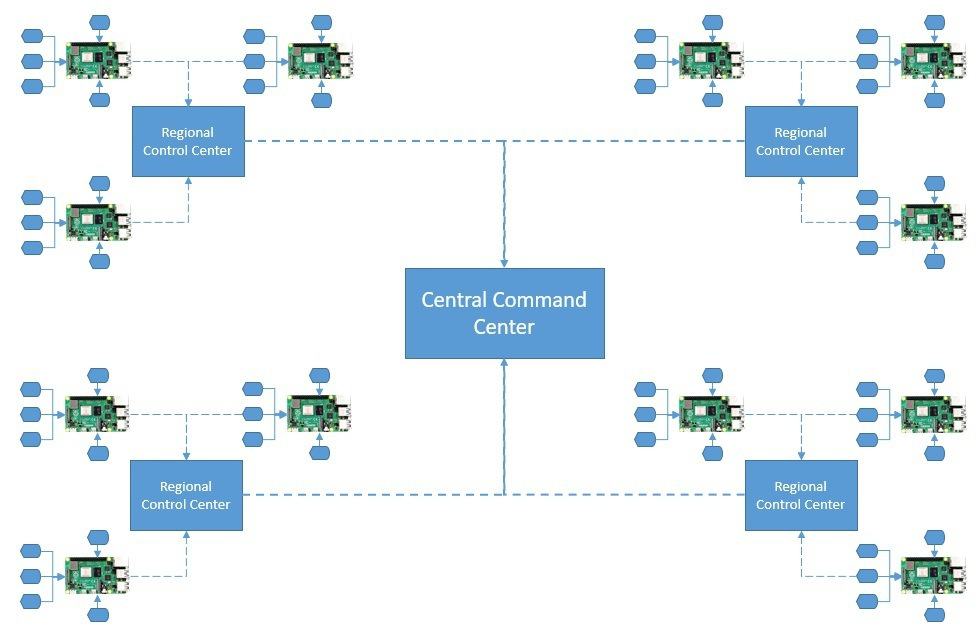
First, we’ll assume that every weather station in a city is equipped with all sensing equipment. Further, these sensors are wired to a board like Raspberry Pi to collect the analog data and digitize it. The board is connected to the wireless to send the raw measurements upstream:
首先,我们将假设一个城市的每个气象站都配备了所有的传感设备。此外,这些传感器被连接到像Raspberry Pi这样的板子上,收集模拟数据并将其数字化。该板与无线连接,向上游发送原始测量数据。
A regional control station collects data from all weather stations in a city. We can aggregate and feed this data into some local analytics engine for quicker insights. The filtered data from all regional control centers are sent to a central command center, which is mostly hosted in the cloud.
一个区域控制站从一个城市的所有气象站收集数据。我们可以将这些数据汇总并送入一些本地分析引擎,以获得更快的洞察力。来自所有区域控制中心的过滤数据被发送到一个中央指挥中心,该中心大多托管在云端。
4.2. Creating the IoT Architecture
4.2.创建物联网架构
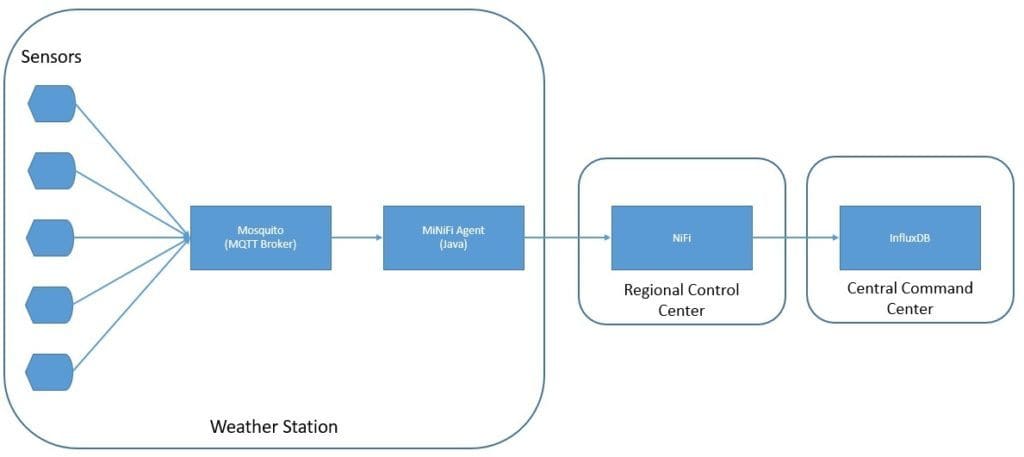
Now, we’re ready to design the IoT architecture for our simple air-quality application. We’ll be using MQTT broker, MiNiFi Java agents, NiFi, and InfluxDB here:
现在,我们准备为我们简单的空气质量应用设计物联网架构。我们将在这里使用MQTT代理、MiNiFi Java代理、NiFi和InfluxDB。
As we can see, we’re using Mosquitto MQTT broker and MiNiFi Java agent on the weather station sites. At the regional control centers, we’re using the NiFi server to aggregate and route data. Finally, we’re using InfluxDB to store measurements at the command-center level.
正如我们所看到的,我们在气象站站点上使用Mosquitto MQTT代理和MiNiFi Java代理。在区域控制中心,我们正在使用NiFi服务器来聚合和路由数据。最后,我们使用InfluxDB在指挥中心层面存储测量数据。
4.3. Performing Installations
4.3.进行安装
Installing Mosquitto MQTT broker and MiNiFi Java agent on a board like Raspberry Pi is quite easy. However, for this tutorial, we’ll install them on our local machine.
在Raspberry Pi这样的板子上安装Mosquitto MQTT代理和MiNiFi Java代理是很容易的。然而,在本教程中,我们将在本地机器上安装它们。
The official download page of Eclipse Mosquito provides binaries for several platforms. Once installed, starting Mosquitto is quite simple from the installation directory:
Eclipse Mosquito的官方下载页面提供了几个平台的二进制文件。一旦安装完毕,从安装目录中启动Mosquitto是非常简单的。
net start mosquittoFurther, NiFi binaries are also available for download from its official site. We have to extract the downloaded archive in a suitable directory. Since MiNiFi will connect to NiFi using the site-to-site protocol, we have to specify the site-to-site input socket port in <NIFI_HOME>/conf/nifi.properties:
此外,NiFi二进制文件也可从其官方网站下载。我们必须在一个合适的目录下解压下载的档案。由于MiNiFi将使用站点对站点协议连接到NiFi,我们必须在
# Site to Site properties
nifi.remote.input.host=
nifi.remote.input.secure=false
nifi.remote.input.socket.port=1026
nifi.remote.input.http.enabled=true
nifi.remote.input.http.transaction.ttl=30 sec
Then, we can start NiFi:
然后,我们可以启动NiFi。
<NIFI_HOME>/bin/run-nifi.batSimilarly, Java or C++ MiNiFi agent and toolkit binaries are available for download from the official site. Again, we have to extract the archives in a suitable directory.
同样,Java或C++ MiNiFi代理和工具包二进制文件也可以从官方网站下载。同样,我们必须在一个合适的目录下解压档案。
MiNiFi, by default, comes with a very minimal set of processors. Since we’ll be consuming data from MQTT, we have to copy the MQTT processor into the <MINIFI_HOME>/lib directory. These are bundled as NiFi Archive (NAR) files and can be located in the <NIFI_HOME>/lib directory:
MiNiFi,默认情况下,带有一套非常小的处理器。由于我们将从MQTT消耗数据,我们必须将MQTT处理器复制到
COPY <NIFI_HOME>/lib/nifi-mqtt-nar-x.x.x.nar <MINIFI_HOME>/lib/nifi-mqtt-nar-x.x.x.narWe can then start the MiNiFi agent:
然后我们可以启动MiNiFi代理。
<MINIFI_HOME>/bin/run-minifi.batLastly, we can download the open-source version of InfluxDB from its official site. As before, we can extract the archive and start InfluxDB with a simple command:
最后,我们可以从其官方网站下载InfluxDB的开源版本。和以前一样,我们可以解压存档,并通过一个简单的命令来启动InfluxDB。
<INFLUXDB_HOME>/influxd.exeWe should keep all other configurations, including the port, as the default for this tutorial. This concludes the installation and setup on our local machine.
我们应该保持所有其他配置,包括端口,作为本教程的默认配置。至此,我们在本地机器上的安装和设置就结束了。
4.4. Defining the NiFi Dataflow
4.4.定义NiFi数据流
Now, we’re ready to define our dataflow. NiFi provides an easy-to-use interface to create and monitor dataflows. This is accessible on the URL http://localhost:8080/nifi.
现在,我们准备定义我们的数据流。NiFi 提供了一个易于使用的界面来创建和监控数据流。这可以在URL http://localhost:8080/nifi 上访问。
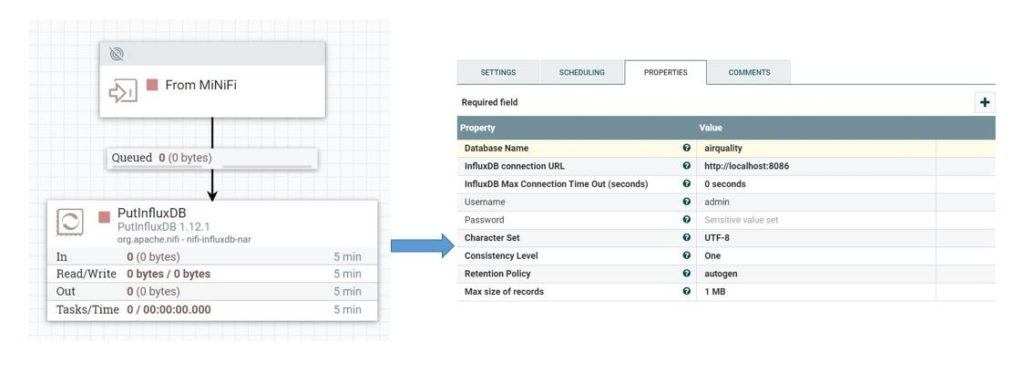
To begin with, we’ll define the main dataflow that will be running on the NiFi server:
首先,我们将定义将在NiFi服务器上运行的主要数据流。
Here, as we can see, we’ve defined an input port that will receive data from MiNiFi agents. It further sends data through a connection to the PutInfluxDB processor responsible for storing the data in the InfluxDB. In this processor’s configuration, we’ve defined the connection URL of InfluxDB and the database name where we want to send the data.
在这里,我们可以看到,我们已经定义了一个输入端口,将接收来自MiNiFi代理的数据。它进一步通过连接将数据发送到PutInfluxDB处理器,负责将数据存储到InfluxDB中。在这个处理器的配置中,我们已经定义了InfluxDB的连接URL和我们要发送数据的数据库名称。
4.5. Defining the MiNiFi Dataflow
4.5.定义MiNiFi数据流
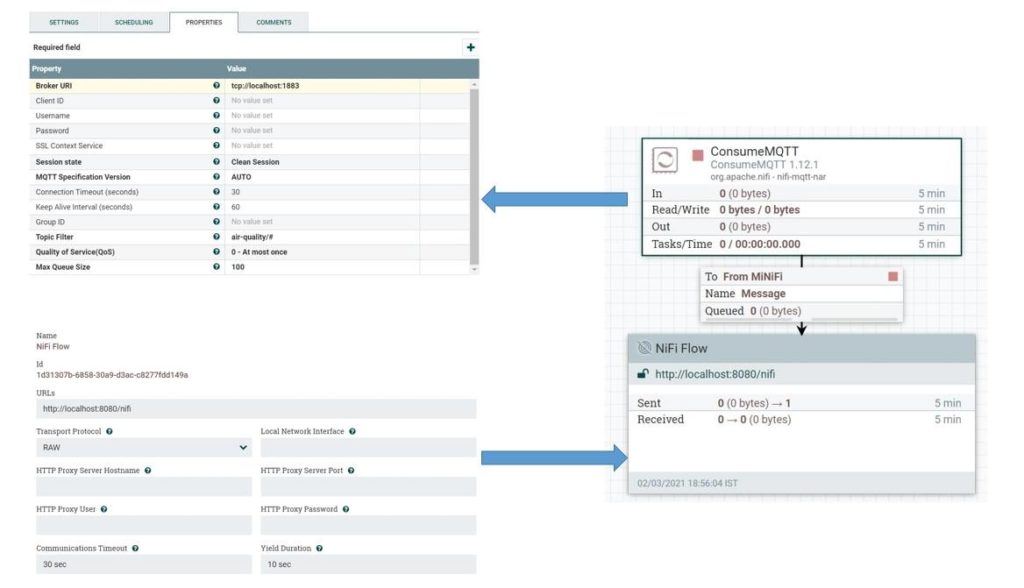
Next, we’ll define the dataflow that will run on the MiNiFi agents. We’ll use the same user interface of NiFi and export the dataflow as a template to configure this in the MiNiFi agent. Let’s define the dataflow for the MiNiFi agent:
接下来,我们将定义将在MiNiFi代理上运行的数据流。我们将使用与NiFi相同的用户界面,并将数据流导出为模板,在MiNiFi代理中进行配置。让我们为MiNiFi代理定义数据流。
Here, we’ve defined the ConsumeMQTT processor that is responsible for getting data from the MQTT broker. We’ve provided the broker URI, as well as the topic filter, in the properties. We’re pulling data from all topics defined under the hierarchy air-quality.
在这里,我们定义了ConsumeMQTT处理器,它负责从MQTT代理处获取数据。我们在属性中提供了代理URI以及主题过滤器。我们将从定义在空气质量层次结构下的所有主题中提取数据。
We’ve also defined a remote process group and connected it to the ConcumeMQTT processor. The remote process group is responsible for pushing data to NiFi through the site-to-site protocol.
我们还定义了一个远程进程组,并将其连接到ConcumeMQTT处理器。远程进程组负责通过站点到站点的协议将数据推送给NiFi。
We can save this dataflow as a template and download it as an XML file. Let’s name this file config.xml. Now, we can use the converter toolkit to convert this template from XML into YAML, which the MiNiFi agent uses:
我们可以把这个数据流保存为一个模板,并下载为一个XML文件。让我们把这个文件命名为config.xml。现在,我们可以使用转换工具箱将这个模板从XML转换成YAML,MiNiFi代理使用YAML。
<MINIFI_TOOLKIT_HOME>/bin/config.bat transform config.xml config.ymlThis will give us the config.yml file where we’ll have to manually add the host and port of the NiFi server:
这将给我们提供config.yml文件,我们将不得不手动添加NiFi服务器的主机和端口。
  Input Ports:
  - id: 19442f9d-aead-3569-b94c-1ad397e8291c
    name: From MiNiFi
    comment: ''
    max concurrent tasks: 1
    use compression: false
    Properties: # Deviates from spec and will later be removed when this is autonegotiated
      Port: 1026
      Host Name: localhost
We can now place this file in the directory <MINIFI_HOME>/conf, replacing the file that may already be present there. We’ll have to restart the MiNiFi agent after this.
我们现在可以把这个文件放在
Here, we’re doing a lot of manual work to create the dataflow and configure it in the MiNiFi agent. This is impractical for real-life scenarios where hundreds of agents may be present in remote locations. However, as we’ve seen earlier, we can automate this by using the MiNiFi C2 server. But this is not in the scope of this tutorial.
在这里,我们要做大量的手工工作来创建数据流并在MiNiFi代理中进行配置。这对于现实生活中的场景来说是不切实际的,因为在这些场景中可能有数百个代理存在于远程位置。然而,正如我们前面所看到的,我们可以通过使用MiNiFi C2服务器实现自动化。但这不在本教程的范围内。
4.6. Testing the Data Pipeline
4.6.测试数据管道
Finally, we are ready to test our data pipeline! Since we do not have the liberty to use real sensors, we’ll create a small simulation. We’ll generate sensor data using a small Java program:
最后,我们已经准备好测试我们的数据管道了!由于我们没有自由使用真正的传感器,我们将创建一个小的模拟。我们将使用一个小的Java程序生成传感器数据。
class Sensor implements Callable<Boolean> {
    String city;
    String station;
    String pollutant;
    String topic;
    Sensor(String city, String station, String pollutant, String topic) {
        this.city = city;
        this.station = station;
        this.pollutant = pollutant;
        this.topic = topic;
    }

    @Override
    public Boolean call() throws Exception {
        MqttClient publisher = new MqttClient(
          "tcp://localhost:1883", UUID.randomUUID().toString());
        MqttConnectOptions options = new MqttConnectOptions();
        options.setAutomaticReconnect(true);
        options.setCleanSession(true);
        options.setConnectionTimeout(10);
        publisher.connect(options);
        IntStream.range(0, 10).forEach(i -> {
            String payload = String.format("%1$s,city=%2$s,station=%3$s value=%4$04.2f",
              pollutant,
              city,
              station,
              ThreadLocalRandom.current().nextDouble(0, 100));
            MqttMessage message = new MqttMessage(payload.getBytes());
            message.setQos(0);
            message.setRetained(true);
            try {
                publisher.publish(topic, message);
                Thread.sleep(1000);
            } catch (MqttException | InterruptedException e) {
                e.printStackTrace();
            }
        });
        return true;
    }
}
Here, we’re using the Eclipse Paho Java client to generate messages to an MQTT broker. We can add as many sensors as we want to create our simulation:
在这里,我们使用Eclipse Paho Java客户端来生成消息到一个MQTT代理。我们可以添加任意多的传感器来创建我们的模拟。
ExecutorService executorService = Executors.newCachedThreadPool();
List<Callable<Boolean>> sensors = Arrays.asList(
  new Simulation.Sensor("london", "central", "ozone", "air-quality/ozone"),
  new Simulation.Sensor("london", "central", "co", "air-quality/co"),
  new Simulation.Sensor("london", "central", "so2", "air-quality/so2"),
  new Simulation.Sensor("london", "central", "no2", "air-quality/no2"),
  new Simulation.Sensor("london", "central", "aerosols", "air-quality/aerosols"));
List<Future<Boolean>> futures = executorService.invokeAll(sensors);
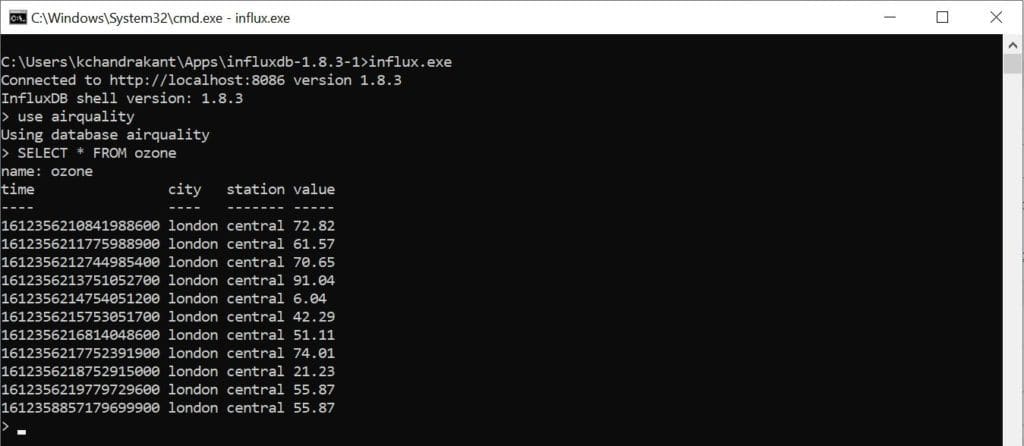
If everything works as it should, we’ll be able to query our data in the InfluxDB database:
如果一切工作正常,我们就可以在InfluxDB数据库中查询我们的数据。
For example, we can see all the points belonging to the measurement “ozone” in the database “airquality”.
例如,我们可以在数据库 “空气质量 “中看到属于测量 “臭氧 “的所有点。
5. Conclusion
5.总结
To sum up, we covered a basic IoT use-case in this tutorial. We also understood how to use tools like MQTT, NiFi, and InfluxDB to build a scalable data pipeline. Of course, this does not cover the entire breadth of an IoT application, and the possibilities of extending the pipeline for data analytics are endless.
总而言之,我们在本教程中涵盖了一个基本的物联网用例。我们还了解了如何使用MQTT、NiFi和InfluxDB等工具来构建一个可扩展的数据管道。当然,这并没有涵盖物联网应用的全部范围,扩展管道进行数据分析的可能性是无限的。
Further, the example we’ve picked in this tutorial is for demonstration purposes only. The actual infrastructure and architecture for an IoT application can be quite varied and complex. Moreover, we can complete the feedback cycle by pushing the actionable insights backward as commands.
此外,我们在本教程中挑选的例子仅用于演示目的。物联网应用的实际基础设施和架构可能是相当多样和复杂的。此外,我们可以通过将可操作的见解作为命令向后推送来完成反馈循环。
