1. Overview
1.概述
In this tutorial, we’re going to see how we can use BitSets to represent a vector of bits.
在本教程中,我们将看到如何使用BitSets来表示一个比特的向量。
First, we’ll start with the rationale behind not using the boolean[]. Then after getting familiar with the BitSet internals, we’ll take a closer look at its API.
首先,我们将从不使用boolean[]的理由开始。然后在熟悉了BitSet的内部结构后,我们将仔细看看它的API。
2. Array of Bits
2.位的阵列
To store and manipulate arrays of bits, one might argue that we should use boolean[] as our data structure. At first glance, that might seem a reasonable suggestion.
为了存储和操作比特数组,人们可能会认为我们应该使用boolean[] 作为我们的数据结构。乍一看,这可能是一个合理的建议。
However, each boolean member in a boolean[] usually consumes one byte instead of just one bit. So when we have tight memory requirements, or we’re just aiming for a reduced memory footprint, boolean[] are far from being ideal.
然而,boolean[] 中的每个boolean成员通常会消耗一个字节而不是仅仅一个比特。因此,当我们有严格的内存要求时,或者我们只是为了减少内存占用,boolean[] 远不是理想的选择。
To make matters more concrete, let’s see how much space a boolean[] with 1024 elements consumes:
为了更具体地说明问题,让我们看看一个有1024个元素的boolean[] 会消耗多少空间。
boolean[] bits = new boolean[1024];
System.out.println(ClassLayout.parseInstance(bits).toPrintable());
Ideally, we expect a 1024-bit memory footprint from this array. However, the Java Object Layout (JOL) reveals an entirely different reality:
理想情况下,我们期望从这个阵列中获得1024位的内存占用。然而,Java对象布局(JOL)揭示了一个完全不同的现实。
[Z object internals:
 OFFSET  SIZE      TYPE DESCRIPTION            VALUE
      0     4           (object header)        01 00 00 00 (00000001 00000000 00000000 00000000) (1)
      4     4           (object header)        00 00 00 00 (00000000 00000000 00000000 00000000) (0)
      8     4           (object header)        7b 12 07 00 (01111011 00010010 00000111 00000000) (463483)
     12     4           (object header)        00 04 00 00 (00000000 00000100 00000000 00000000) (1024)
     16  1024   boolean [Z.                    N/A
Instance size: 1040 bytes
If we ignore the overhead of object header, the array elements are consuming 1024 bytes, instead of the expected 1024 bits. That’s 700% more memory than what we expected.
如果我们忽略对象头的开销,数组元素消耗的是1024字节,而不是预期的1024比特。这比我们预期的多出700%的内存。
The addressability issues and word tearing are the main reasons why booleans are more than just one single bit.
可寻址性问题和单词撕裂是boolean的主要原因,而不仅仅是一个单一位。
To solve this problem, we can use a combination of numeric data types (such as long) and bit-wise operations. That’s where the BitSet comes in.
为了解决这个问题,我们可以使用数字数据类型(如long)和位值操作的组合。这就是BitSet的作用。
3. How BitSet Works
3.BitSet如何工作
As we mentioned earlier, to achieve the one bit per flag memory usage, the BitSet API uses a combination of basic numeric data types and bit-wise operations.
正如我们前面提到的,为了实现每个标志位的内存使用,BitSetAPI使用了基本数字数据类型和位操作的组合。
For the sake of simplicity, let’s suppose we’re going to represent eight flags with one byte. At first, we initialize all bits of this single byte with zero:
为了简单起见,我们假设用一个字节来表示八个标志。首先,我们将这个单一的byte的所有位初始化为0。
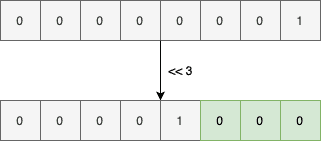
Now if we want to set the bit at position three to true, we should first left-shift the number 1 by three:
现在,如果我们想把位置3的位子设置为true,我们应该先把数字1左移3:。
And then or its result with the current byte value:
然后用当前的字节值其结果。
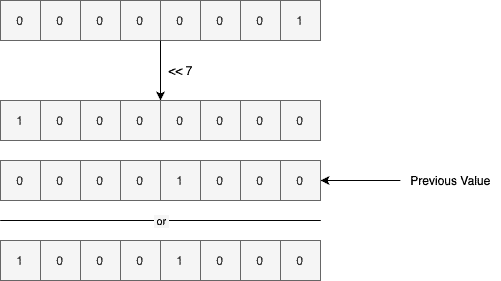
The same process will happen if decide to set the bit at the index seven:
如果决定设置索引7的位,也会发生同样的过程。
As shown above, we perform a left-shift by seven bits and combine the result with the previous byte value using the or operator.
如上图所示,我们进行了7位的左移,并使用or操作符将结果与前一个字节值相结合。
3.1. Getting a Bit Index
3.1.获取比特索引
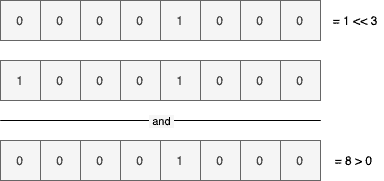
To check if a particular bit index is set to true or not, we’ll use the and operator. For instance, here’s how we check if index three is set:
为了检查某个特定的比特索引是否被设置为true,我们将使用and操作符。例如,下面是我们如何检查索引三是否被设置。
- Performing a left-shift by three bits on the value one
- Anding the result with the current byte value
- If the result is greater than zero, then we found a match, and that bit index is actually set. Otherwise, the requested index is clear or is equal to false
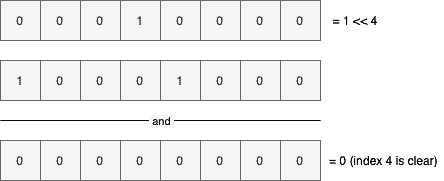
The above diagram shows the get operation steps for index three. If we inquire about a clear index, however, the result will be different:
上图显示了索引三的获取操作步骤。然而,如果我们查询的是一个明确的索引,结果将是不同的。
Since the and result is equal to zero, index four is clear.
由于和的结果等于零,所以索引四是清楚的。
3.2. Growing the Storage
3.2.增长的存储
Currently, we can only store a vector of 8 bits. To go beyond this limitation, we just have to use an array of bytes, instead of a single byte, that’s it!
目前,我们只能存储一个8位的向量。要超越这个限制,我们只需使用一个字节数组,而不是一个字节,就是这样!。
Now, every time we need to set, get, or clear a specific index, we should find the corresponding array element, first. For instance, let’s suppose we’re going to set index 14:
现在,每次我们需要设置、获取或清除一个特定的索引时,我们应该首先找到相应的数组元素。例如,让我们假设我们要设置索引14。
As shown in the above diagram, after finding the right array element, we did set the appropriate index.
如上图所示,在找到正确的数组元素后,我们确实设置了适当的索引。
Also, if we want to set an index beyond 15 here, the BitSet will expand its internal array, first. Only after expanding the array and copying the elements will it set the requested bit. This is somewhat similar to how ArrayList works internally.
另外,如果我们想在这里设置一个超过15的索引,BitSet将首先扩展其内部数组。只有在扩展了数组并复制了元素之后,它才会设置所要求的位。这有点类似于ArrayList的内部操作。
So far, we used the byte data type for the sake of simplicity. The BitSet API, however, is using an array of long values internally.
到目前为止,为了简单起见,我们使用了byte数据类型。然而,BitSetAPI内部使用的是long值数组。
4. The BitSet API
4.BitSetAPI
Now that we know enough about the theory, it’s time to see what the BitSet API looks like.
现在我们对理论有了足够的了解,是时候看看BitSetAPI的样子了。
For starters, let’s compare the memory footprint of a BitSet instance with 1024 bits with the boolean[] we saw earlier:
首先,让我们比较一下1024位的BitSet实例和我们之前看到的boolean[] 的内存占用情况。
BitSet bitSet = new BitSet(1024);

System.out.println(GraphLayout.parseInstance(bitSet).toPrintable());
This will print both the shallow size of the BitSet instance and the size of its internal array:
这将同时打印BitSet实例的浅层尺寸和其内部数组的尺寸。
java.util.BitSet@75412c2fd object externals:
          ADDRESS       SIZE TYPE             PATH         VALUE
        70f97d208         24 java.util.BitSet              (object)
        70f97d220        144 [J               .words       [0, 0, 0, 0, 0, 0, 0, 0, 0, 0, 0, 0, 0, 0, 0, 0]
As shown above, it uses a long[] with 16 elements (16 * 64 bits = 1024 bits) internally. Anyway, this instance is using 168 bytes in total, while the boolean[] were using 1024 bytes.
如上所示,它在内部使用了一个有16个元素的long[] (16*64位=1024位)。总之,这个实例总共使用了168字节,而boolean[] 则使用了1024字节。
The more bits we have, the more the footprint difference increases. For example, to store 1024 * 1024 bits, the boolean[] consumes 1 MB, and the BitSet instance consumes around 130 KB.
我们的比特越多,占用的空间差异就越大。例如,为了存储1024*1024位,boolean[] 消耗了1MB,而BitSet 实例则消耗了大约130KB。
4.1. Constructing BitSets
4.1.构建BitSets
The simplest way to create a BitSet instance is to use the no-arg constructor:
创建一个BitSet实例的最简单方法是使用无参数构造函数。
BitSet bitSet = new BitSet();This will create a BitSet instance with a long[] of size one. Of course, it can automatically grow this array if needed.
这将创建一个BitSet 实例,其大小为1的long[] 。当然,如果需要的话,它可以自动增长这个数组。
It’s also possible to create a BitSet with an initial number of bits:
我们也可以创建一个BitSet,它具有初始比特数。
BitSet bitSet = new BitSet(100_000);Here, the internal array will have enough elements to hold 100,000 bits. This constructor comes in handy when we already have a reasonable estimate on the number of bits to store. In such use cases, it can prevent or decrease the unnecessary copying of array elements while growing it.
这里,内部数组将有足够的元素来容纳100,000比特。当我们已经对要存储的比特数有一个合理的估计时,这个构造函数就会派上用场。在这种使用情况下,它可以防止或减少在增长数组元素时不必要的复制。
It’s even possible to create a BitSet from an existing long[], byte[], LongBuffer, and ByteBuffer. For instance, here we’re creating a BitSet instance from a given long[]:
我们甚至可以从现有的 long[], byte[], LongBuffer, 和 ByteBuffer 中创建一个 BitSet 。例如,在这里我们要从一个给定的long[]创建一个BitSetinstance。
BitSet bitSet = BitSet.valueOf(new long[] { 42, 12 });There are three more overloaded versions of the valueOf() static factory method to support the other mentioned types.
还有三个重载版本的valueOf()静态工厂方法来支持其他提到的类型。
4.2. Setting Bits
4.2.设置位
We can set the value of a particular index to true using the set(index) method:
我们可以使用set(index)方法将某个特定索引的值设置为true 。
BitSet bitSet = new BitSet();

bitSet.set(10);
assertThat(bitSet.get(10)).isTrue();
As usual, the indices are zero-based. It’s even possible to set a range of bits to true using the set(fromInclusive, toExclusive) method:
像往常一样,索引是基于零的。甚至可以使用true 来设置一个比特范围,set(fromInclusive, toExclusive)方法。
bitSet.set(20, 30);
for (int i = 20; i <= 29; i++) {
    assertThat(bitSet.get(i)).isTrue();
}
assertThat(bitSet.get(30)).isFalse();
As is evident from the method signature, the beginning index is inclusive, and the ending one is exclusive.
从方法签名中可以看出,开始的索引是包容的,结束的索引是排他的。
When we say setting an index, we usually mean setting it to true. Despite this terminology, we can set a particular bit index to false using the set(index, boolean) method:
当我们说设置一个索引时,我们通常是指将其设置为真。尽管有这样的术语,我们可以使用false来设置一个特定的位索引,set(index, boolean) 方法。
bitSet.set(10, false);
assertThat(bitSet.get(10)).isFalse();
This version also supports setting a range of values:
这个版本还支持设置一个值的范围。
bitSet.set(20, 30, false);
for (int i = 20; i <= 29; i++) {
    assertThat(bitSet.get(i)).isFalse();
}
4.3. Clearing Bits
4.3.清理比特
Instead of setting a specific bit index to false, we can simply clear it using the clear(index) method:
我们可以简单地使用clear(index) 方法清除它,而不是将一个特定的位索引设置为false,。
bitSet.set(42);
assertThat(bitSet.get(42)).isTrue();

bitSet.clear(42);
assertThat(bitSet.get(42)).isFalse();
Moreover, we can also clear a range of bits with the clear(fromInclusive, toExclusive) overloaded version:
此外,我们还可以用clear(fromInclusive, toExclusive)过载版本清除一个比特范围。
bitSet.set(10, 20);
for (int i = 10; i < 20; i++) {
    assertThat(bitSet.get(i)).isTrue();
}

bitSet.clear(10, 20);
for (int i = 10; i < 20; i++) {
    assertThat(bitSet.get(i)).isFalse();
}
Interestingly, if we call this method without passing any arguments, it’ll clear all the set bits:
有趣的是,如果我们调用这个方法而不传递任何参数,它将清除所有的设置位。
bitSet.set(10, 20);
bitSet.clear();
for (int i = 0; i < 100; i++) {
    assertThat(bitSet.get(i)).isFalse();
}
As shown above, after calling the clear() method, all bits are set to zero.
如上所示,在调用clear()方法后,所有位都被设置为零。
4.4. Getting Bits
4.4.获得比特
So far, we used the get(index) method quite extensively. When the requested bit index is set, then this method will return true. Otherwise, it’ll return false:
到目前为止,我们相当广泛地使用了get(index)方法。当请求的位索引被设置时,那么这个方法将返回true。否则,它将返回false。
bitSet.set(42);

assertThat(bitSet.get(42)).isTrue();
assertThat(bitSet.get(43)).isFalse();
Similar to set and clear, we can get a range of bit indices using the get(fromInclusive, toExclusive) method:
与set和clear类似,我们可以使用get(fromInclusive, toExclusive)方法获得一个比特索引的范围。
bitSet.set(10, 20);
BitSet newBitSet = bitSet.get(10, 20);
for (int i = 0; i < 10; i++) {
    assertThat(newBitSet.get(i)).isTrue();
}
As shown above, this method returns another BitSet in the [20, 30) range of the current one. That is, index 20 of the bitSet variable is equivalent to index zero of the newBitSet variable.
如上所示,这个方法返回另一个BitSet在当前BitSet的[20, 30]范围内。也就是说,bitSet变量的索引20等同于newBitSet变量的索引0。
4.5. Flipping Bits
4.5.翻转比特
To negate the current bit index value, we can use the flip(index) method. That is, it’ll turn true values to false and vice versa:
为了否定当前的比特索引值,我们可以使用flip(index)方法。也就是说,它可以将真值变成假,反之亦然。
bitSet.set(42);
bitSet.flip(42);
assertThat(bitSet.get(42)).isFalse();

bitSet.flip(12);
assertThat(bitSet.get(12)).isTrue();
Similarly, we can achieve the same thing for a range of values using the flip(fromInclusive, toExclusive) method:
同样,我们可以使用flip(fromInclusive, toExclusive)方法对一个数值范围实现同样的事情。
bitSet.flip(30, 40);
for (int i = 30; i < 40; i++) {
    assertThat(bitSet.get(i)).isTrue();
}
4.6. Length
4.6.长度
There are three length-like methods for a BitSet. The size() method returns the number of bits the internal array can represent. For instance, since the no-arg constructor allocates a long[] array with one element, then the size() will return 64 for it:
对于一个BitSet,有三个类似于长度的方法。size()方法返回内部数组可以代表的位数。例如,由于无参数构造函数分配了一个有一个元素的long[] 数组,那么size()将为它返回64。
BitSet defaultBitSet = new BitSet();
assertThat(defaultBitSet.size()).isEqualTo(64);
With one 64-bit number, we can only represent 64 bits. Of course, this will change if we pass the number of bits explicitly:
用一个64位数,我们只能表示64位。当然,如果我们明确地传递比特数,这将会改变。
BitSet bitSet = new BitSet(1024);
assertThat(bitSet.size()).isEqualTo(1024);
Moreover, the cardinality() method represents the number of set bits in a BitSet:
此外,cardinality()方法表示BitSet中的设定位数。
assertThat(bitSet.cardinality()).isEqualTo(0);
bitSet.set(10, 30);
assertThat(bitSet.cardinality()).isEqualTo(30 - 10);
At first, this method returns zero as all bits are false. After setting the [10, 30) range to true, then the cardinality() method call returns 20.
起初,这个方法返回0,因为所有的位都是false。在将[10, 30]范围设置为true后,那么cardinality()方法调用返回20。
Also, the length() method returns the one index after the index of the last set bit:
另外,length()方法返回最后一个设置位的索引之后的一个索引。
assertThat(bitSet.length()).isEqualTo(30);
bitSet.set(100);
assertThat(bitSet.length()).isEqualTo(101);
At first, the last set index is 29, so this method returns 30. When we set the index 100 to true, then the length() method returns 101. It’s also worth mentioning that this method will return zero if all bits are clear.
起初,最后设置的索引是29,所以这个方法返回30。当我们设置索引100为真时,那么length()方法返回101。还值得一提的是,如果所有位都是清零的,这个方法将返回0。
Finally, the isEmpty() method returns false when there is at least one set bit in the BitSet. Otherwise, it’ll return true:
最后,isEmpty()方法在BitSet中至少有一个set位时,返回false。否则,它将返回true。
assertThat(bitSet.isEmpty()).isFalse();
bitSet.clear();
assertThat(bitSet.isEmpty()).isTrue();
4.7. Combining With Other BitSets
4.7.与其他BitSets相结合
The intersects(BitSet) method takes another BitSet and returns true when two BitSets have something in common. That is, they have at least one set bit in the same index:
intersects(BitSet)方法接收另一个BitSet并返回true当两个BitSets有共同点时。也就是说,它们在同一索引中至少有一个被设置的位。
BitSet first = new BitSet();
first.set(5, 10);

BitSet second = new BitSet();
second.set(7, 15);

assertThat(first.intersects(second)).isTrue();
The [7, 9] range is set in both BitSets, so this method returns true.
在两个BitSets中都设置了[7, 9]的范围,所以这个方法返回true。
It’s also possible to perform the logical and operation on two BitSets:
也可以对两个BitSets进行逻辑和操作。
first.and(second);
assertThat(first.get(7)).isTrue();
assertThat(first.get(8)).isTrue();
assertThat(first.get(9)).isTrue();
assertThat(first.get(10)).isFalse();
This will perform a logical and between the two BitSets and modifies the first variable with the result. Similarly, we can perform a logical xor on two BitSets, too:
这将在两个BitSets之间执行逻辑and,并用结果修改第一个变量。同样地,我们也可以对两个BitSets执行逻辑xor。
first.clear();
first.set(5, 10);

first.xor(second);
for (int i = 5; i < 7; i++) {
    assertThat(first.get(i)).isTrue();
}
for (int i = 10; i < 15; i++) {
    assertThat(first.get(i)).isTrue();
}
There are other methods such as the andNot(BitSet) or the or(BitSet), which can perform other logical operations on two BitSets.
还有其他一些方法,例如andNot(BitSet)或or(BitSet),它们可以对两个BitSet执行其他逻辑操作。
4.8. Miscellaneous
4.8.杂项
As of Java 8, there is a stream() method to stream all set bits of a BitSet. For instance:
从Java 8开始,有一个stream()方法来流化BitSet的所有集合位。比如说。
BitSet bitSet = new BitSet();
bitSet.set(15, 25);

bitSet.stream().forEach(System.out::println);
This will print all set bits to the console. Since this will return an IntStream, we can perform common numerical operations such as summation, average, counting, and so on. For instance, here we’re counting the number of set bits:
这将把所有设定的位打印到控制台。由于这将返回一个IntStream,我们可以执行常见的数字操作,如求和、求平均、计数等等。例如,在这里我们要计算被设置的位的数量。
assertThat(bitSet.stream().count()).isEqualTo(10);Also, the nextSetBit(fromIndex) method will return the next set bit index starting from the fromIndex:
另外,nextSetBit(fromIndex)方法将返回从fromIndex开始的下一个设置位索引。
assertThat(bitSet.nextSetBit(13)).isEqualTo(15);The fromIndex itself is included in this calculation. When there isn’t any true bit left in the BitSet, it’ll return -1:
fromIndex本身也包括在这个计算中。当BitSet中没有任何true位时,它将返回-1。
assertThat(bitSet.nextSetBit(25)).isEqualTo(-1);Similarly, the nextClearBit(fromIndex) returns the next clear index starting from the fromIndex:
同样,nextClearBit(fromIndex)返回从fromIndex开始的下一个清除索引。
assertThat(bitSet.nextClearBit(23)).isEqualTo(25);On the other hand, the previousClearBit(fromIndex) returns the index of the nearest clear index in the opposite direction:
另一方面,previousClearBit(fromIndex)返回相反方向上最近的清除索引的索引。
assertThat(bitSet.previousClearBit(24)).isEqualTo(14);Same is true for previousSetBit(fromIndex):
对于 previousSetBit(fromIndex)也是如此。
assertThat(bitSet.previousSetBit(29)).isEqualTo(24);
assertThat(bitSet.previousSetBit(14)).isEqualTo(-1);
Moreover, we can convert a BitSet to a byte[] or a long[] using the toByteArray() or toLongArray() methods, respectively:
此外,我们可以将BitSet 转换为byte[] 或long[] ,分别使用toByteArray() 或toLongArray() 方法。
byte[] bytes = bitSet.toByteArray();
long[] longs = bitSet.toLongArray();
5. Conclusion
5.总结
In this tutorial, we saw how we can use BitSets to represent a vector of bits.
在本教程中,我们看到了如何使用BitSets来表示一个比特的向量。
At first, we got familiar with the rationale behind not using boolean[] to represent a vector of bits. Then we saw how a BitSet works internally and what its API looks like.
首先,我们熟悉了不使用boolean[]来表示比特向量的理由。然后我们看到了BitSet的内部运作以及它的API是什么样子的。
As usual, all the examples are available over on GitHub.
像往常一样,所有的例子都可以在GitHub上找到。


