1. Overview
1.概述
In this tutorial, we’ll learn how to use Postman to test an endpoint secured with Basic Authentication.
在本教程中,我们将学习如何使用Postman来测试使用基本认证的端点。
We’ll see how to use the “Authorization” tab to generate the header based on the raw credentials. After that, we’ll learn how to do it manually. Finally, we’ll see how Postman Interceptor works and how it can come in handy.
我们将看到如何使用“授权”标签,根据原始凭证生成头。之后,我们将学习如何手动操作。最后,我们将看到Postman拦截器是如何工作的,以及它如何能派上用场。
2. Basic Authentication
2.基本认证
Basic Authentication is a method of securing HTTP requests through a special header:
基本认证是一种通过特殊标头确保HTTP请求安全的方法。
Authorization: Basic <credentials>To generate the credentials token, we need to write the username and password, joined by the semicolon character. After that, we need to encode the resulting string with Base64.
为了生成凭证令牌,我们需要写下用户名和密码,用分号字符连接。之后,我们需要用Base64对生成的字符串进行编码。
Let’s assume the username is “admin” and the password is “baeldung“. First, we’ll create the credentials string, which will be “admin:baeldung“. Then, we’ll encode it with Base64, add the “Basic” keyword, and set it as the header’s value:
让我们假设用户名是”admin“,密码是”baeldung“。首先,我们将创建一个证书字符串,它将是”admin:baeldung“。然后,我们将用Base64编码,添加”Basic“关键字,并将其设置为头的值。
Authorization: Basic YWRtaW46YmFlbGR1bmc=3. Authorization Tab
3.授权标签
Firstly, let’s send a GET request to a Basic Auth-secured endpoint and expect an Unauthorized status for the response:
首先,让我们向Basic Auth-secured端点发送一个GET请求,并期望响应为Unauthorized状态。
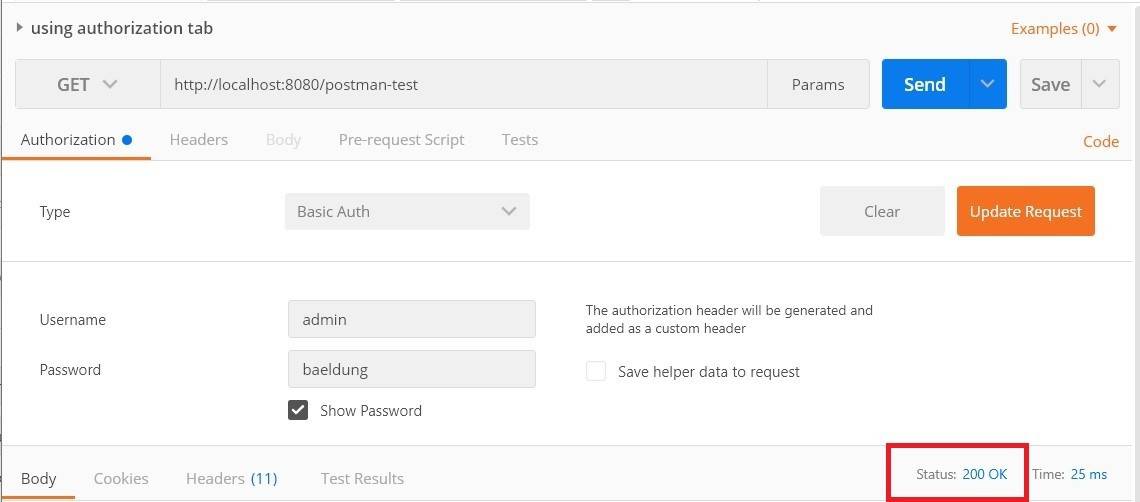
Now, let’s add the credentials. To do this, we simply go to the “Authorization” tab and select “Basic Auth” as the authorization type. After that, we insert the username and password and we’re all set:
现在,让我们来添加凭证。要做到这一点,我们只需进入”Authorization“标签,选择”Basic Auth“作为授权类型。之后,我们插入用户名和密码,我们就完成了。
Consequently, we can see that the request was authorized and the response code is 200. Furthermore, if we click on the “code” link, we can see how the authorization header was now added to the request:
因此,我们可以看到,该请求已被授权,响应代码为200。此外,如果我们点击”code“链接,我们可以看到授权头现在是如何被添加到请求的。
GET /postman-test HTTP/1.1
Host: localhost:8080
Authorization: Basic YWRtaW46YmFlbGR1bmc=
Cache-Control: no-cache
Postman-Token: 6ad07f7c-4846-9c3f-2a3e-b24e8d2273ad
4. Adding the Header Manually
4.手动添加页眉
Postman allows us to manually add headers. As a result, we can add the authorization header directly, if we already have the credentials token.
Postman允许我们手动添加头文件。因此,我们可以直接添加授权头,如果我们已经有了凭证令牌。
We can do this from the “Headers” tab. First, we set “Authorization” as the key. After that, we’ll add the credentials token:
我们可以从”Headers“标签中进行。首先,我们设置”Authorization“作为密钥。之后,我们将添加凭证令牌。
If we inspect the HTTP request, we’ll see that nothing differs from the previous one.
如果我们检查一下HTTP请求,就会发现与之前的请求没有什么不同。
5. Postman Interceptor
5.邮递员拦截器
Postman Interceptor is a Chrome extension that allows us to bind the Postman application to a browser session. In other words, it allows Postman to execute requests on behalf of the user who is logged in on the browser.
Postman拦截器是一个Chrome扩展,它允许我们将Postman应用程序与浏览器会话绑定。换句话说,它允许Postman代表在浏览器上登录的用户执行请求。
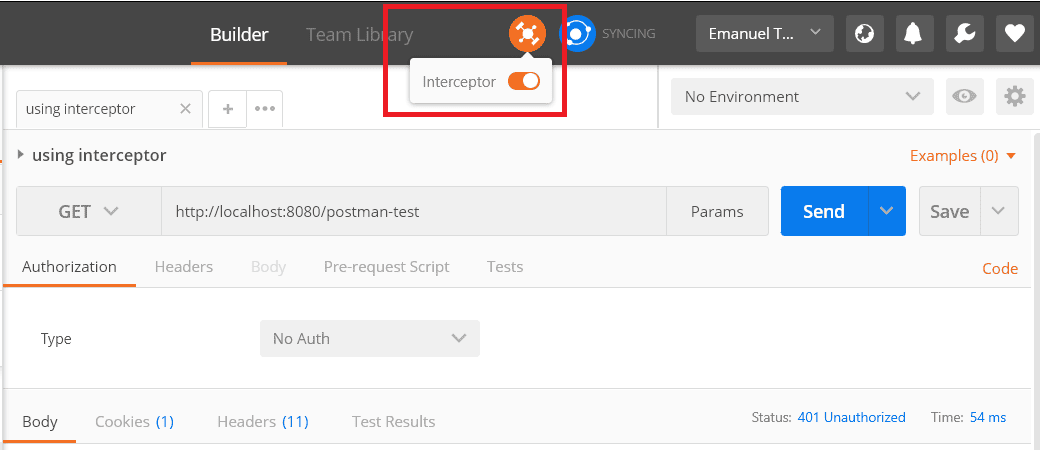
Firstly, we need to download and install the Chrome extension. After that, we enable the interceptor from the Postman application, by clicking on the satellite icon:
首先,我们需要下载并安装Chrome扩展。之后,我们通过点击卫星图标,从Postman应用程序中启用拦截器。
Now, the Postman application is bonded with the browser session. If we navigate the web, we’ll be able to see all the requests in Postman’s “History” tab. However, if we try to execute the GET request now, we’ll still get the 401 Unauthorized response because we haven’t logged in yet.
现在,Postman应用程序已经与浏览器会话结合在一起。如果我们浏览网页,我们将能够在Postman的”History“标签中看到所有的请求。但是,如果我们现在尝试执行GET请求,我们仍然会得到401 Unauthorized响应,因为我们还没有登录。
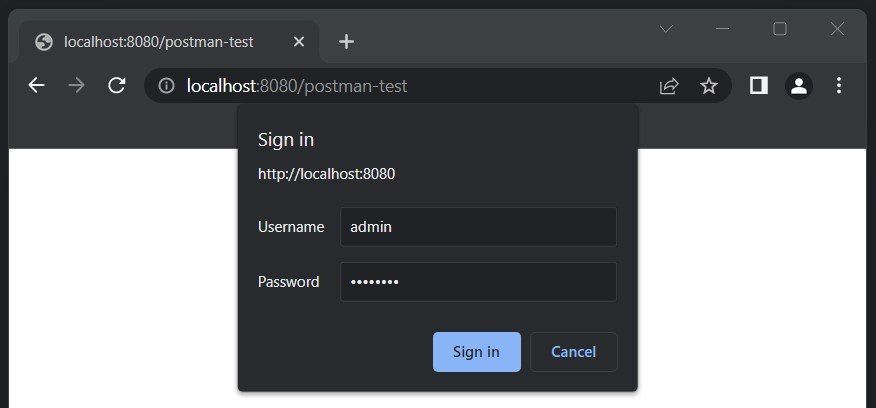
Let’s use the browser to navigate to the Basic Auth-secured page:
让我们用浏览器导航到基本自动安全页面。
After we sign in using the browser pop-up, we can go back to Postman and execute the request again. This time, the request will be authorized.
在我们使用浏览器弹出窗口登录后,我们可以回到Postman并再次执行请求。这一次,该请求将被授权。
6. Conclusion
6.结语
In this article, we learned how Basic Authentication works and explored various ways of testing a secured endpoint with Postman.
在这篇文章中,我们了解了基本认证的工作原理,并探讨了用Postman测试安全端点的各种方法。
We saw how we can manually add the Authorization header, and how to use Postman to generate it based on raw credentials. Finally, we learned about Postman Interceptor and we discovered that we can use it to send requests on behalf of the user logged in from the browser.
我们看到了如何手动添加Authorization头,以及如何使用Postman根据原始凭证来生成。最后,我们了解了Postman拦截器,我们发现我们可以用它来代表从浏览器登录的用户发送请求。
As always, the source code and Postman collection are available over on GitHub.
一如既往,源代码和Postman集合可在GitHub上获得。


