1. Introduction
1.绪论
Printing is a very common visualization technique for data structures. It can be tricky when it comes to trees, though, due to their hierarchical nature.
打印是一种非常常见的数据结构的可视化技术。不过,由于树的层次性,在涉及到树的时候,它可能会很棘手。
In this tutorial, we’ll learn some printing techniques for Binary Trees in Java.
在本教程中,我们将学习Java中二进制树的一些打印技术。
2. Tree Diagrams
2.树状图
Despite the limitations of drawing with only characters over on console, there are many different diagram shapes to represent tree structures. Choosing one of them mostly depends on the size and the balance of the tree.
尽管在控制台上只用字符来绘图有其局限性,但有许多不同的图表形状来表示树形结构。选择其中的一种主要取决于树的大小和平衡。
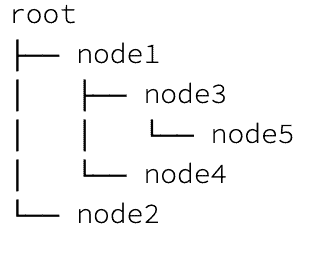
Let’s take a look at some of the possible types of diagrams which we can print:
让我们看一下我们可以打印的一些可能的图表类型。
But, we will explain a practical one which is also easier to implement. By taking the direction into account in which the tree grows, we can call it a horizontal tree:
但是,我们将解释一个实用的,也是比较容易实现的。通过考虑树的生长方向,我们可以把它称为水平树。
Because the horizontal tree flows always in the same direction as the text flows, we have some benefits to choosing a horizontal diagram over others:
因为水平树的流动方向总是与文字的流动方向相同,所以我们选择水平图比其他图有一些好处。
- We can visualize large and unbalanced trees as well
- The length of node values doesn’t affect the display structure
- It is much easier to implement
Therefore, we will go with the horizontal diagram and implement a simple binary tree printer class in the next sections.
因此,我们将采用水平图,在接下来的章节中实现一个简单的二叉树打印机类。
3. Binary Tree Model
3.二叉树模型
First of all, we should model a basic binary tree which we can do with just a few lines of code.
首先,我们应该建立一个基本的二叉树模型,我们只需要几行代码就可以做到。
Let’s define a simple BinaryTreeModel class:
让我们定义一个简单的BinaryTreeModel类。
public class BinaryTreeModel {

    private Object value;
    private BinaryTreeModel left;
    private BinaryTreeModel right;

    public BinaryTreeModel(Object value) {
        this.value = value;
    }

    // standard getters and setters

}
4. Sample Test Data
4.测试数据样本
Before we start implementing our binary tree printer, we need to create some sample data to incrementally test our visualization:
在我们开始实施我们的二叉树打印机之前,我们需要创建一些样本数据来逐步测试我们的可视化。
BinaryTreeModel root = new BinaryTreeModel("root");

BinaryTreeModel node1 = new BinaryTreeModel("node1");
BinaryTreeModel node2 = new BinaryTreeModel("node2");
root.setLeft(node1);
root.setRight(node2);

BinaryTreeModel node3 = new BinaryTreeModel("node3");
BinaryTreeModel node4 = new BinaryTreeModel("node4");
node1.setLeft(node3);
node1.setRight(node4);

node2.setLeft(new BinaryTreeModel("node5"));
node2.setRight(new BinaryTreeModel("node6"));

BinaryTreeModel node7 = new BinaryTreeModel("node7");
node3.setLeft(node7);
node7.setLeft(new BinaryTreeModel("node8"));
node7.setRight(new BinaryTreeModel("node9"));
5. Binary Tree Printer
5.二叉树打印机
Certainly, we need a separate class to keep our BinaryTreeModel clean for the sake of Single Responsibility Principle.
当然,为了单一责任原则,我们需要一个单独的类来保持我们的BinaryTreeModel的干净。
Now, we could use the Visitor Pattern so that the tree handles the hierarchy and our printer just handles the printing. But for this tutorial, we’ll keep them together in order to keep it simple.
现在,我们可以使用visitor Pattern,这样树就可以处理层次结构,而我们的打印机就可以处理打印。但在本教程中,为了保持简单,我们将把它们放在一起。
Thus, we define a class named BinaryTreePrinter and start implementing it.
因此,我们定义了一个名为BinaryTreePrinter的类并开始实现它。
5.1. Pre-Order Traversal
5.1 预购遍历
Considering our horizontal diagram, to print it properly, we can make a simple start by using pre-order traversal.
考虑到我们的水平图,为了正确地打印它,我们可以通过使用pre-order遍历来做一个简单的开始。
Consequently, to perform pre-order traversal, we need to implement a recursive method that first visits the root node, then left subtree, and finally the right subtree.
因此,为了执行预排序遍历,我们需要实现一个递归方法,首先访问根节点,然后是左子树,最后是右子树。
Let’s define a method to traverse our tree:
让我们定义一个方法来遍历我们的树。
public void traversePreOrder(StringBuilder sb, BinaryTreeModel node) {
    if (node != null) {
        sb.append(node.getValue());
        sb.append("\n");
        traversePreOrder(sb, node.getLeft());
        traversePreOrder(sb, node.getRight());
    }
}
Next, let’s define our print method:
接下来,让我们定义我们的打印方法。
public void print(PrintStream os) {
    StringBuilder sb = new StringBuilder();
    traversePreOrder(sb, this.tree);
    os.print(sb.toString());
}
Thus, we can simply print our test tree:
因此,我们可以简单地打印我们的测试树。
new BinaryTreePrinter(root).print(System.out);
The output will be the list of tree nodes in traversed order:
输出将是按遍历顺序排列的树节点列表。
root
node1
node3
node7
node8
node9
node4
node2
node5
node6
5.2. Adding Tree Edges
5.2.添加树的边缘
To set up our diagram correctly, we use three types of characters “├──”, “└──”, and “│” to visualize nodes. The first two of them are for pointers and the last one is to fill the edges and connect the pointers.
为了正确地设置我们的图,我们使用三种类型的字符”├──”、”└──”和”│”来可视化节点。其中前两个是用来做指针的,最后一个是用来填充边和连接指针的。
Let’s update our traversePreOrder method, add two parameters as padding and pointer, and use the characters respectively:
让我们更新我们的traversePreOrder方法,添加两个参数作为padding和pointer,并分别使用这些字符。
public void traversePreOrder(StringBuilder sb, String padding, String pointer, BinaryTreeModel node) {
    if (node != null) {
        sb.append(padding);
        sb.append(pointer);
        sb.append(node.getValue());
        sb.append("\n");

        StringBuilder paddingBuilder = new StringBuilder(padding);
        paddingBuilder.append("│  ");

        String paddingForBoth = paddingBuilder.toString();
        String pointerForRight = "└──";
        String pointerForLeft = (node.getRight() != null) ? "├──" : "└──";

        traversePreOrder(sb, paddingForBoth, pointerForLeft, node.getLeft());
        traversePreOrder(sb, paddingForBoth, pointerForRight, node.getRight());
    }
}
Also, we update print method as well:
另外,我们也更新了print方法。
public void print(PrintStream os) {
    StringBuilder sb = new StringBuilder();
    traversePreOrder(sb, "", "", this.tree);
    os.print(sb.toString());
}
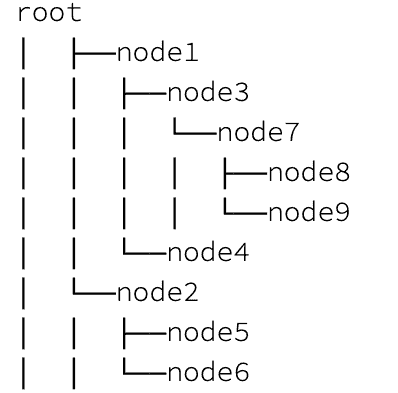
So, let’s test our BinaryTreePrinter again:
那么,让我们再次测试一下我们的BinaryTreePrinter。
Thus, with all the paddings and pointers, our diagram has shaped up nicely.
因此,在所有的填充物和指针的作用下,我们的图表已经形成了很好的形状。
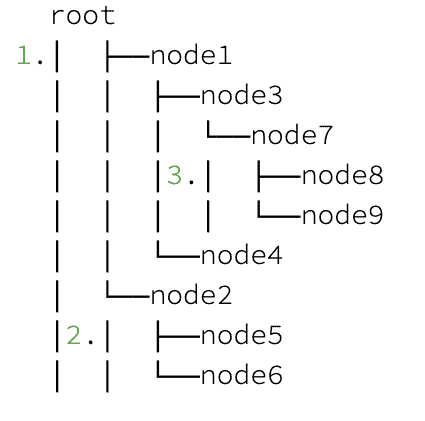
However, we still have some extra lines to get rid of:
然而,我们仍然有一些多余的线条需要摆脱。
As we look over on diagram, there are still characters in three wrong places:
当我们在图上看时,仍有三个错误的地方有字符。
- The column of extra lines under the root node
- The extra lines under the right subtree
- The extra lines under the left subtree which has no right sibling
5.3. Different Implementations for Root and Child Nodes
5.3.根节点和子节点的不同实现方式
In order to fix extra lines, we can split up our traverse method. We’ll apply one behavior to the root node and another for child nodes.
为了解决多余的行,我们可以把我们的遍历方法拆开。我们将对根节点应用一个行为,对子节点应用另一个行为。
Let’s customize traversePreOrder for only the root node:
让我们只为根节点定制traversePreOrder。
public String traversePreOrder(BinaryTreeModel root) {

    if (root == null) {
        return "";
    }

    StringBuilder sb = new StringBuilder();
    sb.append(root.getValue());

    String pointerRight = "└──";
    String pointerLeft = (root.getRight() != null) ? "├──" : "└──";

    traverseNodes(sb, "", pointerLeft, root.getLeft(), root.getRight() != null);
    traverseNodes(sb, "", pointerRight, root.getRight(), false);

    return sb.toString();
}
Next, we’ll create another method for child nodes as traverseNodes. Additionally, we will add a new parameter hasRightSibling to implement the preceding lines correctly:
接下来,我们将为子节点创建另一个方法作为traverseNodes。Additionally,我们将添加一个新的参数hasRightSibling来正确实现前面几行。
public void traverseNodes(StringBuilder sb, String padding, String pointer, BinaryTreeModel node,
  boolean hasRightSibling) {
    if (node != null) {
        sb.append("\n");
        sb.append(padding);
        sb.append(pointer);
        sb.append(node.getValue());

        StringBuilder paddingBuilder = new StringBuilder(padding);
        if (hasRightSibling) {
            paddingBuilder.append("│  ");
        } else {
            paddingBuilder.append("   ");
        }

        String paddingForBoth = paddingBuilder.toString();
        String pointerRight = "└──";
        String pointerLeft = (node.getRight() != null) ? "├──" : "└──";

        traverseNodes(sb, paddingForBoth, pointerLeft, node.getLeft(), node.getRight() != null);
        traverseNodes(sb, paddingForBoth, pointerRight, node.getRight(), false);
    }
}
Also, we need a small change in our print method:
另外,我们需要对我们的print方法做一个小的改动。
public void print(PrintStream os) {
    os.print(traversePreOrder(tree));
}
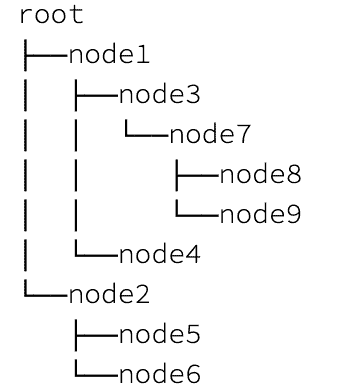
Finally, our diagram has formed into a nice shape with a clean output:
最后,我们的图表已经形成了一个漂亮的形状,输出也很干净。
6. Conclusion
6.结语
In this article, we learned a simple and practical way to print out a Binary Tree in Java.
在这篇文章中,我们学习了一种简单实用的方法来打印出Java中的二叉树。
All the examples of this article and additional test cases are available over on GitHub.
本文的所有例子和其他测试案例都可以在GitHub上找到。


