1. Overview
1.概述
In this tutorial, we’ll explore the concept of searching for neighbors in a two-dimensional space. Then, we’ll walk through its implementation in Java.
在本教程中,我们将探讨在二维空间中搜索邻居的概念。然后,我们将了解其在Java中的实现。
2. One-Dimensional Search vs Two-Dimensional Search
2.一维搜索与二维搜索
We know that binary search is an efficient algorithm for finding an exact match in a list of items using a divide-and-conquer approach.
我们知道二进制搜索是一种高效的算法,用于在项目列表中使用分而治之的方法寻找精确的匹配。
Let’s now consider a two-dimensional area where each item is represented by XY coordinates (points) in a plane.
现在让我们考虑一个二维区域,每个项目由平面上的XY坐标(点)表示。
However, instead of an exact match, suppose we want to find neighbors of a given point in the plane. It’s clear that if we want the nearest n matches, then the binary search will not work. This is because the binary search can compare two items in one axis only, whereas we need to be able to compare them in two axes.
然而,假设我们想找到平面内某一点的邻居,而不是精确匹配。很明显,如果我们想要最近的n匹配,那么二进制搜索将不起作用。这是因为二进制搜索只能在一个轴上比较两个项目,而我们需要的是能够在两个轴上比较它们。
We’ll look at an alternative to the binary tree data structure in the next section.
我们将在下一节看一下二叉树数据结构的替代方案。
3. Quadtree
3.四叉树
A quadtree is a spatial tree data structure in which each node has exactly four children. Each child can either be a point or a list containing four sub-quadtrees.
四叉树是一种空间树形数据结构,其中每个节点正好有四个孩子。每个子节点可以是一个点,也可以是一个包含四个子四叉树的列表。
A point stores data — for example, XY coordinates. A region represents a closed boundary within which a point can be stored. It is used to define the area of reach of a quadtree.
一个点存储数据–例如,XY坐标。区域代表一个封闭的边界,在这个边界内可以存储一个点。它被用来定义一个四叉树的覆盖区域。
Let’s understand this more using an example of 10 coordinates in some arbitrary order:
让我们用一个10个坐标按任意顺序排列的例子来进一步理解这一点。
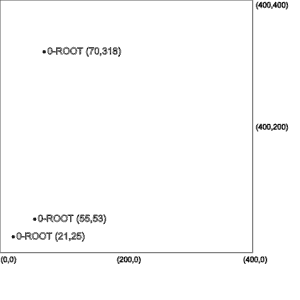
(21,25), (55,53), (70,318), (98,302), (49,229), (135,229), (224,292), (206,321), (197,258), (245,238)The first three values will be stored as points under the root node as shown in the left-most picture.
如最左边的图片所示,前三个值将作为点存储在根节点下。
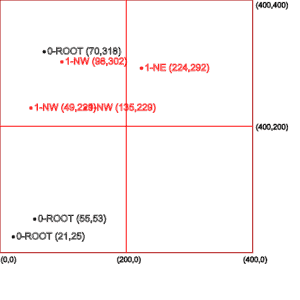
The root node cannot accommodate new points now as it has reached its capacity of three points. Therefore, we’ll divide the region of the root node into four equal quadrants.
根节点现在无法容纳新的点,因为它已经达到了三个点的容量。因此,我们将把根节点的区域划分为四个相等的象限。
Each of these quadrants can store three points and additionally contain four quadrants within its boundary. This can be done recursively, resulting in a tree of quadrants, which is where the quadtree data structure gets its name.
每个象限可以存储三个点,另外在其边界内还包含四个象限。这可以递归进行,从而形成一棵象限树,这就是象限树数据结构的名称由来。
In the middle picture above, we can see the quadrants created from the root node and how the next four points are stored in these quadrants.
在上面的中间图片中,我们可以看到从根节点创建的象限以及接下来的四个点是如何存储在这些象限中的。
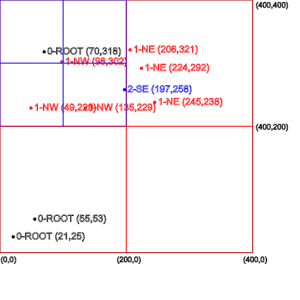
Finally, the right-most picture shows how one quadrant is again subdivided to accommodate more points in that region while the other quadrants still can accept the new points.
最后,最右边的图片显示了一个象限如何被再次细分,以容纳该区域的更多的点,而其他象限仍然可以接受新的点。
We’ll now see how to implement this algorithm in Java.
现在我们来看看如何在Java中实现这一算法。
4. Data Structure
4.数据结构
Let’s create a quadtree data structure. We’ll need three domain classes.
让我们创建一个四叉树数据结构。我们将需要三个域类。
Firstly, we’ll create a Point class to store the XY coordinates:
首先,我们将创建一个Point类来存储XY坐标。
public class Point {
    private float x;
    private float y;

    public Point(float x, float y) {
        this.x = x;
        this.y = y;
    }

    // getters & toString()
}
Secondly, let’s create a Region class to define the boundaries of a quadrant:
其次,让我们创建一个Region类来定义一个象限的边界。
public class Region {
    private float x1;
    private float y1;
    private float x2;
    private float y2;

    public Region(float x1, float y1, float x2, float y2) {
        this.x1 = x1;
        this.y1 = y1;
        this.x2 = x2;
        this.y2 = y2;
    }

    // getters & toString()
}
Finally, let’s have a QuadTree class to store data as Point instances and children as QuadTree classes:
最后,让我们有一个QuadTree类,以Point实例和QuadTree类的形式存储数据。
public class QuadTree {
    private static final int MAX_POINTS = 3;
    private Region area;
    private List<Point> points = new ArrayList<>();
    private List<QuadTree> quadTrees = new ArrayList<>();

    public QuadTree(Region area) {
        this.area = area;
    }
}
To instantiate a QuadTree object, we specify its area using the Region class through the constructor.
为了实例化一个QuadTree对象,我们使用Region类通过构造函数指定其区域。
5. Algorithm
5.算法
Before we write our core logic to store data, let’s add a few helper methods. These will prove useful later.
在我们编写存储数据的核心逻辑之前,让我们添加一些辅助方法。这些将在以后被证明是有用的。
5.1. Helper Methods
5.1.帮助者方法
Let’s modify our Region class.
让我们来修改我们的Region类。
Firstly, let’s have a method containsPoint to indicate if a given point falls inside or outside of a region’s area:
首先,让我们有一个方法containsPoint来指示一个给定的点是否在区域的区域之内或之外。
public boolean containsPoint(Point point) {
    return point.getX() >= this.x1
        && point.getX() < this.x2
        && point.getY() >= this.y1
        && point.getY() < this.y2;
}
Next, let’s have a method doesOverlap to indicate if a given region overlaps with another region:
接下来,让我们有一个方法doesOverlap来指示一个给定的区域是否与另一个区域重叠。
public boolean doesOverlap(Region testRegion) {
    if (testRegion.getX2() < this.getX1()) {
        return false;
    }
    if (testRegion.getX1() > this.getX2()) {
        return false;
    }
    if (testRegion.getY1() > this.getY2()) {
        return false;
    }
    if (testRegion.getY2() < this.getY1()) {
        return false;
    }
    return true;
}
Finally, let’s create a method getQuadrant to divide a range into four equal quadrants and return a specified one:
最后,让我们创建一个方法getQuadrant来将一个范围分成四个相等的象限并返回一个指定的象限。
public Region getQuadrant(int quadrantIndex) {
    float quadrantWidth = (this.x2 - this.x1) / 2;
    float quadrantHeight = (this.y2 - this.y1) / 2;

    // 0=SW, 1=NW, 2=NE, 3=SE
    switch (quadrantIndex) {
    case 0:
        return new Region(x1, y1, x1 + quadrantWidth, y1 + quadrantHeight);
    case 1:
        return new Region(x1, y1 + quadrantHeight, x1 + quadrantWidth, y2);
    case 2:
        return new Region(x1 + quadrantWidth, y1 + quadrantHeight, x2, y2);
    case 3:
        return new Region(x1 + quadrantWidth, y1, x2, y1 + quadrantHeight);
    }
    return null;
}
5.2. Storing Data
5.2. 存储数据
We can now write our logic to store data. Let’s start by defining a new method addPoint on the QuadTree class to add a new point. This method will return true if a point was successfully added:
我们现在可以编写我们的逻辑来存储数据。让我们先在QuadTree类上定义一个新的方法addPoint来添加一个新的点。如果一个点被成功添加,这个方法将返回true。
public boolean addPoint(Point point) {
    // ...
}
Next, let’s write the logic to handle the point. First, we need to check if the point is contained within the boundary of the QuadTree instance. We also need to ensure that the QuadTree instance has not reached the capacity of MAX_POINTS points.
接下来,让我们编写处理该点的逻辑。首先,我们需要检查该点是否包含在QuadTree实例的边界内。我们还需要确保QuadTree实例没有达到MAX_POINTS点的容量。
If both the conditions are satisfied, we can add the new point:
如果两个条件都满足,我们就可以添加新的点。
if (this.area.containsPoint(point)) {
    if (this.points.size() < MAX_POINTS) {
        this.points.add(point);
        return true;
    }
}
On the other hand, if we’ve reached the MAX_POINTS value, then we need to add the new point to one of the sub-quadrants. For this, we loop through the child quadTrees list and call the same addPoint method which will return a true value on successful addition. Then we exit the loop immediately as a point needs to be added exactly to one quadrant.
另一方面,如果我们已经达到了MAX_POINTS值,那么我们需要将新的点添加到一个子象限中。为此,我们循环浏览子quadTrees列表,并调用相同的addPoint方法,在成功添加时返回true值。然后我们立即退出循环,因为一个点需要被精确地添加到一个象限。
We can encapsulate all this logic inside a helper method:
我们可以将所有这些逻辑封装在一个辅助方法中。
private boolean addPointToOneQuadrant(Point point) {
    boolean isPointAdded;
    for (int i = 0; i < 4; i++) {
        isPointAdded = this.quadTrees.get(i)
            .addPoint(point);
        if (isPointAdded)
            return true;
    }
    return false;
}
Additionally, let’s have a handy method createQuadrants to subdivide the current quadtree into four quadrants:
此外,让我们有一个方便的方法createQuadrants,将当前四叉树细分为四个象限。
private void createQuadrants() {
    Region region;
    for (int i = 0; i < 4; i++) {
        region = this.area.getQuadrant(i);
        quadTrees.add(new QuadTree(region));
    }
}
We’ll call this method to create quadrants only if we’re no longer able to add any new points. This ensures that our data structure uses optimum memory space.
我们将调用这个方法来创建象限,只有当我们不再能够添加任何新的点时。这可以确保我们的数据结构使用最佳的内存空间。
Putting it all together, we’ve got the updated addPoint method:
把这一切放在一起,我们就有了更新的addPoint方法。
public boolean addPoint(Point point) {
    if (this.area.containsPoint(point)) {
        if (this.points.size() < MAX_POINTS) {
            this.points.add(point);
            return true;
        } else {
            if (this.quadTrees.size() == 0) {
                createQuadrants();
            }
            return addPointToOneQuadrant(point);
        }
    }
    return false;
}
5.3. Searching Data
5.3.搜索数据
Having our quadtree structure defined to store data, we can now think of the logic for performing a search.
在定义了存储数据的四叉树结构后,我们现在可以考虑执行搜索的逻辑了。
As we’re looking for finding adjacent items, we can specify a searchRegion as the starting point. Then, we check if it overlaps with the root region. If it does, then we add all its child points that fall inside the searchRegion.
由于我们要找的是相邻的项目,我们可以指定一个searchRegion作为起点。然后,我们检查它是否与根区域重叠。如果是,那么我们就把它的所有子点都加到searchRegion里面。
After the root region, we get into each of the quadrants and repeat the process. This goes on until we reach the end of the tree.
在根部区域之后,我们进入每个象限,重复这一过程。这样一直持续到我们到达树的末端。
Let’s write the above logic as a recursive method in the QuadTree class:
让我们把上述逻辑写成QuadTree类中的一个递归方法。
public List<Point> search(Region searchRegion, List<Point> matches) {
    if (matches == null) {
        matches = new ArrayList<Point>();
    }
    if (!this.area.doesOverlap(searchRegion)) {
        return matches;
    } else {
        for (Point point : points) {
            if (searchRegion.containsPoint(point)) {
                matches.add(point);
            }
        }
        if (this.quadTrees.size() > 0) {
            for (int i = 0; i < 4; i++) {
                quadTrees.get(i)
                    .search(searchRegion, matches);
            }
        }
    }
    return matches;
}
6. Testing
6.测试
Now that we have our algorithm in place, let’s test it.
现在我们的算法已经到位,让我们来测试一下。
6.1. Populating the Data
6.1.填充数据
First, let’s populate the quadtree with the same 10 coordinates we used earlier:
首先,让我们用我们之前使用的10个坐标来填充四叉树。
Region area = new Region(0, 0, 400, 400);
QuadTree quadTree = new QuadTree(area);

float[][] points = new float[][] { { 21, 25 }, { 55, 53 }, { 70, 318 }, { 98, 302 },
    { 49, 229 }, { 135, 229 }, { 224, 292 }, { 206, 321 }, { 197, 258 }, { 245, 238 } };

for (int i = 0; i < points.length; i++) {
    Point point = new Point(points[i][0], points[i][1]);
        quadTree.addPoint(point);
}
6.2. Range Search
6.2.范围搜索
Next, let’s perform a range search in an area enclosed by lower bound coordinate (200, 200) and upper bound coordinate (250, 250):
接下来,让我们在下限坐标(200,200)和上限坐标(250,250)所包围的区域内进行范围搜索。
Region searchArea = new Region(200, 200, 250, 250);
List<Point> result = quadTree.search(searchArea, null);
Running the code will give us one nearby coordinate contained within the search area:
运行该代码将给我们提供一个包含在搜索区域内的附近坐标。
[[245.0 , 238.0]]Let’s try a different search area between coordinates (0, 0) and (100, 100):
让我们在坐标(0,0)和(100,100)之间尝试一个不同的搜索区域。
Region searchArea = new Region(0, 0, 100, 100);
List<Point> result = quadTree.search(searchArea, null);
Running the code will give us two nearby coordinates for the specified search area:
运行该代码将为我们提供指定搜索区域的两个附近坐标。
[[21.0 , 25.0], [55.0 , 53.0]]We observe that depending on the size of the search area, we get zero, one or many points. So, if we’re given a point and asked to find the nearest n neighbors, we could define a suitable search area where the given point is at the center.
我们观察到,根据搜索区域的大小,我们会得到0个、1个或许多点。因此,如果给我们一个点并要求我们找到最近的n个邻居,我们可以定义一个合适的搜索区域,其中给定的点在中心位置。
Then, from all the resulting points of the search operation, we can calculate the Euclidean distances between the given points and sort them to get the nearest neighbors.
然后,从搜索操作的所有结果点中,我们可以计算给定点之间的欧几里得距离,并对它们进行排序以获得最近的邻居。
7. Time Complexity
7.时间的复杂性
The time complexity of a range query is simply O(n). The reason is that, in the worst-case scenario, it has to traverse through each item if the search area specified is equal to or bigger than the populated area.
范围查询的时间复杂度是O(n)。原因是,在最坏的情况下,如果指定的搜索区域等于或大于填充区域,它就必须遍历每个项目。
8. Conclusion
8.结语
In this article, we first understood the concept of a quadtree by comparing it with a binary tree. Next, we saw how it can be used efficiently to store data spread across a two-dimensional space.
在这篇文章中,我们首先通过与二叉树的比较来理解四叉树的概念。接下来,我们看到它如何有效地用于存储分布在二维空间的数据。
We then saw how to store data and perform a range search.
然后我们看到了如何存储数据和执行范围搜索。
As always, the source code with tests is available over on GitHub.
一如既往,带有测试的源代码可在GitHub上获得,。


