1. Overview
1.概述
In this article, we’ll learn how to configure Visual Studio Code with Java, and how to use its basic features for this language.
在这篇文章中,我们将学习如何用Java配置Visual Studio Code,以及如何使用这种语言的基本功能。
Then, we’ll see the Maven and Gradle integrations and conclude with the strengths and the drawbacks of this editor.
然后,我们将看到Maven和Gradle的集成,最后总结一下这个编辑器的优点和缺点。
2. Visual Studio Code Setup for Java
2.Java的Visual Studio代码设置
Microsoft improved a lot the developer experience to configure their editor for Java. We can download the Coding Pack for Java, which is a set of essential extensions (the equivalent of JDT for Eclipse).
微软在配置他们的Java编辑器时,对开发者的体验做了很多改进。我们可以下载Coding Pack for Java,它是一组基本的扩展(相当于Eclipse的JDT)。
Even if we haven’t installed anything yet, this executable package will check missing software and install them for us:
即使我们还没有安装任何东西,这个可执行包也会检查缺少的软件,并为我们安装它们。
- Visual Studio Code
- Java Development Kit (JDK)
- Java Extension Pack, which includes:
- Language Support for Java™ by Red Hat: navigate, write, refactor, and read Java files
- Debugger for Java, by Microsoft: launch/attach, breakpoints, evaluation, show call stack
- Maven for Java, by Microsoft: generate projects from Archetype, run Maven goals
- Java Test Runner, by Microsoft: run Junit, TestNG
- Project Manager for Java, by Microsoft: show project view, create a new project, export jar
- Visual Studio IntelliCode, by Microsoft: advanced auto-completion features
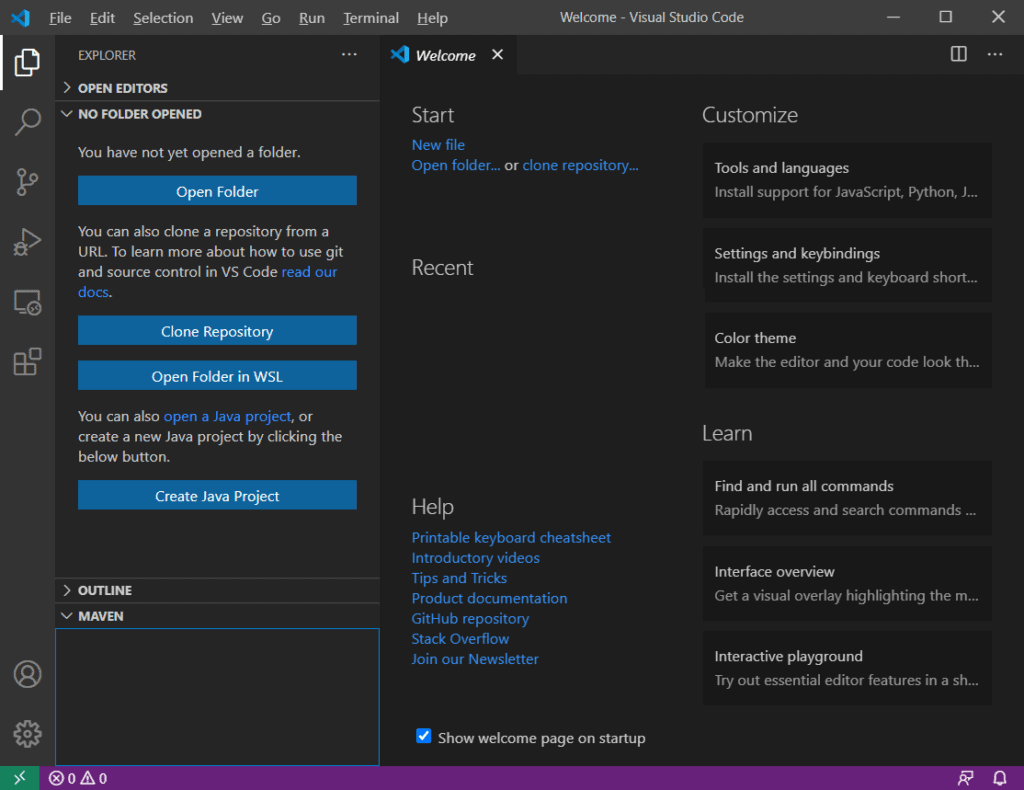
If we already have Visual Studio Code installed, we just have to install the Java Extension Pack from the Extensions button in the sidebar. Now, we’re able to view the Create Java Project button and the Maven view on the left:
如果我们已经安装了Visual Studio Code,我们只需从侧边栏的扩展按钮中安装Java扩展包。现在,我们就能看到创建Java项目按钮和左边的Maven视图。
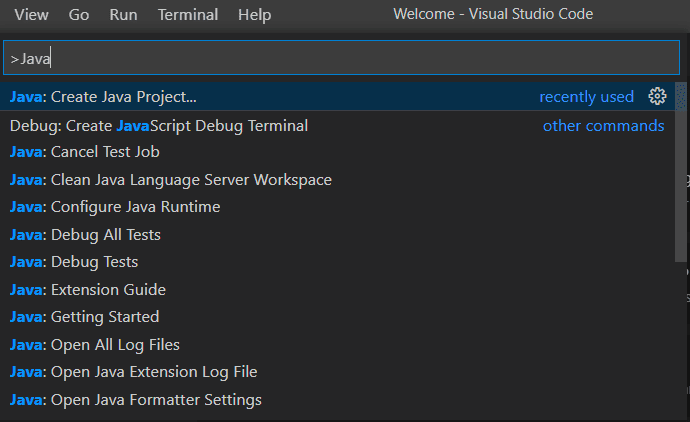
We can also browse the Java features through the View > Command Palette menu:
我们还可以通过View > Command Palette菜单浏览Java功能。
Next, we’ll learn how to use the features included in these extensions.
接下来,我们将学习如何使用这些扩展中包含的功能。
3. Working with a Basic Java Project
3.使用一个基本的Java项目
3.1. Create or Open a Java Project
3.1.创建或打开一个Java项目
If we want to create a new Java project, we’ll find the Java: Create Java Project command in the Command Palette menu, which opens a top menu where we can pick our project type:
如果我们想创建一个新的Java项目,我们会发现Java:创建Java项目命令在命令调色板菜单中,它打开了一个顶部菜单,我们可以选择我们的项目类型:
。
- No build tools creates a blank project with src and lib directories
- Maven lets us pick an archetype from a large library collection, as we’ll see in a later section
- Spring Boot, Quarkus, and MicroProfile require that we install their respective extensions to create a project
If we need to open an existing project, Visual Studio Code will show a small popup at the bottom-right corner to import the folder as a Java project. If we missed it, we can open any Java source file to show it again.
如果我们需要打开一个现有的项目,Visual Studio Code会在右下角显示一个小的弹出窗口,将该文件夹导入为一个Java项目。如果我们错过了,我们可以打开任何一个Java源文件来再次显示。
3.2. Run and Debug the Project
3.2.运行和调试项目
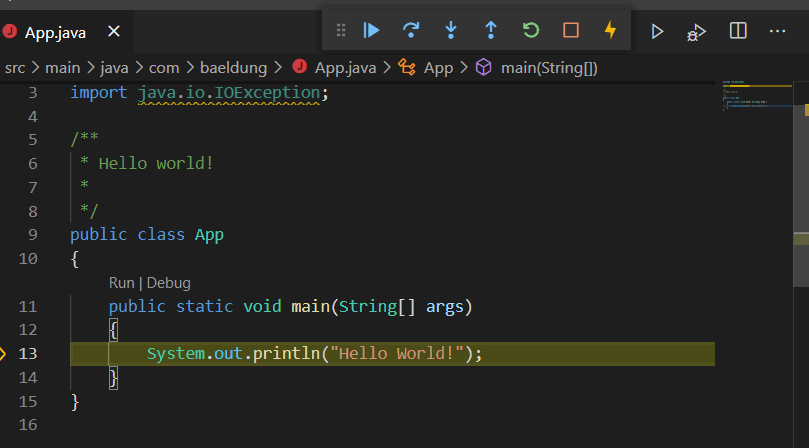
To run the project, we just have to press F5 (debug) or Ctrl-F5 (run). We can also use the Run|Debug shortcuts just above the main methods or the unit tests:
要运行该项目,我们只需按F5(调试)或Ctrl-F5(运行)。我们还可以使用Run|Debug快捷键,就在main方法或单元测试的上方。
We can also see the debug toolbar at the top of the window to stop, rerun, or continue execution.
Then, the Terminal view at the bottom will show the output logs.
我们还可以看到窗口顶部的调试工具栏,以停止、重新运行或继续执行。
然后,底部的Terminal视图将显示输出日志。
3.3. Manage Java Packages and Imports
3.3.管理Java包和进口
The first pain point we’ll notice is that Visual Studio Code does not provide dedicated features to create a class or package.
我们将注意到的第一个痛点是,Visual Studio Code没有提供创建类或包的专门功能。
To create the whole directory structure of our package, we must first create a Java file and declare the required package at the top. After that, Visual Studio Code will show an error: we just have to roll over it to display the Quick Fix link. This link will create the appropriate directory structure if it doesn’t exist.
为了创建我们包的整个目录结构,我们必须首先创建一个Java文件并在顶部声明所需的包。之后,Visual Studio Code会显示一个错误:我们只需翻过它,显示Quick Fix链接。这个链接将创建适当的目录结构,如果它不存在的话。
However, the package management works like in other Java IDE: just press Ctrl+Space and it will propose, for example, to pick an existing class and import it on-the-fly. We can also use the quick fix popup to add missing imports or to remove unused ones.
然而,包管理的工作方式与其他Java IDE一样:只需按下Ctrl+Space,它就会提议,例如,选择一个现有的类并即时导入。我们还可以使用quick fix弹出窗口来添加缺失的导入或删除未使用的导入。
3.4. Code Navigation and Auto-Completion
3.4.代码导航和自动完成
The most useful shortcuts to know are Ctrl+P to open a file and Ctrl+T to open a class or interface. Similar to other Java IDEs, we can navigate to a method call or a class implementation with Ctrl+click. There is also the Outline view from the sidebar, which helps us to navigate through large files.
最有用的快捷键是Ctrl+P来打开一个文件,Ctrl+T来打开一个类或接口。与其他Java IDE类似,我们可以用Ctrl+click导航到方法调用或类实现。还有侧边栏的Outline view,它可以帮助我们浏览大文件。
The auto-completion is also working like in other IDEs: we just press Ctrl+space to display options. For example, we can see the possible implementations of an interface or the available methods and attributes of a class, including their Javadoc. The auto-completion can also generate a code snippet if we press Ctrl+space after statements like while, for, if, switch, or try.
自动补全功能也和其他IDE一样:我们只需按Ctrl+space即可显示选项。例如,我们可以看到一个接口的可能实现或一个类的可用方法和属性,包括它们的Javadoc。如果我们在while、for、if、switch或try等语句后按下Ctrl+space,自动补全功能还可以生成一个代码片段。
However, we can’t generate Javadoc for method arguments.
然而,我们不能为方法参数生成Javadoc。
3.5. Compilation Errors and Warnings
3.5.编译错误和警告
We’ll see compilation errors at first with underlined code. Unused variables are grayed-out, We can also display the full list of errors and warnings from the View > Problems menu. Both propose quick fixes for the basic ones.
我们一开始会看到有下划线的代码的编译错误。未使用的变量是灰色的,我们还可以从View > Problems菜单中显示完整的错误和警告列表。两者都提出了基本的快速修复方法。
4. Maven and Gradle Integration
4.Maven和Gradle集成
4.1. Maven
4.1. Maven
If we choose to create a new Maven project, the Command Palette provides a large collection of Maven archetypes. Once we select one, we’re prompted to pick the destination folder, and then the configuration takes place in an interactive terminal, not in a graphical wizard, like in other Java IDEs.
如果我们选择创建一个新的Maven项目,Command Palette提供了大量的Maven原型集合。一旦我们选择了一个,系统就会提示我们选择目标文件夹,然后在交互式终端中进行配置,而不是像其他Java IDE那样在图形向导中进行。
The Java import popup will be displayed first, then the Maven configuration will start. The extensions will use the global Maven client defined in our PATH variable. However, if the Maven Wrapper is configured in our project, a popup will let us choose if the wrapper should be used instead of the global Maven client.
首先会显示Java导入弹窗,然后开始Maven配置。扩展程序将使用我们PATH变量中定义的全局Maven客户端。不过,如果我们的项目中配置了Maven包装器,则会有一个弹出窗口让我们选择是否使用包装器而不是全局Maven客户端。
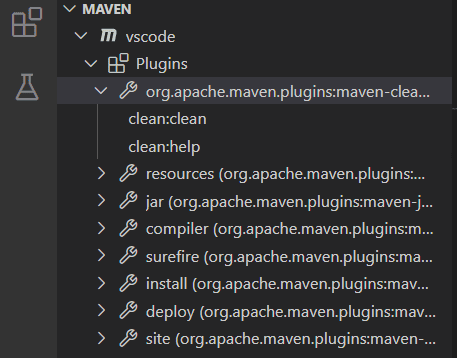
Then, from the Maven side-view, we’ll see the Maven plugins and goals that can be launched:
然后,从Maven侧视图,我们会看到可以启动的Maven插件和目标。
If not, we need to check for errors in the following locations:
如果没有,我们需要检查以下位置的错误。
- From the View > Problems menu, which contains every problem related to the pom.xml file and JDK compatibility problems
- From the View > Output menu, select Maven For Java from the bottom-right list to show Maven client and wrapper problems
4.2. Gradle
4.2 Gradle
To work with Gradle, we must install the Gradle Extension Pack from the Extensions panel. This extension manages projects only if Gradle Wrapper is configured.
为了与Gradle一起工作,我们必须从Extensions面板上安装Gradle Extension Pack。只有在配置了Gradle Wrapper的情况下,该扩展才能管理项目。
After opening a Gradle project, we’ll see the status bar at the bottom indicating the download and installation progress. We check if any error occurred by clicking this bar. We can also display the Output view and choose Gradle Tasks option from it.
打开Gradle项目后,我们会看到底部的状态栏显示下载和安装的进度。我们通过点击这个栏来检查是否有错误发生。我们还可以显示Output视图并从中选择Gradle Tasks选项。
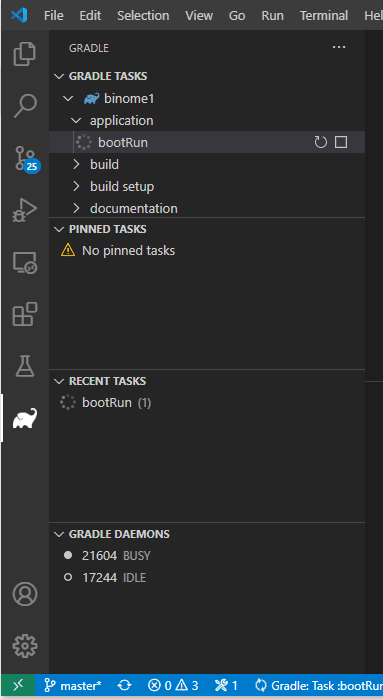
Then, we’ll be able to see the Gradle elephant icon in the sidebar, which displays dedicated Gradle panels to control tasks:
这时,我们就能在侧边栏看到Gradle的elephant图标,它显示专门的Gradle面板来控制任务。
If this icon is not shown, we have to check that our Gradle project is in a sub-directory. In this case, we have to enable the gradle.nestedProjects setting to discover it.
如果这个图标没有显示,我们必须检查我们的Gradle项目是否在一个子目录下。在这种情况下,我们必须启用gradle.nestedProjects设置来发现它。
5. Strengths and Drawbacks
5.优势和劣势
First, we have to admit that this lightweight editor offers fewer features than its counterparts: no wizard, Maven and Gradle integration is not very handy, and basic features are missing, such as tools to manage packages and dependencies. Visual Studio Code wasn’t designed for Java, and that’s something we can easily notice, especially if we’re familiar with other Java IDEs.
首先,我们不得不承认,这个轻量级编辑器提供的功能比同类产品少。没有向导,Maven和Gradle的集成不是很方便,而且缺少基本功能,比如管理包和依赖关系的工具。Visual Studio Code并不是为Java设计的,这一点我们很容易注意到,尤其是当我们熟悉其他Java IDE时。
However, core capabilities such as error detection and auto-completion are very complete, as they’re using the Eclipse JDT language server. Moreover, the popularity of Visual Studio Code comes from its fast launch speed, its limited use of resources, and its better user experience.
但是,错误检测和自动完成等核心功能非常完善,因为它们使用的是Eclipse JDT 语言服务器。此外,Visual Studio Code的受欢迎程度来自于其快速的启动速度、对资源的有限使用以及更好的用户体验。
6. Conclusion
6.结论
In this article, we learned how to configure Visual Studio Code for Java, its supported features for this language, and saw its strengths and drawbacks.
在这篇文章中,我们了解了如何为Java配置Visual Studio Code,它对这种语言的支持功能,并看到了它的优点和缺点。
In conclusion, if we’re already familiar with Visual Studio Code, it can be a good editor to start learning Java. But if we’re already advanced Java IDE users and satisfied to work with them, we might be disappointed to lose some of the comforts we’ve taken for granted.
总之,如果我们已经熟悉了Visual Studio Code,它可以成为一个开始学习Java的好编辑器。但如果我们已经是高级的Java IDE用户,并对与之合作感到满意,我们可能会对失去一些我们认为理所当然的舒适感感到失望。
