1. Introduction
1.介绍
JavaFX is a library for building rich client applications with Java. It provides an API for designing GUI applications that run on almost every device with Java support.
JavaFX是一个用Java构建丰富客户端应用程序的库。它为设计GUI应用程序提供了一个API,可以在几乎所有支持Java的设备上运行。
In this tutorial, we’re going to focus on and cover some its key capabilities and functionality.
在本教程中,我们将重点介绍并涵盖它的一些关键能力和功能。
2. JavaFX API
2.JavaFX API
In Java 8, 9, and 10 no additional setup is necessary to start working with the JavaFX library. The project will be removed from the JDK starting with JDK 11.
在Java 8、9和10中,开始使用JavaFX库不需要额外的设置。从JDK 11开始,该项目将从JDK中删除。
2.1. Architecture
2.1.结构
JavaFX uses hardware accelerated graphics pipeline for the rendering, known as Prism. What’s more, to fully accelerate the graphics usage, it leverages either software or hardware rendering mechanism, by internally using DirectX and OpenGL.
JavaFX使用硬件加速的图形管道进行渲染,称为Prism。更重要的是,为了完全加速图形的使用,它利用了软件或硬件渲染机制,在内部使用DirectX和OpenGL。
JavaFX has a platform dependent Glass windowing toolkit layer to connect to the native operating system. It uses the operating system’s event queue to schedule thread usage. Also, it asynchronously handles windows, events, timers.
JavaFX有一个依赖平台的Glass窗口工具包层来连接到本地操作系统。它使用操作系统的事件队列来安排线程的使用。此外,它还异步地处理窗口、事件、计时器。
The Media and Web engines enable media playback and HTML/CSS support.
Media和Web引擎实现了媒体播放和HTML/CSS支持。
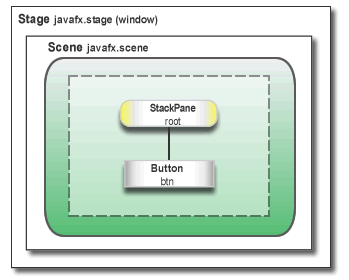
Let’s see what the main structure of a JavaFX application looks like:
让我们看看JavaFX应用程序的主结构是什么样子。

Here, we notice two main containers:
在这里,我们注意到两个主要的容器。
- Stage is the main container and the entry point of the application. It represents the main window and passed as an argument of the start() method.
- Scene is a container for holding the UI elements, such as Image Views, Buttons, Grids, TextBoxes.
The Scene can be replaced or switched to another Scene. This represents a graph of hierarchical objects, which is known as a Scene Graph. Each element in that hierarchy is called a node. A single node has its ID, style, effects, event handlers, state.
这个Scene可以被替换或切换到另一个Scene。这代表了一个分层对象的图,它被称为Scene Graph。该层次结构中的每个元素被称为一个节点。一个节点有它的ID、风格、效果、事件处理程序、状态。
Additionally, the Scene also contains the layout containers, images, media.
此外,Scene还包含布局容器、图像、媒体。
2.2. Threads
2.2.线程
At the system level, the JVM creates separate threads for running and rendering the application:
在系统层面,JVM为运行和渲染应用程序创建了单独的线程。
- Prism rendering thread – responsible for rendering the Scene Graph separately.
- Application thread – is the main thread of any JavaFX application. All the live nodes and components are attached to this thread.
2.3. Lifecycle
2.3.生命周期
The javafx.application.Application class has the following lifecycle methods:
javafx.application.Application 类有以下生命周期方法:。
- init() – is called after the application instance is created. At this point, the JavaFX API isn’t ready yet, so we can’t create graphical components here.
- start(Stage stage) – all the graphical components are created here. Also, the main thread for the graphical activities starts here.
- stop() – is called before the application shutdown; for example, when a user closes the main window. It’s useful to override this method for some cleanup before the application termination.
The static launch() method starts the JavaFX application.
静态的launch()方法启动JavaFX应用程序。
2.4. FXML
2.4.FXML
JavaFX uses a special FXML markup language to create the view interfaces.
JavaFX使用一种特殊的FXML标记语言来创建视图界面。
This provides an XML based structure for separating the view from the business logic. XML is more suitable here, as it’s able to quite naturally represent a Scene Graph hierarchy.
这提供了一个基于XML的结构,用于将视图与业务逻辑分开。XML在这里更合适,因为它能够很自然地表示Scene Graph层次结构。
Finally, to load up the .fxml file, we use the FXMLLoader class, which results in the object graph of the scene hierarchy.
最后,为了加载.fxml文件,我们使用FXMLLoader类,这导致了场景层次的对象图。
3. Getting Started
3.入门
To get practical, and let’s build a small application that allows searching through a list of people.
为了实际操作,让我们建立一个小的应用程序,允许通过一个人的名单进行搜索。。
First, let’s add a Person model class – to represent our domain:
首先,让我们添加一个Person模型类–来代表我们的领域。
public class Person {
    private SimpleIntegerProperty id;
    private SimpleStringProperty name;
    private SimpleBooleanProperty isEmployed;

    // getters, setters
}
Notice how, to wrap up the int, String and boolean values, we’re using the SimpleIntegerProperty, SimpleStringProperty, SimpleBooleanProperty classes in the javafx.beans.property package.
请注意,为了包装int、String和boolean值,我们使用了SimpleIntegerProperty、SimpleStringProperty、SimpleBooleanProperty包中的javafx.beans.property>类。
Next, let’s create the Main class that extends the Application abstract class:
接下来,让我们创建Main类,它扩展了Application抽象类:
public class Main extends Application {

    @Override
    public void start(Stage primaryStage) throws Exception {
        FXMLLoader loader = new FXMLLoader(
          Main.class.getResource("/SearchController.fxml"));
        AnchorPane page = (AnchorPane) loader.load();
        Scene scene = new Scene(page);

        primaryStage.setTitle("Title goes here");
        primaryStage.setScene(scene);
        primaryStage.show();
    }

    public static void main(String[] args) {
        launch(args);
    }
}
Our main class overrides the start() method, which is the entry point for the program.
我们的主类重写了start()方法,它是程序的入口点。
Then, the FXMLLoader loads up the object graph hierarchy from SearchController.fxml into the AnchorPane.
然后,FXMLLoader从SearchController.fxml加载对象图层次到AnchorPane。
After starting a new Scene, we set it to the primary Stage. We also set the title for our window and show() it.
在启动一个新的Scene之后,我们将其设置为主要的Stage。我们还为我们的窗口设置了标题,并show()它。
Note that it’s useful to include the main() method to be able to run the JAR file without the JavaFX Launcher.
注意,包括main()方法是很有用的,可以在没有JavaFX Launcher的情况下运行JAR文件。
3.1. FXML View
3.1.FXML视图
Let’s now dive deeper into the SearchController XML file.
现在让我们深入研究一下SearchController XML文件。
For our searching application, we’ll add a text field to enter the keyword and the search button:
对于我们的搜索应用,我们将添加一个文本字段来输入关键词和搜索按钮。
<AnchorPane
  xmlns:fx="http://javafx.com/fxml"
  xmlns="http://javafx.com/javafx"
  fx:controller="com.baeldung.view.SearchController">
    <children>

        <HBox id="HBox" alignment="CENTER" spacing="5.0">
            <children>
                <Label text="Search Text:"/>
                <TextField fx:id="searchField"/>
                <Button fx:id="searchButton"/>
            </children>
        </HBox>

        <VBox fx:id="dataContainer"
              AnchorPane.leftAnchor="10.0"
              AnchorPane.rightAnchor="10.0"
              AnchorPane.topAnchor="50.0">
        </VBox>

    </children>
</AnchorPane>
AnchorPane is the root container here, and the first node of the graph hierarchy. While resizing the window, it will reposition the child to its anchor point. The fx: controller attribute wires the Java class with the markup.
AnchorPane是这里的根容器,也是图形层次结构的第一个节点。在调整窗口大小的同时,它将把孩子重新定位到其锚点。fx: controller属性将Java类与标记相连接。
There are some other built-in layouts available:
还有一些其他的内置布局可用。
- BorderPane – divides the layout into five sections: top, right, bottom, left, center
- HBox – arrange the child components in a horizontal panel
- VBox – the child nodes are arranged in a vertical column
- GridPane – useful for creating a grid with rows and columns
In our example, inside of the horizontal HBox panel, we used a Label to place text, TextField for the input, and a Button. With fx: id we mark the elements so that we can use them later in the Java code.
在我们的例子中,在水平的HBox面板内,我们使用了一个Label来放置文本,TextField用于输入,还有一个Button。我们用fx: id来标记这些元素,这样我们就可以在以后的Java代码中使用它们。
The VBox panel is where we’ll display the search results.
VBox面板是我们将显示搜索结果的地方。
Then, to map them to the Java fields – we use the @FXML annotation:
然后,为了将它们映射到Java字段–我们使用@FXML注释:。
public class SearchController {

    @FXML
    private TextField searchField;
    @FXML
    private Button searchButton;
    @FXML
    private VBox dataContainer;
    @FXML
    private TableView tableView;

    @FXML
    private void initialize() {
        // search panel
        searchButton.setText("Search");
        searchButton.setOnAction(event -> loadData());
        searchButton.setStyle("-fx-background-color: #457ecd; -fx-text-fill: #ffffff;");

        initTable();
    }
}
After populating the @FXML annotated fields, initialize() will be called automatically. Here, we’re able to perform further actions over the UI components – like registering event listeners, adding style or changing the text property.
在填充了@FXML注释的字段后,initialize()将被自动调用。在这里,我们能够对UI组件执行进一步的操作–比如注册事件监听器、添加样式或更改文本属性。
In the initTable() method we’ll create the table that will contain the results, with 3 columns, and add it to the dataContainer VBox:
在initTable()方法中,我们将创建包含结果的表格,有3列,并将其添加到dataContainer VBox。
private void initTable() {
    tableView = new TableView<>();
    TableColumn id = new TableColumn("ID");
    TableColumn name = new TableColumn("NAME");
    TableColumn employed = new TableColumn("EMPLOYED");
    tableView.getColumns().addAll(id, name, employed);
    dataContainer.getChildren().add(tableView);
}
Finally, all of this logic described here will produce the following window:
最后,这里描述的所有这些逻辑将产生以下窗口。

4. Binding API
4.绑定的API
Now that the visual aspects are handled, let’s start looking at binding data.
现在,视觉方面的问题已经处理完毕,让我们开始关注绑定数据的问题。
The binding API provides some interfaces that notify objects when a value change of another object occurs.
绑定API提供了一些接口,当另一个对象的值发生变化时,会通知对象。
We can bind a value using the bind() method or by adding listeners.
我们可以使用bind()方法或通过添加监听器来绑定一个值。
Unidirectional binding provides a binding for one direction only:
单向绑定只为一个方向提供了一个绑定。
searchLabel.textProperty().bind(searchField.textProperty());Here, any change in the search field will update the text value of the label.
这里,搜索字段的任何变化都会更新标签的文本值。
By comparison, bidirectional binding synchronizes the values of two properties in both directions.
相比之下,双向绑定使两个属性的值在两个方向上同步。
The alternative way of binding the fields are ChangeListeners:
绑定字段的替代方法是ChangeListeners:。
searchField.textProperty().addListener((observable, oldValue, newValue) -> {
    searchLabel.setText(newValue);
});
The Observable interface allows observing the value of the object for changes.
Observable接口允许观察对象的值的变化。
To exemplify this, the most commonly used implementation is the javafx.collections.ObservableList<T> interface:
为了说明这一点,最常用的实现是 javafx.collection.ObservableList<T>接口。
ObservableList<Person> masterData = FXCollections.observableArrayList();
ObservableList<Person> results = FXCollections.observableList(masterData);
Here, any model change like insertion, update or removal of the elements, will notify the UI controls immediately.
在这里,任何模型的变化,如元素的插入、更新或移除,将立即通知UI控件。
The masterData list will contain the initial list of Person objects, and the results list will be the list we display upon searching.
masterData列表将包含Person对象的初始列表,而结果列表将是我们在搜索时显示的列表。
We also have to update the initTable() method to bind the data in the table to the initial list, and to connect each column to the Person class fields:
我们还必须更新initTable()方法,将表中的数据与初始列表绑定,并将每一列与Person类字段相连。
private void initTable() {
    tableView = new TableView<>(FXCollections.observableList(masterData));
    TableColumn id = new TableColumn("ID");
    id.setCellValueFactory(new PropertyValueFactory("id"));
    TableColumn name = new TableColumn("NAME");
    name.setCellValueFactory(new PropertyValueFactory("name"));
    TableColumn employed = new TableColumn("EMPLOYED");
    employed.setCellValueFactory(new PropertyValueFactory("isEmployed"));

    tableView.getColumns().addAll(id, name, employed);
    dataContainer.getChildren().add(tableView);
}
5. Concurrency
5.并发性
Working with the UI components in a scene graph isn’t thread-safe, as it’s accessed only from the Application thread. The javafx.concurrent package is here to help with multithreading.
在场景图中处理UI组件并不是线程安全的,因为它只能从应用程序线程中访问。javafx.concurrent包可以帮助实现多线程。
Let’s see how we can perform the data search in the background thread:
让我们看看我们如何在后台线程中进行数据搜索。
private void loadData() {
    String searchText = searchField.getText();
    Task<ObservableList<Person>> task = new Task<ObservableList<Person>>() {
        @Override
        protected ObservableList<Person> call() throws Exception {
            updateMessage("Loading data");
            return FXCollections.observableArrayList(masterData
                    .stream()
                    .filter(value -> value.getName().toLowerCase().contains(searchText))
                    .collect(Collectors.toList()));
        }
    };
}
Here, we create a one-time task javafx.concurrent.Task object and override the call() method.
在这里,我们创建了一个一次性任务javafx.concurrent.Task对象并重载了call()方法。
The call() method runs entirely on the background thread and returns the result to the Application thread. This means any manipulation of the UI components within this method, will throw a runtime exception.
call()方法完全在后台线程上运行,并将结果返回给应用程序线程。这意味着在该方法中对UI组件的任何操作,都会引发运行时异常。
However, updateProgress(), updateMessage() can be called to update Application thread items. When the task state transitions to SUCCEEDED state, the onSucceeded() event handler is called from the Application thread:
然而,updateProgress(), updateMessage()可以被调用以更新应用线程项目。当任务状态过渡到SUCCEEDED状态时,onSucceeded()事件处理程序将从应用程序线程中被调用。
task.setOnSucceeded(event -> {
    results = task.getValue();
    tableView.setItems(FXCollections.observableList(results));
});
In the same callback, we’ve updated the tableView data to the new list of results.
在同一个回调中,我们已经将tableView数据更新为新的结果列表。
The Task is Runnable, so to start it we need just to start a new Thread with the task parameter:
这个Task是Runnable,所以要启动它,我们只需要用task参数启动一个新的Thread>。
Thread th = new Thread(task);
th.setDaemon(true);
th.start();
The setDaemon(true) flag indicates that the thread will terminate after finishing the work.
setDaemon(true)标志表示线程在完成工作后将终止。
6. Event Handling
6.事件处理[/strong]
We can describe an event as an action that might be interesting to the application.
我们可以把事件描述为一个可能对应用程序感兴趣的行动。
For example, user actions like mouse clicks, key presses, window resize are handled or notified by javafx.event.Event class or any of its subclasses.
例如,用户的操作,如鼠标点击、按键、窗口调整,都是由javafx.event.Event类或其任何子类来处理或通知的。
Also, we distinguish three types of events:
此外,我们还区分了三种类型的事件。
- InputEvent – all the types of key and mouse actions like KEY_PRESSED, KEY_TYPED, KEY_RELEASED or MOUSE_PRESSES, MOUSE_RELEASED
- ActionEvent – represents a variety of actions like firing a Button or finishing a KeyFrame
- WindowEvent – WINDOW_SHOWING, WINDOW_SHOWN
To demonstrate, the code fragment below catches the event of pressing the Enter key over the searchField:
为了演示,下面的代码片段捕捉了在searchField上按下Enter键的事件。
searchField.setOnKeyPressed(event -> {
    if (event.getCode().equals(KeyCode.ENTER)) {
        loadData();
    }
});
7. Style
7.风格
We can change the UI of the JavaFX application by applying a custom design to it.
我们可以通过对JavaFX应用程序应用自定义设计来改变它的用户界面。
By default, JavaFX uses modena.css as a CSS resource for the whole application. This is a part of the jfxrt.jar.
默认情况下,JavaFX使用modena.css作为整个应用程序的CSS资源。这是jfxrt.jar的一部分。
To override the default style, we can add a stylesheet to the scene:
为了覆盖默认样式,我们可以在场景中添加一个样式表。
scene.getStylesheets().add("/search.css");We can also use inline style; for example, to set a style property for a specific node:
我们也可以使用内联样式;例如,为一个特定的节点设置一个样式属性。
searchButton.setStyle("-fx-background-color: slateblue; -fx-text-fill: white;");8. Conclusion
8.结论
This brief write-up covers the basics of JavaFX API. We went through the internal structure and introduced key capabilities of its architecture, lifecycle, and components.
这篇简短的文章涵盖了JavaFX API的基础知识。我们浏览了内部结构,并介绍了其架构、生命周期和组件的主要功能。
As a result, we learned and are now able to create a simple GUI application.
结果,我们学会了,现在能够创建一个简单的GUI应用程序。
And, as always, the full source code of the tutorial is available over on GitHub.
而且,像往常一样,该教程的完整源代码可在GitHub上获得。