1. Overview
1.概述
In this article, we’re going to use Apache JMeter to configure and run performance tests.
在本文中,我们将使用Apache JMeter来配置和运行性能测试。
2. Setting up JMeter
2.设置JMeter
Let’s download JMeter, unzip it, go to the bin folder and run the executable (*.bat for Windows and *.sh for Linux/Unix).
让我们下载JMeter,将其解压,进入bin文件夹并运行可执行文件(Windows为*.bat,Linux/Unix为*.sh)。
Next, we just need to add this folder to the path environment variable so that it’s accessible from the command line.
接下来,我们只需要把这个文件夹添加到路径环境变量中,这样它就可以从命令行中访问。
The most stable version at the time of writing is the 3.3 – we can check the newest version here.
在撰写本文时,最稳定的版本是3.3 – 我们可以查看最新的版本这里。
3. Creating JMeter Scripts
3.创建JMeter脚本
Now let’s write our first JMeter script (a file containing a technical description of our tests).
现在我们来写第一个JMeter脚本(一个包含我们测试的技术描述的文件)。
This API is a simple SpringBoot application exposing a REST API.
该API是一个简单的SpringBoot应用程序,暴露了一个REST API。
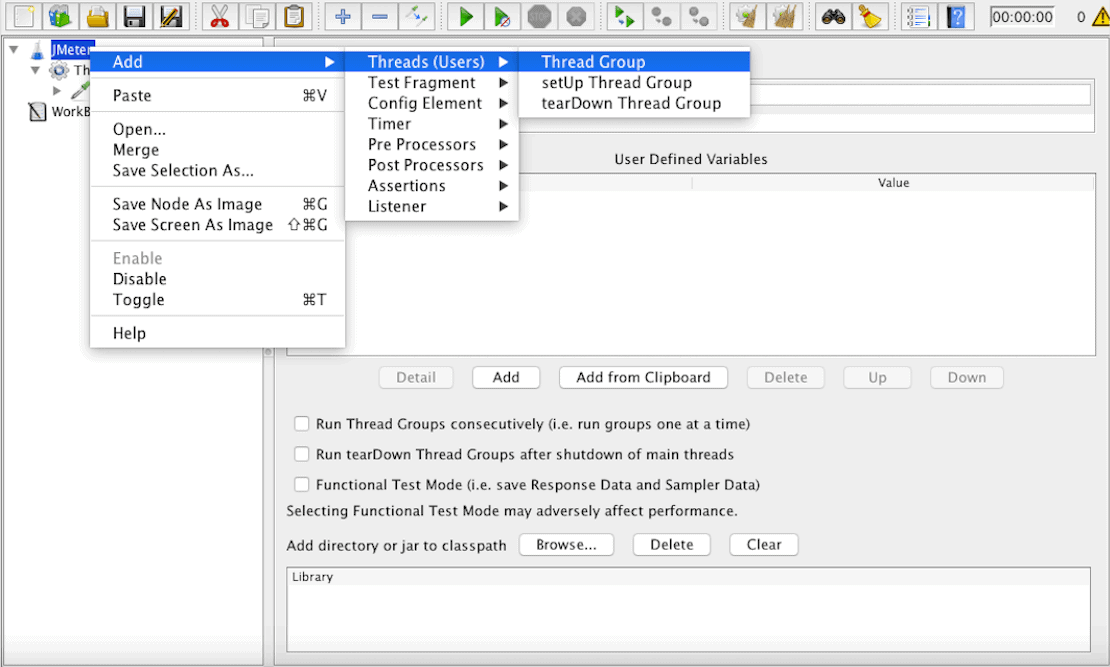
Let’s update the Test plan one and change its name first, then add a Thread Group.
让我们更新测试计划一项,首先改变其名称,然后添加线程组。
A Thread Group allows us to know the user flow and simulates how they interact with the app, right click on our script name on the GUI and follow the selected menu:
一个线程组可以让我们知道用户的流程,模拟他们与应用程序的互动,在GUI上右击我们的脚本名称,并按照选定的菜单。
Now we head to the configuration part of the Thread Group, where we specify the number of users making requests to our application in parallel:
现在我们前往线程组的配置部分,在那里我们指定向我们的应用程序并行发出请求的用户数量。
Here, we specified parameters like:
在这里,我们指定了一些参数,如。
– Name: the name we want to give to the thread group
– 名称:我们想给线程组的名称
– The number of Threads (users): the number of parallel users
– 线程(用户)的数量:并行用户的数量
– Ramp-up time: time needed for going from 0 to the declared number of users
– 提升时间:从0到申报用户数所需的时间。
– Loop count: number of repetitions
– 循环次数:重复的次数
Add an HTTP Request as it’s the one we’ll simulating as coming from each of 5 users.
添加一个HTTP请求,因为它是我们要模拟的来自5个用户的请求。
Let’s fill the info to address our API described up there like in the image below:
让我们填写信息,以解决上面描述的我们的API,如下面的图片。
We just fill the website address, the port, and the specific path.
我们只需填写网站地址、端口和具体路径。
Next, let’s simulate users’ requests after adding a View Results Tree (Use View Results in Table if the results is a list of records) by following the menu “Add > Listener”.
接下来,让我们按照菜单”添加>监听器”来模拟用户在添加查看结果树(如果结果是一个记录列表,则使用在表中查看结果)之后的请求。
Hit the green arrow right button on the top to run the test and see the response data:
点击上面的绿色箭头右键,运行测试并查看响应数据。
We can see a more detailed representation of the response on the Sampler result tab.
我们可以在Sampler result标签上看到更详细的响应表示。
Let’s end by adding a Duration Assertion in the HTTP Request, so every request that lasts longer than ten milliseconds will be considered as a failed test:
最后,让我们在HTTP请求中添加一个Duration断言,所以每一个持续时间超过10毫秒的请求都将被视为测试失败。
After rerunning the test, we see that there are some (here it’s 3) users that cannot get the lists of students in less than ten milliseconds:
重新运行测试后,我们看到有一些(这里是3个)用户不能在10毫秒内得到学生名单。
Now, let’s save the test with the extension .jmx in the resource folder of the API.
现在,让我们在API的资源文件夹中保存扩展名为.jmx的测试。
More elements are available to configure our test file:
更多的元素可用于配置我们的测试文件。
- JDBC Request: useful to send a JDBC request(SQL query) to a database, before using it we need to set up a JDBC connection configuration element
- XML Assertion: tests that the response data is of a properly correct XML document
- Size Assertion: asserts that the response contains the right number of bytes in it
- JMS Publisher: to publish messages to a given target(topic/queue) following J2EE specification for messaging
All available components are detailed in the user manual.
所有可用的组件都在用户手册中详细说明。
4. Run the JMeter Tests
4.运行JMeter测试
There’re two ways to run JMeter tests, one of them consists of using the available Maven plugin and the other one the standalone JMeter app in the non-GUI mode.
有两种方法可以运行JMeter测试,其中一种是使用可用的Maven插件,另一种是在非GUI模式下的独立JMeter应用程序。
In any case, both need to know where to reach the JMeter script we configured earlier.
在任何情况下,都需要知道哪里可以到达我们之前配置的JMeter脚本。
4.1. JMeter Maven Plugin
4.1.JMeter Maven插件
JMeter Maven Plugin is a Maven plugin that brings the facility to run JMeter tests as part of our build; his last version right now is 2.6.0 who is compatible with Apache JMeter 3.3.
JMeter Maven Plugin 是一个Maven插件,它可以将JMeter测试作为我们构建的一部分来运行;他现在的最新版本是2.6.0,与Apache JMeter 3.3兼容。
Let’s add it to the pom.xml of our project:
让我们把它添加到我们项目的pom.xml中。
<plugin>
    <groupId>com.lazerycode.jmeter</groupId>
    <artifactId>jmeter-maven-plugin</artifactId>
    <version>2.6.0</version>
    <executions>
        <execution>
            <id>jmeter-tests</id>
            <goals>
                <goal>jmeter</goal>
            </goals>
        </execution>
    </executions>
    <configuration>
        <testFilesDirectory>${project.basedir}/src/main/resources</testFilesDirectory>
        <resultsDirectory>${project.basedir}/src/main/resources</resultsDirectory>
    </configuration>
</plugin>
After this, we can run all our tests with mvn verify or just the JMeter ones with mvn jmeter:jmeter; here is the console output of the command:
之后,我们可以用mvn verify运行所有的测试,或者只用mvn jmeter:jmeter运行JMeter的测试;这里是命令的控制台输出。
Note: Here we specified the directory where our tests are located in the project, either the default one(${project.basedir}/src/test/jmeter) will be chosen; likewise is configured the result directory else the default one will be ${project.basedir}/target/jmeter/results.
注意:这里我们指定了项目中测试所在的目录,要么选择默认目录(${project.basedir}/src/test/jmeter);同样,也配置了结果目录,否则默认目录将是${project.basedir}/target/jmeter/results。
The full plugin documentation is accessible here.
完整的插件文档可在此处访问。
4.2. Non-GUI Mode
4.2.非GUI模式
The other way to do it’s via the JMeter executable, assuming that it’s available via the command line we can do this:
另一种方法是通过JMeter的可执行程序,假设它可以通过命令行来实现,我们可以这样做。
jmeter -Jjmeter.save.saveservice.output_format=xml
jmeter -Jjmeter.save.saveservice.output_format=xml
-n -t src/main/resources/JMeter.jmx -l src/main/resources/JMeter.jtl
-n -t src/main/resources/JMeter.jmx -l src/main/resources/JMeter.jtl
We set XML as the output format, which fills the exact test file and the result one.
我们设置了XML作为输出格式,这就填补了准确的测试文件和结果文件。
Note: it’s recommended to not use GUI mode for load testing, only for test creation and test debugging.
注意:建议不要将GUI模式用于负载测试,只用于测试创建和测试调试。
5. Conclusion
5.结论
In this quick tutorial, we’ve set up Apache JMeter on a SpringBoot app to run performance tests with a Maven plugin while looking practically how to design a basic performance test.
在这个快速教程中,我们在SpringBoot应用上设置了Apache JMeter,用Maven插件运行性能测试,同时实际了解如何设计一个基本的性能测试。
As always, the source code for this article can be found over on GitHub.
像往常一样,本文的源代码可以在GitHub上找到over。


