1. Overview
1.概述
Keycloak is a third-party authorization server that manages users of our web or mobile applications.
Keycloak是一个第三方授权服务器,用于管理我们的网络或移动应用程序的用户。
It offers some default attributes, such as first name, last name, and email to be stored for any given user. But many times, these are not enough, and we might need to add some extra user attributes specific to our application.
它提供了一些默认的属性,如名字、姓氏和电子邮件,以便为任何给定的用户存储。但很多时候,这些是不够的,我们可能需要添加一些特定于我们应用程序的额外的用户属性。
In this tutorial, we’ll see how we can add custom user attributes to our Keycloak authorization server and access them in a Spring-based backend.
在本教程中,我们将看到如何向我们的Keycloak授权服务器添加自定义用户属性,并在基于Spring的后端访问它们。
First, we’ll see this for a standalone Keycloak server, and then for an embedded one.
首先,我们将看到一个独立的Keycloak服务器,然后是一个嵌入式的。
2. Standalone Server
2.独立服务器
2.1. Adding Custom User Attributes
2.1.添加自定义用户属性
The first step here is to go to Keycloak’s admin console. For that, we’ll need to start the server by running this command from our Keycloak distribution’s bin folder:
这里的第一步是进入Keycloak的管理控制台。为此,我们需要从Keycloak的bin文件夹中运行这个命令来启动服务器。
./standalone.sh -Djboss.socket.binding.port-offset=100Then we need to go to the admin console and key-in the initial1/zaq1!QAZ credentials.
然后我们需要进入管理员控制台,并键入initial1/zaq1!QAZ凭证。
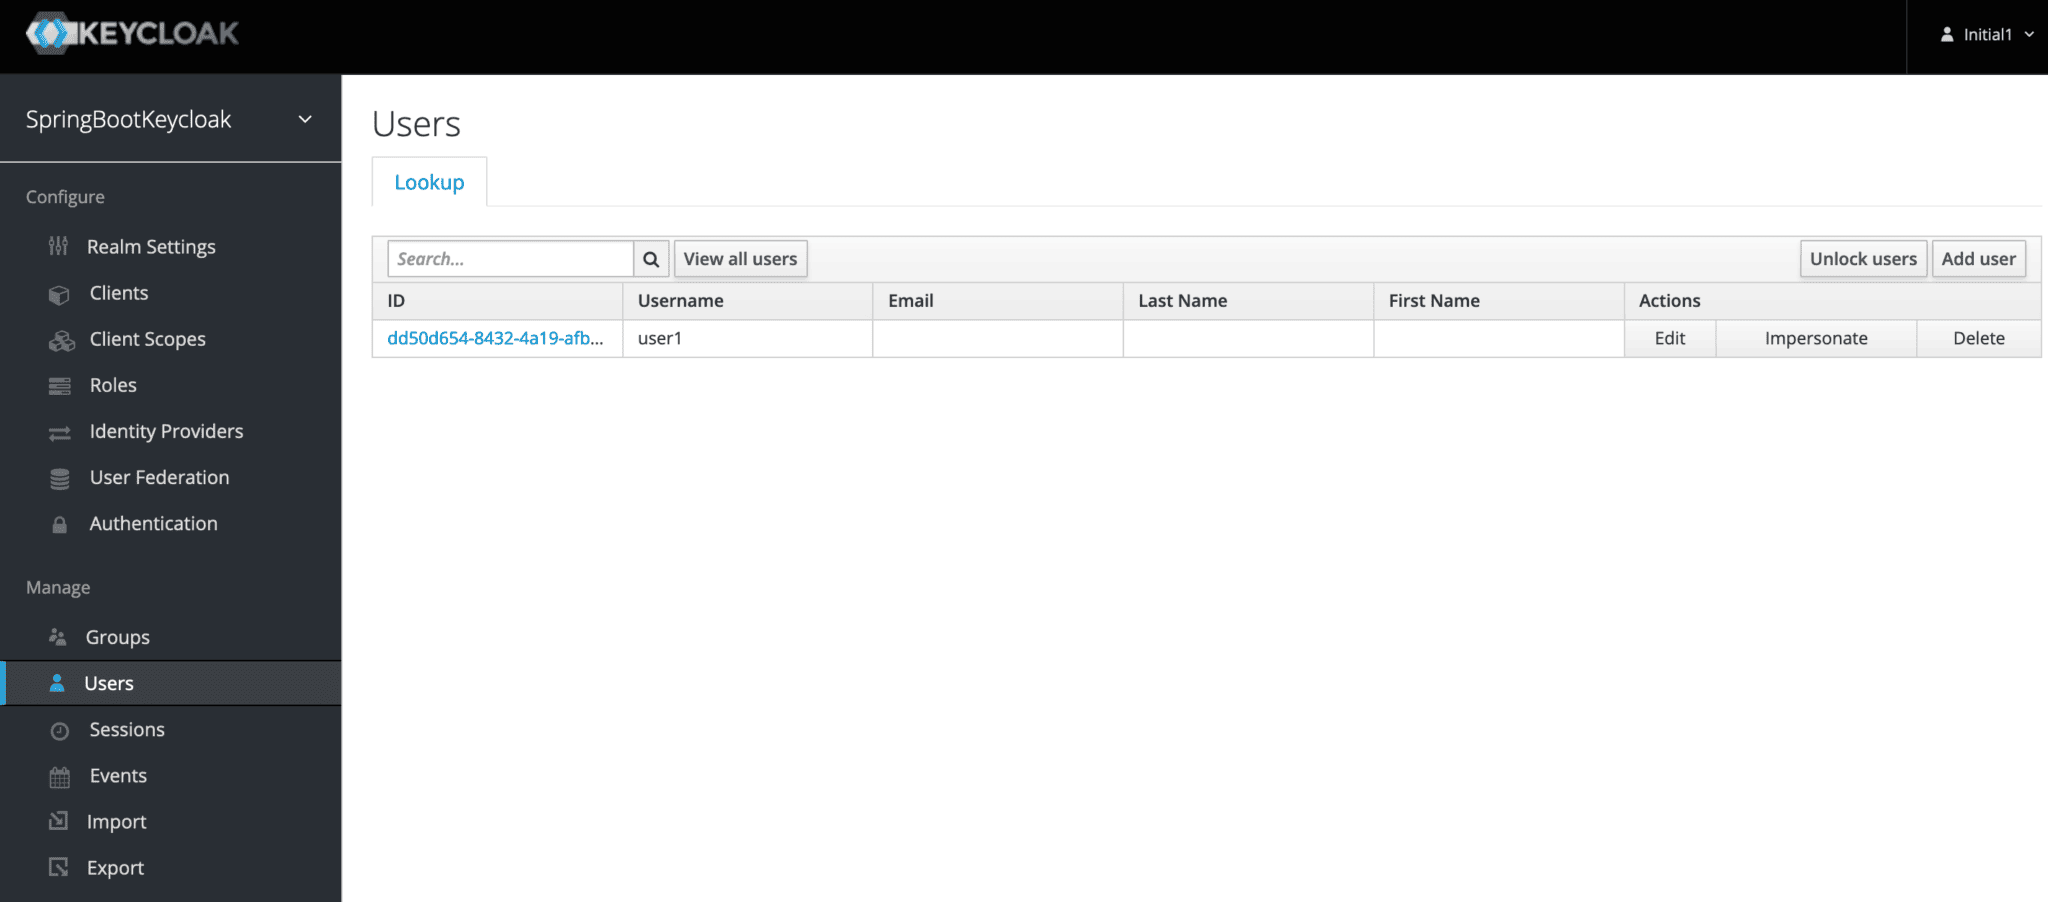
Next, we’ll click on Users under the Manage tab and then View all users:
接下来,我们将点击管理标签下的用户,然后查看所有用户。
Here we can see the user we’d added previously: user1.
这里我们可以看到我们之前添加的用户。user1。
Now let’s click on its ID and go to the Attributes tab to add a new one, DOB for date of birth:
现在让我们点击它的ID,进入Attributes标签,添加一个新的属性,DOB表示出生日期。
After clicking Save, the custom attribute gets added to the user’s information.
点击Save后,自定义属性被添加到用户的信息中。
Next, we need to add a mapping for this attribute as a custom claim so that it’s available in the JSON payload for the user’s token.
接下来,我们需要为这个属性添加一个映射,作为一个自定义的要求,这样它就可以在用户令牌的JSON有效载荷中使用。
For that, we need to go to our application’s client on the admin console. Recall that earlier we’d created a client, login-app:
为此,我们需要在管理控制台进入我们应用程序的客户端。记得早些时候我们已经创建了一个客户端,login-app。
Now, let’s click on it and go to its Mappers tab to create a new mapping:
现在,让我们点击它,进入它的Mappers标签,创建一个新的映射。
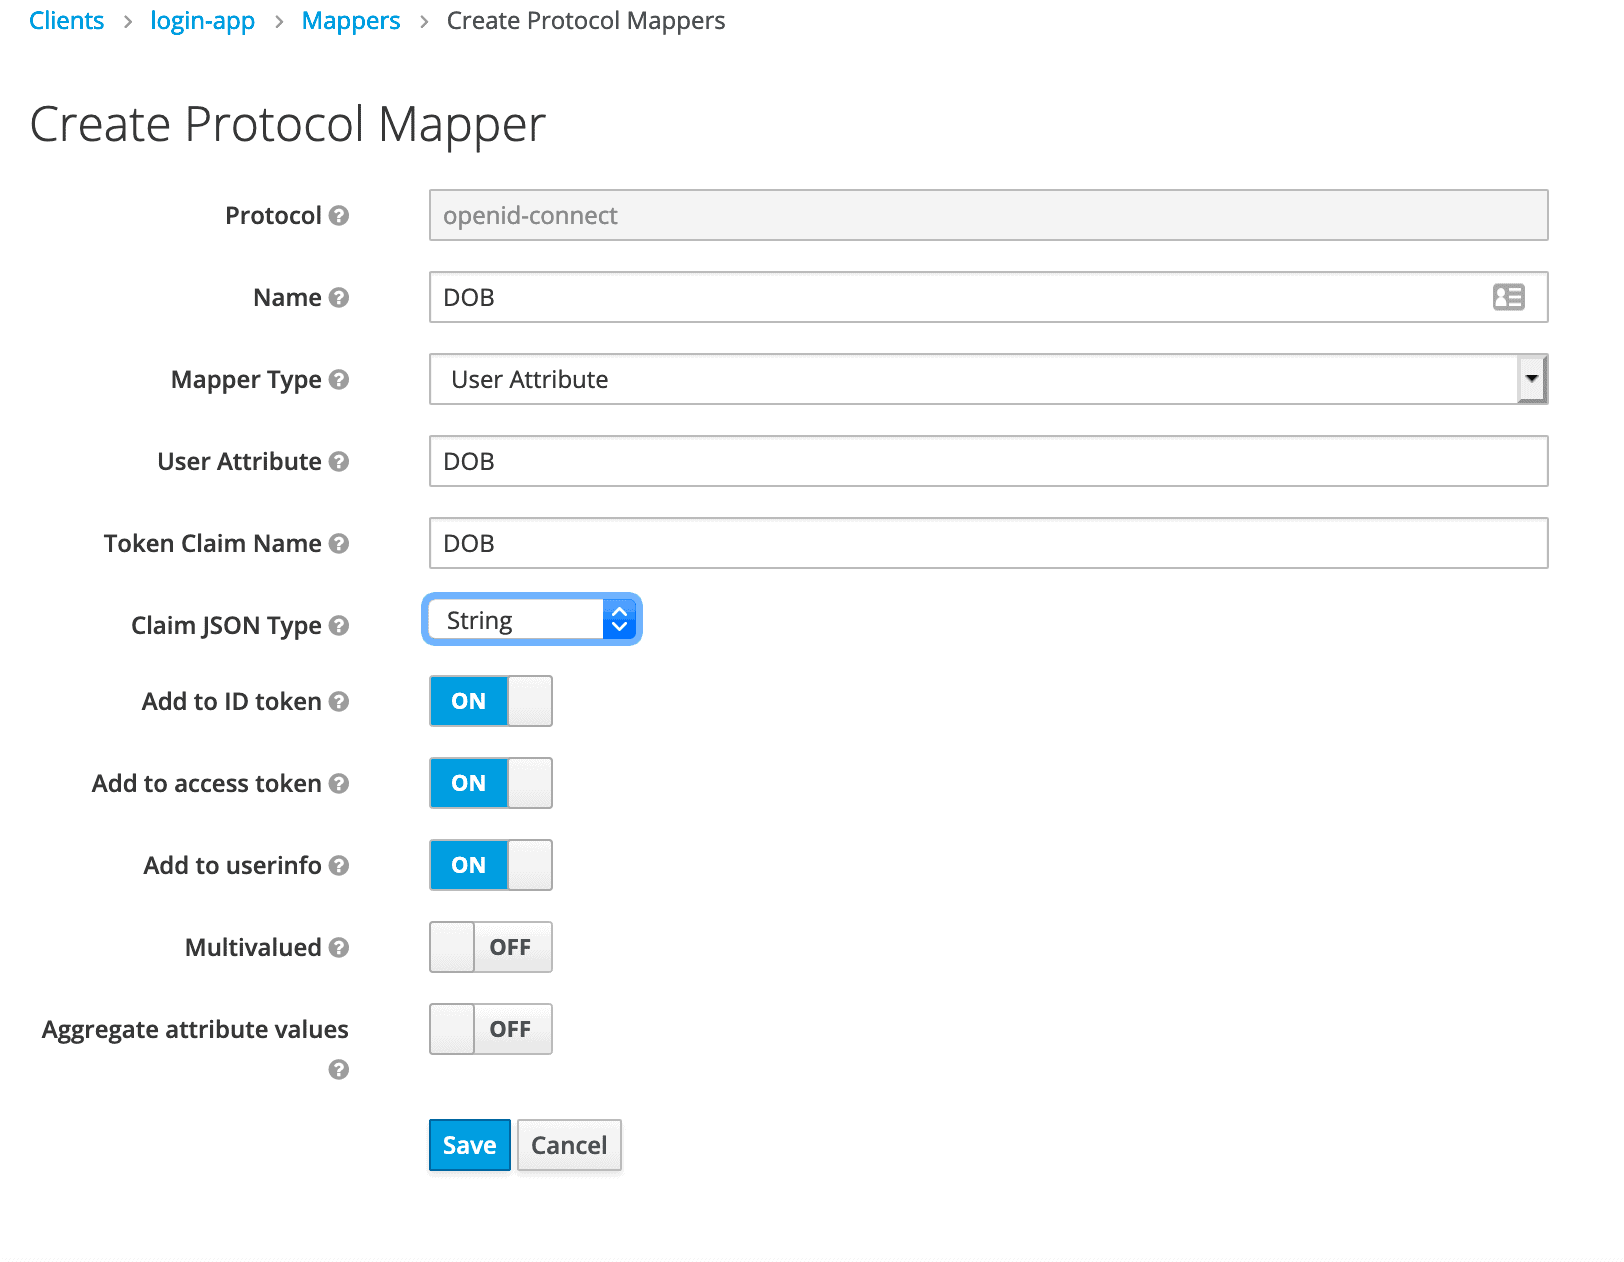
First, we’ll select the Mapper Type as User Attribute and then set Name, User Attribute, and Token Claim Name as DOB. Claim JSON Type should be set as String.
首先,我们将选择Mapper Type为User Attribute,然后将Name、User Attribute和Token Claim Name设为DOB。Claim JSON Type应被设置为String。
On clicking Save, our mapping is ready. So now, we’re equipped from the Keycloak end to receive DOB as a custom user attribute.
点击Save,我们的映射就准备好了。所以现在,我们已经从Keycloak端配备了接收DOB作为一个自定义用户属性。
In the next section, we’ll see how to access it via an API call.
在下一节,我们将看到如何通过API调用访问它。
2.2. Accessing Custom User Attributes
2.2.访问自定义用户属性
Building on top of our Spring Boot application, let’s add a new REST controller to get the user attribute we added:
在我们的Spring Boot应用程序之上,让我们添加一个新的REST控制器来获取我们添加的用户属性。
@Controller
public class CustomUserAttrController {

    @GetMapping(path = "/users")
    public String getUserInfo(Model model) {
        KeycloakAuthenticationToken authentication = (KeycloakAuthenticationToken)
          SecurityContextHolder.getContext().getAuthentication();

        Principal principal = (Principal) authentication.getPrincipal();
        String dob="";

        if (principal instanceof KeycloakPrincipal) {
            KeycloakPrincipal kPrincipal = (KeycloakPrincipal) principal;
            IDToken token = kPrincipal.getKeycloakSecurityContext().getIdToken();

            Map<String, Object> customClaims = token.getOtherClaims();

            if (customClaims.containsKey("DOB")) {
                dob = String.valueOf(customClaims.get("DOB"));
            }
        }

        model.addAttribute("username", principal.getName());
        model.addAttribute("dob", dob);
        return "userInfo";
    }
}
As we can see, here we first obtained the KeycloakAuthenticationToken from the security context and then extracted the Principal from it. After casting it as a KeycloakPrincipal, we obtained its IDToken.
我们可以看到,这里我们首先从安全上下文中获得了KeycloakAuthenticationToken,然后从中提取了Principal。在把它铸成KeycloakPrincipal之后,我们获得了它的IDToken。
DOB can then be extracted from this IDToken‘s OtherClaims.
然后可以从这个IDToken的OtherClaims中提取DOB。
Here’s the template, named userInfo.html, that we’ll use to display this information:
这里是模板,名为userInfo.html,,我们将用它来显示这些信息。
<div id="container">
    <h1>Hello, <span th:text="${username}">--name--</span>.</h1>
    <h3>Your Date of Birth as per our records is <span th:text="${dob}"/>.</h3>
</div>
2.3. Testing
2.3.测试
On starting the Boot application, we should navigate to http://localhost:8081/users. We’ll first be asked to enter credentials.
在启动Boot应用程序时,我们应该导航到http://localhost:8081/users。我们首先会被要求输入凭证。
After entering user1‘s credentials, we should see this page:
在输入user1的凭证后,我们应该看到这个页面。
3. Embedded Server
3.嵌入式服务器
Now let’s see how to achieve the same thing on an embedded Keycloak instance.
现在让我们看看如何在一个嵌入式Keycloak实例上实现同样的事情。
3.1. Adding Custom User Attributes
3.1.添加自定义用户属性
Basically, we need to do the same steps here, only that we’ll need to save them as pre-configurations in our realm definition file, baeldung-realm.json.
基本上,我们需要在这里做同样的步骤,只是我们需要将它们作为pre-configurations保存在我们的领域定义文件baeldung-realm.json。
To add the attribute DOB to our user john@test.com, first, we need to configure its attributes:
要将属性DOB添加到我们的用户john@test.com,首先,我们需要配置其属性。
"attributes" : {
    "DOB" : "1984-07-01"
},
Then add the protocol mapper for DOB:
然后为DOB添加协议映射器。
"protocolMappers": [
    {
    "id": "c5237a00-d3ea-4e87-9caf-5146b02d1a15",
    "name": "DOB",
    "protocol": "openid-connect",
    "protocolMapper": "oidc-usermodel-attribute-mapper",
    "consentRequired": false,
    "config": {
        "userinfo.token.claim": "true",
        "user.attribute": "DOB",
        "id.token.claim": "true",
        "access.token.claim": "true",
        "claim.name": "DOB",
        "jsonType.label": "String"
        }
    }
]
That’s all we need here.
这就是我们在这里需要的一切。
Now that we’ve seen the authorization server part of adding a custom user attribute, it’s time to look at how the resource server can access the user’s DOB.
现在我们已经看到了添加自定义用户属性的授权服务器部分,现在是时候看看资源服务器如何访问用户的DOB。
3.2. Accessing Custom User Attributes
3.2.访问自定义用户属性
On the resource server-side, the custom attributes will simply be available to us as claim values in the AuthenticationPrincipal.
在资源服务器端,自定义属性将只是作为AuthenticationPrincipal中的索赔值提供给我们。
Let’s code an API for it:
让我们为它编写一个API。
@RestController
public class CustomUserAttrController {
    @GetMapping("/user/info/custom")
    public Map<String, Object> getUserInfo(@AuthenticationPrincipal Jwt principal) {
        return Collections.singletonMap("DOB", principal.getClaimAsString("DOB"));
    }
}
3.3. Testing
3.3.测试
Now let’s test it using JUnit.
现在让我们用JUnit来测试它。
We’ll first need to obtain an access token and then call the /user/info/custom API endpoint on the resource server:
我们首先需要获得一个访问令牌,然后调用资源服务器上的/user/info/custom API端点。
@Test
public void givenUserWithReadScope_whenGetUserInformationResource_thenSuccess() {
    String accessToken = obtainAccessToken("read");
    Response response = RestAssured.given()
      .header(HttpHeaders.AUTHORIZATION, "Bearer " + accessToken)
      .get(userInfoResourceUrl);

    assertThat(response.as(Map.class)).containsEntry("DOB", "1984-07-01");
}
As we can see, here we verified that we’re getting the same DOB value as we added in the user’s attributes.
我们可以看到,在这里我们验证了我们得到的DOB值与我们在用户属性中添加的相同。
4. Conclusion
4.总结
In this tutorial, we learned how to add extra attributes to a user in Keycloak.
在本教程中,我们学习了如何在Keycloak中为用户添加额外属性。
We saw this for both a standalone and an embedded instance. We also saw how to access these custom claims in a REST API on the backend in both scenarios.
我们看到了独立实例和嵌入式实例的情况。我们还看到了在这两种情况下如何在后台的REST API中访问这些自定义的索赔。
As always, the source code is available over on GitHub. For the standalone server, it’s on the tutorials GitHub, and for the embedded instance, on the OAuth GitHub.
一如既往,源代码可在GitHub上获得。对于独立服务器,它位于教程GitHub上,而对于嵌入式实例,它位于OAuth GitHub上。


