1. Overview
1.概述
In this tutorial, we’ll focus on how to test a REST service that is secured and uses Keycloak for authentication and authorization with Swagger UI.
在本教程中,我们将重点讨论如何用Swagger UI测试一个安全的、使用Keycloak进行认证和授权的REST服务。
2. The Challenge
2.挑战
Like other web resources, REST APIs are often secured. So, the service consumer (such as a Swagger UI) needs not only to handle the HTTP call itself but also needs to provide authentication information to the service provider.
像其他网络资源一样,REST APIs通常是安全的。所以,服务消费者(如Swagger UI)不仅需要自己处理HTTP调用,还需要向服务提供者提供认证信息。
Keycloak is an IAM server that allows authentication and authorization outside of the service provider implementation. It’s part of the architecture, as shown in the following diagram:
Keycloak是一个IAM服务器,它允许在服务提供商的实施之外进行认证和授权。它是架构的一部分,如下图所示。
As we can see, both the service provider and the service consumer need to contact the Keycloak server. First, we’ll need to install a Keycloak server and integrate it into a Spring Boot application as a REST service provider. Then, we need to extend the Swagger UI.
正如我们所看到的,服务提供者和服务消费者都需要联系Keycloak服务器。首先,我们需要安装一个Keycloak服务器,并将其作为一个REST服务提供者集成到Spring Boot应用程序中。然后,我们需要扩展Swagger用户界面。
3. Customizing Swagger UI
3.定制Swagger用户界面
We could directly extend the Swagger UI by including a script like this one into the HTML:
我们可以通过在HTML中加入类似这样的脚本来直接扩展Swagger的用户界面。
<script src="keycloak/keycloak.js"></script>
<script>
  var keycloak = Keycloak('keycloak.json');
    keycloak.init({ onLoad: 'login-required' })
      .success(function (authenticated) {
        console.log('Login Successful');
        window.authorizations.add("oauth2", new ApiKeyAuthorization("Authorization", "Bearer " + keycloak.token, "header"));
      }).error(function () {
        console.error('Login Failed');
        window.location.reload();
      }
    );
 </script>
The script is available as an NPM package, so it would be possible to fork the Swagger UI Source Code Repository and extend the project by the corresponding dependency.
该脚本可作为NPM包,因此可以分叉Swagger UI源代码库,并通过相应的依赖关系扩展该项目。
4. Using Standards
4.使用标准
Extending the Swagger UI by vendor-specific code is only sensible for very special cases. So, we should prefer using vendor-independent standards. The following sections will describe how to implement this.
通过供应商特定的代码来扩展Swagger用户界面,只有在非常特殊的情况下才是明智的。所以,我们应该更倾向于使用与供应商无关的标准。下面几节将描述如何实现这一点。
4.1. Existing Standards
4.1.现行标准
First, we need to know which standards exist. For authentication and authorization, there’s a protocol like OAuth2. For SSO, we could use OpenID Connect (OIDC) as an extension to OAuth2.
首先,我们需要知道存在哪些标准。对于认证和授权,有一个像OAuth2的协议。对于SSO,我们可以使用OpenID Connect(OIDC)作为OAuth2的扩展。
The standard to describe a REST API is OpenAPI. This standard includes defining multiple security schemes, including OAuth2 and OIDC:
描述REST API的标准是OpenAPI。该标准包括定义多个安全方案,包括OAuth2和OIDC。
paths:
  /api/v1/products:
    get:
      ...
      security:
        - my_oAuth_security_schema:
          - read_access
...
securitySchemes:
  my_oAuth_security_schema:
    type: oauth2
    flows:
      implicit:
        authorizationUrl: https://api.example.com/oauth2/authorize
        scopes:
          read_access: read data
          write_access: modify data
4.2. Extend the Service Provider
4.2.扩展服务提供者
In a code-first approach, the service provider can generate the OpenAPI documentation based on the code. So, the security schemes must also be provided this way. For example, with Spring Boot including SpringFox, we could write such a configuration class:
在代码优先的方法中,服务提供者可以根据代码生成OpenAPI文档。所以,安全方案也必须以这种方式提供。例如,利用包括SpringFox在内的Spring Boot,我们可以编写这样一个配置类。
@Configuration
public class OpenAPISecurityConfig {

    @Autowired
    void addSecurity(Docket docket) {
        docket
          .securitySchemes(of(authenticationScheme()))
          .securityContexts(of(securityContext()));
    }

    private SecurityScheme authenticationScheme() {
        return new OAuth2SchemeBuilder("implicit")
          .name("my_oAuth_security_schema")
          .authorizationUrl("https://api.example.com/oauth2/authorize")
          .scopes(authorizationScopes())
          .build();
    }

    private List<AuthorizationScope> authorizationScopes() {
        return Arrays.asList(
          new AuthorizationScope("read_access", "read data"),
          new AuthorizationScope("write_access", "modify data")
        );
    }

    private SecurityContext securityContext() {
        return SecurityContext.builder()
          .securityReferences(readAccessAuth())
          .operationSelector(operationContext ->
            HttpMethod.GET.equals(operationContext.httpMethod())
          )
          .build();
    }

    private List<SecurityReference> readAccessAuth() {
        AuthorizationScope[] authorizationScopes = new AuthorizationScope[] { authorizationScopes().get(0) };
        return of(new SecurityReference("my_oAuth_security_schema", authorizationScopes));
    }

}
Using other technologies would lead to different implementations, of course. But we should always be aware of the OpenAPI that has to be generated.
当然,使用其他技术会导致不同的实现方式。但我们应该始终注意到必须生成的OpenAPI。
4.3. Extend the Service Consumer
4.3.扩展服务消费者
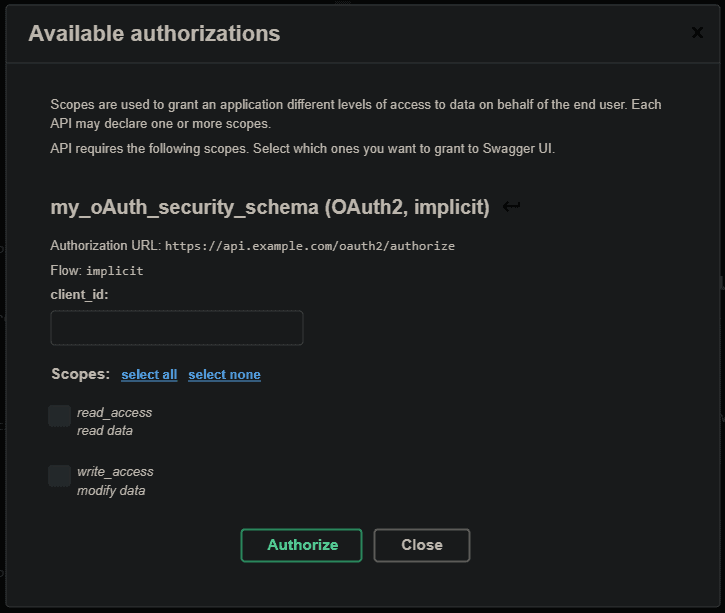
Swagger UI supports OpenAPI authentication schemes by default – no need to customize it. We’ll get a possibility to authenticate then:
Swagger UI默认支持OpenAPI认证方案–不需要定制它。我们将得到一个认证的可能性,然后。

Other clients would have different solutions. For example, there’s an NPM module for Angular applications that provides OAuth2 and OpenID Connect (OIDC) in a straightforward way.
其他客户端会有不同的解决方案。例如,有一个用于Angular应用程序的NPM模块,它以一种直接的方式提供OAuth2和OpenID Connect(OIDC)。
4.4. Swagger UI Restrictions
4.4.Swagger用户界面的限制
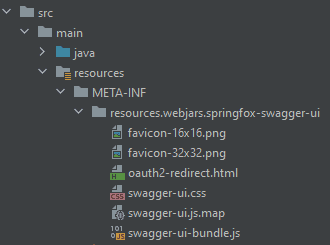
Swagger UI supports OpenID Connect Discovery since version 3.38.0 (Swagger Editor since version 3.14.8). Unfortunately, SpringFox in the current version 3.0.0 packages a Swagger UI 3.26.2. Therefore, if we want to include a Swagger UI of a newer version, we need to include it directly within our application using the same directory structure as SpringFox does to overshadow the SpringFox-packaged files:
Swagger UI从3.38.0版本开始支持OpenID Connect Discovery(Swagger编辑器从3.14.8版本开始)。不幸的是,SpringFox在当前的3.0.0版本中打包了一个Swagger UI 3.26.2。因此,如果我们想包含一个较新版本的Swagger UI,我们需要在我们的应用程序中直接包含它,使用与SpringFox相同的目录结构来掩盖SpringFox打包的文件。

SpringDoc 1.6.1 instead does not package a Swagger UI but declares a transitive dependency to the Swagger UI 4.1.3, so we won’t have any troubles with SpringDoc.
SpringDoc 1.6.1并没有打包Swagger UI,而是声明了对Swagger UI 4.1.3的横向依赖,因此我们不会对SpringDoc产生任何麻烦。
5. Conclusion
5.总结
In this article, we pointed out the possibilities to test REST services with Swagger UI in the case of using Keycloak as an IAM. The best solution is to use standards like OpenAPI, OAuth2, and OpenID Connect, which are all supported by the tools.
在这篇文章中,我们指出了在使用Keycloak作为IAM的情况下,用Swagger UI测试REST服务的可能性。最好的解决方案是使用像OpenAPI、OAuth2和OpenID Connect这样的标准,这些都是工具所支持的。
As always, all the code is available over on GitHub.
像往常一样,所有的代码都可以在GitHub上找到。