1. Overview
1.概述
In this tutorial, we’ll explain how we can add multiple source directories in the Maven-based Java project.
在本教程中,我们将介绍如何在基于Maven的Java项目中添加多个源代码目录。
2. Extra Source Directory
2.额外来源目录
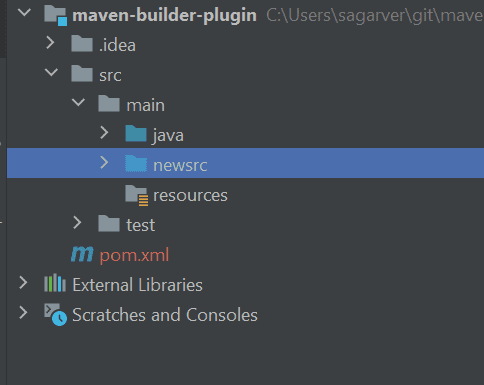
Let’s assume we need to add a /newsrc source directory inside src/main:
让我们假设我们需要在src/main内添加一个/newsrc源目录。
First, let’s create a simple Java class file DataConnection.java inside the src/main/newsrc/ folder:
首先,让我们在src/main/newsrc/文件夹下创建一个简单的Java类文件DataConnection.java。
public class DataConnection {

    public static String temp() {
        return "secondary source directory";
    }
}
After that, let’s create another class file in the src/main/java directory that is using our DataConnection class created in the other folder:
之后,让我们在src/main/java目录下创建另一个类文件,该文件使用我们在另一个文件夹中创建的DataConnection类。
public class MainApp {
    public static void main(String args[]){
        System.out.println(DataConnection.temp());
    }
}
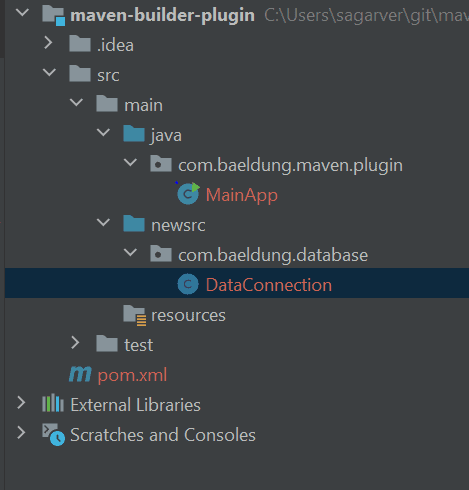
Before we try to compile our Maven project, let’s have a quick look at the project’s structure:
在我们尝试编译Maven项目之前,让我们先看看项目的结构。
Now, if we try to compile it, we’ll get a compilation error:
现在,如果我们试图编译它,我们会得到一个编译错误。
[ERROR] BuilderHelper/src/main/java/com/baeldung/maven/plugin/MainApp.java:[3,29] package com.baeldung.database does not exist
[ERROR] BuilderHelper/src/main/java/com/baeldung/database/MainApp.java:[9,28] cannot find symbol
[ERROR] symbol: variable DataConnection
[ERROR] location: class com.baeldung.MainApp
We can understand the root cause of the error message – we’ve defined the DataConnection class outside of the general project directory configuration.
我们可以理解错误信息的根本原因–我们在一般项目目录配置之外定义了DataConnection类。
Maven supports only one source folder by default. To configure more than one source directory, we’ll need to use a Maven plugin called build-helper-maven-plugin.
Maven默认只支持一个源文件夹。要配置一个以上的源文件夹,我们需要使用一个名为build-helper-maven-plugin的Maven插件。
3. Add Source Directory with build-helper-maven-plugin
3.用build-helper-maven-plugin添加源代码目录
We’ll use build-helper-maven-plugin to add a source directory in order to resolve the above error. This plugin helps us to achieve our goal with a minimum amount of configuration.
我们将使用build-helper-maven-plugin来添加一个源代码目录,以解决上述错误。这个插件可以帮助我们用最少的配置实现我们的目标。
Since we have a sibling directory next to the src/main folder, we’ll now add a second source directory:
由于我们在src/main文件夹旁边有一个兄弟目录,我们现在要添加第二个源代码目录。
  <build>
        <plugins>
            <plugin>
                <groupId>org.codehaus.mojo</groupId>
                <artifactId>build-helper-maven-plugin</artifactId>
                <version>3.2.0</version>
                <executions>
                    <execution>
                        <id>add-source</id>
                        <phase>generate-sources</phase>
                        <goals>
                            <goal>add-source</goal>
                        </goals>
                        <configuration>
                            <sources>
                                <source>src/main/newsrc/</source>
                            </sources>
                        </configuration>
                    </execution>
                </executions>
            </plugin>
        </plugins>
    </build>
Here, we’re running the add-source goal in the generate-sources phase. Also, we specified the source directory in a configuration.sources.source tag.
这里,我们在generate-sources阶段运行add-source目标。另外,我们在configuration.sources.source标签中指定了源目录。
As we know, Maven’s default lifecycle contains several phases prior to compilation: validate, initialize, generate-sources, process-sources, generate-resources, process-resources, and compile. So, here, we’re adding a new source directory before Maven compiles the source code.
正如我们所知,Maven的默认生命周期包含编译前的几个阶段。验证、初始化、生成资源、处理资源、生成资源、处理资源,以及编译。所以,在这里,我们要在Maven编译源代码之前添加一个新的源代码目录。
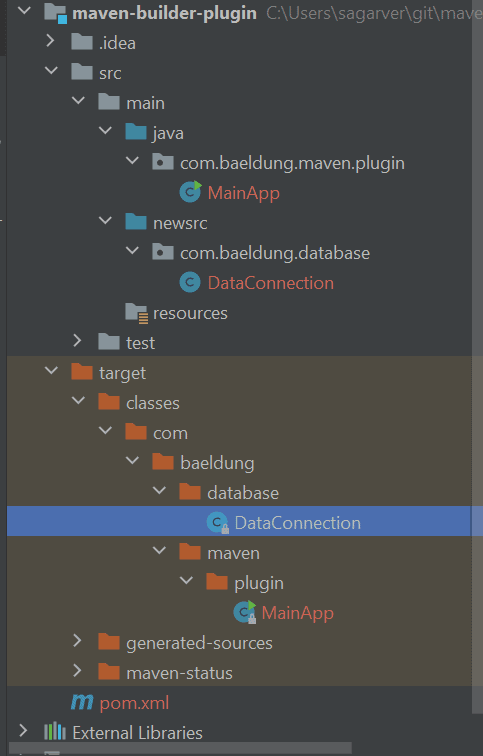
Now, we’ll compile the project, and then the build succeeds. After this, when we check the target folder, we’ll see that the plugin generates classes from both source directories:
现在,我们将编译该项目,然后构建成功。在这之后,当我们检查目标文件夹时,我们会看到该插件从两个源代码目录中生成了类。
We can find the latest version of this plugin on Maven Central. We’ve only added one source directory in our example, but the plugin allows us to add as many as we want.
我们可以在Maven Central上找到该插件的最新版本。在我们的例子中,我们只添加了一个源目录,但该插件允许我们添加任意数量的目录。
4. Conclusion
4.总结
In this tutorial, we’ve learned how we can add multiple source directories using build-helper-maven-plugin.
在本教程中,我们已经了解了如何使用build-helper-maven-plugin添加多个源目录。
As always, the full source code of the examples is available over on GitHub.
一如既往,这些示例的完整源代码可在GitHub上获得over。


