1. Overview
1.概述
The Eclipse IDE is one of the most common tools for Java application development. It comes with default settings that enable us to build and execute our code right away within the IDE.
Eclipse IDE是用于Java应用开发的最常用的工具之一。它自带的默认设置使我们能够在IDE中立即构建和执行我们的代码。
However, these default settings are sometimes not sufficient when we try to build using Maven in Eclipse. Consequently, we’ll encounter build errors.
然而,当我们试图在Eclipse中使用Maven进行构建时,这些默认设置有时是不够的。因此,我们会遇到构建错误。
In this quick tutorial, we’ll demonstrate the configuration changes we need to make so that we can build Maven-based Java projects within the IDE.
在这个快速教程中,我们将展示我们需要做的配置修改,以便我们能在IDE中构建基于Maven的Java项目。
2. Java Compilation in Eclipse
2.在Eclipse中进行Java编译
Before we start, let’s try to understand a little bit about the compilation process in Eclipse.
在我们开始之前,让我们试着了解一下Eclipse中的编译过程。
The Eclipse IDE comes bundled with its own Java compiler called Eclipse Compiler for Java (ECJ). This is an incremental compiler that can compile only the modified files instead of having to always compile the entire application.
Eclipse IDE捆绑了自己的Java编译器,称为Eclipse Compiler for Java(ECJ)。这是一个增量编译器,可以只编译修改过的文件,而不必总是编译整个应用程序。
This capability makes it possible for code changes that we make through the IDE to be compiled and checked for errors instantaneously as we type.
这种能力使我们通过集成开发环境所做的代码修改有可能在我们打字时被即时编译并检查出错误。
Due to the usage of Eclipse’s internal Java compiler, we don’t need to have a JDK installed in our system for Eclipse to work.
由于使用了Eclipse内部的Java编译器,我们不需要在系统中安装JDK就可以让Eclipse工作。
3. Compiling Maven Projects in Eclipse
3.在Eclipse中编译Maven项目
The Maven build tool helps us to automate our software build process, and Eclipse comes bundled with Maven as a plugin. However, Maven doesn’t come bundled with any Java compilers. Instead, it expects that we have the JDK installed.
Maven构建工具可以帮助我们实现软件构建过程的自动化,Eclipse作为一个插件捆绑了Maven。然而,Maven并没有捆绑任何Java编译器。相反,它希望我们能安装JDK。
To see what happens when we try to build a Maven project inside Eclipse, assuming that Eclipse has the default settings, let’s open any Maven project in Eclipse.
假设Eclipse有默认设置,让我们在Eclipse中打开任何Maven项目,看看在Eclipse中构建Maven项目时会发生什么。
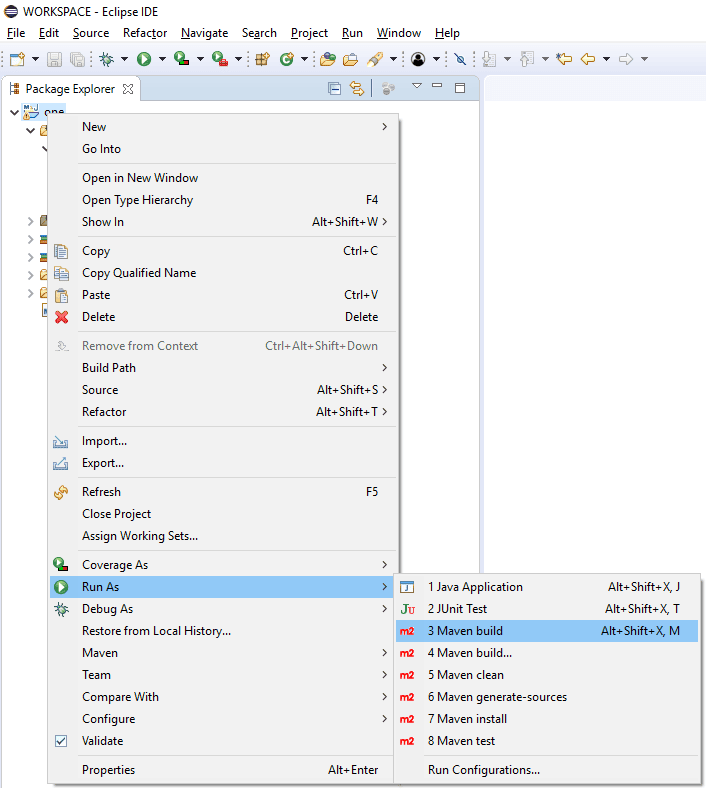
Then, from the Package Explorer window, let’s right-click on the project folder and then left-click on Run As > 3 Maven build:
然后,在包资源管理器窗口中,我们右键单击项目文件夹,然后左键单击Run As > 3 Maven build。
This will trigger the Maven build process. As expected, we’ll get a failure:
这将触发Maven的构建过程。正如预期的那样,我们会得到一个失败。
[INFO] BUILD FAILURE
[INFO] ------------------------------------------------------------------------
[ERROR] Failed to execute goal org.apache.maven.plugins:maven-compiler-plugin:3.8.0:compile
  (default-compile) on project one: Compilation failure
[ERROR] No compiler is provided in this environment. Perhaps you are running on a JRE rather than a JDK?
The error message indicates that Maven is unable to find the Java compiler, which comes only with a JDK and not with a JRE.
错误信息表明,Maven无法找到Java编译器,而Java编译器只随JDK而非JRE一起出现。
4. JDK Configuration in Eclipse
4.Eclipse中的JDK配置
Let’s now fix the Maven build issue in Eclipse.
现在让我们在Eclipse中修复Maven的构建问题。
First, we need to download the latest version of JDK and install it in our system.
首先,我们需要下载最新版本的JDK并将其安装到我们的系统中。
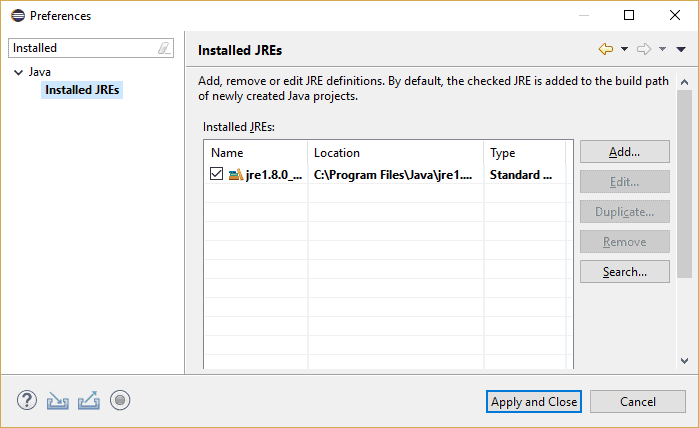
After that, let’s add the JDK as a runtime in Eclipse by navigating to Window > Preferences > Java > Installed JREs:
之后,让我们在Eclipse中通过导航到Window > Preferences > Java > Installed JREs,将JDK添加为运行时。
We can see that Eclipse already has Java configured. However, this is the JRE and not the JDK so let’s proceed with the next steps.
我们可以看到,Eclipse已经配置了Java。然而,这只是JRE,而不是JDK,所以让我们继续进行下一步。
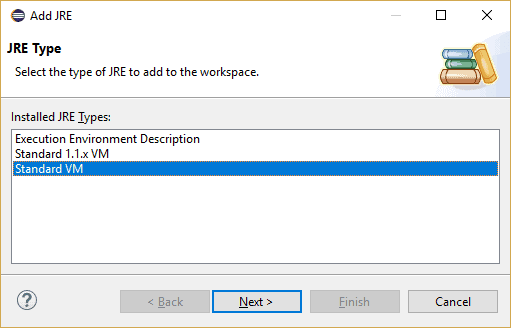
Now, let’s click on the Add… button to invoke the Add JRE wizard. This will ask us to select the type of JRE.
现在,让我们点击添加…按钮来调用添加JRE向导。这将要求我们选择JRE的类型。
Here, we’ve selected the default option, Standard VM:
这里,我们选择了默认选项,标准虚拟机。
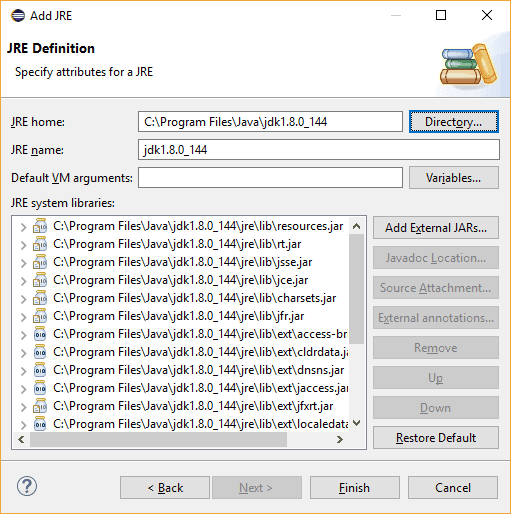
Clicking on Next will take us to the window where we’ll specify the location of the JRE home as the home directory of our JDK installation.
点击Next将带我们到一个窗口,在那里我们将指定JRE home的位置作为我们JDK安装的主目录。
Following this, the wizard will validate the path and fetch the other details:
在这之后,向导将验证路径并获取其他细节。
We can now click on Finish to close the wizard.
现在我们可以点击Finish来关闭向导。
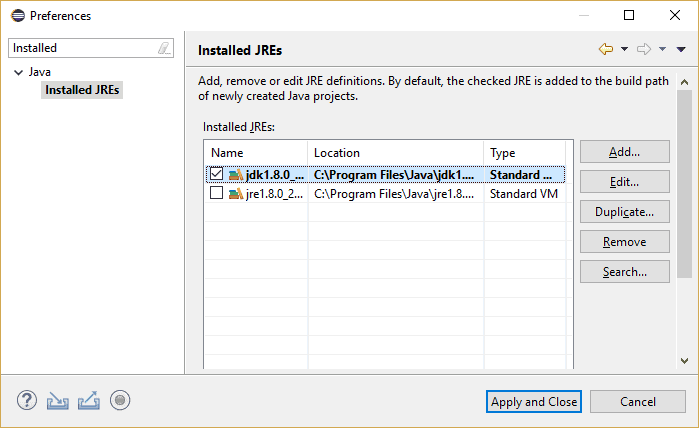
This will bring us back to the Installed JREs window, where we can see our newly added JDK and select it as our runtime in Eclipse:
这将使我们回到已安装的JREs窗口,在那里我们可以看到新添加的JDK,并选择它作为Eclipse中的运行时。
Let’s click on Apply and Close to save our changes.
让我们点击应用并关闭以保存我们的更改。
5. Testing the JDK Configuration
5.测试JDK配置
Let’s now trigger the Maven build one more time, in the same way as before.
现在让我们再触发一次Maven构建,方法与之前相同。
We can see that it’s successful:
我们可以看到,它是成功的。
[INFO] ------------------------------------------------------------------------
[INFO] BUILD SUCCESS
[INFO] ------------------------------------------------------------------------
6. Conclusion
6.结语
In this tutorial, we saw how we could configure Eclipse for Maven builds to work within the IDE.
在本教程中,我们看到了如何为Maven构建配置Eclipse,使其在IDE中工作。
By doing this one-time configuration, we’re able to leverage the IDE itself for our builds without having to set up Maven externally.
通过这种一次性配置,我们能够利用IDE本身进行构建,而不需要在外部设置Maven。
