1. Overview
1.概述
Nowadays, there are many JEE based frameworks like Spring, Play, and Grails available for web application development.
如今,有许多基于JEE的框架,如Spring、Play和Grails,可用于Web应用开发。
We may have our reasons to choose one of them over the others. However, our choice also depends on the use case and the problem we’re trying to solve.
我们可能有自己的理由选择其中一个而不是其他。然而,我们的选择也取决于用例和我们试图解决的问题。
In this introductory tutorial, we’ll explore the Ninja web framework and create a simple web application. At the same time, we’ll examine a few of the basic features that it provides.
在这个入门教程中,我们将探索Ninja网络框架并创建一个简单的网络应用。同时,我们将研究它所提供的一些基本功能。
2. Ninja
2.忍者
Ninja is a full-stack, yet lightweight, web framework that utilizes existing Java libraries to get the work done.
Ninja是一个全栈但轻量级的网络框架,利用现有的Java库来完成工作。
Having features from HTML to JSON rendering, persistence to testing, it is a one-stop solution for building scalable web applications.
它具有从HTML到JSON渲染、持久性到测试的功能,是构建可扩展网络应用的一站式解决方案。
It follows the convention-over-configuration paradigm and categorizes the code in packages like models, controllers, and services.
它遵循convention-over-configuration范式,将代码分为models、controllers和services等包。
Ninja uses popular Java libraries for key features like Jackson for JSON/XML rendering, Guice for dependency management, Hibernate for persistence, and Flyway for database migrations.
Ninja使用流行的Java库来实现关键功能,例如Jackson用于JSON/XML渲染,Guice用于依赖管理,Hibernate用于持久性,以及Flyway用于数据库迁移。
For rapid development, it offers SuperDevMode for hot reloading of the code. So, it allows us to see the changes instantly in the development environment.
为了快速开发,它提供了SuperDevMode,用于热重载代码。因此,它允许我们在开发环境中即时看到变化。
3. Setup
3.设置
Ninja requires a standard set of tools to create a web application:
忍者需要一套标准的工具来创建一个网络应用。
- Java 1.8 or later
- Maven 3 or later
- IDE (Eclipse or IntelliJ)
We’ll use a Maven archetype to set up the Ninja project quickly. It’ll prompt us to provide a group id, an artifact id, and a version number, followed by a project name:
我们将使用Maven原型来快速建立Ninja项目。它将提示我们提供一个组ID、一个工件ID和一个版本号,然后是一个项目名称。
mvn archetype:generate -DarchetypeGroupId=org.ninjaframework \
  -DarchetypeArtifactId=ninja-servlet-archetype-simple
Or, for an existing Maven project, we can add the latest ninja-core dependency to the pom.xml:
或者,对于现有的Maven项目,我们可以将最新的ninja-core依赖性添加到pom.xml。
<dependency>
    <groupId>org.ninjaframework</groupId>
    <artifactId>ninja-core</artifactId>
    <version>6.5.0</version>
</dependency>
Then, we’ll run the Maven command to compile the files for the first time:
然后,我们将运行Maven命令,首次编译这些文件。
mvn clean installLast, let’s run the app using a Ninja-provided Maven command:
最后,让我们用Ninja提供的Maven命令来运行该应用。
mvn ninja:runVoila! Our application is started and will be accessible at localhost:8080:

Voila!我们的应用程序已经启动,并将在localhost:8080:
访问。

4. Project Structure
4.项目结构
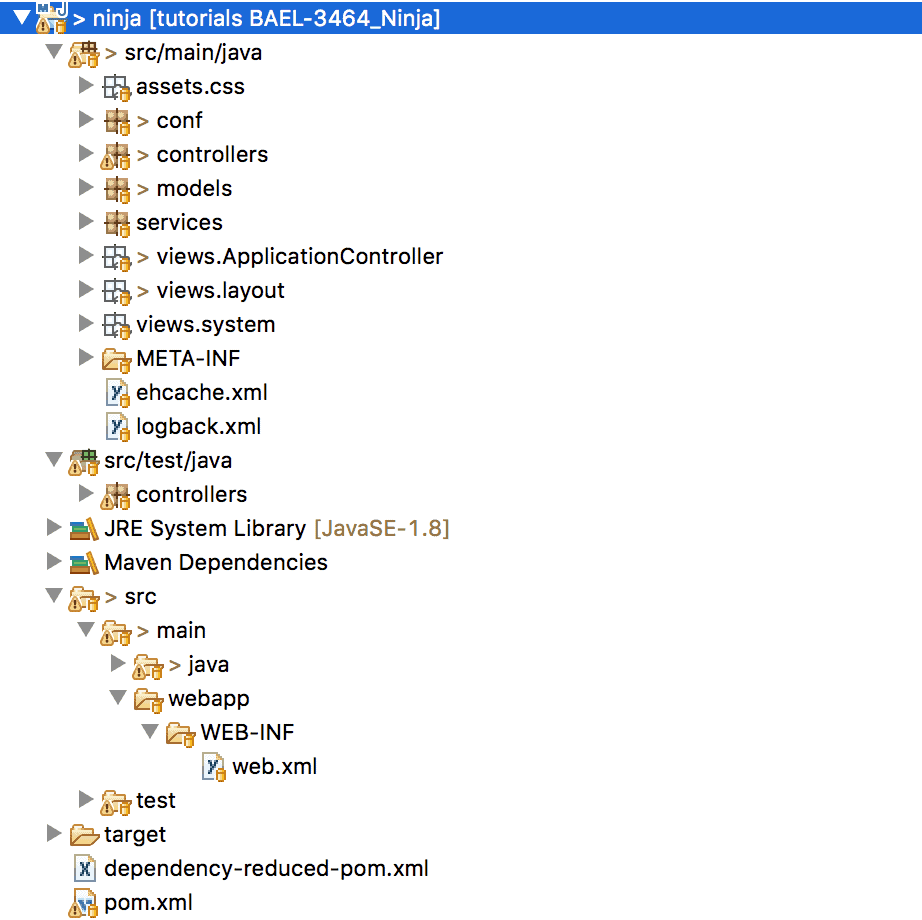
Let’s take a look at the Maven-like project structure created by Ninja:
我们来看看Ninja创建的类似Maven的项目结构。
 The framework creates a few packages based on conventions.
The Java classes are categorized under conf, controllers, models, and services directories in src/main/java.
Java类分为conf、controllers、models和services目录,在src/main/java.
下。
Likewise, src/test/java holds the corresponding unit test classes.
同样地,src/test/java存放相应的单元测试类。
The views directory under src/main/java contains the HTML files. And, the src/main/java/assets directory contains resources like images, stylesheets, and JavaScript files.
src/main/java下的views目录包含HTML文件。还有,src/main/java/assets目录包含了图片、样式表和JavaScript文件等资源。
5. Controller
5.控制器
We’re all set to discuss a few basic features of the framework. A controller is a class that receives a request and returns the response with specific results.
我们都准备好讨论框架的一些基本功能了。一个控制器是一个接收请求并返回特定结果的响应的类。
First, let’s discuss a few conventions to follow:
首先,让我们讨论一下要遵循的几个惯例。
- Create a class in the controllers package and suffix the name with Controller
- A method serving the request must return the object of the Result class
Let’s create the ApplicationController class with a simple method to render the HTML:
让我们创建ApplicationController类,用一个简单的方法来渲染HTML。
@Singleton
public class ApplicationController {
    public Result index() {
        return Results.html();
    }
}
Here, the index method will render an HTML by calling the html method of the Results class. The Result object holds everything that is required to render the content like response code, headers, and cookies.
在这里,index方法将通过调用html类的Results方法渲染一个HTML。Result对象持有渲染内容所需的一切,如响应代码、头文件和cookies。
Note: Guice’s @Singleton annotation allows only one instance of the controller throughout the app.
注意:Guice的@Singleton注解只允许整个应用程序中有一个控制器的实例。
6. View
6.查看
For the index method, Ninja will look for the HTML file – index.ftl.html under the views/ApplicationController directory.
对于index方法,Ninja将在views/ApplicationController目录下寻找HTML文件 – index.ftl.html。
Ninja uses the Freemarker template engine for HTML rendering. So, all the files under views should have the .ftl.html extension.
Ninja使用Freemarker模板引擎进行HTML渲染。所以,views下的所有文件都应该有.ftl.html扩展名。
Let’s create the index.ftl.html file for the index method:
让我们创建index.ftl.html文件,用于index方法。
<html>
<head>
    <title>Ninja: Index</title>
</head>
<body>
    <h1>${i18n("helloMsg")}</h1>
    <a href="/userJson">User Json</a>
</body>
</html>
Here, we’ve used the Ninja-provided i18n tag to get the helloMsg property from the message.properties file. We’ll discuss this further in the internationalization section later on.
在这里,我们使用了Ninja提供的i18n标签,从message.properties文件中获取helloMsg属性。我们将在后面的国际化部分进一步讨论这个问题。
7. Route
7.路
Next, we’ll define the route for the request to reach the index method.
接下来,我们将定义请求到达index方法的路径。
Ninja uses the Routes class in the conf package to map a URL to a particular method of the controller.
Ninja使用conf包中的Routes类,将URL映射到控制器的特定方法。
Let’s add a route to access the index method of the ApplicationController:
让我们添加一个路由来访问ApplicationController的index方法。
public class Routes implements ApplicationRoutes {
    @Override
    public void init(Router router) {
        router.GET().route("/index").with(ApplicationController::index);
    }
}
That’s it! We’re all set to access the index page at localhost:8080/index:

这就是了!我们已经准备好访问index页面,地址是localhost:8080/index:

8. JSON Rendering
8.JSON 渲染
As already discussed, Ninja uses Jackson for JSON rendering. To render JSON content, we can use the json method of the Results class.
正如已经讨论过的,Ninja使用Jackson来渲染JSON。要渲染JSON内容,我们可以使用json类的Results方法。
Let’s add the userJson method in the ApplicationController class and render the content of a simple HashMap in JSON:
让我们在ApplicationController类中添加userJson方法,以JSON格式渲染一个简单的HashMap的内容。
public Result userJson() {
    HashMap<String, String> userMap = new HashMap<>();
    userMap.put("name", "Norman Lewis");
    userMap.put("email", "norman@email.com");
    return Results.json().render(user);
}
Then, we’ll add the required routing to access the userJson:
然后,我们将添加必要的路由来访问userJson。
router.GET().route("/userJson").with(ApplicationController::userJson);Now, we can render JSON using localhost:8080/userJson:

现在,我们可以使用 localhost:8080/userJson渲染JSON:

9. Service
9.服务
We can create a service to keep the business logic separate from the controller and inject our service wherever required.
我们可以创建一个服务,将业务逻辑与控制器分开,并在需要的地方注入我们的服务。
First, let’s create a simple UserService interface to define the abstraction:
首先,让我们创建一个简单的UserService接口来定义这个抽象概念。
public interface UserService {
    HashMap<String, String> getUserMap();
}
Then, we’ll implement the UserService interface in the UserServiceImpl class and override the getUserMap method:
然后,我们将在UserServiceImpl类中实现UserService接口,并重写getUserMap方法。
public class UserServiceImpl implements UserService {
    @Override
    public HashMap<String, String> getUserMap() {
        HashMap<String, String> userMap = new HashMap<>();
        userMap.put("name", "Norman Lewis");
        userMap.put("email", "norman@email.com");
        return userMap;
    }
}
Then, we’ll bind the UserService interface with the UserServiceImpl class using Ninja’s dependency injection feature provided by Guice.
然后,我们将使用Ninja的Guice提供的依赖注入功能,将UserService接口与UserServiceImpl类绑定。
Let’s add the binding in the Module class available in the conf package:
让我们在conf包中可用的Module类中添加绑定。
@Singleton
public class Module extends AbstractModule {
    protected void configure() {
        bind(UserService.class).to(UserServiceImpl.class);
    }
}
Last, we’ll inject the UserService dependency in the ApplicationController class using the @Inject annotation:
最后,我们将使用@Inject注解在ApplicationController类中注入UserService依赖项。
public class ApplicationController {
    @Inject
    UserService userService;

    // ...
}
Thus, we’re all set to use the UserService‘s getUserMap method in the ApplicationController:
这样,我们就可以在ApplicationController中使用UserService的getUserMap方法。
public Result userJson() {
    HashMap<String, String> userMap = userService.getUserMap();
    return Results.json().render(userMap);
}
10. Flash Scope
10.闪光范围
Ninja provides a simple yet efficient way to handle success and error messages from requests through its feature called Flash Scope.
Ninja提供了一个简单而有效的方法,通过其称为Flash Scope的功能来处理来自请求的成功和错误信息。
To use it in the controller, we’ll add the FlashScope argument to the method:
为了在控制器中使用它,我们将向该方法添加FlashScope参数。
public Result showFlashMsg(FlashScope flashScope) {
    flashScope.success("Success message");
    flashScope.error("Error message");
    return Results.redirect("/home");
}
Note: The redirect method of the Results class redirects the target to the provided URL.
注意:Results类的redirect方法将目标重定向到提供的URL。
Then, we’ll add a routing /flash to the showFlashMsg method and modify the view to show the flash messages:
然后,我们将在showFlashMsg方法中添加一个路由/flash,并修改视图以显示Flash信息。
<#if (flash.error)??>
    <div class="alert alert-danger">
        ${flash.error}
    </div>
</#if>
<#if (flash.success)??>
    <div class="alert alert-success">
        ${flash.success}
    </div>
</#if>
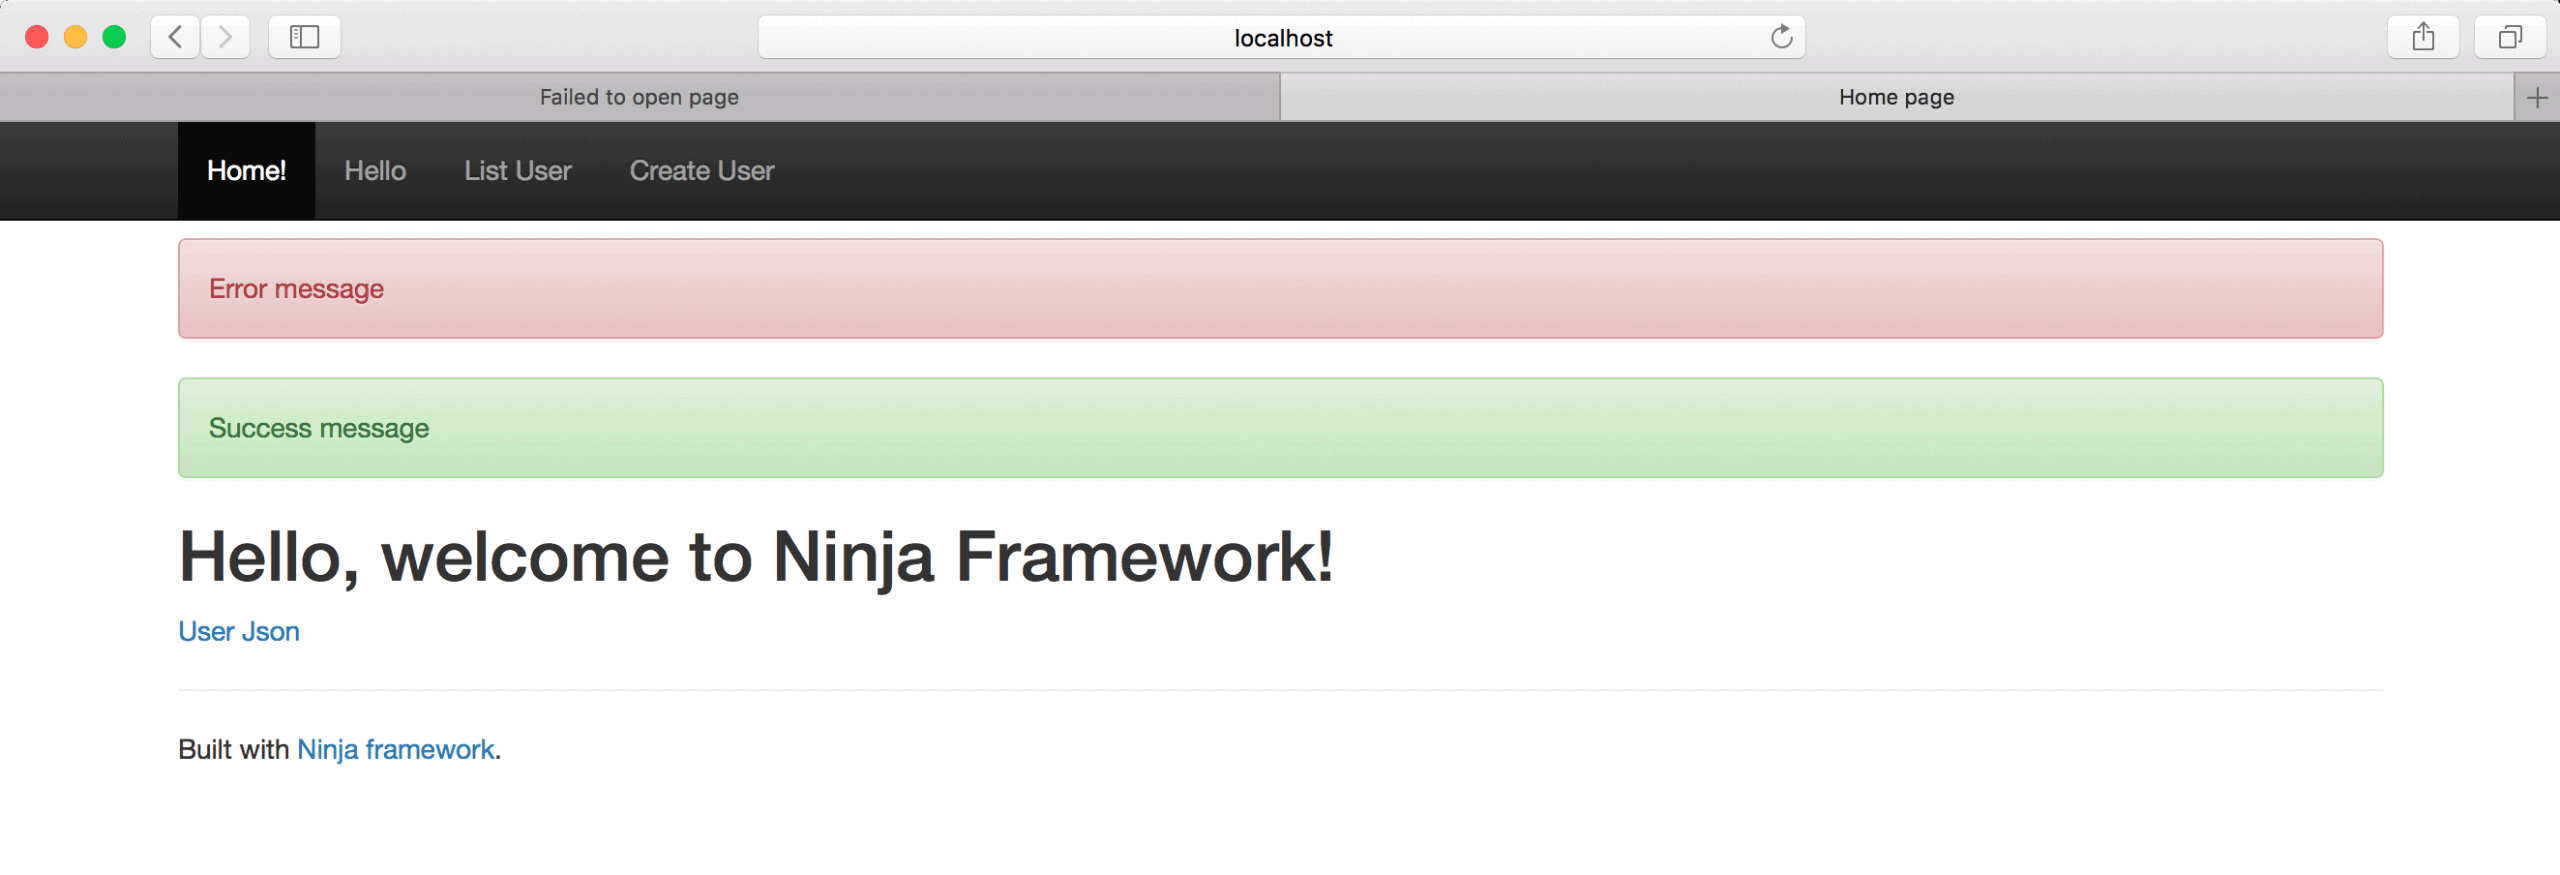
Now, we can see the FlashScope in action at localhost:8080/flash:
现在,我们可以看到FlashScope在localhost:8080/flash上运行。
11. Internationalization
11.国际化
Ninja provides a built-in internationalization feature that is easy to configure.
忍者提供了一个内置的国际化功能,很容易配置。
First, we’ll define the list of supported languages in the application.conf file:
首先,我们将在 application.conf文件中定义支持的语言列表。
application.languages=fr,enThen, we’ll create the default properties file – messages.properties for English – with key-value pairs for messages:
然后,我们将创建默认的属性文件–messages.properties(英文)–包含消息的键值对。
header.home=Home!
helloMsg=Hello, welcome to Ninja Framework!
Similarly, we can add the language code in the file name for a language-specific properties file — for instance, message_fr.properties file for French:
同样地,我们可以在文件名中添加语言代码,以获得特定语言的属性文件–例如,message_fr.properties文件用于法语。
header.home=Accueil!
helloMsg=Bonjour, bienvenue dans Ninja Framework!
Once the configurations are ready, we can easily enable internationalization in the ApplicationController class.
一旦配置准备好了,我们就可以轻松地在ApplicationController类中启用国际化。
We’ve got two ways, either by using the Lang class or the Messages class:
我们有两种方法,要么使用Lang类,要么使用Messages类。
@Singleton
public class ApplicationController {
    @Inject
    Lang lang;

    @Inject
    Messages msg;

    // ...
}
Then, using the Lang class, we can set the language of the result:
然后,使用Lang类,我们可以设置结果的语言。
Result result = Results.html();
lang.setLanguage("fr", result);
Similarly, using the Messages class, we can get a language-specific message:
同样地,使用Messages类,我们可以得到一个特定语言的消息。
Optional<String> language = Optional.of("fr");
String helloMsg = msg.get("helloMsg", language).get();
12. Persistence
12.坚持不懈
Ninja supports JPA 2.0 and utilizes Hibernate to enable persistence in the web application. Also, it offers built-in H2 database support for rapid development.
Ninja支持JPA 2.0并利用Hibernate来实现Web应用程序的持久性。此外,它还提供了内置的H2数据库支持,以便快速开发。
12.1. Model
12.1. 模型
We require an Entity class to connect with a table in the database. For this, Ninja follows the convention of looking for the entity classes in the models package. So, we’ll create the User entity class there:
我们需要一个Entity类来连接到数据库中的表。为此,Ninja遵循惯例,在models包中寻找实体类。因此,我们将在那里创建User实体类。
@Entity
public class User {
    @Id
    @GeneratedValue(strategy=GenerationType.AUTO)
    Long id;
    public String firstName;
    public String email;
}
Then, we’ll configure Hibernate and set the details for the database connection.
然后,我们将配置Hibernate并设置数据库连接的细节。
12.2. Configuration
12.2.配置
For Hibernate configuration, Ninja expects the persistence.xml file to be in the src/main/java/META-INF directory:
对于Hibernate配置,Ninja希望persistence.xml文件在src/main/java/META-INF目录中。
<?xml version="1.0" encoding="UTF-8"?>
<persistence xmlns="http://java.sun.com/xml/ns/persistence"
  xmlns:xsi="http://www.w3.org/2001/XMLSchema-instance"
  xsi:schemaLocation="http://java.sun.com/xml/ns/persistence/persistence_2_0.xsd"
  version="2.0">

    <!-- Database settings for development -->
    <persistence-unit name="dev_unit"
      transaction-type="RESOURCE_LOCAL">
        <provider>org.hibernate.jpa.HibernatePersistenceProvider</provider>
        <properties>
            <property name="hibernate.connection.driver_class" value="org.h2.Driver" />
            <property name="hibernate.dialect" value="org.hibernate.dialect.H2Dialect" />
            <property name="hibernate.show_sql" value="true" />
            <property name="hibernate.format_sql" value="true" />
            <property name="hibernate.hbm2ddl.auto" value="update" />
            <property name="hibernate.connection.autocommit" value="true" />
        </properties>
    </persistence-unit>
</persistence>
Then, we’ll add the database connection details to application.conf:
然后,我们将数据库连接细节添加到application.conf。
ninja.jpa.persistence_unit_name=dev_unit
db.connection.url=jdbc:h2:./devDb
db.connection.username=sa
db.connection.password=
12.3. EntityManager
12.3.EntityManager
Last, we’ll inject the instance of the EntityManager in the ApplicationController using Guice’s Provider class:
最后,我们将使用Guice的EntityManager类将ApplicationController的实例注入。
public class ApplicationController {
    @Inject
    Provider<EntityManager> entityManagerProvider;

    // ...
}
So, we’re ready to use the EntityManager to persist the User object:
因此,我们准备使用EntityManager来持久化User对象。
@Transactional
public Result insertUser(User user) {
    EntityManager entityManager = entityManagerProvider.get();
    entityManager.persist(user);
    entityManager.flush();
    return Results.redirect("/home");
}
Similarly, we can use the EntityManager to read the User object from the DB:
同样地,我们可以使用EntityManager来从DB中读取User对象。
@UnitOfWork
public Result fetchUsers() {
    EntityManager entityManager = entityManagerProvider.get();
    Query q = entityManager.createQuery("SELECT x FROM User x");
    List<User> users = (List<User>) q.getResultList();
    return Results.json().render(users);
}
Here, Ninja’s @UnitOfWork annotation will handle everything about the database connections without dealing with transactions. Hence, it can prove handy for read-only queries, where we usually don’t require transactions.
在这里,Ninja的@UnitOfWork注解将处理关于数据库连接的一切,而不需要处理事务。因此,它可以证明对只读查询很方便,我们通常不需要事务。
13. Validation
13.审定
Ninja provides built-in support for bean validations by following the JSR303 specifications.
Ninja通过遵循JSR303规范为bean验证提供了内置支持。
Let’s examine the feature by annotating a property in the User entity with the @NotNull annotation:
让我们通过用@NotNull注解对User实体中的一个属性进行检查。
public class User {
    // ...

    @NotNull
    public String firstName;
}
Then, we’ll modify the already discussed insertUser method in the ApplicationController to enable the validation:
然后,我们将修改已经讨论过的insertUser方法,在ApplicationController中启用验证。
@Transactional
public Result insertUser(FlashScope flashScope, @JSR303Validation User user, Validation validation) {
    if (validation.getViolations().size() > 0) {
        flashScope.error("Validation Error: User can't be created");
    } else {
        EntityManager entityManager = entitiyManagerProvider.get();
        entityManager.persist(user);
        entityManager.flush();
        flashScope.success("User '" + user + "' is created successfully");
    }
    return Results.redirect("/home");
}
We’ve used Ninja’s @JSR303Validation annotation to enable the validation of the User object. Then, we’ve added the Validation argument to work with validations through methods like hasViolations, getViolations, and addViolation.
我们使用Ninja的@JSR303Validation注解来启用User对象的验证。然后,我们添加了Validation参数,以通过hasViolations、getViolations和addViolation.等方法与验证进行协作。
Last, the FlashScope object is used to show the validation error on the screen.
最后,FlashScope对象被用来在屏幕上显示验证错误。
Note: Ninja follows the JSR303 specifications for bean validations. However, the JSR380 specification (Bean Validation 2.0) is the new standard.
注意:Ninja遵循JSR303关于bean验证的规范。然而,JSR380规范(Bean Validation 2.0)是新标准。
14. Conclusion
14.结语
In this article, we explored the Ninja web framework — a full-stack framework that provides handy features using popular Java libraries.
在这篇文章中,我们探讨了Ninja网络框架–一个全栈框架,利用流行的Java库提供方便的功能。
To begin with, we created a simple web application using controllers, models, and services. Then, we enabled JPA support in the app for persistence.
首先,我们使用控制器、模型和服务创建了一个简单的Web应用程序。然后,我们在应用程序中启用了JPA支持以实现持久性。
At the same time, we saw a few basic features like Routes, JSON rendering, Internationalization, and Flash Scopes.
同时,我们看到了一些基本的功能,如路由、JSON渲染、国际化和Flash作用域。
Last, we explored the validation support provided by the framework.
最后,我们探讨了该框架所提供的验证支持。
As usual, all the code implementations are available over on GitHub.
像往常一样,所有的代码实现都可以在GitHub上找到,。
