1. Overview
1.概述
OpenAPI is a language-agnostic and platform-independent specification that standardizes the REST APIs. OpenAPI makes it easy for the users to understand the APIs without dwelling deep into the code. Swagger-UI generates a visual document from this OpenAPI specification that helps visualize and test the REST APIs.
OpenAPI是一种语言无关、平台无关的规范,它对REST API进行了标准化。OpenAPI使用户能够轻松地理解API,而无需深入研究代码。Swagger-UI从这个OpenAPI规范中生成一个可视化文档,帮助可视化和测试REST API。
In this tutorial, let’s learn how to generate OpenAPI documentation, test REST APIs, and configure JWT authentication for our OpenAPI using Springdoc-OpenAPI in a Spring Boot application.
在本教程中,我们将学习如何在JWT应用程序中使用Springdoc-OpenAPI生成OpenAPI文档,测试REST API,并为我们的OpenAPI配置Spring Boot验证。
2. Swagger-UI
2.Swagger UI
Swagger-UI, a collection of HTML, Javascript, and CSS files, generates a user interface based on the OpenAPI specification. Let’s use the Springdoc-OpenAPI library to automate the generation of OpenAPI documents for the REST APIs and use Swagger-UI to visualize these APIs.
Swagger-UI是一个HTML、Javascript和CSS文件的集合,可以根据OpenAPI规范生成一个用户界面。让我们使用Springdoc-OpenAPI库来自动生成REST API的OpenAPI文档,并使用Swagger-UI来可视化这些API。
Writing an OpenAPI document specification can be challenging when the number of APIs in an application keep increasing. Springdoc-OpenAPI helps us to auto-generate the OpenAPI document. Further, let’s try to use this library and generate the OpenAPI document.
当应用程序中的API数量不断增加时,编写OpenAPI文档规范可能是一个挑战。Springdoc-OpenAPI可以帮助我们自动生成OpenAPI文档。此外,让我们尝试使用这个库并生成OpenAPI文档。
2.1. Dependencies
2.1. 依赖性
Straightaway, let’s start by adding Springdoc-OpenAPI dependencies:
直接,让我们开始添加Springdoc-OpenAPI依赖项。
<dependency>
    <groupId>org.springdoc</groupId>
    <artifactId>springdoc-openapi-ui</artifactId>
    <version>1.6.9</version>
</dependency>
This dependency also adds Swagger-UI web-jars to our Spring Boot application.
这个依赖关系还为我们的Spring Boot应用程序添加了Swagger-UI的web-jars。
2.2. Configuration
2.2.配置
Next, let’s start the application and hit the URL http://localhost:8080/swagger-ui.html in the browser.
接下来,让我们启动应用程序,在浏览器中点击URL http://localhost:8080/swagger-ui.html 。
As a result, we get the Swagger-UI page:
结果是,我们得到了Swagger-UI页面。
Similarly, the OpenAPI v3.0 document will be available at http://localhost:8080/v3/api-docs.
类似地,OpenAPI v3.0文件将在http://localhost:8080/v3/api-docs.上提供。
Additionally, let’s add descriptions, terms of service, and other meta-information for our User APIs using @OpenAPIDefinition:
此外,让我们使用@OpenAPIDefinition为我们的User APIs添加描述、服务条款和其他元信息。
@Configuration
@OpenAPIDefinition(
  info =@Info(
    title = "User API",
    version = "${api.version}",
    contact = @Contact(
      name = "Baeldung", email = "user-apis@baeldung.com", url = "https://www.baeldung.com"
    ),
    license = @License(
      name = "Apache 2.0", url = "https://www.apache.org/licenses/LICENSE-2.0"
    ),
    termsOfService = "${tos.uri}",
    description = "${api.description}"
  ),
  servers = @Server(
    url = "${api.server.url}",
    description = "Production"
  )
)
public class OpenAPISecurityConfiguration {}
Also, we can externalize the configurations and meta-information. For example, define api.version, tos.uri, and api.description in the application.properties or application.yaml file.
此外,我们还可以外部化配置和元信息。例如,在application.properties或application.yaml文件中定义api.version、tos.uri和api.description。
2.3. Test
2.3 测试
Finally, let’s test the Swagger-UI and check the OpenAPI documentation.
最后,让我们测试一下Swagger-UI并检查一下OpenAPI文档。
For this, start the application and open the URL http://localhost:8080/swagger-ui/index.html for the Swagger-UI:
为此,启动应用程序并打开Swagger-UI的URL http://localhost:8080/swagger-ui/index.html。
Similarly, the OpenAPI document will be available at http://localhost:8080/v3/api-docs:
同样,OpenAPI文件将在http://localhost:8080/v3/api-docs上提供。
{
    "openapi": "3.0.1",
    "info": {
      "title": "User API",
      "termsOfService": "terms-of-service",
     ...
     ...
}
3. JWT Authentication
3.JWT认证
Springdoc-OpenAPI generates the documentation based on our application REST APIs. Additionally, this documentation can be customized using the Springdoc-OpenAPI annotations.
Springdoc-OpenAPI基于我们的应用程序REST API生成文档。此外,可以使用Springdoc-OpenAPI注释来定制该文档。
In this section, let’s learn to configure the JWT-based authentication for our OpenAPIs.
在这一节中,让我们学习如何为我们的OpenAPI配置基于JWT的认证。
We can configure the JWT authentication for OpenAPI per operation, class, or global level.
我们可以在每个操作、类或全局层面为OpenAPI配置JWT认证。
3.1. Per-Operation Configuration
3.1.每个操作的配置
To begin with, let’s declare JWT authentication only for specific operations. Let’s define this configuration:
首先,让我们声明JWT认证只用于特定的操作。让我们来定义这个配置。
@Configuration
@SecurityScheme(
  name = "Bearer Authentication",
  type = SecuritySchemeType.HTTP,
  bearerFormat = "JWT",
  scheme = "bearer"
)
public class OpenAPI30Configuration {}
@SecurityScheme annotation adds the securitySchemes to the components section of the OneAPI Specification. @SecurityScheme defines a security mechanism that can be used by our APIs. The supported security schemes are APIKey, HTTP Authentication (Basic and Bearer), OAuth2, and OpenID Connect. In this case, let’s use HTTP Bearer Authentication as our security scheme.
@SecurityScheme注解将securitySchemes添加到 OneAPI 规范的 components 部分。@SecurityScheme定义了可由我们的 API 使用的安全机制。支持的安全机制有APIKey、HTTP认证(基本和承载)、OAuth2和OpenID连接。在这种情况下,让我们使用HTTP承载认证作为我们的安全方案。
For HTTP Bearer token-based authentication, we need to choose the security scheme as bearerAuth and bearer format as JWT.
对于基于HTTP承载令牌的认证,我们需要选择安全方案为bearerAuth,承载格式为JWT.。
Since we like to protect only a specific operation, we need to specify the operation that requires authentication. For operation-level authentication, we should use the @SecurityRequirement annotation on the operation:
由于我们喜欢只保护一个特定的操作,我们需要指定需要认证的操作。对于操作级认证,我们应该在操作上使用@SecurityRequirement注解。
@Operation(summary = "Delete user", description = "Delete user")
@SecurityRequirement(name = "Bearer Authentication")
@DeleteMapping
description = "A JWT token is required to access this API...",
public String deleteUser(Authentication authentication) {}
With these configurations in place, let’s redeploy the application and hit the URL http://localhost:8080/swagger-ui.html:
有了这些配置,让我们重新部署应用程序并点击URL http://localhost:8080/swagger-ui.html。
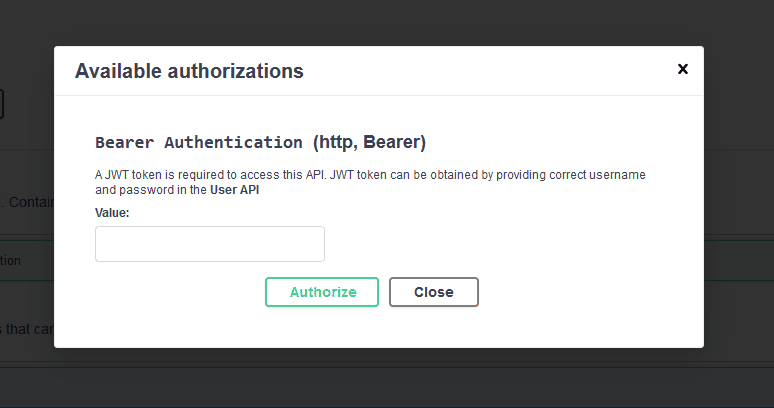
Clicking on the  icon opens a login dialog for the user to provide an access token to invoke the operation:
点击 图标会打开一个登录对话框,让用户提供访问令牌以调用该操作。
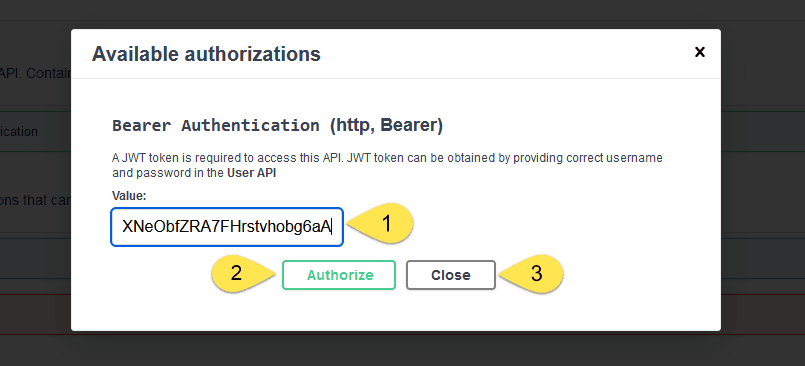
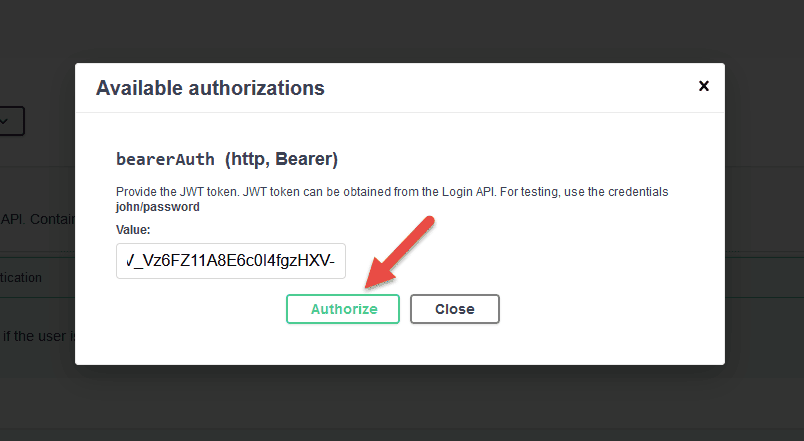
For this example, a JWT token can be obtained by providing john/password or jane/password to the authentication API. Once we get the JWT token, we can pass it in the value textbox and click on Authorize button and then the Close button:
在这个例子中,可以通过向authentication API提供john/password或jane/password来获得JWT令牌。一旦我们得到JWT令牌,我们可以把它传到value文本框中,然后点击Authorize按钮,然后点击Close按钮。
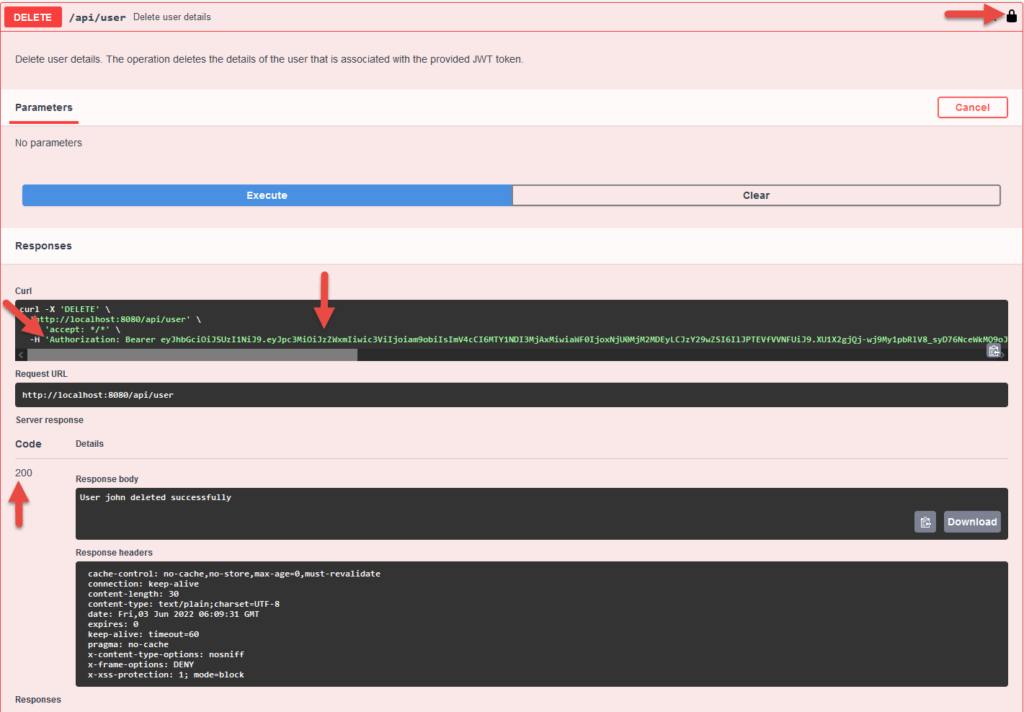
With the JWT token in place, let’s invoke the deleteUser API:
有了JWT令牌,我们来调用deleteUser API。
As a result, we see the operation will be provided with a JWT token as indicated by the  icon, and Swagger-UI provides this token as an HTTP Bearer in the Authorization header. Finally, with this configuration in place, we can successfully invoke the protected deleteUser API.
因此,我们看到该操作将提供一个JWT令牌,正如 a>icon,并且Swagger-UI在Authorization头中提供该令牌作为HTTP承载器。最后,有了这个配置,我们可以成功地调用受保护的deleteUser API。
So far, we have configured an operation-level security configuration. Likewise, let’s check the OpenAPI JWT security class and global configurations.
到目前为止,我们已经配置了一个操作级别的安全配置。同样地,让我们检查一下OpenAPI JWT安全类和全局配置。
3.2. Class Level Configuration
3.2.类级配置
Similarly, we can provide OpenAPI authentication to all the operations in a class. Declare the @SecurityRequirement annotation on the class that contains all APIs. Doing so will provide authentication to all the APIs in that particular class:
同样地,我们可以为一个类中的所有操作提供OpenAPI认证。在包含所有API的类上声明@SecurityRequirementannotation。这样做将为该特定类中的所有API提供认证。
@RequestMapping("/api/user")
@RestController
@SecurityRequirement(name = "bearerAuth")
@Tag(name = "User", description = "The User API. Contains all the operations that can be performed on a user.")
public class UserApi {}
Consequently, this configuration enables the security of all the operations in the class UserApi. As a result, assuming that the class has two operations, the Swagger-UI looks like this:
因此,这个配置使UserApi类中的所有操作都具有安全性。因此,假设该类有两个操作,Swagger-UI看起来像这样。
3.3. Global Configuration
3.3.全局配置
Typically, we prefer to keep the OpenAPI authentication to all the APIs in an application. For these situations, we can declare the security at a global level using Spring @Bean annotation:
通常情况下,我们倾向于将OpenAPI认证保留给应用程序中的所有API。对于这些情况,我们可以使用Spring @Bean annotation在全局层面上声明安全性。
@Configuration
public class OpenAPI30Configuration {
@Bean
public OpenAPI customizeOpenAPI() {
    final String securitySchemeName = "bearerAuth";
    return new OpenAPI()
      .addSecurityItem(new SecurityRequirement()
        .addList(securitySchemeName))
      .components(new Components()
        .addSecuritySchemes(securitySchemeName, new SecurityScheme()
          .name(securitySchemeName)
          .type(SecurityScheme.Type.HTTP)
          .scheme("bearer")
          .bearerFormat("JWT")));
    }
}
With this global configuration, the Springdoc-OpenAPI configures JWT authentication to all the OpenAPIs in the application:
通过这个全局配置,Springdoc-OpenAPI将JWT认证配置给应用程序中的所有OpenAPI。
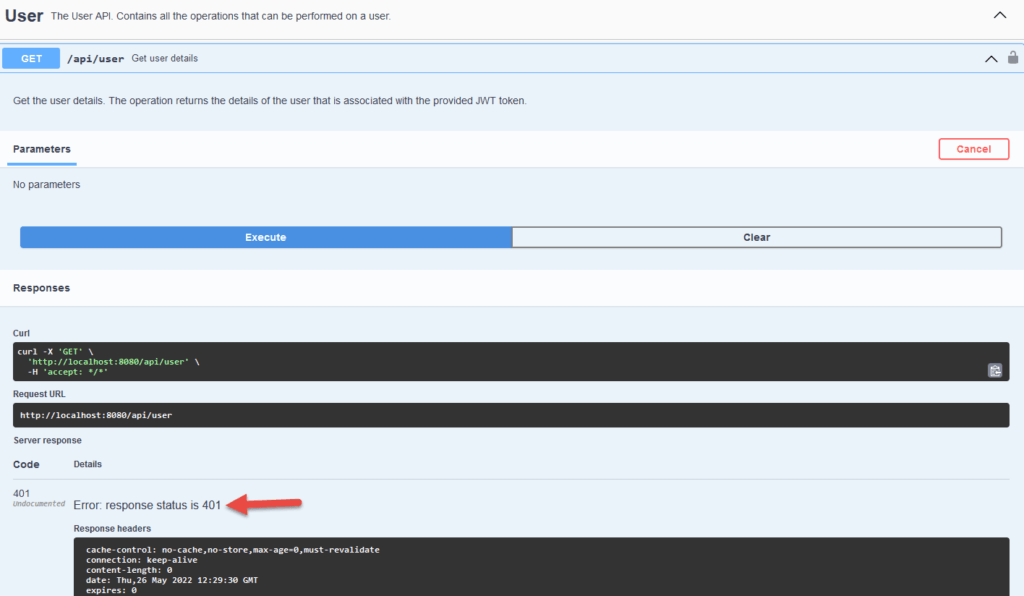
Let’s try to invoke the GET API:
让我们试着调用GET API。
Eventually, we get HTTP 401 Unauthorized. The API is secured, and we haven’t provided the JWT token. Next, let’s provide the JWT token and check the behavior.
最终,我们得到HTTP 401 Unauthorized. API是安全的,而我们没有提供JWT令牌。接下来,让我们提供JWT令牌,并检查其行为。
Click on Authorize button and provide the JWT token to invoke the operations. We can obtain the bearer token from the authentication API available in the swagger console:
点击Authorize 按钮,并提供JWT令牌以调用这些操作。我们可以从swagger控制台提供的认证API中获得承载令牌。
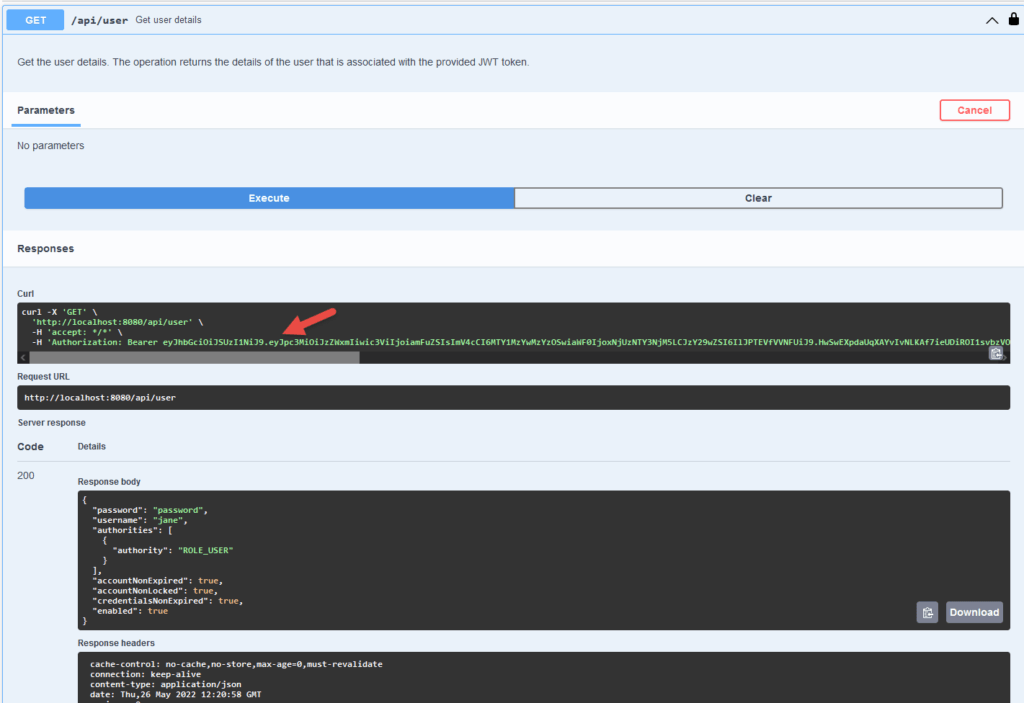
Finally, with the JWT token configured, let’s reinvoke the API:
最后,在配置了JWT令牌之后,让我们重新启用API。
At this point, with the correct JWT token, we can invoke our secured APIs successfully.
在这一点上,有了正确的JWT令牌,我们可以成功地调用我们的安全API。
4. Conclusion
4.总结
In this tutorial, we learned how to configure JWT authentication to our OpenAPIs. Swagger-UI provides a tool to document and test the REST APIs based on OneAPI specification. The Swaggerdoc-OpenAPI tool helps us generate this specification based on the REST APIs that are part of our Spring Boot application.
在本教程中,我们学习了如何为我们的OpenAPI配置JWT认证。Swagger-UI提供了一个工具来记录和测试基于OneAPI规范的REST APIs。Swaggerdoc-OpenAPI工具可以帮助我们根据Spring Boot应用程序中的REST API生成该规范。
As always, the complete source code is available over on GitHub.
一如既往,完整的源代码可在GitHub上获得,。


