1. Introduction
1.绪论
In this tutorial, we’ll start with a quick review of OAuth 2.0, OpenID, and Keycloak. Then we’ll learn about the Keycloak REST APIs and how to call them in Postman.
在本教程中,我们将首先快速回顾一下OAuth 2.0、OpenID和Keycloak。然后,我们将了解Keycloak的REST APIs以及如何在Postman中调用它们。
2. OAuth 2.0
2.2.OAuth 2.0
OAuth 2.0 is an authorization framework that lets an authenticated user grant access to third parties via tokens. A token is usually limited to some scopes with a limited lifetime. Therefore, it’s a safe alternative to the user’s credentials.
OAuth 2.0是一个授权框架,允许经过认证的用户通过令牌向第三方授予访问权。令牌通常被限制在一些范围内,并有有限的使用寿命。因此,它是用户凭证的一个安全替代方案。
OAuth 2.0 comes with four main components:
OAuth 2.0有四个主要组成部分。
- Resource Owner – the end-user or system that owns a protected resource or data
- Resource Server – the service exposes a protected resource, usually through an HTTP-based API
- Client – calls the protected resource on behalf of the resource owner
- Authorization Server – issues an OAuth 2.0 token and delivers it to the client after authenticating the resource owner
OAuth 2.0 is a protocol with some standard flows, but we’re especially interested in the authorization server component here.
OAuth 2.0是一个具有一些标准流程的协议,但我们在这里对授权服务器组件特别感兴趣。
3. OpenID Connect
3.开放ID连接
OpenID Connect 1.0 (OIDC) is built on top of OAuth 2.0 to add an identity management layer to the protocol. Hence, it allows clients to verify the end user’s identity and access basic profile information via a standard OAuth 2.0 flow. OIDC has introduced a few standard scopes to OAuth 2.0, like openid, profile, and email.
OpenID Connect 1.0 (OIDC)建立在OAuth 2.0之上,为该协议添加了一个身份管理层。因此,它允许客户通过标准的OAuth 2.0流程验证最终用户的身份并访问基本的配置文件信息。OIDC已经为OAuth 2.0引入了一些标准作用域,如openid、profile和email。
4. Keycloak as Authorization Server
4.Keycloak作为授权服务器
JBoss has developed Keycloak as a Java-based open-source Identity and Access Management solution. Besides the support of both OAuth 2.0 and OIDC, it also offers features like identity brokering, user federation, and SSO.
JBoss已经开发了Keycloak,作为一个基于Java的开源身份和访问管理解决方案。除了支持OAuth 2.0和OIDC之外,它还提供了身份经纪、用户联盟和SSO等功能。
We can use Keycloak as a standalone server with an admin console or embed it in a Spring application. Once we have our Keycloak running in either of these ways, we can try the endpoints.
我们可以将Keycloak作为一个带有管理控制台的独立服务器或将其嵌入Spring应用程序中。一旦我们的Keycloak以上述任何一种方式运行,我们就可以尝试端点。
5. Keycloak Endpoints
5.Keycloak端点
Keycloak exposes a variety of REST endpoints for OAuth 2.0 flows.
Keycloak为OAuth 2.0流暴露了各种REST端点。
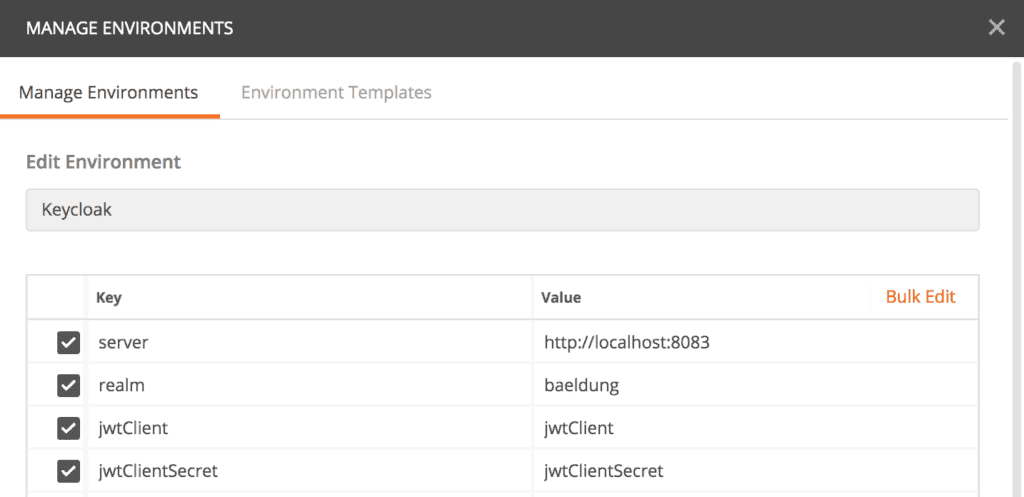
To use these endpoints with Postman, we’ll start by creating an Environment called “Keycloak.” Then we’ll add some key/value entries for the Keycloak authorization server URL, the realm, OAuth 2.0 client id, and client password:
为了在Postman中使用这些端点,我们将首先创建一个名为”Keycloak.“的环境,然后为Keycloak授权服务器URL、领域、OAuth 2.0客户端ID和客户端密码添加一些键/值条目。
Finally, we’ll create a collection where we can organize our Keycloak tests. Now we’re ready to explore available endpoints.
最后,我们将创建一个集合,在这里我们可以组织我们的Keycloak测试。现在我们准备探索可用的端点。
5.1. OpenID Configuration Endpoint
5.1.OpenID配置端点
The configuration endpoint is like the root directory. It returns all other available endpoints, supported scopes and claims, and signing algorithms.
配置端点就像根目录。它返回所有其他可用的端点、支持的作用域和索赔以及签名算法。
Let’s create a request in Postman: {{server}}/auth/realms/{{realm}}/.well-known/openid-configuration. Postman sets the values of {{server}} and {{realm}} from the selected environment during runtime:
让我们在Postman中创建一个请求: {{server}}/auth/realms/{{realm}}/.Postman在运行时从选定的环境中设置{{server}}和{{realm}}的值:。
Then we’ll execute the request, and if everything goes well, we’ll have a response:
然后我们将执行请求,如果一切顺利,我们将得到一个响应。
{
    "issuer": "http://localhost:8083/auth/realms/baeldung",
    "authorization_endpoint": "http://localhost:8083/auth/realms/baeldung/protocol/openid-connect/auth",
    "token_endpoint": "http://localhost:8083/auth/realms/baeldung/protocol/openid-connect/token",
    "token_introspection_endpoint": "http://localhost:8083/auth/realms/baeldung/protocol/openid-connect/token/introspect",
    "userinfo_endpoint": "http://localhost:8083/auth/realms/baeldung/protocol/openid-connect/userinfo",
    "end_session_endpoint": "http://localhost:8083/auth/realms/baeldung/protocol/openid-connect/logout",
    "jwks_uri": "http://localhost:8083/auth/realms/baeldung/protocol/openid-connect/certs",
    "check_session_iframe": "http://localhost:8083/auth/realms/baeldung/protocol/openid-connect/login-status-iframe.html",
    "grant_types_supported": [...],
    ...
    "registration_endpoint": "http://localhost:8083/auth/realms/baeldung/clients-registrations/openid-connect",
    ...
    "introspection_endpoint": "http://localhost:8083/auth/realms/baeldung/protocol/openid-connect/token/introspect"
}
As mentioned before, we can see all the available endpoints in the response, such as “authorization_endpoint,” “token_endpoint,” and so on.
如前所述,我们可以在响应中看到所有可用的端点,如”authorization_endpoint,” “token_endpoint,“等等。
Moreover, there are other useful attributes in the response. For example, we can figure out all the supported grant types from “grant_types_supported” or all the supported scopes from “scopes_supported.”
此外,响应中还有其他有用的属性。例如,我们可以从”grant_types_supported“中找出所有支持的授予类型,或从”scopes_supported.“中找出所有支持的作用域。
5.2. Authorize Endpoint
5.2.授权端点
Let’s continue our journey with the authorize endpoint responsible for OAuth 2.0 Authorization Code Flow. It’s available as “authorization_endpoint” in the OpenID configuration response.
让我们继续我们的旅程,负责OAuth 2.0授权代码流的authorize端点。它在OpenID配置响应中作为“authorization_endpoint”可用。
The endpoint is:
端点是:。
{{server}}/auth/realms/{{realm}}/protocol/openid-connect/auth?response_type=code&client_id=jwtClient
{{server}}/auth/realms/{{realm}}/protocol/openid-connect/auth? response_type=code& client_id=jwtClient
Moreover, this endpoint accepts scope and redirect_uri as optional parameters.
此外,该端点接受scope和redirect_uri作为可选参数。
We won’t use this endpoint in Postman. Instead, we usually initiate the authorization code flow via a browser. Then Keycloak redirects the user to a login page if no active login cookie is available. Finally, the authorization code is delivered to the redirect URL.
我们不会在Postman中使用这个端点。相反,我们通常通过浏览器启动授权代码流。然后,如果没有有效的登录cookie,Keycloak会将用户重定向到一个登录页面。最后,授权码被传递到重定向的URL。
Next we’ll see how to obtain an access token.
接下来我们将看到如何获得一个访问令牌。
5.3. Token Endpoint
5.3.令牌端点
The token endpoint allows us to retrieve an access token, refresh token, or id token. OAuth 2.0 supports different grant types, like authorization_code, refresh_token, or password.
令牌端点允许我们检索访问令牌、刷新令牌或ID令牌。OAuth 2.0支持不同的授予类型,如authorization_code,refresh_token,或password。
The token endpoint is: {{server}}/auth/realms/{{realm}}/protocol/openid-connect/token
令牌的端点是。{{server}}/auth/realms/{{realm}}/protocol/openid-connect/token。
However, each grant type needs some dedicated form parameters.
然而,每种补助金类型都需要一些专门的表格参数。
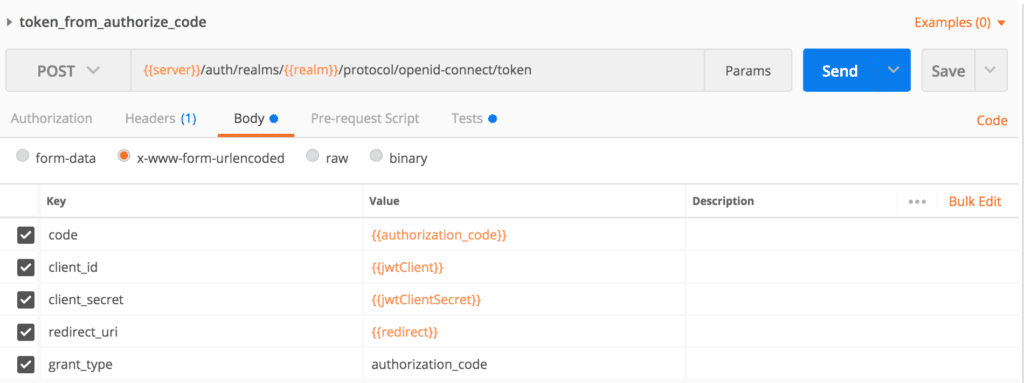
We’ll first test our token endpoint to obtain an access token for our authorize code. We’ll have to pass these form parameters in the request body: client_id, client_secret, grant_type, code, and redirect_uri. The token endpoint also accepts scope as an optional parameter:
我们将首先测试我们的令牌端点,为我们的授权代码获得一个访问令牌。我们必须在请求体中传递这些表单参数。client_id, client_secret, grant_type, code, 和redirect_uri。令牌端点还接受scope作为一个可选参数。
If we want to bypass the authorization code flow, the password grant type is our choice. Here we’ll need user credentials, so we can use this flow when we have a built-in login page on our website or application.
如果我们想绕过授权代码流程,密码授予类型是我们的选择。这里我们需要用户凭证,所以当我们的网站或应用程序上有一个内置的登录页面时,我们可以使用这个流程。
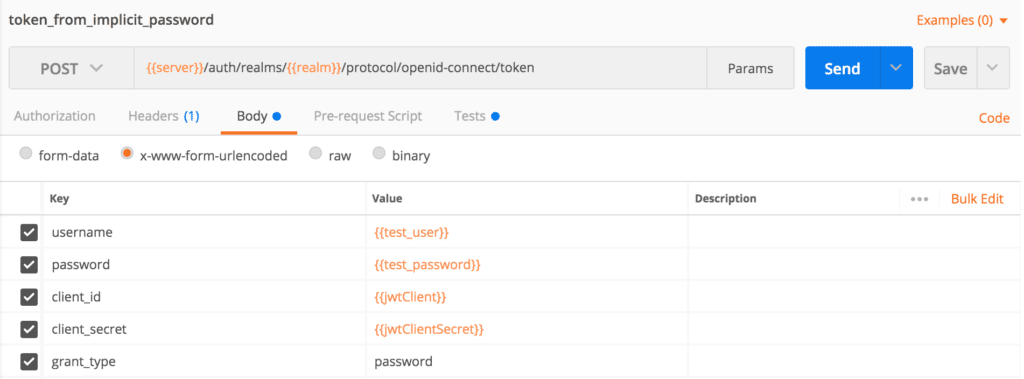
Let’s create a Postman request and pass the form parameters client_id, client_secret, grant_type, username, and password in the body:
让我们创建一个Postman请求,并在正文中传递表单参数client_id、client_secret、grant_type、username和password。
Before executing this request, we have to add the username and password variables to Postman’s environment key/value pairs.
在执行这个请求之前,我们必须将用户名和密码变量添加到Postman的环境键/值对。
Another useful grant type is refresh_token. We can use this when we have a valid refresh token from a previous call to the token endpoint. The refresh token flow requires the parameters client_id, client_secret, grant_type, and refresh_token.
另一个有用的授予类型是 refresh_token。当我们从先前对令牌端点的调用中获得一个有效的刷新令牌时,我们可以使用它。刷新令牌流程需要参数client_id、client_secret、grant_type和refresh_token。
We need the response access_token to test other endpoints. To speed up our testing with Postman, we can write a script in the Tests section of our token endpoint requests:
我们需要响应access_token来测试其他端点。为了加快我们用Postman进行测试的速度,我们可以在令牌端点请求的Tests部分写一个脚本。
var jsonData = JSON.parse(responseBody);
postman.setEnvironmentVariable("refresh_token", jsonData.refresh_token);
postman.setEnvironmentVariable("access_token", jsonData.access_token);
5.4. User Information Endpoint
5.4.用户信息端点
We can retrieve user profile data from the user information endpoint when we have a valid access token.
当我们有一个有效的访问令牌时,我们可以从用户信息端点检索用户资料数据。
The user information endpoint is available at: {{server}}/auth/realms/{{realm}}/protocol/openid-connect/userinfo
用户信息端点可在。{{server}}/auth/realms/{{realm}}/protocol/openid-connect/userinfo
Now we’ll create a Postman request for it, and pass the access token in the Authorization header:
现在我们将为它创建一个Postman请求,并在Authorization头中传递访问令牌。
Then we’ll execute the request. Here’s the successful response:
然后,我们将执行请求。下面是成功的响应。
{
    "sub": "a5461470-33eb-4b2d-82d4-b0484e96ad7f",
    "preferred_username": "john@test.com",
    "DOB": "1984-07-01",
    "organization": "baeldung"
}
5.5. Token Introspect Endpoint
5.5.Token Introspect端点
If a resource server needs to verify that an access token is active or wants more metadata about it, especially for opaque access tokens, then the token introspect endpoint is the answer. In this case, the resource server integrates the introspect process with the security configuration.
如果资源服务器需要验证访问令牌是否处于活动状态,或者希望获得有关它的更多元数据,特别是对于不透明的访问令牌,那么令牌内观端点就是答案。在这种情况下,资源服务器将自省过程与安全配置结合起来。
We’ll call Keycloak’s introspect endpoint: {{server}}/auth/realms/{{realm}}/protocol/openid-connect/token/introspect
我们将调用Keycloak的inrospect端点。{{server}}/auth/realms/{{realm}}/protocol/openid-connect/token/introspect
Then we’ll create an introspect request in Postman, and pass client_id, client_secret, and token as form parameters:
然后我们将在Postman中创建一个内省请求,并将client_id、client_secret和token作为表单参数。
If the access_token is valid, then we’ll have our response:
如果access_token是有效的,那么我们将得到我们的响应。
{
    "exp": 1601824811,
    "iat": 1601824511,
    "jti": "d5a4831d-7236-4686-a17b-784cd8b5805d",
    "iss": "http://localhost:8083/auth/realms/baeldung",
    "sub": "a5461470-33eb-4b2d-82d4-b0484e96ad7f",
    "typ": "Bearer",
    "azp": "jwtClient",
    "session_state": "96030af2-1e48-4243-ba0b-dd4980c6e8fd",
    "preferred_username": "john@test.com",
    "email_verified": false,
    "acr": "1",
    "scope": "profile email read",
    "DOB": "1984-07-01",
    "organization": "baeldung",
    "client_id": "jwtClient",
    "username": "john@test.com",
    "active": true
}
However, if we use an invalid access token, then the response will be:
然而,如果我们使用无效的访问令牌,那么响应将是。
{
    "active": false
}
6. Conclusion
6.结语
In this article, with a running Keycloak Server, we created Postman requests for the authorization, token, user information, and introspect endpoints.
在这篇文章中,通过运行Keycloak服务器,我们为授权、令牌、用户信息和反省端点创建了Postman请求。
As always, the complete examples of the Postman requests are available over on GitHub.
与往常一样,Postman请求的完整示例可在GitHub上获得。


