1. Overview
1.概述
Load testing is a critical part of the software development life cycle (SDLC) for modern enterprise applications. In this tutorial, we’ll use Postman collections to perform a simple load testing activity.
负载测试是现代企业应用程序的软件开发生命周期(SDLC)的一个关键部分。在本教程中,我们将使用Postman集合来执行一个简单的负载测试活动。
2. Setup
2.设置
We can download and install the desktop client that’s compatible with our system’s operating system. Alternatively, we can create a free Postman account and access the web client.
我们可以下载并安装与我们系统的操作系统兼容的桌面客户端。或者,我们可以创建一个免费的Postman帐户并访问网络客户端。
Now, let’s create a new collection called “Google Apps – Load Testing” by importing a few sample HTTP requests available in Postman’s Collection Format v2.1:
现在,让我们通过导入Postman Collection Format v2.1中的几个HTTP请求样本,创建一个名为 “Google Apps – Load Testing “的新集合。
{
  "info": {
    "_postman_id": "ddbb5536-b6ad-4247-a715-52a5d518b648",
    "name": "Google Apps - Load Testing",
    "schema": "https://schema.getpostman.com/json/collection/v2.1.0/collection.json"
  },
  "item": [
    {
      "name": "Get Google",
      "event": [
        {
          "listen": "test",
          "script": {
            "exec": [
              ""
            ],
            "type": "text/javascript"
          }
        }
      ],
      "request": {
        "method": "GET",
        "header": [],
        "url": {
          "raw": "https://www.google.com",
          "protocol": "https",
          "host": [
            "www",
            "google",
            "com"
          ]
        }
      },
      "response": []
    },
    {
      "name": "Get Youtube",
      "event": [
        {
          "listen": "test",
          "script": {
            "exec": [
              ""
            ],
            "type": "text/javascript"
          }
        }
      ],
      "request": {
        "method": "GET",
        "header": [],
        "url": {
          "raw": "https://www.youtube.com/",
          "protocol": "https",
          "host": [
            "www",
            "youtube",
            "com"
          ],
          "path": [
            ""
          ]
        }
      },
      "response": []
    },
    {
      "name": "Get Google Translate",
      "event": [
        {
          "listen": "test",
          "script": {
            "exec": [
              ""
            ],
            "type": "text/javascript"
          }
        }
      ],
      "request": {
        "method": "GET",
        "header": [],
        "url": {
          "raw": "https://translate.google.com/",
          "protocol": "https",
          "host": [
            "translate",
            "google",
            "com"
          ],
          "path": [
            ""
          ]
        }
      },
      "response": []
    }
  ]
}
We should use the “Raw text” option while importing the data:
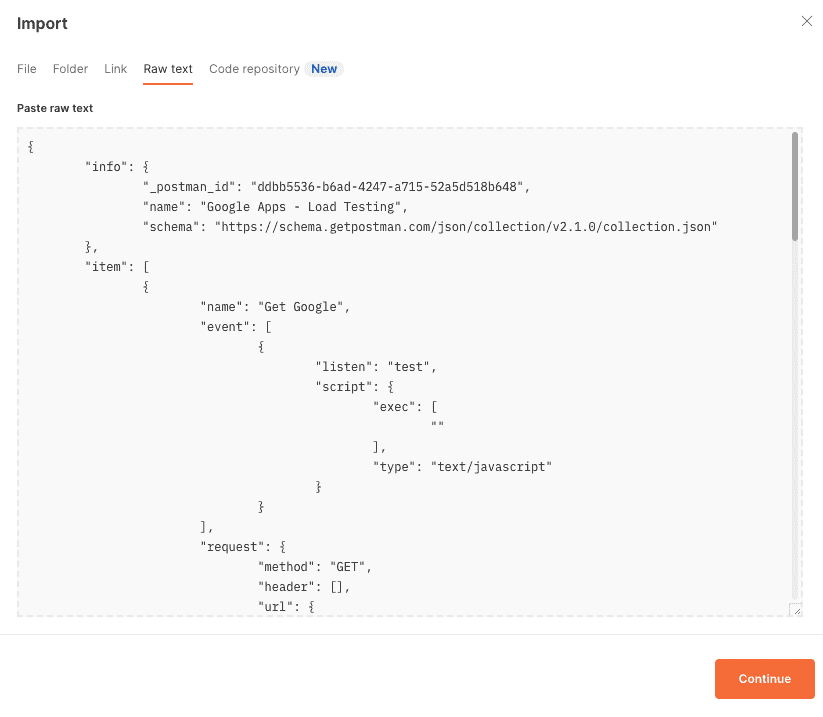
That’s it! We just need to follow through with the import task by clicking on the Continue action, and we’ll have our test collection ready within Postman.
我们应该在导入数据时使用 “原始文本 “选项:

这就是了!我们只需要通过点击继续操作来完成导入任务,我们就可以在Postman中准备好我们的测试集合了。
3. Using Postman Collection Runner
3.使用Postman收集运行器
In this section, we’ll explore how we can use Postman’s Collection Runner to execute the API requests in the “Google Apps – Load Testing” collection and perform basic load testing.
在本节中,我们将探讨如何使用Postman的Collection Runner来执行 “Google Apps – Load Testing “集合中的API请求并进行基本的负载测试。
3.1. Basic Configuration
3.1.基本配置
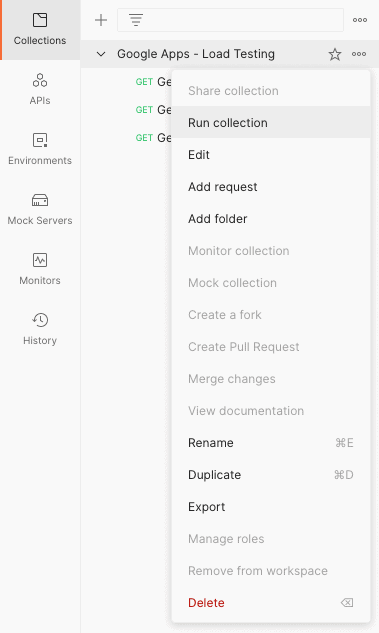
We can launch the Collection Runner with a right-click over the collection:
我们可以用右键点击集合,启动集合运行器。
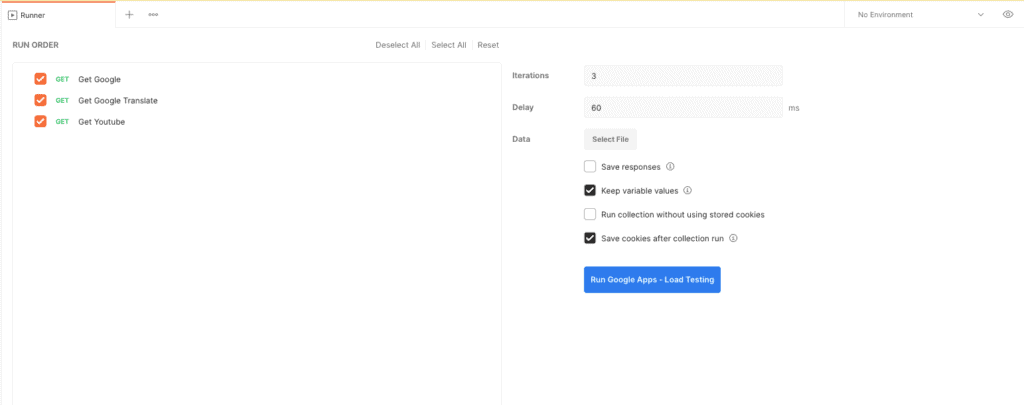
In the Runner mode, let’s configure the run by specifying the order of execution, number of iterations, and delay between consecutive API hits:
在Runner模式下,让我们通过指定执行顺序、迭代次数和连续API点击之间的延迟来配置运行。
Next, let’s click on “Run Google Apps – Load Testing” to start the basic load testing of the API requests within the collection:
接下来,让我们点击 “运行谷歌应用程序–负载测试”,开始对集合内的API请求进行基本的负载测试。
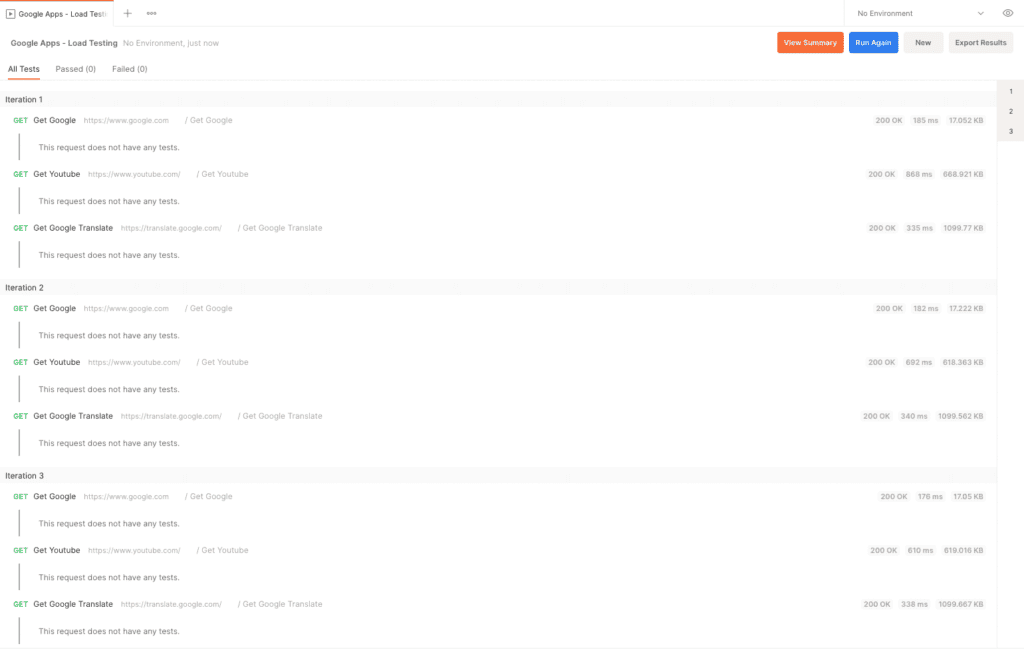
As the runner executes the API requests, we can see live results for each API hit spanned over multiple iterations.
当运行器执行API请求时,我们可以看到跨越多个迭代的每个API点击的实时结果。
3.2. Advanced Configuration Using Test Scripts
3.2.使用测试脚本的高级配置
Using the Postman GUI, we were able to control the order of execution for the APIs. However, we can gain finer control over the execution flow by using the Test Scripts feature of Postman.
使用Postman GUI,我们能够控制API的执行顺序。然而,我们可以通过使用Postman的测试脚本功能来获得对执行流程的更精细的控制。
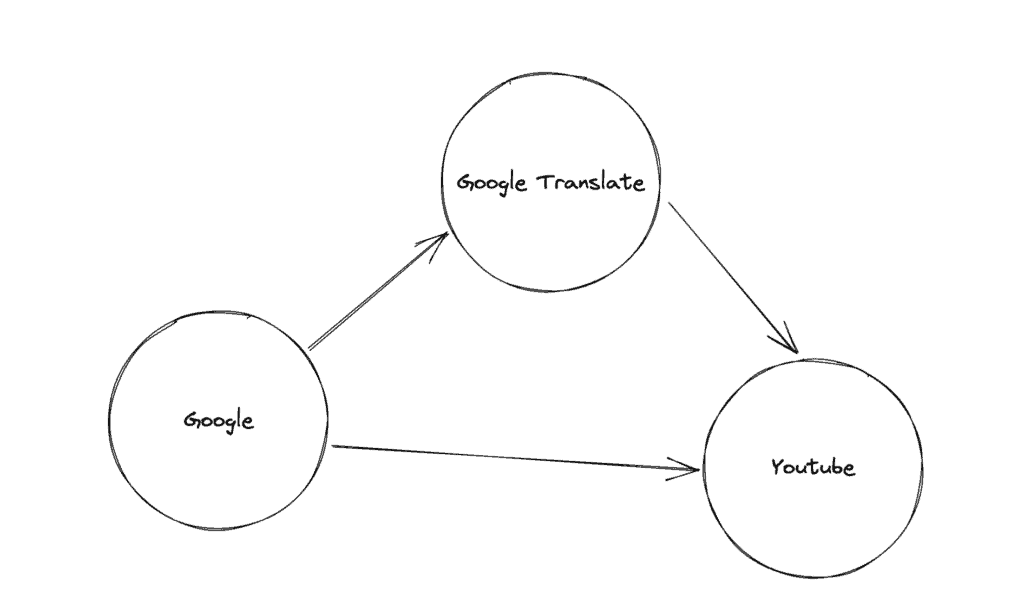
Let’s say we want to include the “Google Translate” API in the workflow only if hits to “Google API” are returning with an HTTP 200 status code. Otherwise, we want to directly hit the “Youtube API”:
假设我们想在工作流程中包括 “谷歌翻译 “API,只有当点击 “谷歌API “时返回HTTP200状态代码。否则,我们想直接点击 “Youtube API”。
We’ll start by adding a simple conditional statement in the Tests section for the “Get Google” request:
我们首先在测试部分为 “获取谷歌 “请求添加一个简单的条件语句。
if (pm.response.code == 200) {
    postman.setNextRequest("Get Google Translate");
}
else {
    postman.setNextRequest("Get Youtube");
}
Next, we’ll set “Get Youtube” as the subsequent request to be executed after “Get Google Translate”:
接下来,我们将设置 “获取Youtube “作为 “获取谷歌翻译 “之后执行的后续请求。
postman.setNextRequest("Get Youtube");Moreover, we know that “Get Youtube” is the last request in the flow, so we’ll set the next request after it as null:
此外,我们知道 “获取Youtube “是流程中的最后一个请求,所以我们会把它之后的下一个请求设置为null。
postman.setNextRequest(null);Finally, let’s see the complete collection with test scripts:
最后,让我们看看带有测试脚本的完整集合。
{
  "info": {
    "_postman_id": "ddbb5536-b6ad-4247-a715-52a5d518b648",
    "name": "Google Apps - Load Testing",
    "schema": "https://schema.getpostman.com/json/collection/v2.1.0/collection.json"
  },
  "item": [
    {
      "name": "Get Google",
      "event": [
        {
          "listen": "test",
          "script": {
            "exec": [
              "if (pm.response.code == 200) {",
              "  postman.setNextRequest(\"Get Google Translate\");",
              "}",
              "else {",
              "  postman.setNextRequest(\"Get Youtube\");",
              "}"
            ],
            "type": "text/javascript"
          }
        }
      ],
      "request": {
        "method": "GET",
        "header": [],
        "url": {
          "raw": "https://www.google.com",
          "protocol": "https",
          "host": [
            "www",
            "google",
            "com"
          ]
        }
      },
      "response": []
    },
    {
      "name": "Get Youtube",
      "event": [
        {
          "listen": "test",
          "script": {
            "exec": [
              "postman.setNextRequest(null);"
            ],
            "type": "text/javascript"
          }
        }
      ],
      "request": {
        "method": "GET",
        "header": [],
        "url": {
          "raw": "https://www.youtube.com/",
          "protocol": "https",
          "host": [
            "www",
            "youtube",
            "com"
          ],
          "path": [
            ""
          ]
        }
      },
      "response": []
    },
    {
      "name": "Get Google Translate",
      "event": [
        {
          "listen": "test",
          "script": {
            "exec": [
              "postman.setNextRequest(\"Get Youtube\");"
            ],
            "type": "text/javascript"
          }
        }
      ],
      "request": {
        "method": "GET",
        "header": [],
        "url": {
          "raw": "https://translate.google.com/",
          "protocol": "https",
          "host": [
            "translate",
            "google",
            "com"
          ],
          "path": [
            ""
          ]
        }
      },
      "response": []
    }
  ]
}
Like earlier, we can use the Collection Runner to execute this custom flow.
像前面一样,我们可以使用Collection Runner来执行这个自定义流程。
4. Using Newman Runner
4.使用Newman Runner
We can use the Newman CLI utility to run a Postman collection through the command line. Taking this approach opens up wider opportunities for automation.
我们可以使用Newman CLI工具来通过命令行运行Postman集合。采取这种方法为自动化提供了更广泛的机会。
Let’s use it to run two iterations of the custom flow for our existing collection:
让我们用它来为我们现有的集合运行两个迭代的自定义流程。
newman run -n2 "Custom Flow Google Apps - Load Testing.postman_collection.json"Once all the iterations are over, we’d get a statistics summary where we can see the average response time of the requests:
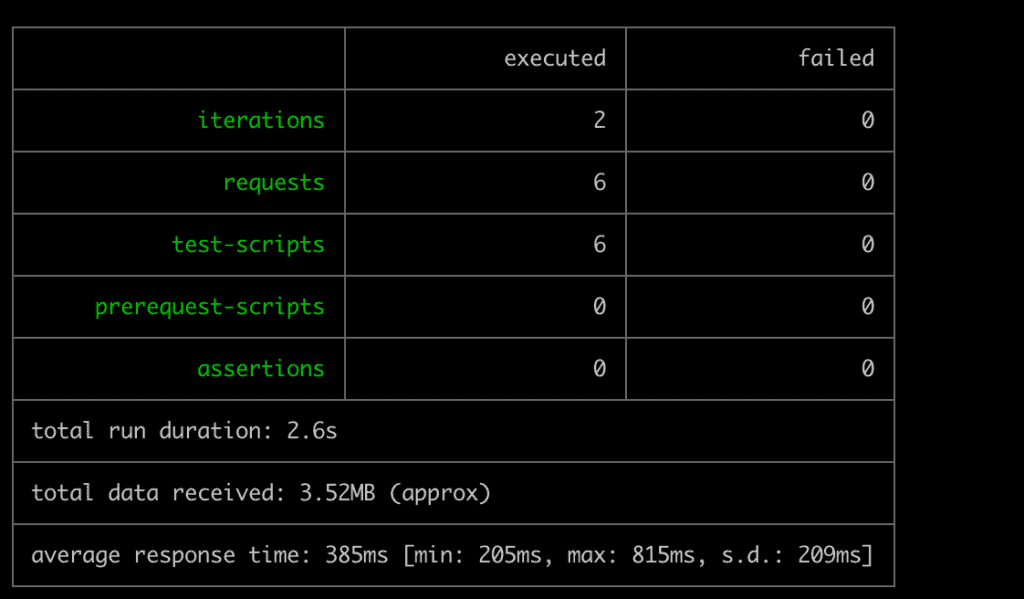
一旦所有的迭代结束,我们会得到一个统计摘要,我们可以看到请求的平均响应时间:

We must note that we’re deliberately using lower values for our demonstration as most modern services have a rate-limiting and request-blocking logic that will start blocking our requests for higher values or duration.
我们必须注意,我们故意使用较低的值进行演示,因为大多数现代服务都有一个速率限制和请求阻断逻辑,如果数值或持续时间较高,就会开始阻断我们的请求。
5. Using Grafana K6
5.使用 Grafana K6
Postman is the easiest way to formulate the request collection and execution flow. However, while using Postman or Newman, we’re invoking the requests one after the other sequentially.
Postman是制定请求收集和执行流程的最简单方法。然而,在使用Postman或Newman时,我们是按顺序一个接一个地调用请求的。
In a practical scenario, we need to test our systems for requests that are coming from multiple users at the same time. For such a use case, we can use Grafana’s k6 utility.
在实际情况中,我们需要针对同时来自多个用户的请求来测试我们的系统。对于这样的用例,我们可以使用Grafana的k6工具。
First, we need to convert our existing Postman collection to a k6 compatible format. We can use the postman-to-k6 library for this milestone:
首先,我们需要将我们现有的Postman集合转换为k6兼容格式。我们可以使用postman-to-k6库来实现这一里程碑。
postman-to-k6 "Google Apps - Load Testing.json" -o k6-script.jsNext, let’s do a live run for three seconds with two virtual users:
接下来,让我们用两个虚拟用户做一个三秒钟的实时运行。
k6 run --duration 3s --vus 2 k6-script.jsOn completion, we get a detailed statistics report showing metrics such as average response time, number of iterations, and many others:
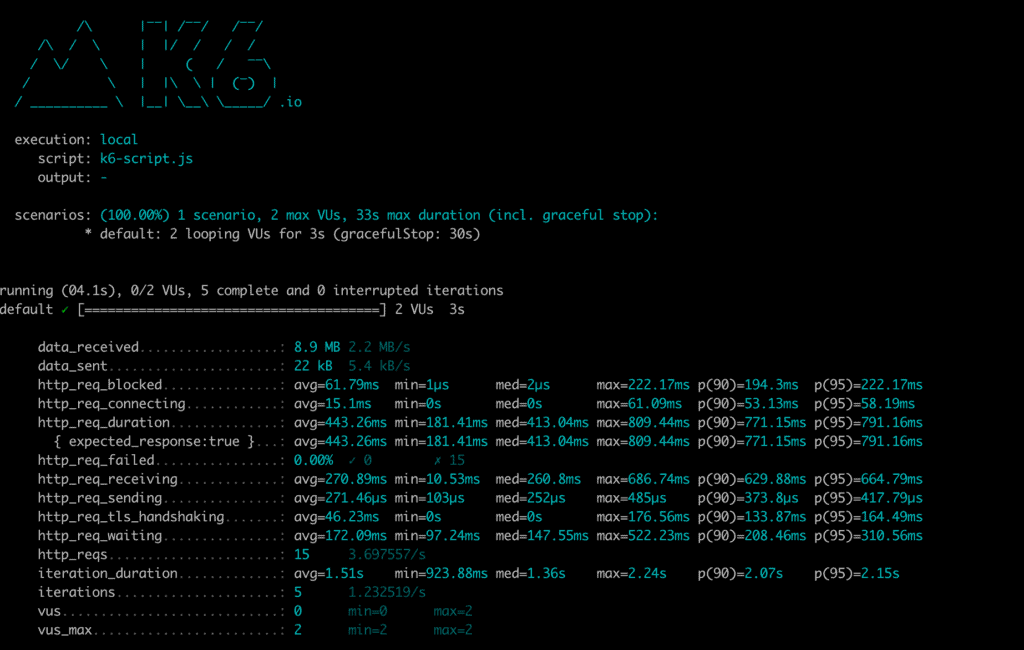
完成后,我们会得到一份详细的统计报告,显示平均响应时间、迭代次数等指标:

6. Conclusion
6.结语
In this tutorial, we leveraged Postman collections to do basic load testing using the GUI and the Newman runner. Additionally, we learned about the k6 utility that can be used to do advanced load testing of the requests in a Postman collection.
在本教程中,我们利用Postman集合,使用GUI和Newman runner进行基本的负载测试。此外,我们了解了k6工具,它可以用来对Postman集合中的请求进行高级负载测试。
