1. Introduction
1.简介
To thoroughly test a web API, we need some kind of web client to access the API’s endpoints. Postman is a standalone tool that exercises web APIs by making HTTP requests from outside the service.
为了彻底测试一个网络API,我们需要某种网络客户端来访问API的端点。Postman是一个独立的工具,它通过从服务之外发出HTTP请求来锻炼网络API。
When using Postman, we don’t need to write any HTTP client infrastructure code just for the sake of testing. Instead, we create test suites called collections and let Postman interact with our API.
当使用Postman时,我们不需要仅仅为了测试而编写任何HTTP客户端基础结构代码。相反,我们创建称为集合的测试套件,让Postman与我们的API进行交互。
In this tutorial, we’ll see how to create a Postman Collection that can test a REST API.
在本教程中,我们将看到如何创建一个可以测试REST API的Postman集合。
2. Setup
2.设置
Before we get started with our collection, we’ll need to set up the environment.
在我们开始收集之前,我们需要设置环境。
2.1. Installing Postman
2.1.安装Postman
Postman is available for Linux, Mac, and Windows. The tool can be downloaded and installed from the Postman website.
Postman可用于Linux、Mac和Windows。该工具可以从Postman网站下载和安装。
After dismissing the splash screen, we can see the user interface:
解除闪屏后,我们可以看到用户界面。
2.2. Running the Server
2.2.运行服务器
Postman needs a live HTTP server to process its requests. For this tutorial, we’ll use a previous Baeldung project, spring-boot-rest, which is available on GitHub.
Postman 需要一个实时的 HTTP 服务器来处理其请求。在本教程中,我们将使用以前的一个Baeldung项目,spring-boot-rest,该项目可在GitHub上获得。
As we might guess from the title, spring-boot-rest is a Spring Boot application. We build the app with the Maven goal install. Once built, we launch the server with the custom Maven goal spring-boot:run.
从标题我们可以猜到,spring-boot-rest是一个Spring Boot应用。我们用Maven目标install构建该应用。建好后,我们用自定义Maven目标spring-boot:run启动服务器。
To verify that the server is running, we can hit this URL in our browser:
为了验证服务器是否在运行,我们可以在浏览器中点击这个URL。
http://localhost:8082/spring-boot-rest/auth/foosThis service uses an in-memory database. All records are cleared when the server is stopped.
这项服务使用一个内存数据库。当服务器停止时,所有记录都会被清除。
3. Creating a Postman Collection
3.创建一个邮差集
A collection in Postman is a series of HTTP requests. Postman saves every aspect of the requests, including headers and message bodies. Therefore, we can run the requests in sequence as semi-automated tests.
Postman中的一个集合是一系列的HTTP请求。Postman保存了请求的每个方面,包括头信息和消息体。因此,我们可以将这些请求作为半自动的测试依次运行。
Let’s begin by creating a new collection. We can click the dropdown arrow on the New button and select Collection:
让我们从创建一个新的集合开始。我们可以点击New按钮上的下拉箭头,选择Collection。
When the CREATE A NEW COLLECTION dialog appears, we can name our collection “foo API test“. Finally, we click the Create button to see our new collection appear in the list to the left:
当CREATE A NEW COLLECTION对话框出现时,我们可以将我们的集合命名为”foo API test“。最后,我们点击Create按钮,看到我们的新集合出现在左边的列表中。
Once our collection is created, we can hover the cursor over it to reveal two menu buttons. The arrow button opens a pull-right panel that provides access to the Collection Runner. Conversely, the ellipsis button opens a dropdown menu containing a number of operations on the collection.
一旦我们的集合被创建,我们可以将光标悬停在它上面,显示出两个菜单按钮。箭头按钮打开一个向右拉的面板,提供对集合运行器的访问。相反,省略号按钮打开了一个下拉菜单,包含了对集合的一些操作。
4. Adding a POST Request
4.添加一个POST请求
4.1. Creating a New Request
4.1.创建一个新的请求
Now that we have an empty collection, let’s add a request that hits our API. Specifically, let’s send a POST message to the URI /auth/foos. To do that, we open the ellipsis menu on our collection and select Add Request.
现在我们有了一个空的集合,让我们添加一个点击我们API的请求。具体来说,让我们向URI /auth/foos发送一个POST消息。要做到这一点,我们打开集合上的省略号菜单,选择添加请求。。
When the SAVE REQUEST dialog appears, let’s provide a descriptive name, such as “add a foo”. Then, click the button Save to foo API test.
当SAVE REQUEST对话框出现时,让我们提供一个描述性的名字,例如”add a foo”。然后,点击按钮Save to foo API test。
Once the request is created, we can see that our collection indicates one request. However, if our collection has not been expanded, then we can’t see the request yet. In that case, we can click the collection to expand it.
一旦请求被创建,我们可以看到我们的集合显示一个请求。然而,如果我们的集合没有被展开,那么我们还不能看到这个请求。在这种情况下,我们可以点击集合来展开它。
Now, we should see the new request listed under our collection. We can observe that the new request, by default, is an HTTP GET, which is not what we want. We’ll fix that in the next section:
现在,我们应该看到新的请求列在我们的集合下。我们可以观察到,这个新的请求,默认情况下,是一个HTTP GET,这不是我们想要的。我们将在下一节中解决这个问题。
4.2. Editing the Request
4.2.编辑请求
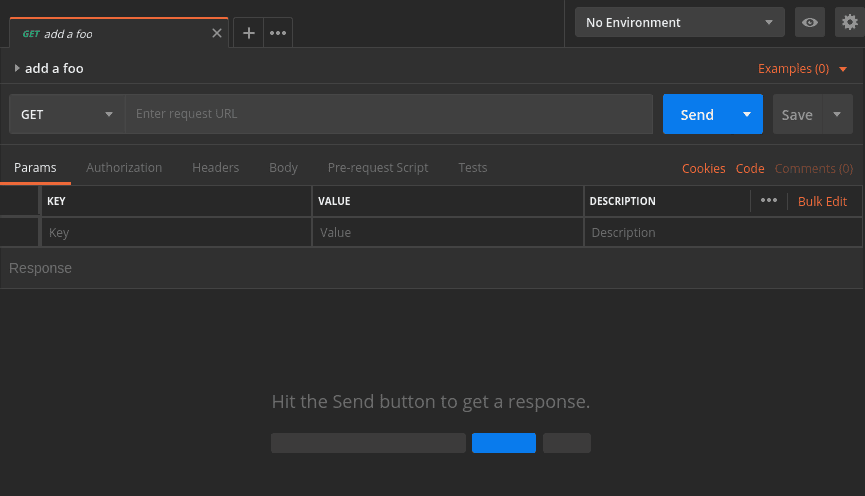
To edit the request, let’s click it, thus loading it into the request editor tab:
要编辑这个请求,让我们点击它,从而把它加载到请求编辑器标签中。
Although the request editor has numerous options, we only need a few of them for now.
虽然请求编辑器有许多选项,但我们现在只需要其中的几个。
Firstly, let’s use the dropdown to change the method from GET to POST.
首先,让我们使用下拉菜单将方法从GET改为POST。
Secondly, we need a URL. To the right of the method dropdown is a text box for the request URL. So, let’s enter that now:
第二,我们需要一个URL。在方法下拉菜单的右边有一个请求URL的文本框。所以,让我们现在就输入它。
http://localhost:8082/spring-boot-rest/auth/foosThe last step is to provide a message body. Below the URL address is a row of tab headers. We’ll click the Body tab header to get to the body editor.
最后一步是提供一个信息体。在URL地址下面有一排标签头。我们将点击Body标签头,进入正文编辑器。
In the Body tab, just above the text area, there’s a row of radio buttons and a dropdown. These control the formatting and content type of the request.
在Body标签中,就在文本区的上方,有一排单选按钮和一个下拉菜单。这些控制请求的格式和内容类型。
Our service accepts JSON data, so we select the raw radio button. In the dropdown to the right, we apply the JSON (application/json) content type.
我们的服务接受JSON数据,所以我们选择raw单选按钮。在右边的下拉菜单中,我们应用JSON(application/json)内容类型。
Once the encoding and content-type have been set, we add our JSON content to the text area:
一旦编码和内容类型设置完毕,我们就把我们的JSON内容添加到文本区。
{
    "name": "Transformers"
}
Finally, let’s be sure to save our changes by pressing Ctrl-S or hitting the Save button. The Save button is located to the right of the Send button. Once we save, we can see that the request has been updated to POST in the list on the left:
最后,让我们确保按下Ctrl-S或点击Save按钮来保存我们的更改。Save按钮位于Send按钮的右边。一旦我们保存,我们可以在左边的列表中看到请求已被更新为POST。
5. Running the Request
5.运行请求
5.1. Running a Single Request
5.1.运行单个请求
To run a single request, we just click the Send button to the right of the URL address. Once we click Send, the response panel will open below the request panel. It may be necessary to scroll down to see it:
要运行一个请求,我们只需点击URL地址右边的Send按钮。一旦我们点击Send,响应面板将在请求面板下面打开。可能需要向下滚动才能看到它。
Let’s examine our results. Specifically, in the header bar, we see that our request succeeded with the status 201 Created. Furthermore, the response body shows that our Transformers record received an id of 1.
让我们检查一下我们的结果。具体来说,在标题栏中,我们看到我们的请求成功了,状态为201 Created。此外,响应体显示,我们的Transformers记录收到的id是1。
5.2. Using the Collection Runner
5.2.使用集合运行器
In contrast to the Send button, the collection runner can execute an entire collection. To launch the collection runner, we hover the cursor over our foo API test collection and click the pull-right arrow. In the pull-right panel we can see a Run button, so let’s click that:
与发送按钮相比,集合运行器可以执行整个集合。为了启动集合运行器,我们将光标悬停在我们的foo API测试集合上,然后点击右拉箭头。在右拉面板中,我们可以看到一个Run按钮,所以让我们点击它。
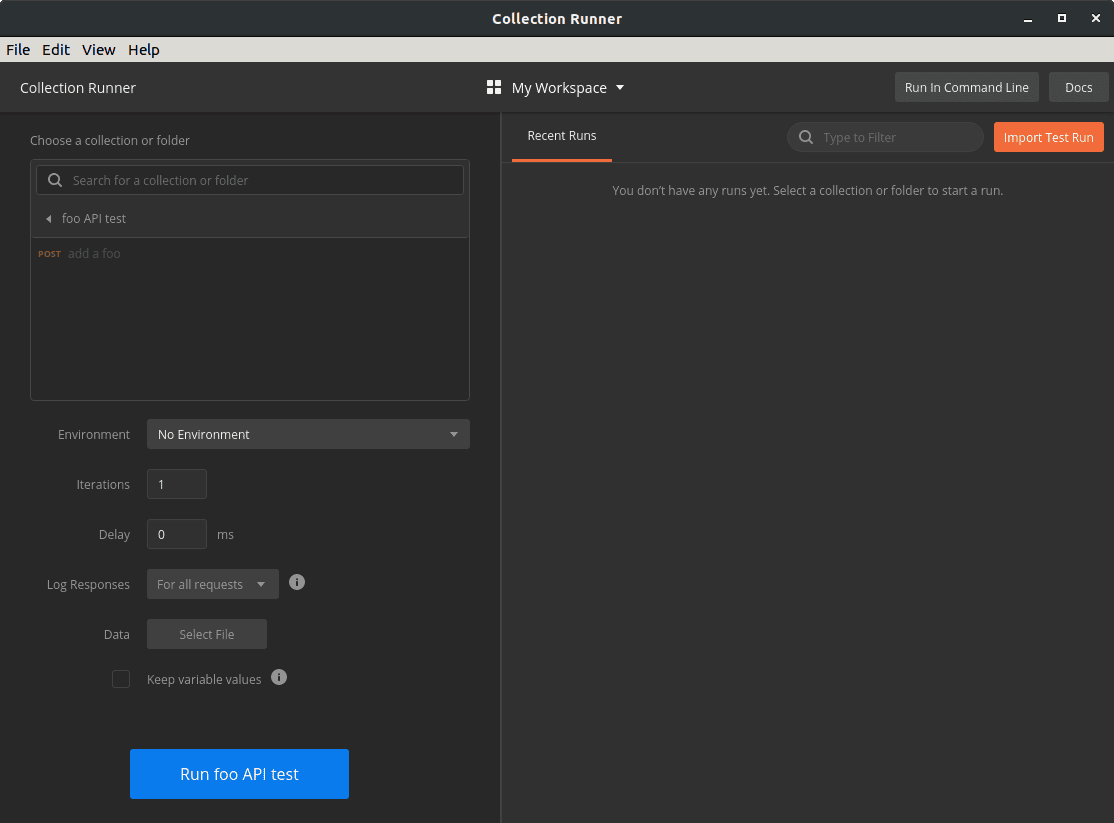
When we click the Run button the collection runner opens in a new window. Because we launched it from our collection, the runner is already initialized to our collection:
当我们点击Run按钮时,集合运行器在一个新窗口中打开。因为我们从我们的集合中启动它,所以运行器已经被初始化为我们的集合。
The collection runner offers options that affect the test run, but we won’t need them for this exercise. Let’s go directly to the Run foo API test button at the bottom and click that.
集合运行器提供了影响测试运行的选项,但我们在这个练习中不需要它们。让我们直接进入底部的Run foo API test按钮并点击它。
When we run the collection, the view changes to Run Results. In this view, we see a list of tests that are marked green for success and red for failure.
当我们运行该集合时,视图变为Run Results。在这个视图中,我们看到一个测试列表,其中绿色标记为成功,红色标记为失败。。
Even though our request was sent, the runner indicates that zero tests passed and zero tests failed. This is because we haven’t added tests to our request yet:
尽管我们的请求已经发出,但运行器显示有零个测试通过,零个测试失败。这是因为我们还没有向我们的请求添加测试。
6. Testing the Response
6.测试反应
6.1. Adding Tests to a Request
6.1.在请求中添加测试
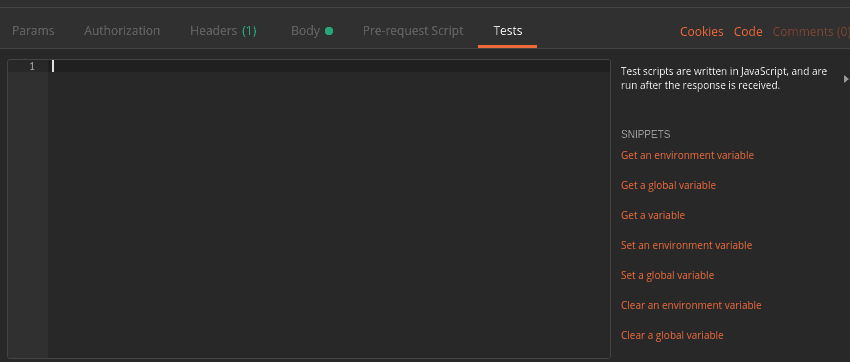
To create a test, let’s return to the request editing panel where we built our POST method. We click the Tests tab which is located under the URL. When we do that, the Tests panel appears:
要创建一个测试,让我们回到我们建立POST方法的请求编辑面板。我们点击Tests标签,它位于URL下面。当我们这样做时,测试面板出现了。
In the Tests panel, we write JavaScript that will be executed when the response is received from the server.
在测试面板中,我们写的JavaScript将在收到服务器的响应时被执行。
Postman offers built-in variables that provide access to the request and response. Furthermore, a number of JavaScript libraries can be imported using the require() syntax.
Postman提供了内置的变量,提供对请求和响应的访问。此外,可以使用require()语法导入一些JavaScript库。
There are far too many scripting features to cover in this tutorial. However, the official Postman documentation is an excellent resource on this topic.
在本教程中,有太多的脚本功能需要介绍。然而,官方Postman文档是关于这个主题的一个优秀资源。
Let’s continue by adding three tests to our request:
让我们继续向我们的请求添加三个测试。
pm.test("success status", () => pm.response.to.be.success );
pm.test("name is correct", () =>
  pm.expect(pm.response.json().name).to.equal("Transformers"));
pm.test("id was assigned", () =>
  pm.expect(pm.response.json().id).to.be.not.null );
As we can see, these tests make use of the global pm module provided by Postman. In particular, the tests use pm.test(), pm.expect(), and pm.response.
我们可以看到,这些测试使用了Postman提供的全局pm模块。特别是,这些测试使用了pm.test(), pm.expect(), 和pm.response。
The pm.test() function accepts a label and an assertion function, such as expect(). We’re using pm.expect() to assert conditions on the contents of the response JSON.
pm.test() 函数接受一个标签和一个断言函数,,如 expect()。我们使用pm.expect()来断言响应JSON内容的条件。
The pm.response object provides access to various properties and operations on the response returned from the server. Available properties include the response status and JSON content, among others.
pm.response对象提供了对从服务器返回的响应的各种属性和操作的访问。可用的属性包括响应状态和JSON内容,等等。
As always, we save our changes with Ctrl-S or the Save button.
像往常一样,我们用Ctrl-S或Save按钮保存我们的修改。
6.2. Running the Tests
6.2.运行测试
Now that we have our tests, let’s run the request again. Pressing the Send button displays the results in the Test Results tab of the response panel:
现在我们有了我们的测试,让我们再次运行这个请求。按下发送按钮,在响应面板的测试结果标签中显示结果。
Likewise, the collection runner now displays our test results. Specifically, the summary at the top left shows the updated passed and failed totals. Below the summary is a list that shows each test with its status:
同样,集合运行器现在显示我们的测试结果。具体来说,左上方的摘要显示了最新的通过和失败总数。摘要下面是一个列表,显示每个测试的状态。
6.3. Viewing the Postman Console
6.3.查看Postman控制台
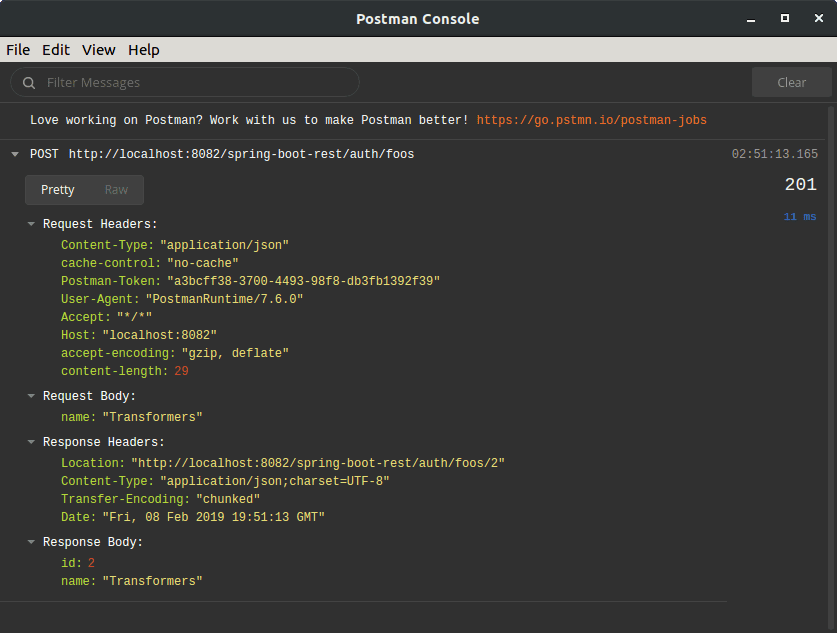
The Postman Console is a useful tool for creating and debugging scripts. We can find the console under the View menu with the item name Show Postman Console. When launched, the console opens in a new window.
Postman控制台是一个创建和调试脚本的有用工具。我们可以在View菜单下找到控制台,项目名称为Show Postman Console。启动后,控制台会在一个新窗口中打开。
While the console is open, it records all HTTP requests and responses. Furthermore, when scripts use console.log(), the Postman Console displays those messages:
当控制台打开时,它会记录所有的HTTP请求和响应。此外,当脚本使用console.log()时,Postman控制台会显示这些信息。
7. Creating a Sequence of Requests
7.创建一个请求序列
So far, we’ve focused on a single HTTP request. Now, let’s see what we can do with multiple requests. By chaining together a series of requests, we can simulate and test a client-server workflow.
到目前为止,我们已经关注了一个单一的HTTP请求。现在,让我们来看看我们能用多个请求做什么。通过将一系列的请求串联起来,我们可以模拟和测试一个客户端-服务器的工作流程。
In this section, let’s apply what we’ve learned in order to create a sequence of requests. Specifically, we’ll add three more requests to execute after the POST request we have already created. These will be a GET, a DELETE, and finally, another GET.
在这一节中,让我们应用我们所学到的知识,以创建一个请求序列。具体来说,我们将在我们已经创建的POST请求之后再添加三个请求来执行。这将是一个GET,一个DELETE,最后是另一个GET。
7.1. Capturing Response Values in Variables
7.1.捕获变量中的响应值
Before we create our new requests, let’s make a modification to our existing POST request. Because we don’t know which id the server will assign each foo instance, we can use a variable to capture the id returned by the server.
在我们创建新请求之前,让我们对现有的POST请求做一个修改。因为我们不知道服务器会给每个foo实例分配哪个ID,我们可以使用一个变量来捕获服务器返回的ID。
To capture that id, we’ll add one more line to the end of the POST request’s test script:
为了捕捉这个ID,我们将在POST请求的测试脚本的末尾再加一行。
pm.variables.set("id", pm.response.json().id);The pm.variables.set() function takes a value and assigns it to a temporary variable. In this case, we’re creating an id variable to store our object’s id value. Once set, we can access this variable in later requests.
pm.variables.set()函数接收一个值并将其分配给一个临时变量。在这种情况下,我们要创建一个id变量来存储我们对象的id值。一旦设置好,我们就可以在以后的请求中访问这个变量。
7.2. Adding a GET Request
7.2.添加一个GET请求
Now, using the techniques from previous sections, let’s add a GET request after the POST request.
现在,使用前几节的技术,让我们在POST请求之后添加一个GET请求。
With this GET request, we’ll retrieve the same foo instance that the POST request created. Let’s name this GET request as “get a foo“.
通过这个GET请求,我们将检索POST请求创建的同一个foo实例。让我们把这个GET请求命名为”get a foo“。
The URL of the GET request is:
GET请求的URL是。
http://localhost:8082/spring-boot-rest/auth/foos/{{id}}In this URL, we’re referencing the id variable that we previously set during the POST request. Thus, the GET request should retrieve the same instance that was created by the POST.
在这个URL中,我们引用了之前在POST请求中设置的id变量。因此,GET请求应该检索到由POST创建的同一个实例。
Variables, when appearing outside of scripts, are referenced using the double-brace syntax {{id}}.
当变量出现在脚本之外时,可以使用双括号语法{{id}}来引用。
Since there’s no body for a GET request, let’s proceed directly to the Tests tab. Because the tests are similar, we can copy the tests from the POST request, then make a few changes.
由于GET请求没有正文,让我们直接进入Tests标签。因为测试是类似的,我们可以复制POST请求的测试,然后做一些修改。
Firstly, we don’t need to set the id variable again, so let’s not copy that line.
首先,我们不需要再次设置id变量,所以我们不要复制这一行。
Secondly, we know which id to expect this time, so let’s verify that id. We can use the id variable to do that:
其次,我们知道这次要期待哪个id,所以让我们来验证这个id。我们可以使用id变量来做到这一点。
pm.test("success status", () => pm.response.to.be.success );
pm.test("name is correct", () =>
  pm.expect(pm.response.json().name).to.equal("Transformers"));
pm.test("id is correct", () =>
  pm.expect(pm.response.json().id).to.equal(pm.variables.get("id")) );
Since the double-brace syntax is not valid JavaScript, we use the pm.variables.get() function to access the id variable.
由于双括号语法不是有效的JavaScript,我们使用pm.variables.get()函数来访问id变量。
Finally, let’s save the changes as we’ve done before.
最后,让我们像以前一样保存这些变化。
7.3. Adding a DELETE Request
7.3.添加一个DELETE请求
Next, we’ll add a DELETE request that will remove the foo object from the server.
接下来,我们将添加一个DELETE请求,将从服务器上删除foo对象。
We’ll proceed by adding a new request after the GET, and setting its method to DELETE. We can name this request “delete a foo“.
我们将在GET之后添加一个新的请求,并将其方法设置为DELETE。我们可以把这个请求命名为”delete a foo“。
The URL of the delete is identical to the GET URL:
删除的URL与GET的URL相同。
http://localhost:8082/spring-boot-rest/auth/foos/{{id}}The response will not have a body to test, but we can test the response code. Therefore, the DELETE request will have only one test:
响应不会有主体可以测试,但我们可以测试响应代码。因此,DELETE请求将只有一个测试。
pm.test("success status", () => pm.response.to.be.success );7.4. Verifying the DELETE
7.4.验证DELETE
Finally, let’s add another copy of the GET request to verify that the DELETE really worked. This time, let’s duplicate our first GET request instead of creating a request from scratch.
最后,让我们添加另一个GET请求的副本,以验证DELETE是否真的有效。这一次,让我们复制我们的第一个GET请求,而不是从头开始创建一个请求。
To duplicate a request, we right-click on the request to show the dropdown menu. Then, we select Duplicate.
要复制一个请求,我们在请求上点击右键来显示下拉菜单。然后,我们选择Duplicate。
The duplicate request will have the word Copy appended to its name. Let’s rename it to “verify delete” to avoid confusion. The Rename option is available by right-clicking the request.
重复的请求将有复制这个词附加在它的名字上。让我们把它重命名为”验证删除“,以避免混淆。重命名选项可以通过右键点击请求来实现。
By default, the duplicate request appears immediately after the original request. As a result, we’ll need to drag it below the DELETE request.
默认情况下,重复请求会紧随原始请求之后出现。因此,我们需要把它拖到DELETE请求的下面。
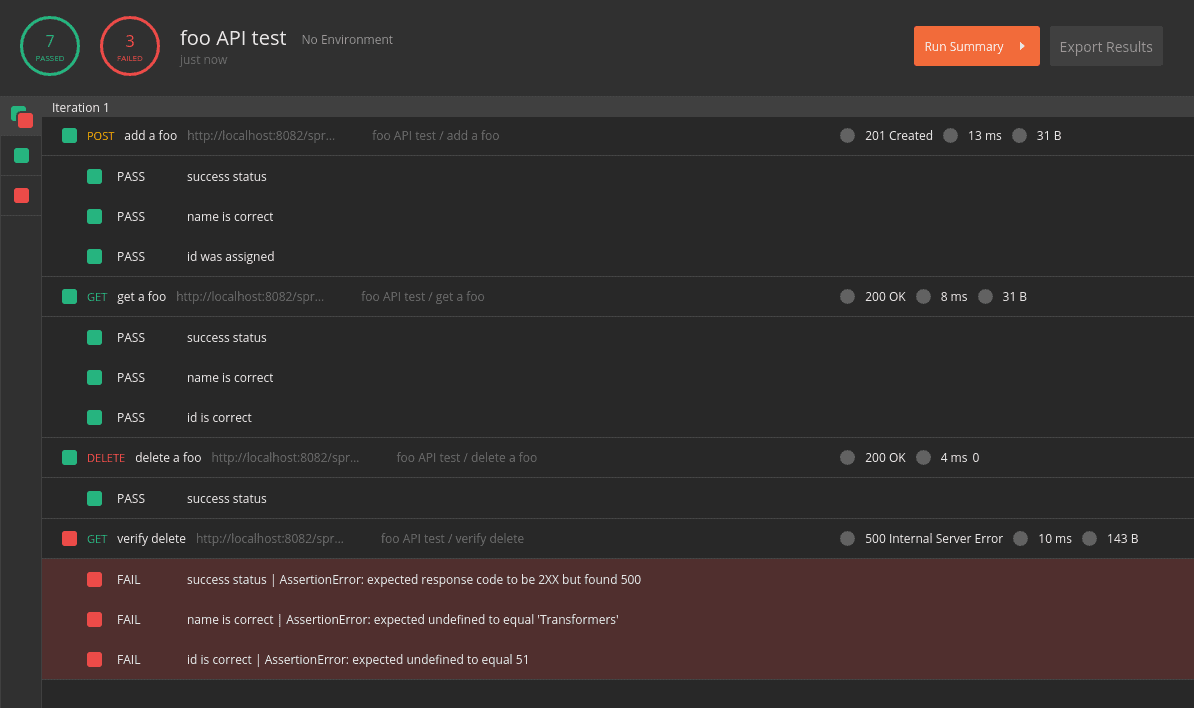
The final step is to modify the tests. However, before we do that, let’s take an opportunity to see a failed test.
最后一步是修改测试。然而,在这之前,让我们借机看看一个失败的测试。
We have copied the GET request and moved it after the DELETE, but we haven’t updated the tests yet. Since the DELETE request should have deleted the object, the tests should fail.
我们已经复制了GET请求并将其移到DELETE之后,但我们还没有更新测试。由于DELETE请求应该已经删除了该对象,测试应该失败。
Let’s make sure to save all of our requests, then hit Retry in the collection runner. As expected, our tests have failed:
让我们确保保存我们所有的请求,然后在集合运行器中点击Retry。正如预期的那样,我们的测试已经失败了。
Now that our brief detour is complete, let’s fix the tests.
现在,我们的短暂迂回已经完成,让我们来修复测试。
By reviewing the failed tests, we can see that the server responds with a 500 status. Therefore, we’ll change the status in our test.
通过回顾失败的测试,我们可以看到服务器响应的状态是500。因此,我们要在测试中改变这个状态。
Furthermore, by viewing the failed response in the Postman Console, we learn that the response includes a cause property. Moreover, the cause property contains the string “No value present“. We can test for that as well:
此外,通过在Postman Console中查看失败的响应,我们得知该响应包括一个cause属性。此外,cause属性包含字符串”无值存在“。我们也可以对此进行测试。
pm.test("status is 500", () => pm.response.to.have.status(500) );
pm.test("no value present", () =>
  pm.expect(pm.response.json().cause).to.equal("No value present"));
7.5. Running the Full Collection
7.5 运行全集
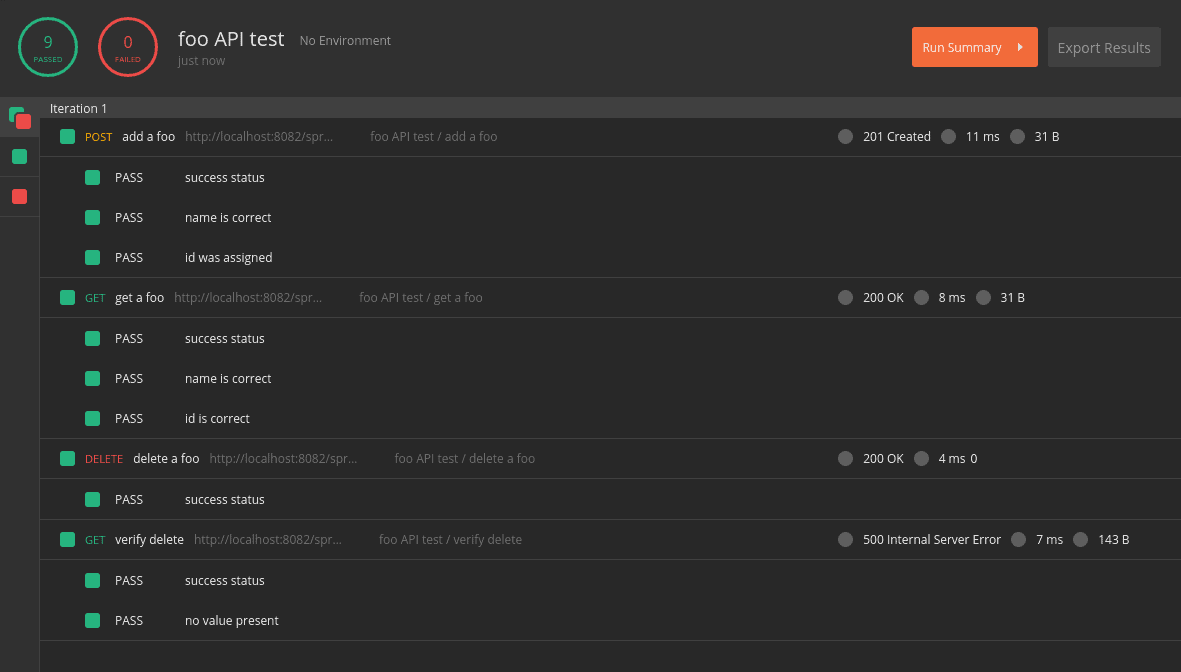
Now that we’ve added all of the requests, let’s run the full collection in the collection runner:
现在我们已经添加了所有的请求,让我们在集合运行器中运行整个集合。
If everything has gone according to plan, we should have nine successful tests.
如果一切按计划进行,我们应该有九个成功的测试。
8. Exporting and Importing the Collection
8.导出和导入收藏品
While Postman stores our collections in a private, local location, we may want to share the collection. To do that, we export the collection to a JSON file.
虽然Postman将我们的集合存储在一个私有的本地位置,但我们可能想分享集合。为了做到这一点,我们将集合导出为一个JSON文件。
The Export command is available within the ellipsis menu of the collection. When prompted for a JSON file version, let’s choose the latest recommended version.
Export命令在集合的省略号菜单内可用。当提示输入JSON文件版本时,让我们选择最新的推荐版本。
After we select the file version, Postman will prompt for a file name and location for the exported collection. We can choose a folder within our GitHub project, for example.
在我们选择了文件版本之后,Postman会提示我们为导出的集合提供一个文件名和位置。我们可以选择GitHub项目中的一个文件夹,例如。
To import a previously exported collection, we use the Import button. We can find it in the toolbar of the main Postman window. When Postman prompts for a file location, we can navigate to the JSON file we wish to import.
要导入先前导出的集合,我们使用Import按钮。我们可以在Postman主窗口的工具条上找到它。当Postman提示文件的位置时,我们可以导航到我们希望导入的JSON文件。
It’s worth noting that Postman does not track exported files. As a result, Postman doesn’t show external changes until we re-import the collection.
值得注意的是,Postman并不跟踪导出的文件。因此,Postman不会显示外部变化,直到我们重新导入集合。
9. Conclusion
9.结论
In this article, we have used Postman to create semi-automated tests for a REST API. While this article serves as an introduction to Postman’s basic features, we have barely scratched the surface of its capabilities. The Postman online documentation is a valuable resource for deeper exploration.
在这篇文章中,我们使用Postman为REST API创建了半自动化的测试。虽然本文是对Postman的基本功能的介绍,但我们还没有触及其功能的表面。Postman在线文档是进行更深入探索的宝贵资源。
The collection created in this tutorial is available over on GitHub.
本教程中创建的集合可在GitHub上获得。


