1. Introduction
1.绪论
Nowadays, it’s very common to write an application and deploy to the cloud and not worry about the infrastructure. Serverless and FaaS have become very popular.
如今,编写一个应用程序并部署到云端,而不用担心基础设施的问题,这是很常见的。无服务器和FaaS已经变得非常流行。
In this type of environment, where instances are created and destroyed frequently, the time to boot and time to first request are extremely important, as they can create a completely different user experience.
在这种类型的环境中,实例被频繁地创建和销毁,启动时间和首次请求时间是极其重要的,因为它们可以创造一个完全不同的用户体验。
Languages as JavaScript and Python are always in the spotlight in this type of scenario. In other words, Java with its fat JARs and long booting time was never a top contender.
在这种情况下,像JavaScript和Python这样的语言总是受到关注。换句话说,拥有庞大的JARs和漫长的启动时间的Java从来就不是一个顶级的竞争者。
In this tutorial, we’ll present Quarkus and discuss if it’s an alternative for bringing Java more effectively to the cloud.
在本教程中,我们将介绍Quarkus,并讨论它是否是将Java更有效地带到云端的一个替代方案。
2. Quarkus
2.夸克斯
QuarkusIO, the Supersonic Subatomic Java, promises to deliver small artifacts, extremely fast boot time, and lower time-to-first-request. When combined with GraalVM, Quarkus will compile ahead-of-time (AOT).
QuarkusIO,超音速亚原子 Java,承诺提供较小的人工制品、极快的启动时间和较低的首次请求时间。当与GraalVM相结合时,Quarkus将提前进行编译(AOT)。
And, since Quarkus is built on top of standards, we don’t need to learn anything new. Consequently, we can use CDI and JAX-RS, among others. Also, Quarkus has a lot of extensions, including ones that support Hibernate, Kafka, OpenShift, Kubernetes, and Vert.x.
而且,由于Quarkus是建立在标准之上的,我们不需要学习任何新的东西。因此,我们可以使用CDI和JAX-RS等。此外,Quarkus 有很多扩展,包括支持 Hibernate、Kafka、OpenShift、Kubernetes 和 Vert.x 的扩展。
3. Our First Application
3.我们的第一次申请
The easiest way to create a new Quarkus project is to open a terminal and type:
创建一个新的Quarkus项目最简单的方法是打开终端并输入。
mvn io.quarkus:quarkus-maven-plugin:0.13.1:create \
    -DprojectGroupId=com.baeldung.quarkus \
    -DprojectArtifactId=quarkus-project \
    -DclassName="com.baeldung.quarkus.HelloResource" \
    -Dpath="/hello"
This will generate the project skeleton, a HelloResource with a /hello endpoint exposed, configuration, Maven project, and Dockerfiles.
这将生成项目骨架、带有/hello端点的HelloResource、配置、Maven项目和Docker文件。
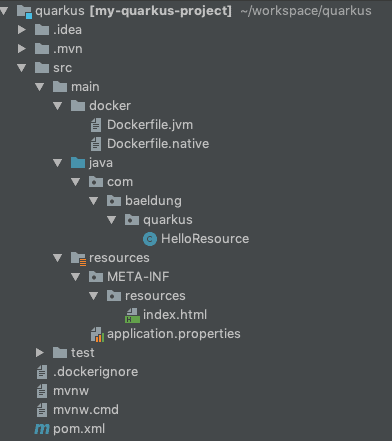
Once imported into our IDE, we’ll have a structure similar to that shown in the image below:
一旦导入我们的IDE,我们将有一个类似于下图所示的结构。

Let’s examine the content of the HelloResource class:
让我们来看看HelloResource类的内容。
@Path("/hello")
public class HelloResource {

    @GET
    @Produces(MediaType.TEXT_PLAIN)
    public String hello() {
        return "hello";
    }
}
Everything looks good so far. At this point, we have a simple application with a single RESTEasy JAX-RS endpoint. Let’s go ahead and test it by opening a terminal and running the command:
到目前为止,一切看起来都很好。在这一点上,我们有一个带有单个RESTEasy JAX-RS端点的简单应用。让我们继续,通过打开终端并运行命令来测试它。
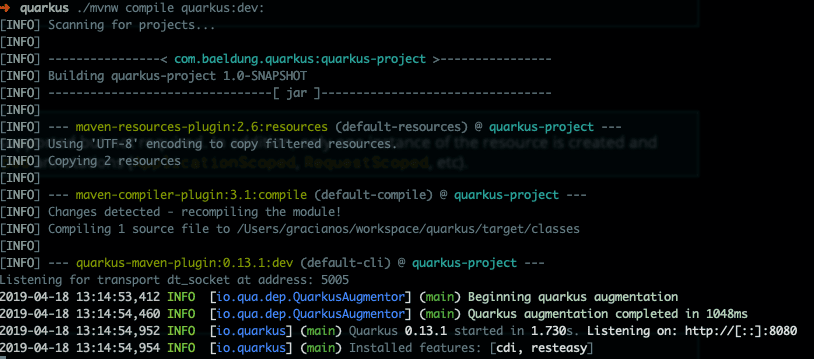
./mvnw compile quarkus:dev:
Our REST endpoint should be exposed at localhost:8080/hello. Let’s test it with the curl command:
我们的REST端点应该暴露在localhost:8080/hello。让我们用curl命令来测试它。
$ curl localhost:8080/hello
hello
4. Hot Reload
4.热重装
When running in development mode (./mvn compile quarkus:dev), Quarkus provides a hot-reload capability. In other words, changes made to Java files or to configuration files will automatically be compiled once the browser is refreshed. The most impressive feature here is that we don’t need to save our files. This could be good or bad, depending on our preference.
当在开发模式下运行时(./mvn compile quarkus:dev),Quarkus提供了热加载功能。换句话说,一旦浏览器被刷新,对Java文件或配置文件的修改将自动被编译。这里最令人印象深刻的特点是,我们不需要保存我们的文件。这可能是好事,也可能是坏事,取决于我们的偏好。
We’ll now modify our example to demonstrate the hot-reload capability. If the application is stopped, we can simply restart it in dev mode. We’ll use the same example as before as our starting point.
我们现在要修改我们的例子来演示热重载能力。如果应用程序被停止了,我们可以简单地在开发模式下重新启动它。我们将使用和之前一样的例子作为我们的起点。
First, we’ll create a HelloService class:
首先,我们将创建一个HelloService类。
@ApplicationScoped
public class HelloService {
    public String politeHello(String name){
        return "Hello Mr/Mrs " + name;
    }
}
Now, we’ll modify the HelloResource class, injecting the HelloService and adding a new method:
现在,我们将修改HelloResource类,注入HelloService并添加一个新方法。
@Inject
HelloService helloService;

@GET
@Produces(MediaType.APPLICATION_JSON)
@Path("/polite/{name}")
public String greeting(@PathParam("name") String name) {
    return helloService.politeHello(name);
}
Next, let’s test our new endpoint:
接下来,让我们测试一下我们的新端点。
$ curl localhost:8080/hello/polite/Baeldung
Hello Mr/Mrs Baeldung
We’ll make one more change to demonstrate that the same can be applied to property files. Let’s edit the application.properties file and add one more key:
我们再做一个改动,以证明同样的方法可以应用于属性文件。让我们编辑application.properties文件,再添加一个键。
greeting=Good morningAfter that, we’ll modify the HelloService to use our new property:
之后,我们将修改HelloService以使用我们的新属性。
@ConfigProperty(name = "greeting")
private String greeting;

public String politeHello(String name){
    return greeting + " " + name;
}
If we execute the same curl command, we should now see:
如果我们执行同样的curl命令,我们现在应该看到。
Good morning BaeldungWe can easily package the application by running:
我们可以通过运行以下程序轻松地将应用程序打包。
./mvnw package
This will generate 2 jar files inside the target directory:
这将在target目录下生成两个jar文件。
- quarkus-project-1.0-SNAPSHOT-runner.jar — an executable jar with the dependencies copied to target/lib
- quarkus-project-1.0-SNAPSHOT.jar — contains classes and resource files
We can now run the packaged application:
我们现在可以运行打包的应用程序。
java -jar target/quarkus-project-1.0-SNAPSHOT-runner.jar5. Native Image
5.本地图像
Next, we’ll produce a native image of our application. A native image will improve start-up time and time to first response. In other words, it contains everything it needs to run, including the minimal JVM necessary to run the application.
接下来,我们将为我们的应用程序制作一个本地图像。一个本地镜像将改善启动时间和首次响应时间。换句话说,它包含了运行所需的一切,包括运行应用程序所需的最小JVM。
To start with, we need to have GraalVM installed and the GRAALVM_HOME environment variable configured.
首先,我们需要安装GraalVM并配置GRAALVM_HOME环境变量。
We’ll now stop the application (Ctrl + C), if not stopped already, and run the command:
我们现在要停止应用程序(Ctrl + C),如果尚未停止的话,并运行该命令。
./mvnw package -PnativeThis can take a few seconds to complete. Because native images try to create all code AOT to boot faster, as a result, we’ll have longer build times.
这可能需要几秒钟来完成。因为本地图像试图创建所有的代码AOT以更快地启动,结果,我们会有更长的构建时间。
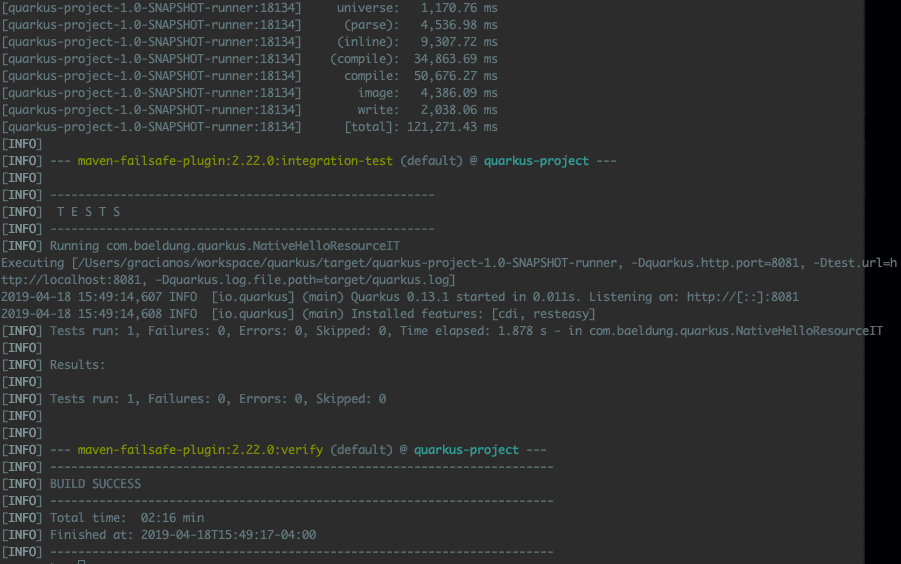
We can run ./mvnw verify -Pnative to verify that our native artifact was properly constructed:
我们可以运行./mvnw verify -Pnative来验证我们的本地工件是否被正确构建。

Secondly, we’ll create a container image using our native executable. For that, we must have a container runtime (i.e. Docker) running in our machine. Let’s open up a terminal window and execute:
其次,我们将使用我们的本地可执行文件创建一个容器镜像。为此,我们必须有一个容器运行时(即Docker)在我们的机器中运行。让我们打开一个终端窗口并执行。
./mvnw package -Pnative -Dnative-image.docker-build=true
This will create a Linux 64-bit executable, therefore if we’re using a different OS, it might not be runnable anymore. That’s okay for now.
这将创建一个Linux 64位可执行文件,因此,如果我们使用不同的操作系统,它可能无法再运行。这在目前来说是没有问题的。
The project generation created a Dockerfile.native for us:
项目生成时,为我们创建了一个Dockerfile.native。
FROM registry.fedoraproject.org/fedora-minimal
WORKDIR /work/
COPY target/*-runner /work/application
RUN chmod 775 /work
EXPOSE 8080
CMD ["./application", "-Dquarkus.http.host=0.0.0.0"]
If we examine the file, we have a hint at what comes next. First, we’ll create a docker image:
如果我们检查一下这个文件,我们就会对接下来的内容有一个提示。首先,我们将创建一个docker镜像。
docker build -f src/main/docker/Dockerfile.native -t quarkus/quarkus-project .Now, we can run the container using:
现在,我们可以通过以下方式运行该容器。
docker run -i --rm -p 8080:8080 quarkus/quarkus-project
The container started in an incredibly low time of 0.009s. That’s one of the strengths of Quarkus.

容器启动的时间低得令人难以置信,只有0.009秒。这就是Quarkus的优势之一。
Finally, we should test our modified REST to validate our application:
最后,我们应该测试我们修改后的REST,以验证我们的应用。
$ curl localhost:8080/hello/polite/Baeldung
Good morning Baeldung
6. Deploying to OpenShift
6.部署到OpenShift
Once we’re done testing locally using Docker, we’ll deploy our container to OpenShift. Assuming we have the Docker image on our registry, we can deploy the application following the steps below:
一旦我们使用Docker完成本地测试,我们将把我们的容器部署到OpenShift。假设我们的注册表上有Docker镜像,我们可以按照以下步骤部署应用程序。
oc new-build --binary --name=quarkus-project -l app=quarkus-project
oc patch bc/quarkus-project -p '{"spec":{"strategy":{"dockerStrategy":{"dockerfilePath":"src/main/docker/Dockerfile.native"}}}}'
oc start-build quarkus-project --from-dir=. --follow
oc new-app --image-stream=quarkus-project:latest
oc expose service quarkus-project
Now, we can get the application URL by running:
现在,我们可以通过运行获得应用程序的URL。
oc get routeLastly, we’ll access the same endpoint (note that the URL might be different, depending on our IP address):
最后,我们将访问同一个端点(注意,URL可能不同,这取决于我们的IP地址)。
$ curl http://quarkus-project-myproject.192.168.64.2.nip.io/hello/polite/Baeldung
Good morning Baeldung
7. Conclusion
7.结语
In this article, we demonstrated that Quarkus is a great addition that can bring Java more effectively to the cloud. For example, it’s possible now to imagine Java on AWS Lambda. Also, Quarkus is based on standards such as JPA and JAX/RS. Therefore, we don’t need to learn anything new.
在这篇文章中,我们展示了Quarkus是一个很好的补充,可以将Java更有效地带到云端。例如,现在可以想象Java在AWS Lambda上的情况。而且,Quarkus是基于JPA和JAX/RS等标准的。因此,我们不需要学习任何新东西。
Quarkus has caught a lot of attention lately, and lots of new features are being added every day. There are several quickstart projects for us to try Quarkus at Quarkus GitHub repository.
Quarkus最近引起了很多人的关注,每天都有很多新的功能被加入。在Quarkus GitHub 仓库,有几个快速启动项目供我们尝试Quarkus。
As always, the code for this article is available over on GitHub. Happy coding!
一如既往,本文的代码可在GitHub上获得。编码愉快!