1. Overview
1.概述
This tutorial continues the Registration with Spring Security series with a look at how to properly implement Roles and Privileges.
本教程继续介绍Spring Security系列的注册,探讨如何正确地实现角色和权限。
2. User, Role and Privilege
2.用户、角色和特权
Let’s start with our entities. We have three main entities:
让我们从我们的实体开始。我们有三个主要实体。
- The User
- The Role represents the high-level roles of the user in the system. Each role will have a set of low-level privileges.
- The Privilege represents a low-level, granular privilege/authority in the system.
Here’s the user:
这里是用户。
@Entity
public class User {

    @Id
    @GeneratedValue(strategy = GenerationType.AUTO)
    private Long id;

    private String firstName;
    private String lastName;
    private String email;
    private String password;
    private boolean enabled;
    private boolean tokenExpired;

    @ManyToMany
    @JoinTable(
        name = "users_roles",
        joinColumns = @JoinColumn(
          name = "user_id", referencedColumnName = "id"),
        inverseJoinColumns = @JoinColumn(
          name = "role_id", referencedColumnName = "id"))
    private Collection<Role> roles;
}
As we can see, the user contains the roles as well as a few additional details that are necessary for a proper registration mechanism.
正如我们所看到的,用户包含了角色以及一些额外的细节,这些都是正确的注册机制所必需的。
Next, here’s the role:
接下来,这里是角色。
@Entity
public class Role {

    @Id
    @GeneratedValue(strategy = GenerationType.AUTO)
    private Long id;

    private String name;
    @ManyToMany(mappedBy = "roles")
    private Collection<User> users;

    @ManyToMany
    @JoinTable(
        name = "roles_privileges",
        joinColumns = @JoinColumn(
          name = "role_id", referencedColumnName = "id"),
        inverseJoinColumns = @JoinColumn(
          name = "privilege_id", referencedColumnName = "id"))
    private Collection<Privilege> privileges;
}
Finally, let’s look at the privilege:
最后,让我们来看看特权。
@Entity
public class Privilege {

    @Id
    @GeneratedValue(strategy = GenerationType.AUTO)
    private Long id;

    private String name;

    @ManyToMany(mappedBy = "privileges")
    private Collection<Role> roles;
}
As we can see, we’re considering both the User <-> Role as well as the Role <-> Privilege relationships to be many-to-many bidirectional.
我们可以看到,我们认为用户<->角色以及角色<->权限的关系都是多对多的双向关系。
3. Setup Privileges and Roles
3.设置权限和角色
Next, let’s focus on doing some early setup of the Privileges and Roles in the system.
接下来,让我们集中精力对系统中的权限和角色进行一些早期设置。
We’ll tie this to the startup of the application, and we’ll use an ApplicationListener on ContextRefreshedEvent to load our initial data on server start:
我们将把它与应用程序的启动联系起来,我们将在ContextRefreshedEvent上使用一个ApplicationListener来在服务器启动时加载我们的初始数据。
@Component
public class SetupDataLoader implements
  ApplicationListener<ContextRefreshedEvent> {

    boolean alreadySetup = false;

    @Autowired
    private UserRepository userRepository;

    @Autowired
    private RoleRepository roleRepository;

    @Autowired
    private PrivilegeRepository privilegeRepository;

    @Autowired
    private PasswordEncoder passwordEncoder;

    @Override
    @Transactional
    public void onApplicationEvent(ContextRefreshedEvent event) {

        if (alreadySetup)
            return;
        Privilege readPrivilege
          = createPrivilegeIfNotFound("READ_PRIVILEGE");
        Privilege writePrivilege
          = createPrivilegeIfNotFound("WRITE_PRIVILEGE");

        List<Privilege> adminPrivileges = Arrays.asList(
          readPrivilege, writePrivilege);
        createRoleIfNotFound("ROLE_ADMIN", adminPrivileges);
        createRoleIfNotFound("ROLE_USER", Arrays.asList(readPrivilege));

        Role adminRole = roleRepository.findByName("ROLE_ADMIN");
        User user = new User();
        user.setFirstName("Test");
        user.setLastName("Test");
        user.setPassword(passwordEncoder.encode("test"));
        user.setEmail("test@test.com");
        user.setRoles(Arrays.asList(adminRole));
        user.setEnabled(true);
        userRepository.save(user);

        alreadySetup = true;
    }

    @Transactional
    Privilege createPrivilegeIfNotFound(String name) {

        Privilege privilege = privilegeRepository.findByName(name);
        if (privilege == null) {
            privilege = new Privilege(name);
            privilegeRepository.save(privilege);
        }
        return privilege;
    }

    @Transactional
    Role createRoleIfNotFound(
      String name, Collection<Privilege> privileges) {

        Role role = roleRepository.findByName(name);
        if (role == null) {
            role = new Role(name);
            role.setPrivileges(privileges);
            roleRepository.save(role);
        }
        return role;
    }
}
So, what’s happening during this simple setup code? Nothing complicated:
那么,在这个简单的设置代码中发生了什么?并不复杂。
- We’re creating the privileges.
- Then we’re creating the roles and assigning the privileges to them.
- Finally, we’re creating a user and assigning a role to it.
Note how we’re using an alreadySetup flag to determine if the setup needs to run or not. This is simply because the ContextRefreshedEvent may be fired multiple times depending on how many contexts we have configured in our application. And we only want to run the setup once.
请注意我们如何使用alreadySetup标志来确定是否需要运行设置。这只是因为ContextRefreshedEvent可能被触发多次,这取决于我们在应用中配置了多少个上下文。而我们只想运行一次设置。
Two quick notes here. We’ll first look at terminology. We’re using the Privilege – Role terms here. But in Spring, these are slightly different. In Spring, our Privilege is referred to as Role and also as a (granted) authority, which is slightly confusing.
这里有两个快速说明。我们首先看一下术语。我们在这里使用权限-角色术语。但在Spring中,这些术语略有不同。在Spring中,我们的Privilege被称为Role,也被称为(授予的)权限,这让人有点困惑。
This is not a problem for the implementation of course, but it’s definitely worth noting.
当然,这对实施来说不是问题,但绝对值得注意。
Second, these Spring Roles (our Privileges) need a prefix. By default, that prefix is “ROLE”, but it can be changed. We’re not using that prefix here, just to keep things simple, but keep in mind that it will be required if we’re not explicitly changing it.
其次,这些Spring角色(我们的权限)需要一个前缀。默认情况下,这个前缀是 “ROLE”,但它可以被改变。我们在这里不使用这个前缀,只是为了保持简单,但请记住,如果我们不明确改变它,它将是必需的。
4. Custom UserDetailsService
4.自定义UserDetailsService
Now let’s check out the authentication process.
现在我们来看看认证过程。
We’re going to see how to retrieve the user within our custom UserDetailsService and how to map the right set of authorities from the roles and privileges the user has assigned:
我们将看到如何在我们的自定义UserDetailsService中检索用户,以及如何从用户分配的角色和权限中映射正确的权限集。
@Service("userDetailsService")
@Transactional
public class MyUserDetailsService implements UserDetailsService {

    @Autowired
    private UserRepository userRepository;

    @Autowired
    private IUserService service;

    @Autowired
    private MessageSource messages;

    @Autowired
    private RoleRepository roleRepository;

    @Override
    public UserDetails loadUserByUsername(String email)
      throws UsernameNotFoundException {

        User user = userRepository.findByEmail(email);
        if (user == null) {
            return new org.springframework.security.core.userdetails.User(
              " ", " ", true, true, true, true,
              getAuthorities(Arrays.asList(
                roleRepository.findByName("ROLE_USER"))));
        }

        return new org.springframework.security.core.userdetails.User(
          user.getEmail(), user.getPassword(), user.isEnabled(), true, true,
          true, getAuthorities(user.getRoles()));
    }

    private Collection<? extends GrantedAuthority> getAuthorities(
      Collection<Role> roles) {

        return getGrantedAuthorities(getPrivileges(roles));
    }

    private List<String> getPrivileges(Collection<Role> roles) {

        List<String> privileges = new ArrayList<>();
        List<Privilege> collection = new ArrayList<>();
        for (Role role : roles) {
            privileges.add(role.getName());
            collection.addAll(role.getPrivileges());
        }
        for (Privilege item : collection) {
            privileges.add(item.getName());
        }
        return privileges;
    }

    private List<GrantedAuthority> getGrantedAuthorities(List<String> privileges) {
        List<GrantedAuthority> authorities = new ArrayList<>();
        for (String privilege : privileges) {
            authorities.add(new SimpleGrantedAuthority(privilege));
        }
        return authorities;
    }
}
The interesting thing to follow here is how the Privileges (and Roles) are mapped to GrantedAuthority entities.
这里值得关注的是特权(和角色)如何被映射到GrantedAuthority实体。
This mapping makes the entire security configuration highly flexible and powerful. We can mix and match roles and privileges as granular as necessary, and at the end, they’ll be correctly mapped to authorities and returned back to the framework.
这种映射使得整个安全配置高度灵活和强大。我们可以根据需要混合和匹配角色和权限的粒度,在最后,它们将被正确地映射到权限并返回到框架中。
5. Role Hierarchy
5.等级制度的作用
Additionally, let’s organize our roles into hierarchies.
此外,让我们把我们的角色组织成等级制度。
We’ve seen how to implement role-based access control by mapping privileges to roles. This allows us to assign a single role to a user rather than having to assign all the individual privileges.
我们已经看到如何通过将权限映射到角色来实现基于角色的访问控制。这使得我们可以为一个用户分配一个角色,而不必分配所有单独的权限。
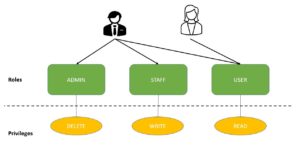
However, as the number of roles increases, users might require multiple roles, leading to role explosion:
然而,随着角色数量的增加,用户可能需要多个角色,导致角色爆炸。
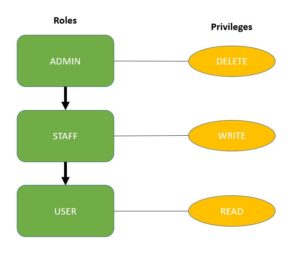
To overcome this, we can use Spring Security’s role hierarchies:
为了克服这个问题,我们可以使用Spring Security的角色层次结构。
Assigning the role ADMIN automatically gives the user the privileges of both the STAFF and USER roles.
分配角色ADMIN会自动赋予用户STAFF和USER两个角色的权限。
However, a user with the role STAFF can only perform STAFF and USER role actions.
然而,具有STAFF角色的用户只能执行STAFF和USER角色操作。
Let’s create this hierarchy in Spring Security by simply exposing a bean of type RoleHierarchy:
让我们在Spring Security中通过简单地暴露一个RoleHierarchy类型的bean来创建这个层次结构。
@Bean
public RoleHierarchy roleHierarchy() {
    RoleHierarchyImpl roleHierarchy = new RoleHierarchyImpl();
    String hierarchy = "ROLE_ADMIN > ROLE_STAFF \n ROLE_STAFF > ROLE_USER";
    roleHierarchy.setHierarchy(hierarchy);
    return roleHierarchy;
}
We use the > symbol in the expression to define the role hierarchy. Here, we’ve configured the role ADMIN to include the role STAFF, which in turn includes the role USER.
我们在表达式中使用> 符号来定义角色层次。在这里,我们将角色ADMIN配置为包括角色STAFF,后者又包括角色USER。
Finally, to include this role hierarchy in Spring Web Expressions, we add the roleHierarchy instance to the WebSecurityExpressionHandler:
最后,为了在Spring Web Expressions中包含这个角色层次,我们将roleHierarchy实例添加到WebSecurityExpressionHandler。
@Bean
public DefaultWebSecurityExpressionHandler webSecurityExpressionHandler() {
    DefaultWebSecurityExpressionHandler expressionHandler = new DefaultWebSecurityExpressionHandler();
    expressionHandler.setRoleHierarchy(roleHierarchy());
    return expressionHandler;
}
As we can see, role hierarchies are a great way to reduce the number of roles and authorities we need to add to a user.
正如我们所看到的,角色分层是一种很好的方式,可以减少我们需要添加给用户的角色和权限数量。
6. User Registration
6.用户注册
Finally, let’s take a look at registration for a new user.
最后,让我们看一下新用户的注册情况。
We’ve seen how setup goes about creating the User and assigning Roles (and Privileges) to it.
我们已经看到了如何设置创建用户并为其分配角色(和权限)的过程。
Let’s now take a look at how this needs to be done during registration of a new user:
现在让我们来看看在注册新用户时需要如何做。
@Override
public User registerNewUserAccount(UserDto accountDto) throws EmailExistsException {

    if (emailExist(accountDto.getEmail())) {
        throw new EmailExistsException
          ("There is an account with that email adress: " + accountDto.getEmail());
    }
    User user = new User();

    user.setFirstName(accountDto.getFirstName());
    user.setLastName(accountDto.getLastName());
    user.setPassword(passwordEncoder.encode(accountDto.getPassword()));
    user.setEmail(accountDto.getEmail());

    user.setRoles(Arrays.asList(roleRepository.findByName("ROLE_USER")));
    return repository.save(user);
}
In this simple implementation, since we’re assuming that a standard user is being registered, we’re assigning it the ROLE_USER role.
在这个简单的实现中,由于我们假设一个标准的用户正在被注册,我们给它分配了ROLE_USER角色。
Of course, more complex logic can easily be implemented in the same way, either by having multiple, hard-coded registration methods or by allowing the client to send the type of user that’s being registered.
当然,更复杂的逻辑可以很容易地以同样的方式实现,要么有多个硬编码的注册方法,要么允许客户端发送正在注册的用户类型。
7. Conclusion
7.结论
In this article, we illustrated how to implement Roles and Privileges with JPA, for a Spring Security-backed system.
在这篇文章中,我们说明了如何用JPA为一个Spring Security支持的系统实现角色和权限。
We also configured a role hierarchy to simplify our access control configuration.
我们还配置了一个角色层次结构,以简化我们的访问控制配置。
The full implementation of this Registration with Spring Security tutorial can be found over on GitHub.
这个使用 Spring Security 的注册教程的完整实现可以在 GitHub 上找到over on GitHub。

