1. Introduction
1.绪论
Spring Cloud Gateway is a library that allows us to quickly create lightweight API gateways based on Spring Boot, which we’ve already covered in earlier articles.
Spring Cloud Gateway是一个允许我们快速创建基于Spring Boot的轻量级API网关的库,我们在之前的文章中已经介绍过。
This time, we’ll show how to quickly implement OAuth 2.0 patterns on top of it.
这一次,我们将展示如何在其之上快速实现OAuth 2.0模式。
2. OAuth 2.0 Quick Recap
2.OAuth 2.0快速回顾
The OAuth 2.0 standard is a well-established standard used all over the internet as a security mechanism by which users and applications can securely access resources.
OAuth 2.0标准是一个成熟的标准,作为一种安全机制,用户和应用程序可以安全地访问资源,在互联网上到处使用。
Although it’s beyond the scope of this article to describe this standard in detail, let’s start with a quick recap of a few key terms:
尽管详细描述这一标准超出了本文的范围,但让我们首先快速回顾一下几个关键术语。
- Resource: Any kind of information that can only be retrieved by authorized clients
- Client: an application that consumes a resource, usually through a REST API
- Resource Server: A service that is responsible for serving a resource to authorized clients
- Resource Owner: entity (human or application) that owns a resource and, ultimately, is responsible for granting access to it to a client
- Token: a piece of information got by a client and sent to a resource server as part of the request to authenticate it
- Identity Provider (IdP): Validates user credentials and issues access tokens to clients.
- Authentication Flow: Sequence of steps a client must go through to get a valid token.
For a comprehensive description of the standard, a good starting point is Auth0’s documentation on this topic.
对于该标准的全面描述,Auth0的关于该主题的文档是一个很好的起点。
3. OAuth 2.0 Patterns
3.OAuth 2.0模式
Spring Cloud Gateway is mainly used in one of the following roles:
Spring Cloud Gateway主要用于以下角色之一。
- OAuth Client
- OAuth Resource Server
Let’s discuss each of those cases in more detail.
让我们更详细地讨论这些案例中的每一个。
3.1. Spring Cloud Gateway as an OAuth 2.0 Client
3.1.作为OAuth 2.0客户端的Spring云网关
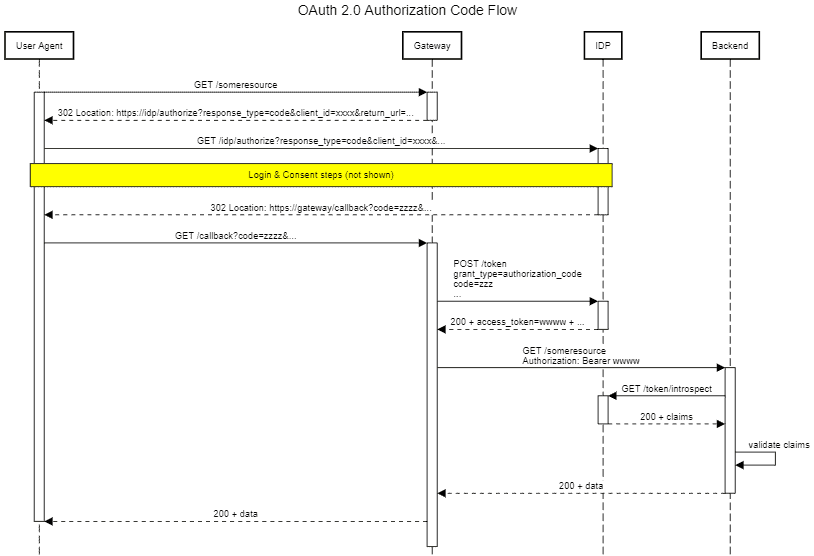
In this scenario, any unauthenticated incoming request will initiate an authorization code flow. Once the token is acquired by the gateway, it is then used when sending requests to a backend service:
在这种情况下,任何未经认证的传入请求都会启动一个授权码流。一旦网关获得令牌,就会在向后端服务发送请求时使用该令牌。
A good example of this pattern in action is a social network feed aggregator application: for each supported network, the gateway would act as an OAuth 2.0 client.
这种模式的一个很好的例子是一个社交网络feed聚合器应用:对于每个支持的网络,网关将作为一个OAuth 2.0客户端。
As a result, the frontend – usually a SPA application built with Angular, React, or similar UI frameworks – can seamlessly access data on those networks on behalf of the end-user. Even more important: it can do so without the user ever revealing their credentials to the aggregator.
因此,前端(通常是用Angular、React或类似的UI框架构建的SPA应用程序)可以代表终端用户无缝访问这些网络上的数据。更重要的是:它可以在用户不向聚合器透露其凭据的情况下做到这一点。
3.2. Spring Cloud Gateway as an OAuth 2.0 Resource Server
3.2.作为OAuth 2.0资源服务器的Spring云网关
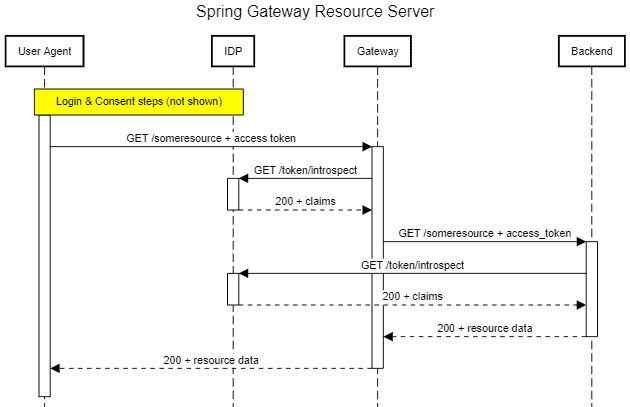
Here, the Gateway acts as a gatekeeper, enforcing that every request has a valid access token before sending it to a backend service. Moreover, it can also check if the token has the proper permissions to access a given resource based on the associated scopes:
在这里,网关充当了守门员的角色,在将请求发送到后端服务之前,强制要求每个请求都有一个有效的访问令牌。此外,它还可以根据相关的作用域,检查该令牌是否具有访问特定资源的适当权限。
It is important to notice that this kind of permission check mainly operates at a coarse level. Fine-grained access control (e.g., object/field-level permissions) are usually implemented at the backend using domain logic.
One thing to consider in this pattern is how backend services authenticate and authorize any forwarded request. There are two main cases:
需要注意的是,这种权限检查主要是在粗略的层面上操作。细粒度的访问控制(例如,对象/域级别的权限)通常在后端使用域逻辑实现。
这种模式要考虑的一点是后端服务如何认证和授权任何转发的请求。主要有两种情况。
- Token propagation: API Gateway forwards the received token to the backend as-is
- Token replacement: API Gateway replaces the incoming token with another one before sending the request.
In this tutorial, we’ll cover just the token propagation case, as it is the most common scenario. The second one is also possible but requires additional setup and coding that would distract us from the main points we want to show here.
在本教程中,我们将只讨论令牌传播的情况,因为这是最常见的情况。第二种情况也是可能的,但需要额外的设置和编码,这将分散我们对我们想在这里展示的要点的注意力。
4. Sample Project Overview
4.项目概况样本
To show how to use Spring Gateway with the OAuth patterns we’ve described so far, let’s build a sample project that exposes a single endpoint: /quotes/{symbol}. Access to this endpoint requires a valid access token issued by the configured identity provider.
为了展示如何将Spring Gateway与我们目前所描述的OAuth模式结合起来使用,让我们建立一个示例项目,暴露一个单一的端点。/quotes/{symbol}。访问该端点需要由配置的身份提供者发出的有效访问令牌。
In our case, we’ll use the embedded Keycloak identity provider. The only required changes are the addition of a new client application and a few users for testing.
在我们的案例中,我们将使用嵌入式Keycloak身份提供者。唯一需要改变的是增加一个新的客户端应用程序和几个用户进行测试。
To make things a little more interesting, our backend service will return a different quote price depending on the user associated with a request. Users that have the gold role get a lower price, while everybody else gets the regular price (life is unfair, after all ;^)).
为了使事情更有趣,我们的后端服务将根据与请求相关的用户返回不同的报价。拥有黄金角色的用户得到一个较低的价格,而其他人则得到正常价格(毕竟生活是不公平的;^))。
We’ll front this service with Spring Cloud Gateway and, by changing just a few lines of configuration, we’ll be able to switch its role from an OAuth client to a resource server.
我们将用Spring Cloud Gateway把这个服务前置,只需改变几行配置,我们就能把它的角色从OAuth客户端转换为资源服务器。
5. Project Setup
5.项目设置
5.1. Keycloak IdP
5.1.钥匙环IdP
The Embedded Keycloak we’ll use for this tutorial is just a regular SpringBoot application that we can clone from GitHub and build with Maven:
我们将在本教程中使用的嵌入式Keycloak只是一个普通的SpringBoot应用程序,我们可以从GitHub克隆并使用Maven构建。
$ git clone https://github.com/Baeldung/spring-security-oauth
$ cd oauth-rest/oauth-authorization/server
$ mvn install
Note: This project currently targets Java 13+ but also builds and runs fine with Java 11. We only have to add -Djava.version=11 to Maven’s command.
注意:该项目目前以Java 13+为目标,但在Java 11下也能正常构建和运行。我们只需在Maven的命令中添加-Djava.version=11。
Next, we’ll replace the src/main/resources/baeldung-domain.json for this one. The modified version has the same configurations available in the original one plus an additional client application (quotes-client), two user groups (golden_ and silver_customers), and two roles (gold and silver).
接下来,我们将替换src/main/resources/baeldung-domain.json为这一个。修改后的版本具有与原版本相同的配置,外加一个额外的客户端应用程序(quotes-client)、两个用户组(golden_和silver_customers)以及两个角色(gold和silver)。
We can now start the server using the spring-boot:run maven plugin:
现在我们可以使用spring-boot:run maven插件启动服务器。
$ mvn spring-boot:run
... many, many log messages omitted
2022-01-16 10:23:20.318
  INFO 8108 --- [           main] c.baeldung.auth.AuthorizationServerApp   : Started AuthorizationServerApp in 23.815 seconds (JVM running for 24.488)
2022-01-16 10:23:20.334
  INFO 8108 --- [           main] c.baeldung.auth.AuthorizationServerApp   : Embedded Keycloak started: http://localhost:8083/auth to use keycloak
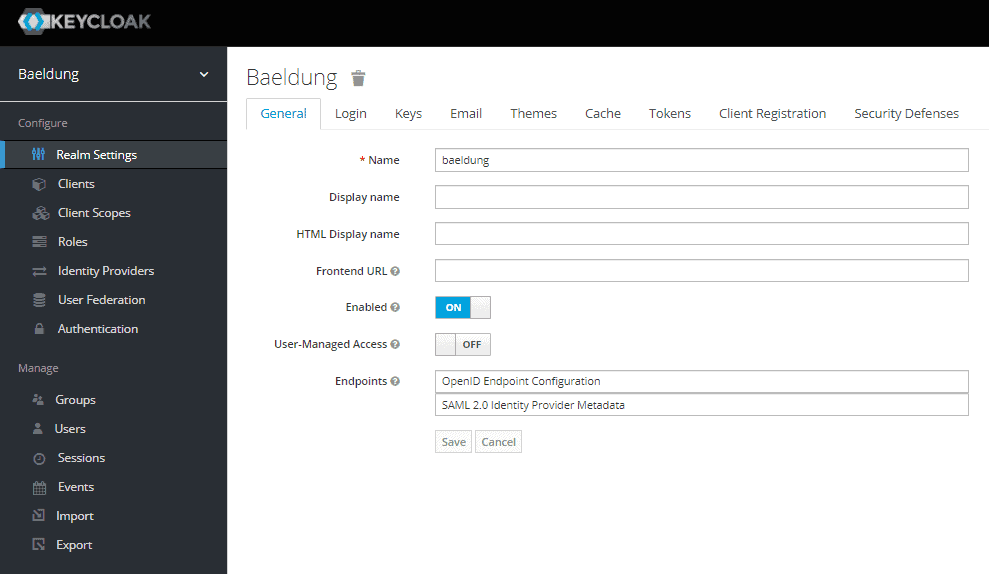
Once the server is up, we can access it by pointing our browser to http://localhost:8083/auth/admin/master/console/#/realms/baeldung. Once we’ve logged in with the administrator’s credentials (bael-admin/pass), we’ll get the realm’s management screen:
一旦服务器启动,我们可以通过将浏览器指向http://localhost:8083/auth/admin/master/console/#/realms/baeldung来访问它。一旦我们用管理员的凭证(bael-admin/pass)登录,我们就会得到领域的管理屏幕。
To finish the IdP setup, let’s add a couple of users. The first one will be Maxwell Smart, a member of the golden_customer group. The second will be John Snow, which we won’t add to any group.
为了完成IdP的设置,让我们添加几个用户。第一个将是Maxwell Smart,是golden_customer组的成员。第二个将是John Snow,我们不会将其添加到任何组。
Using the provided configuration, members of the golden_customers group will automatically assume the gold role.
使用提供的配置,golden_customers组的成员将自动承担gold角色。
5.2. Backend Service
5.2.后台服务
The quotes backend requires the regular Spring Boot Reactive MVC dependencies, plus the resource server starter dependency:
报价后端需要常规的Spring Boot Reactive MVC依赖,加上资源服务器启动器依赖。
<dependency>
    <groupId>org.springframework.boot</groupId>
    <artifactId>spring-boot-starter-oauth2-resource-server</artifactId>
    <version>2.6.2</version>
</dependency>
Notice that we’ve intentionally omitted the dependency’s version. This is the recommended practice when using SpringBoot’s parent POM or the corresponding BOM in the dependency management section.
注意,我们有意省略了依赖关系的版本。这是在使用SpringBoot的父POM或依赖管理部分的相应BOM时推荐的做法。
In the main application class, we must enable web flux security with the @EnableWebFluxSecurity:
在主应用程序类中,我们必须用@EnableWebFluxSecurity来启用网络流量安全。
@SpringBootApplication
@EnableWebFluxSecurity
public class QuotesApplication {
    public static void main(String[] args) {
        SpringApplication.run(QuotesApplication.class);
    }
}
The endpoint implementation uses the provided BearerAuthenticationToken to check if the current user has or not the gold role:
端点实现使用提供的BearerAuthenticationToken来检查当前用户是否具有gold角色。
@RestController
public class QuoteApi {
    private static final GrantedAuthority GOLD_CUSTOMER = new SimpleGrantedAuthority("gold");

    @GetMapping("/quotes/{symbol}")
    public Mono<Quote> getQuote(@PathVariable("symbol") String symbol,
      BearerTokenAuthentication auth ) {

        Quote q = new Quote();
        q.setSymbol(symbol);
        if ( auth.getAuthorities().contains(GOLD_CUSTOMER)) {
            q.setPrice(10.0);
        }
        else {
            q.setPrice(12.0);
        }
        return Mono.just(q);
    }
}
Now, how does Spring get the user roles? After all, this is not a standard claim like scopes or email. Indeed, there’s no magic here: we must supply a custom ReactiveOpaqueTokenIntrospection that extracts those roles from custom fields returned by Keycloak. This bean, available online, is basically the same shown in Spring’s documentation on this topic, with just a few minor changes specific to our custom fields.
现在,Spring是如何获得用户角色的?毕竟,这不是像scopes或email那样的标准要求。事实上,这里没有任何魔法:我们必须提供一个自定义的ReactiveOpaqueTokenIntrospection,从Keycloak返回的自定义域中提取这些角色。这个Bean(可在网上找到)基本上与Spring的关于这个主题的文档中所示的相同,只是针对我们的自定义字段做了一些小改动。
We must also supply the configuration properties needed to access our identity provider:
我们还必须提供访问我们的身份提供者所需的配置属性。
spring.security.oauth2.resourceserver.opaquetoken.introspection-uri=http://localhost:8083/auth/realms/baeldung/protocol/openid-connect/token/introspect
spring.security.oauth2.resourceserver.opaquetoken.client-id=quotes-client
spring.security.oauth2.resourceserver.opaquetoken.client-secret=<CLIENT SECRET>
Finally, to run our application, we can either import it in an IDE or run it from Maven. The project’s POM contains a profile for this purpose:
最后,为了运行我们的应用程序,我们可以在集成开发环境中导入该程序,或者从Maven中运行它。本项目的POM中包含一个用于此目的的配置文件。
$ mvn spring-boot:run -Pquotes-applicationThe application will now be ready to serve requests on http://localhost:8085/quotes. We can check that it is responding using curl:
现在应用程序将准备好为http://localhost:8085/quotes上的请求提供服务。我们可以使用curl检查它是否有响应。
$ curl -v http://localhost:8085/quotes/BAELAs expected, we get a 401 Unauthorized response since no Authorization header was sent.
正如预期,我们得到了一个401 Unauthorized响应,因为没有发送Authorization头。
6. Spring Gateway as OAuth 2.0 Resource Server
6.Spring Gateway作为OAuth 2.0资源服务器
Securing a Spring Cloud Gateway application acting as a resource server is no different from a regular resource service. As such, it comes with no surprise that we must add the same starter dependency as we did for the backend service:
保护作为资源服务器的Spring Cloud Gateway 应用程序与普通的资源服务没有什么不同。因此,我们必须添加与后端服务相同的启动依赖关系,这一点并不奇怪。
<dependency>
    <groupId>org.springframework.cloud</groupId>
    <artifactId>spring-cloud-starter-gateway</artifactId>
    <version>3.1.0</version>
</dependency>
<dependency>
    <groupId>org.springframework.boot</groupId>
    <artifactId>spring-boot-starter-oauth2-resource-server</artifactId>
    <version>2.6.2</version>
</dependency>
Accordingly, we also must add the @EnableWebFluxSecurity to our startup class:
因此,我们也必须将@EnableWebFluxSecurity添加到我们的启动类。
@SpringBootApplication
@EnableWebFluxSecurity
public class ResourceServerGatewayApplication {
    public static void main(String[] args) {
        SpringApplication.run(ResourceServerGatewayApplication.class,args);
    }
}
The security-related configuration properties are the same used in the backend:
与安全有关的配置属性与后端使用的相同。
spring:
  security:
    oauth2:
      resourceserver:
        opaquetoken:
          introspection-uri: http://localhost:8083/auth/realms/baeldung/protocol/openid-connect/token/introspect
          client-id: quotes-client
          client-secret: <code class="language-css"><CLIENT SECRET>
Next, we just add route declarations the same way we did in our previous article on Spring Cloud Gateway setup:
接下来,我们只需按照我们在上一篇关于Spring Cloud Gateway设置的文章中的方式添加路由声明。
... other properties omitted
  cloud:
    gateway:
      routes:
      - id: quotes
        uri: http://localhost:8085
        predicates:
        - Path=/quotes/**
Notice that, apart from the security dependencies and properties, we didn’t change anything on the gateway itself. To run the gateway application, we’ll use spring-boot:run, using a specific profile with the required settings:
注意,除了安全依赖和属性,我们没有改变网关本身的任何东西。为了运行网关应用程序,我们将使用spring-boot:run,使用一个具有所需设置的特定配置文件。
$ mvn spring-boot:run -Pgateway-as-resource-server6.1. Testing the Resource Server
6.1.测试资源服务器
Now that we have all pieces of our puzzle, let’s put them together. Firstly, we have to make sure we have Keycloak, the quotes backend, and the gateway all running.
现在我们有了所有的拼图碎片,让我们把它们放在一起。首先,我们必须确保我们有Keycloak,报价后端,和网关都在运行。
Next, we need to get an access token from Keycloak. In this case, the most straightforward way to get one is to use a password grant flow (a.k.a, “Resource Owner”). This means doing a POST request to Keycloak passing the username/password of one of the users, together with the client id and secret for the quotes client application:
接下来,我们需要从Keycloak获得一个访问令牌。在这种情况下,获得一个访问令牌的最直接方法是使用一个密码授予流程(又称 “资源所有者”)。这意味着向Keycloak发出一个POST请求,传递其中一个用户的用户名/密码,以及报价客户端应用程序的客户端ID和秘密。
$ curl -L -X POST \
  'http://localhost:8083/auth/realms/baeldung/protocol/openid-connect/token' \
  -H 'Content-Type: application/x-www-form-urlencoded' \
  --data-urlencode 'client_id=quotes-client' \
  --data-urlencode 'client_secret=0e082231-a70d-48e8-b8a5-fbfb743041b6' \
  --data-urlencode 'grant_type=password' \
  --data-urlencode 'scope=email roles profile' \
  --data-urlencode 'username=john.snow' \
  --data-urlencode 'password=1234'
The response will be a JSON object containing the access token, along with other values:
响应将是一个JSON对象,包含访问令牌,以及其他值。
{
	"access_token": "...omitted",
	"expires_in": 300,
	"refresh_expires_in": 1800,
	"refresh_token": "...omitted",
	"token_type": "bearer",
	"not-before-policy": 0,
	"session_state": "7fd04839-fab1-46a7-a179-a2705dab8c6b",
	"scope": "profile email"
}
We can now use the returned access token to access the /quotes API:
我们现在可以使用返回的访问令牌来访问/quotes API。
$ curl --location --request GET 'http://localhost:8086/quotes/BAEL' \
--header 'Accept: application/json' \
--header 'Authorization: Bearer xxxx...'
Which produces a quote in JSON format:
这将产生一个JSON格式的报价。
{
  "symbol":"BAEL",
  "price":12.0
}
Let’s repeat this process, this time using an access token for Maxwell Smart:
让我们重复这个过程,这次使用Maxwell Smart的访问令牌。
{
  "symbol":"BAEL",
  "price":10.0
}
We see that we have a lower price, which means the backend was able to correctly identify the associated user. We can also check that unauthenticated requests do not get propagated to the backend, using a curl request with no Authorization header:
我们看到,我们有一个较低的价格,这意味着后台能够正确识别相关的用户。我们还可以使用没有Authorization头的curl请求,检查未经认证的请求是否会被传播到后台。
$ curl http://localhost:8086/quotes/BAELInspecting the gateway logs, we see that there are no messages related to the request forwarding process. This shows that the response was generated at the gateway.
检查网关日志,我们看到没有与请求转发过程相关的消息。这表明响应是在网关处产生的。
7. Spring Gateway as OAuth 2.0 Client
7.Spring Gateway作为OAuth 2.0客户端
For the startup class, we’ll use the same one we already have for the resource server version. We’ll use this to emphasize that all security behavior comes from the available libraries and properties.
对于启动类,我们将使用我们已经为资源服务器版本准备的相同的启动类。我们将用它来强调所有的安全行为都来自于可用的库和属性。。
In fact, the only noticeable difference when comparing both versions are in the configuration properties. Here, we need to configure the provider details using either the issuer-uri property or individual settings for the various endpoints (authorization, token, and introspection).
事实上,在比较这两个版本时,唯一明显的区别是在配置属性方面。在这里,我们需要使用issuer-uri属性或各种端点(授权、令牌和自省)的单独设置来配置提供者的细节。
We also need to define our application client registration details, which include the requested scopes. Those scopes inform the IdP which set of information items will be available through the introspection mechanism:
我们还需要定义我们的应用程序客户端注册细节,其中包括请求的范围。这些作用域告知IdP哪一组信息项目将通过自省机制提供。
... other propeties omitted
  security:
    oauth2:
      client:
        provider:
          keycloak:
            issuer-uri: http://localhost:8083/auth/realms/baeldung
        registration:
          quotes-client:
            provider: keycloak
            client-id: quotes-client
            client-secret: <CLIENT SECRET>
            scope:
            - email
            - profile
            - roles
Finally, there’s one important change in the route definitions section. We must add the TokenRelay filter to any route that requires the access token to be propagated:
最后,在路由定义部分有一个重要的变化。我们必须将TokenRelay过滤器添加到任何需要传播访问令牌的路由中:。
spring:
  cloud:
    gateway:
      routes:
      - id: quotes
        uri: http://localhost:8085
        predicates:
        - Path=/quotes/**
        filters:
        - TokenRelay=
Alternatively, if we want all routes to start an authorization flow, we can add the TokenRelay filter to the default-filters section:
另外,如果我们希望所有路由都能启动授权流,我们可以在default-filters部分添加TokenRelay过滤器。
spring:
  cloud:
    gateway:
      default-filters:
      - TokenRelay=
      routes:
... other routes definition omitted
7.1. Testing Spring Gateway as OAuth 2.0 Client
7.1.测试Spring Gateway作为OAuth 2.0客户端
For the test setup, we also need to make sure we have the three pieces of our project running. This time, however, we’ll run the gateway using a different Spring Profile containing the required properties to make it act as an OAuth 2.0 client. The sample project’s POM contains a profile that allows us to start it with this profile enabled:
对于测试设置,我们还需要确保我们的项目的三个部分都在运行。但是这一次,我们将使用不同的Spring配置文件来运行网关,其中包含使其作为OAuth 2.0客户端的必要属性。示例项目的POM包含一个配置文件,允许我们在启用该配置文件后启动它。
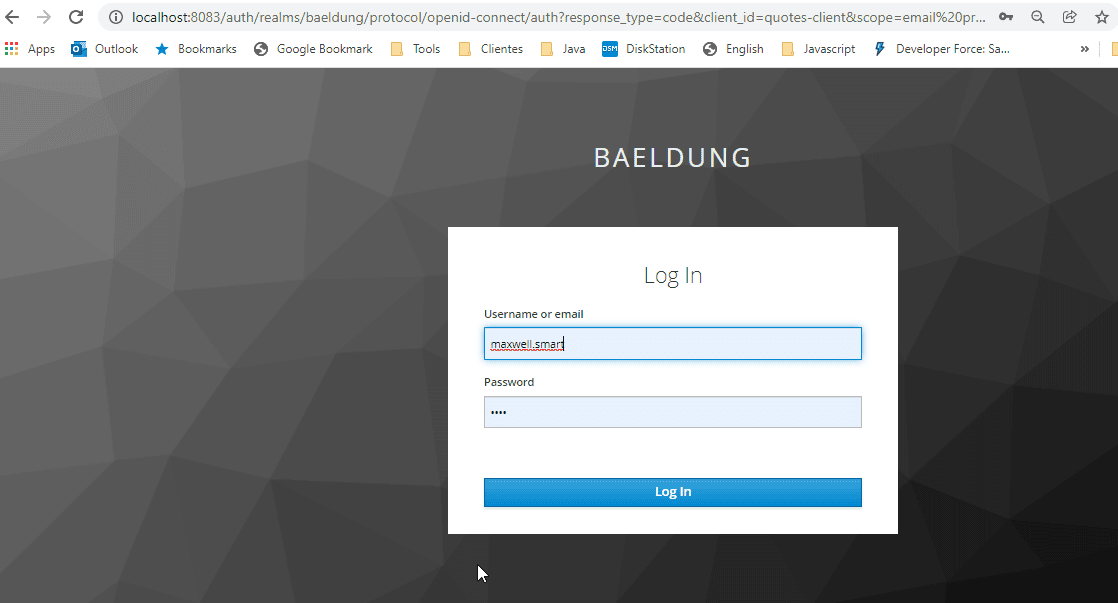
$ mvn spring-boot:run -Pgateway-as-oauth-clientOnce the gateway is running, we can test it by pointing our browser to http://localhost:8087/quotes/BAEL. If everything is working as expected, we’ll be redirected to the IdP’s login page:
一旦网关运行,我们可以通过将我们的浏览器指向http://localhost:8087/quotes/BAEL 来测试它。如果一切按预期运行,我们将被重定向到IdP的登录页面。
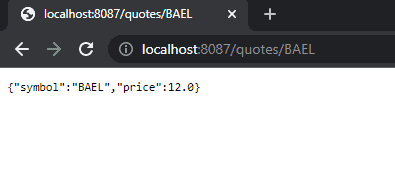
Since we’ve used Maxwell Smart’s credentials, we again get a quote with a lower price:
由于我们使用了Maxwell Smart的证书,我们再次得到了一个价格较低的报价。
To conclude our test, we’ll use an anonymous/incognito browser window and test this endpoint with John Snow’s credentials. This time we get the regular quote price:
为了结束我们的测试,我们将使用一个匿名/隐身的浏览器窗口,用John Snow的凭证测试这个端点。这一次我们得到的是正常的报价。
8. Conclusion
8.结语
In this article, we’ve explored some of the OAuth 2.0 security patterns and how to implement them using Spring Cloud Gateway. As usual, all code is available over on GitHub.
在这篇文章中,我们探讨了一些OAuth 2.0的安全模式,以及如何使用Spring Cloud Gateway来实现它们。像往常一样,所有的代码都可以在GitHub上找到。
