1. Overview
1.概述
In this tutorial, we’ll introduce client-side service discovery via “Spring Cloud Netflix Eureka.”
在本教程中,我们将通过”Spring Cloud Netflix Eureka.“介绍客户端服务发现。
Client-side service discovery allows services to find and communicate with each other without hard-coding the hostname and port. The only ‘fixed point’ in such an architecture is the service registry, with which each service has to register.
客户端服务发现允许服务在不硬编码主机名和端口的情况下找到并相互通信。这种架构中唯一的 “固定点 “是服务注册表,每个服务都必须向其注册。
One drawback is that all clients must implement a certain logic to interact with this fixed point. This assumes an additional network round trip before the actual request.
一个缺点是,所有客户端必须实现一定的逻辑来与这个固定点互动。这假定在实际请求之前有一个额外的网络往返。。
With Netflix Eureka, each client can simultaneously act as a server to replicate its status to a connected peer. In other words, a client retrieves a list of all connected peers in a service registry, and makes all further requests to other services through a load-balancing algorithm.
使用Netflix Eureka,每个客户端可以同时作为服务器,将其状态复制给连接的对等体。换句话说,客户端在一个服务注册表中检索所有连接的对等体的列表,并通过负载平衡算法向其他服务提出所有进一步的请求。
To be informed about the presence of a client, they have to send a heartbeat signal to the registry.
为了获知客户的存在,他们必须向注册中心发送一个心跳信号。
To achieve the goal of this tutorial, we’ll implement three microservices:
为了实现本教程的目标,我们将实现三个microservices。
- a service registry (Eureka Server)
- a REST service, which registers itself at the registry (Eureka Client)
- a web application, which is consuming the REST service as a registry-aware client (Spring Cloud Netflix Feign Client)
2. Eureka Server
2.尤里卡服务器
Implementing a Eureka Server for service registry is as easy as:
实施用于服务注册的Eureka服务器很简单。
- adding spring-cloud-starter-netflix-eureka-server to the dependencies
- enabling the Eureka Server in a @SpringBootApplication by annotating it with @EnableEurekaServer
- configuring some properties
Let’s do it step by step.
让我们一步步来吧。
First, we’ll create a new Maven project and put the dependencies in it. Notice that we’re importing the spring-cloud-starter-parent to all the projects described in this tutorial:
首先,我们要创建一个新的Maven项目,并将依赖项放入其中。注意,我们要把spring-cloud-starter-parent导入本教程所述的所有项目中。
<dependency>
    <groupId>org.springframework.cloud</groupId>
    <artifactId>spring-cloud-starter-netflix-eureka-server</artifactId>
</dependency>

<dependencyManagement>
    <dependencies>
        <dependency>
            <groupId>org.springframework.cloud</groupId>
            <artifactId>spring-cloud-starter-parent</artifactId>
            <version>Greenwich.RELEASE</version>
            <type>pom</type>
            <scope>import</scope>
        </dependency>
    </dependencies>
</dependencyManagement>
We can check the latest Spring Cloud releases in the Spring’s Projects documentation.
我们可以在Spring的项目文档中查看最新的Spring Cloud版本。
Then we’ll create the main application class:
然后我们将创建主应用程序类。
@SpringBootApplication
@EnableEurekaServer
public class EurekaServerApplication {
    public static void main(String[] args) {
        SpringApplication.run(EurekaServerApplication.class, args);
    }
}
Finally, we’ll configure the properties in YAML format, so an application.yml will be our configuration file:
最后,我们将以YAML格式配置属性,所以一个application.yml将是我们的配置文件。
server:
  port: 8761
eureka:
  client:
    registerWithEureka: false
    fetchRegistry: false
Here we’re configuring an application port; the default one for Eureka servers is 8761. We’re telling the built-in Eureka Client not to register with itself because our application should be acting as a server.
这里我们要配置一个应用程序端口;Eureka服务器的默认端口是8761。我们要告诉内置的Eureka客户端不要向自己注册,因为我们的应用程序应该充当一个服务器。
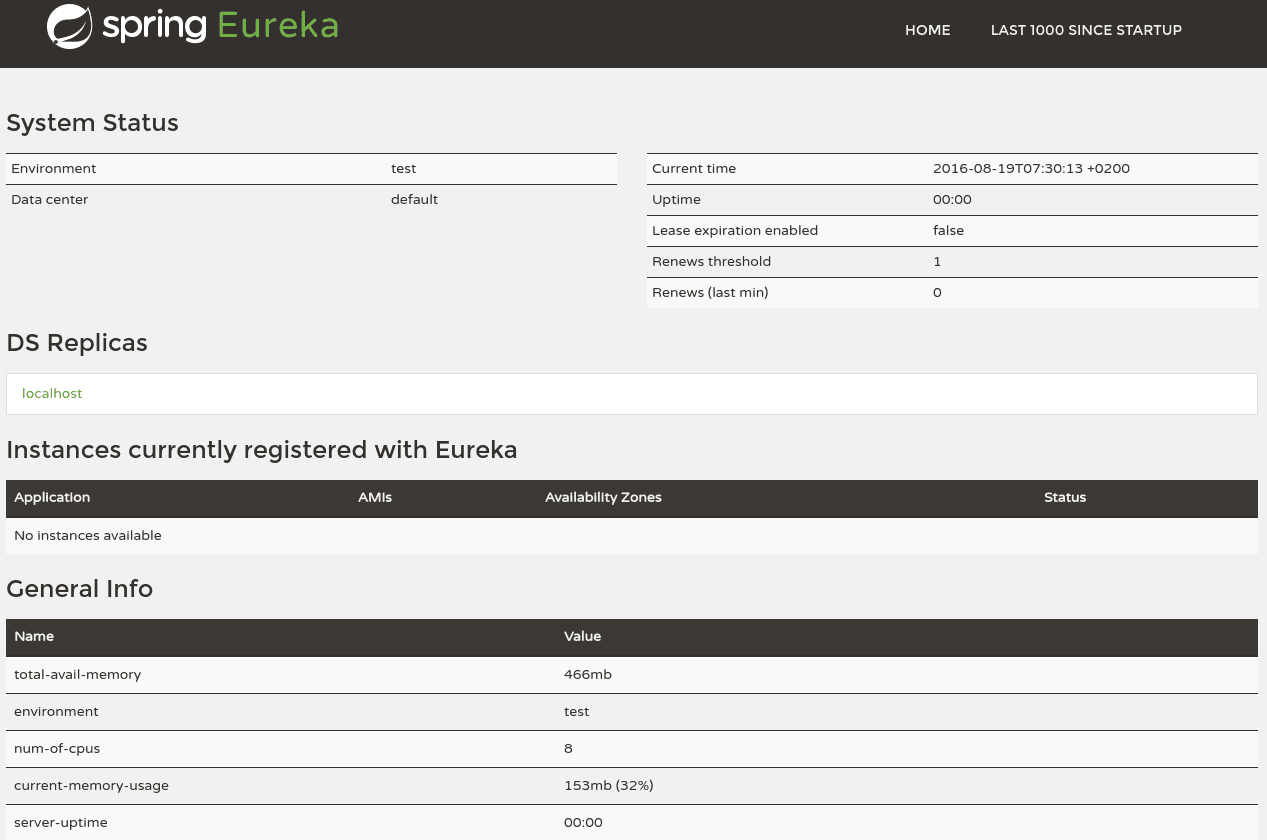
Now we’ll point our browser to http://localhost:8761 to view the Eureka dashboard, where we’ll later inspect the registered instances.
现在我们将浏览器指向http://localhost:8761以查看Eureka仪表板,稍后我们将在那里检查注册的实例。
At the moment, we can see basic indicators, such as status and health indicators:
目前,我们可以看到基本指标,如状态和健康指标。
3. Eureka Client
3.尤里卡客户
For a @SpringBootApplication to be discovery-aware, we have to include a Spring Discovery Client (for example, spring-cloud-starter-netflix-eureka-client) into our classpath.
为了使@SpringBootApplication具有发现意识,我们必须将Spring发现客户端(例如,spring-cloud-starter-netflix-eureka-client)纳入我们的classpath。
Then we need to annotate a @Configuration with either @EnableDiscoveryClient or @EnableEurekaClient. Note that this annotation is optional if we have the spring-cloud-starter-netflix-eureka-client dependency on the classpath.
然后我们需要在@Configuration中注释@EnableDiscoveryClient或@EnableEurekaClient。注意,如果我们在classpath上有spring-cloud-starter-netflix-eureka-client依赖关系,那么这个注解是可选的。
The latter tells Spring Boot to use Spring Netflix Eureka for service discovery explicitly. To fill our client application with some sample-life, we’ll also include the spring-boot-starter-web package in the pom.xml and implement a REST controller.
后者告诉Spring Boot明确使用Spring Netflix Eureka进行服务发现。为了让我们的客户端应用程序充满一些生活样本,我们还将在pom.xml中包含spring-boot-starter-web包并实现一个REST控制器。
But first, we’ll add the dependencies. Again, we can leave it to the spring-cloud-starter-parent dependency to figure out the artifact versions for us:
但首先,我们要添加依赖项。同样,我们可以让spring-cloud-starter-parent 依赖性来为我们找出工件的版本。
<dependency>
    <groupId>org.springframework.cloud</groupId>
    <artifactId>spring-cloud-starter-netflix-eureka-starter</artifactId>
</dependency>
<dependency>
    <groupId>org.springframework.boot</groupId>
    <artifactId>spring-boot-starter-web</artifactId>
</dependency>
Here we’ll implement the main application class:
这里我们将实现主应用程序类。
@SpringBootApplication
@RestController
public class EurekaClientApplication implements GreetingController {

    @Autowired
    @Lazy
    private EurekaClient eurekaClient;

    @Value("${spring.application.name}")
    private String appName;

    public static void main(String[] args) {
        SpringApplication.run(EurekaClientApplication.class, args);
    }

    @Override
    public String greeting() {
        return String.format(
          "Hello from '%s'!", eurekaClient.getApplication(appName).getName());
    }
}
And the GreetingController interface:
还有GreetingController接口。
public interface GreetingController {
    @RequestMapping("/greeting")
    String greeting();
}
Instead of the interface, we could also simply declare the mapping inside the EurekaClientApplication class. The interface can be useful though if we want to share it between server and client.
我们也可以简单地在EurekaClientApplication类中声明映射,而不是使用接口。不过,如果我们想在服务器和客户端之间共享它的话,这个接口还是很有用的。
Next, we have to set-up an application.yml with a configured Spring application name to uniquely identify our client in the list of registered applications.
接下来,我们必须设置一个application.yml,并配置Spring应用程序名称,以便在注册的应用程序列表中唯一地识别我们的客户端。
We can let Spring Boot choose a random port for us because later we’ll access this service with its name.
我们可以让Spring Boot为我们选择一个随机的端口,因为稍后我们将用它的名字访问这个服务。
Finally, we have to tell our client where it has to locate the registry:
最后,我们必须告诉我们的客户,它必须在哪里找到注册表。
spring:
  application:
    name: spring-cloud-eureka-client
server:
  port: 0
eureka:
  client:
    serviceUrl:
      defaultZone: ${EUREKA_URI:http://localhost:8761/eureka}
  instance:
    preferIpAddress: true
We decided to set up our Eureka Client this way because this kind of service should be easily scalable later on.
我们决定以这种方式设置我们的尤里卡客户端,因为这种服务以后应该很容易扩展。
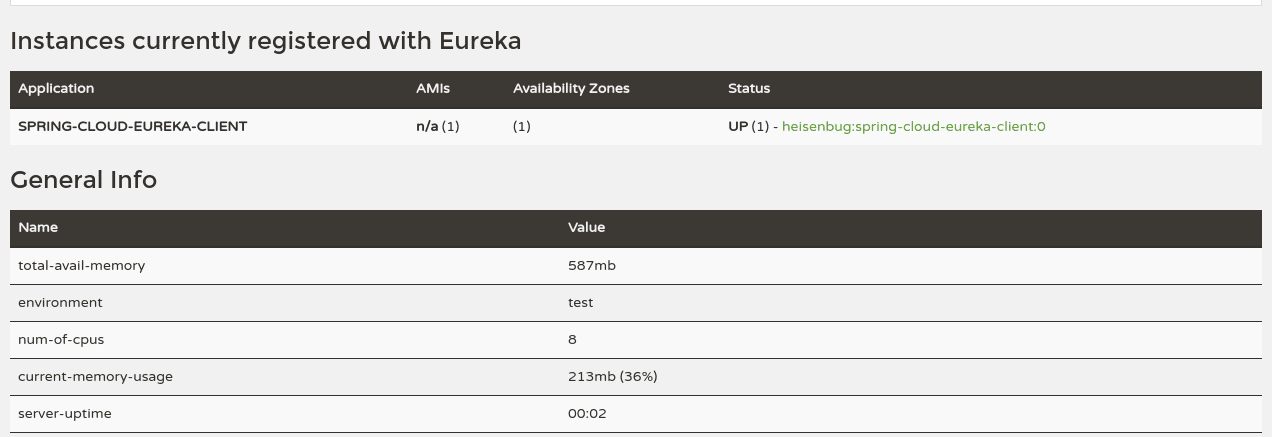
Now we’ll run the client, and point our browser to http://localhost:8761 again to see its registration status on the Eureka Dashboard. By using the Dashboard, we can do further configuration, like link the homepage of a registered client with the Dashboard for administrative purposes. The configuration options, however, are beyond the scope of this article:
现在我们将运行客户端,并将我们的浏览器再次指向http://localhost:8761,以便在Eureka仪表板上看到其注册状态。通过使用仪表板,我们可以做进一步的配置,比如将已注册客户的主页与仪表板联系起来,以达到管理的目的。不过,这些配置选项超出了本文的范围。
4. Feign Client
4.假扮客户
To finalize our project with three dependent microservices, we’ll now implement a REST-consuming web application using Spring Netflix Feign Client.
为了最终完成我们的项目,有三个依赖性的微服务,我们现在将使用REST实现一个Spring Netflix Feign Client的消耗性网络应用。
Think of Feign as a discovery-aware Spring RestTemplate using interfaces to communicate with endpoints. These interfaces will be automatically implemented at runtime, and instead of service-urls, it’s using service-names.
将Feign视为一个具有发现意识的Spring RestTemplate,使用接口与端点通信。这些接口将在运行时自动实现,它不使用service-urls,而是使用service-names。。
Without Feign, we would have to autowire an instance of EurekaClient into our controller with which we could receive service-information by service-name as an Application object.
如果没有Feign,我们将不得不在控制器中自动连接一个EurekaClient实例,我们可以通过service-name作为Application对象接收服务信息。
We would use this Application to get a list of all instances of this service, pick a suitable one, and then use this InstanceInfo to get the hostname and port. With this, we could do a standard request with any http client:
我们将使用这个Application来获取这个服务的所有实例的列表,选择一个合适的,然后使用这个InstanceInfo来获取主机名和端口。有了这个,我们可以用任何http客户端做一个标准的请求:。
@Autowired
private EurekaClient eurekaClient;

@RequestMapping("/get-greeting-no-feign")
public String greeting(Model model) {

    InstanceInfo service = eurekaClient
      .getApplication(spring-cloud-eureka-client)
      .getInstances()
      .get(0);

    String hostName = service.getHostName();
    int port = service.getPort();

    // ...
}
A RestTemplate can also be used to access Eureka client-services by name, but this topic is beyond this article.
RestTemplate也可用于按名称访问Eureka客户端服务,但这个话题超出了本文的范围。
To set up our Feign Client project, we’ll add the following four dependencies to its pom.xml:
为了设置我们的Feign Client项目,我们将在其pom.xml中添加以下四个依赖项。
<dependency>
    <groupId>org.springframework.cloud</groupId>
    <artifactId>spring-cloud-starter-feign</artifactId>
</dependency>
<dependency>
    <groupId>org.springframework.cloud</groupId>
    <artifactId>spring-cloud-starter-netflix-eureka-client</artifactId>
</dependency>
<dependency>
    <groupId>org.springframework.boot</groupId>
    <artifactId>spring-boot-starter-web</artifactId>
</dependency>
<dependency>
    <groupId>org.springframework.boot</groupId>
    <artifactId>spring-boot-starter-thymeleaf</artifactId>
</dependency>
The Feign Client is located in the spring-cloud-starter-feign package. To enable it, we have to annotate a @Configuration with @EnableFeignClients. To use it, we simply annotate an interface with @FeignClient(“service-name”) and auto-wire it into a controller.
Feign Client位于spring-cloud-starter-feign包中。要启用它,我们必须在@Configuration中注释@EnableFeignClients。要使用它,我们只需用@FeignClient(“service-name”)注释一个接口,并将其自动连接到一个控制器。
A good method for creating such Feign Clients is to create interfaces with @RequestMapping annotated methods and put them into a separate module. This way they can be shared between server and client. On the server-side, we can implement them as @Controller, and on the client-side, they can be extended and annotated as @FeignClient.
创建这种Feign Clients的好方法是创建带有@RequestMapping注释方法的接口,并将它们放入一个单独的模块。这样,它们就可以在服务器和客户端之间共享。在服务器端,我们可以将它们作为@Controller来实现,而在客户端,它们可以被扩展并注解为@FeignClient。
Furthermore, the spring-cloud-starter-eureka package needs to be included in the project and enabled by annotating the main application class with @EnableEurekaClient.
此外,spring-cloud-starter-eureka包需要包含在项目中,并通过用@EnableEurekaClient注释主应用程序类来启用。
The spring-boot-starter-web and spring-boot-starter-thymeleaf dependencies are used to present a view containing fetched data from our REST service.
spring-boot-starter-web和spring-boot-starter-thymeleaf依赖关系被用于呈现一个视图,其中包含从我们的REST服务中获取的数据。
This will be our Feign Client interface:
这将是我们的Feign客户端接口。
@FeignClient("spring-cloud-eureka-client")
public interface GreetingClient {
    @RequestMapping("/greeting")
    String greeting();
}
Here we’ll implement the main application class, which simultaneously acts as a controller:
在这里,我们将实现主应用程序类,它同时作为一个控制器。
@SpringBootApplication
@EnableFeignClients
@Controller
public class FeignClientApplication {
    @Autowired
    private GreetingClient greetingClient;

    public static void main(String[] args) {
        SpringApplication.run(FeignClientApplication.class, args);
    }

    @RequestMapping("/get-greeting")
    public String greeting(Model model) {
        model.addAttribute("greeting", greetingClient.greeting());
        return "greeting-view";
    }
}
This will be the HTML template for our view:
这将是我们视图的HTML模板。
<!DOCTYPE html>
<html xmlns:th="http://www.thymeleaf.org">
    <head>
        <title>Greeting Page</title>
    </head>
    <body>
        <h2 th:text="${greeting}"/>
    </body>
</html>
The application.yml configuration file is almost the same as in the previous step:
application.yml 配置文件与上一步几乎相同。
spring:
  application:
    name: spring-cloud-eureka-feign-client
server:
  port: 8080
eureka:
  client:
    serviceUrl:
      defaultZone: ${EUREKA_URI:http://localhost:8761/eureka}
Now we can build and run this service. Finally, we’ll point our browser to http://localhost:8080/get-greeting and it should display something like the following:
现在我们可以建立并运行这个服务。最后,我们将浏览器指向http://localhost:8080/get-greeting,它应该显示类似以下内容。
Hello from SPRING-CLOUD-EUREKA-CLIENT!5. ‘TransportException: Cannot Execute Request on Any Known Server’
5.’TransportException:无法在任何已知的服务器上执行请求’
While running Eureka servers, we often run into exceptions like:
在运行Eureka服务器时,我们经常遇到这样的异常情况。
com.netflix.discovery.shared.transport.TransportException: Cannot execute request on any known serverBasically, this happens due to the wrong configuration in application.properties or application.yml. Eureka provides two properties for the client that can be configurable:
基本上,这种情况的发生是由于application.properties或application.yml中的错误配置。Eureka为客户端提供了两个可配置的属性。
- registerWithEureka: If we set this property as true, then while the server starts, the inbuilt client will try to register itself with the Eureka server.
- fetchRegistry: If we configure this property as true, the inbuilt client will try to fetch the Eureka registry.
Now when we start up the Eureka server, we don’t want to register the inbuilt client to configure itself with the server.
现在当我们启动Eureka服务器时,我们不想让内置的客户端注册,以便在服务器上配置自己。
If we mark the above properties as true (or just don’t configure them, as they’re true by default), then while starting the server, the inbuilt client tries to register itself with the Eureka server and also tries to fetch the registry, which isn’t available yet. As a result, we get TransportException.
如果我们将上述属性标记为true(或者干脆不配置它们,因为它们在默认情况下是true),那么在启动服务器时,内置的客户端会尝试在Eureka服务器上注册自己,也会尝试获取注册表,但这还不适用。结果,我们得到TransportException。
So we should never configure these properties as true in the Eureka server applications. The correct settings that should be put in application.yml are:
所以我们绝不应该在Eureka服务器应用程序中将这些属性配置为true。应该放在application.yml中的正确设置是。
eureka:
  client:
    registerWithEureka: false
    fetchRegistry: false
6. Conclusion
6.结论
In this article, we learned how to implement a service registry using Spring Netflix Eureka Server and register some Eureka Clients with it.
在这篇文章中,我们学习了如何使用Spring Netflix Eureka Server实现一个服务注册中心,并在其中注册一些Eureka Client。
Since our Eureka Client from step 3 listens on a randomly chosen port, it doesn’t know its location without the information from the registry. With a Feign Client and our registry, we can locate and consume the REST service, even when the location changes.
由于我们的Eureka Client在一个随机选择的端口上监听,所以如果没有来自注册表的信息,它就不知道自己的位置。有了Feign Client和我们的注册表,我们就可以定位并使用REST服务,即使位置发生变化。
Finally, we saw the big picture of using service discovery in a microservice architecture.
最后,我们看到了在微服务架构中使用服务发现的大画面。
As usual, we can find the sources over on GitHub, which also includes a set of Docker-related files to use with docker-compose to create containers from our project.
像往常一样,我们可以在GitHub上找到源代码,其中还包括一组Docker相关的文件,以便与docker-compose一起使用,从我们的项目创建容器。

