1. Overview
1.概述
Keycloak is an open-source identity and access management or IAM solution, that can be used as a third-party authorization server to manage our web or mobile applications’ authentication and authorization requirements.
Keycloak是一个开源的身份和访问管理或IAM解决方案,可以作为第三方授权服务器来管理我们的Web或移动应用程序的认证和授权要求。
In this tutorial, we’ll focus on how we can customize the theme for our Keycloak server so that we can have a different look and feel for our end-user facing web pages.
在本教程中,我们将专注于如何为我们的Keycloak服务器定制主题,这样我们就可以为我们面向终端用户的网页提供不同的外观和感觉。
First, we’ll establish a background from the perspective of a standalone Keycloak server. In later sections, we’ll look at similar examples in the context of an embedded one.
首先,我们将从一个独立的Keycloak服务器的角度建立一个背景。在后面的章节中,我们将在一个嵌入式的背景下看类似的例子。
For that, we’ll build on top of our previous articles: a Quick Guide to Using Keycloak and Keycloak Embedded in a Spring Boot Application. So, for those starting out, it’s a good idea to go through them first.
为此,我们将在我们以前的文章的基础上。使用Keycloak的快速指南和嵌入Spring Boot应用程序中的Keycloak。因此,对于那些刚开始的人来说,最好先看一下它们。
2. Themes in Keycloak
2.Keycloak的主题
2.1. Default Themes
2.1.默认主题
A couple of themes are pre-built in Keycloak and come bundled with the distribution.
有几个主题是在Keycloak中预先建立的,并与发行版捆绑在一起。
For a standalone server, these can be found as different folders in the keycloak-<version>/themes directory:
对于一个独立的服务器,这些可以在keycloak-<version>/themes目录下找到不同的文件夹。
- base: a skeletal theme that contains HTML templates and message bundles; all themes, including custom ones, generally inherit from it
- keycloak: contains images and stylesheets for beautifying pages; if we don’t provide a custom theme, this is the one used by default
It is not recommended to modify the existing themes. Instead, we should create a new theme that extends one of the above two.
我们不建议修改现有的主题。相反,我们应该创建一个新的主题,扩展上述两个主题中的一个。
To create a new customized theme, we’ll need to add a new folder, let’s call it custom, to the themes directory. In case we want a complete overhaul, copying contents from the base folder is the best way to kick-start.
为了创建一个新的自定义主题,我们需要在themes目录下添加一个新的文件夹,我们称之为custom。如果我们想进行彻底的改造,从base文件夹复制内容是最好的启动方式。
For our demo, we’re not planning on replacing everything, so it’s pragmatic to get the contents from the keycloak directory.
对于我们的演示,我们不打算替换所有的东西,所以从keycloak目录中获取内容是很务实的。
As we’ll see in the next section, custom will only need the contents of the theme type that we want to override, and not the entire keycloak folder.
正如我们将在下一节看到的,custom将只需要我们想要覆盖的主题类型的内容,而不是整个keycloak文件夹。
2.2. Types of Themes
2.2.主题的类型
Keycloak supports six types of themes:
Keycloak支持六种类型的主题。
- Common: for common items such as fonts; is imported by other theme types
- Welcome: for the landing page
- Login: for login, OTP, grant, registration, and forgot password pages
- Account: for user account management pages
- Admin Console: for admin console
- Email: for emails that are sent by the server
The last four themes from the above list can be set via the Admin Console for a standalone server. When we create a new folder in the themes directory, it’s available for selection after a server restart.
上述列表中的最后四个主题可以通过独立服务器的管理控制台来设置。当我们在themes目录下创建一个新的文件夹时,在服务器重新启动后就可以选择。
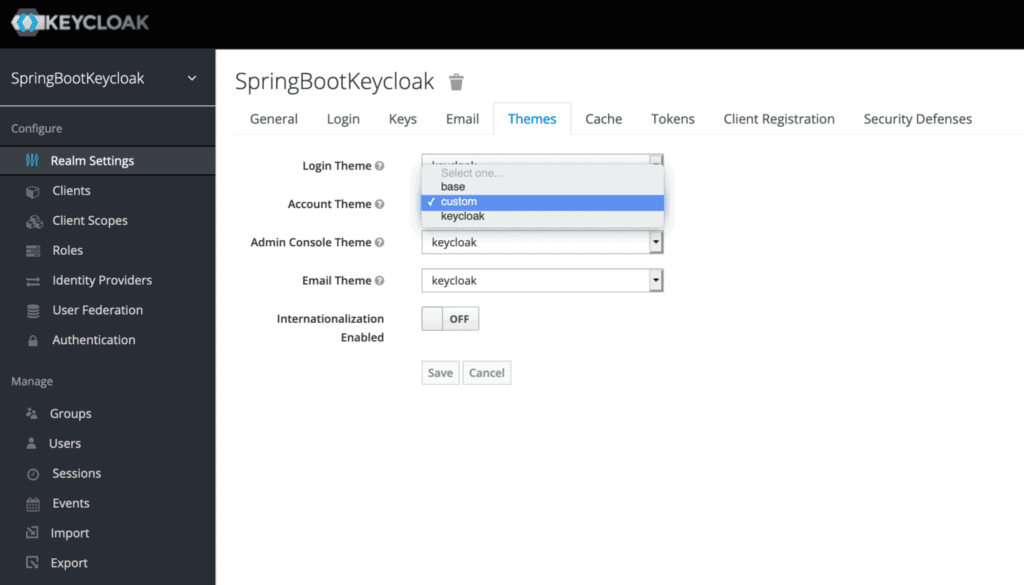
Let’s login to the admin console with the credentials initial1/zaq1!QAZ and go to the Themes tab for our realm:
让我们用initial1/zaq1!QAZ的凭证登录到管理控制台,进入Themes标签,查看我们的领域。
Notably, the themes are set realm-wise so that we can have different ones for different realms. Here we’re setting our custom theme for user account management for our SpringBootKeycloak realm.
值得注意的是,这些主题是按境界设置的,因此我们可以为不同的境界设置不同的主题。这里我们正在为我们的SpringBootKeycloak领域设置用户账户管理的自定义主题。
2.3. Structure of a Theme Type
2.3.主题类型的结构
Apart from the HTML templates, message bundles, images, and stylesheets as outlined in our Default Themes section, a theme in Keycloak consists of a couple more elements – theme properties and scripts.
除了我们在默认主题部分所概述的HTML模板、信息包、图像和样式表之外,Keycloak的主题还包括几个元素 – 主题属性和脚本。
Each theme type contains a theme.properties file. As an example, let’s have a look at this file from the account type:
每个主题类型都包含一个theme.properties文件。作为一个例子,让我们看一下account类型的这个文件。
parent=base
import=common/keycloak

styles=css/account.css
stylesCommon=node_modules/patternfly/dist/css/patternfly.min.css node_modules/patternfly/dist/css/patternfly-additions.min.css
As we can see, this theme extends from the base theme to get all its HTML and message bundles and also imports the common theme to include a few styles from it. Apart from that, it also defines its own style, css/account.css.
正如我们所看到的,这个主题从base主题中延伸出来,以获得其所有的HTML和消息包,并且还导入了common主题,以包括其中的一些样式。除此之外,它还定义了自己的样式,css/account.css。
Scripts are an optional feature. If we need to include tailored JavaScript files for our templates for a given theme type, we can create a resources/js directory and keep them there. Next, we need to include them in our theme.properties:
脚本是一个可选的功能。如果我们需要为特定主题类型的模板包含定制的JavaScript文件,我们可以创建一个resources/js目录,并将它们放在那里。接下来,我们需要在我们的theme.properties中包含它们。
scripts=js/script1.js js/script2.js2.4. Adding Customizations
2.4.添加自定义功能
Now on to the fun part!
现在进入有趣的部分!
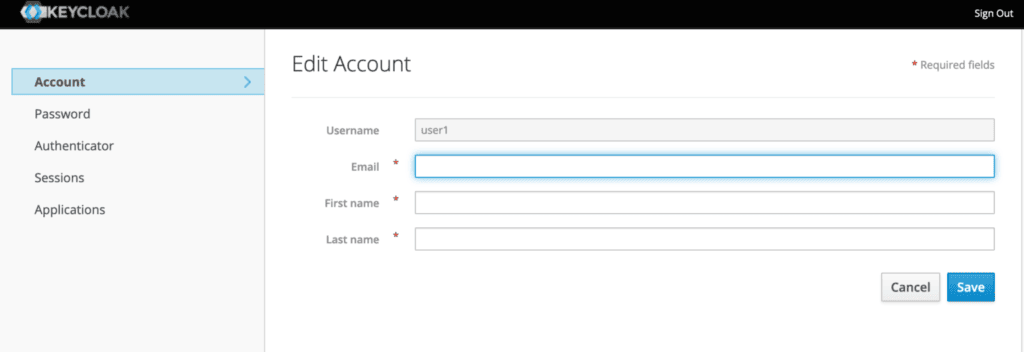
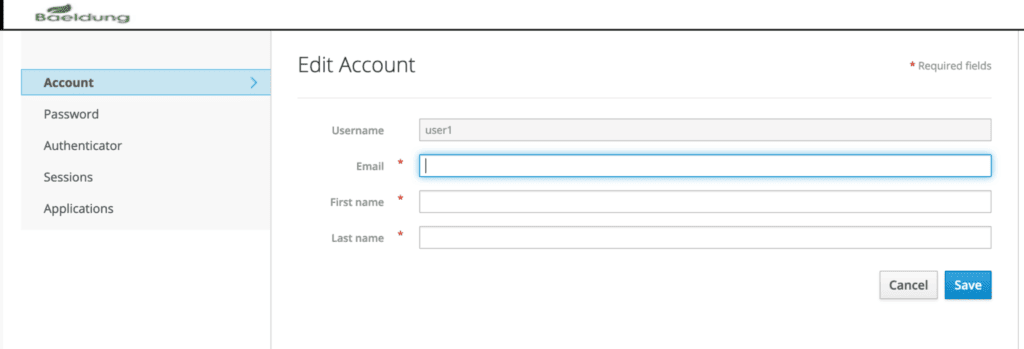
Let’s take the example of our Account Management page and see how to change its appearance. To be precise, we’ll be changing the logo appearing on the page.
让我们以我们的账户管理页面为例,看看如何改变其外观。准确地说,我们将改变页面上出现的标志。
Just before we’ll do all the changes, below is the original template, available at http://localhost:8180/auth/realms/SpringBootKeycloak/account:
就在我们要做所有改动之前,下面是原始模板,可在http://localhost:8180/auth/realms/SpringBootKeycloak/account。
Let’s try to change the logo to our own. For that, we need to add a new folder, account inside the themes/custom directory. We’ll rather copy it from the themes/keycloak directory so that we have all the required elements.
让我们试着把标志改成我们自己的。为此,我们需要在themes/custom目录下添加一个新的文件夹,account。我们将从themes/keycloak目录中复制它,以便我们拥有所有需要的元素。
Now, it’s just a matter of adding our new logo file, say baeldung.png to resources/img in our custom directory and modifying resources/css/account.css:
现在,只需将我们的新标志文件,例如baeldung.png添加到resources/img中的custom目录,并修改resources/css/account.css。
.navbar-title {
    background-image: url('../img/baeldung.png');
    height: 25px;
    background-repeat: no-repeat;
    width: 123px;
    margin: 3px 10px 5px;
    text-indent: -99999px;
}

.container {
    height: 100%;
    background-color: #fff;
}
And here’s how the page looks now:
下面是该页面现在的样子。
Importantly, during the development phase, we’ll like to see the effect of our changes immediately, without a server restart. To enable that, we need to make a few changes to Keycloak’s standalone.xml in the standalone/configuration folder:
重要的是,在开发阶段,我们希望立即看到我们的改变的效果,而不需要重新启动服务器。为了实现这一点,我们需要对Keycloak在standalone/configuration文件夹中的standalone.xml做一些修改。
<theme>
    <staticMaxAge>-1</staticMaxAge>
    <cacheThemes>false</cacheThemes>
    <cacheTemplates>false</cacheTemplates>
    ...
</theme>
Similar to how we customized the account theme here, to change the look and feel of the other theme types, we need to add new folders called admin, email, or login, and follow the same process.
与我们在这里定制account主题的方式类似,要改变其他主题类型的外观和感觉,我们需要添加新的文件夹,称为admin、email,或login,并遵循相同的过程。
2.5. Customizing the Welcome Page
2.5.定制欢迎页面
To customize the Welcome page, first, we need to add a line to the standalone.xml:
要定制欢迎页面,首先,我们需要在standalone.xml中添加一行。
<theme>
    ...
    <welcomeTheme>custom</welcomeTheme>
    ...
</theme>
Second, we have to create a folder welcome under themes/custom. Again, it’s prudent to copy index.ftl and theme.properties along with existing resources from the default keycloak theme directory.
第二,我们必须在themes/custom下创建一个文件夹welcome。再次,谨慎的做法是,将index.ftl和theme.properties以及现有的resources从默认的keycloak主题目录中复制。
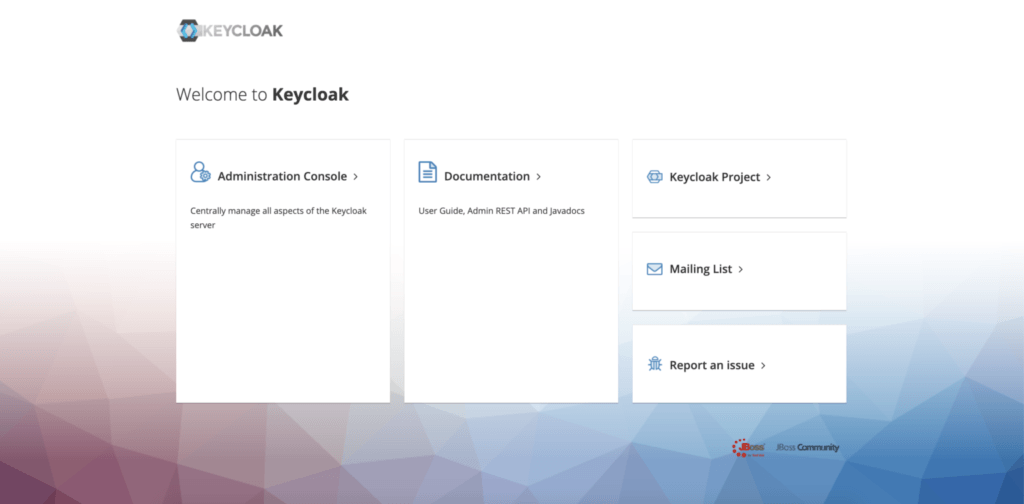
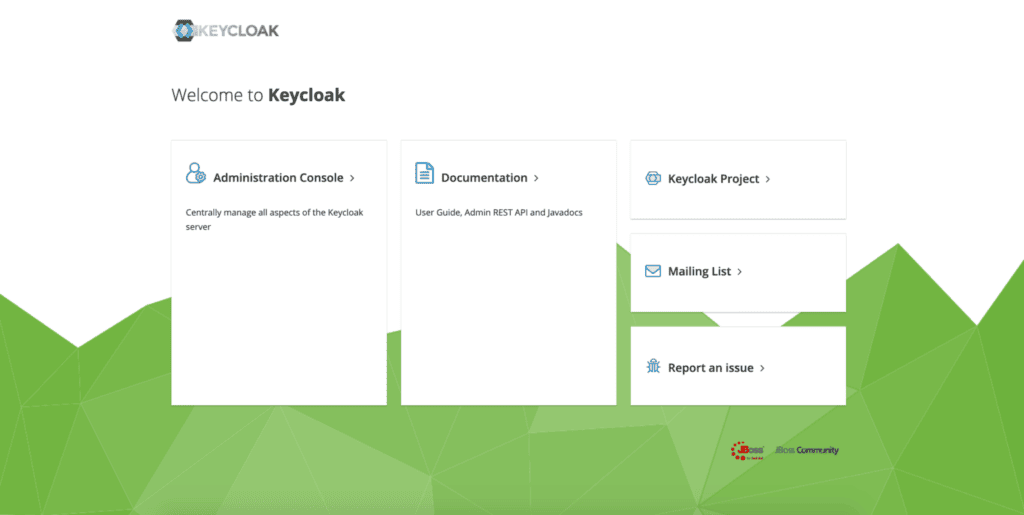
Now let’s try to change the background of this page.
现在让我们试着改变这个页面的背景。
Let’s navigate to http://localhost:8180/auth/ to see what it initially looks like:
让我们导航到http://localhost:8180/auth/,看看它最初是什么样子。
To change the background image, keep the new image, say geo.png, inside themes/custom/welcome/resources, then simply edit resources/css/welcome.css:
要改变背景图片,保留新的图片,例如geo.png,在themes/custom/welcome/resources内,然后简单地编辑resources/css/welcome.css。
body {
    background: #fff url(../geo.png);
    background-size: cover;
}3. Customizing an Embedded Keycloak Server
3.定制一个嵌入式Keycloak服务器
An embedded Keycloak server by definition means that we do not have the IAM provider installed on our machine. Consequently, we need to keep all required artifacts, such as themes.properties and CSS files, in our source code.
嵌入式Keycloak服务器的定义意味着我们的机器上没有安装IAM提供者。因此,我们需要在源代码中保留所有需要的工件,例如themes.properties和CSS文件。
A good place to keep them in the src/main/resources/themes folder of our Spring Boot project.
把它们放在Spring Boot项目的src/main/resources/themes文件夹中是个好地方。
Of course, since the files of the theme structure are the same, the way we customize them also remains the same as the standalone server.
当然,由于主题结构的文件是相同的,我们定制的方式也与独立服务器相同。
However, we need to configure a few things to instruct the Keycloak server to pick stuff up from our custom theme.
然而,我们需要配置一些东西,以指示Keycloak服务器从我们的自定义主题中提取东西。
3.1. Changes to Realm Definition File
3.1.对境界定义文件的修改
First, let’s see how to specify a custom theme for a given theme type.
首先,让我们看看如何为一个给定的主题类型指定一个自定义主题。
Recall that in case of our standalone server, on the Themes page of our admin console, we’d added the custom theme from the dropdown for Account Theme.
记得在我们的独立服务器上,在管理控制台的Themes页面,我们从Account Theme的下拉菜单中添加了custom主题。
To achieve the same effect here, we need to add a line to our realm definition file, baeldung-realm.json:
为了在这里达到同样的效果,我们需要在我们的境界定义文件baeldung-realm.json中添加一行。
"accountTheme": "custom",And that’s all we need; all other types such as Login and Email will still follow the standard theme.
这就是我们所需要的;所有其他类型,如Login和Email仍将遵循标准主题。
3.2. Redirecting to the Custom Theme Directory
3.2.重定向到自定义主题目录
Next, let’s see how we can tell the server where the said custom theme is located.
接下来,让我们看看如何告诉服务器上述custom主题的位置。
We can do this in a couple of ways.
我们可以通过几种方式做到这一点。
At the time of starting up the Boot App for our embedded server, we can specify the theme directory as a VM argument:
在为我们的嵌入式服务器启动Boot App时,我们可以指定主题目录作为VM参数。
mvn spring-boot:run -Dkeycloak.theme.dir=/src/main/resources/themesTo achieve the same programmatically, we can set it as a system property in our @SpringBootApplication class:
为了实现同样的程序化,我们可以在@SpringBootApplication类中把它设置为系统属性。
public static void main(String[] args) throws Exception {
    System.setProperty("keycloak.theme.dir","src/main/resources/themes");
    SpringApplication.run(JWTAuthorizationServerApp.class, args);
}
Or, we can change the server configuration in the keycloak-server.json:
或者,我们可以改变keycloak-server.json中的服务器配置。
"theme": {
    ....
    "welcomeTheme": "custom",
    "folder": {
        "dir": "src/main/resources/themes"
    }
},
Notably, here we added a welcomeTheme attribute as well to enable customizations to the welcome page.
值得注意的是,在这里我们也添加了一个welcomeTheme属性,以实现对欢迎页面的定制。
As noted earlier, all other changes to CSS files and images remain the same.
如前所述,对CSS文件和图像的所有其他变化保持不变。
To view the changes to our welcome page, we need to start the embedded server and navigate to http://localhost:8083/auth.
为了查看我们的欢迎页面的变化,我们需要启动嵌入式服务器并导航到http://localhost:8083/auth。
The account management page is available at http://localhost:8083/auth/realms/baeldung/account and we can access it using the following credentials: john@test.com/123.
帐户管理页面可在http://localhost:8083/auth/realms/baeldung/account上找到,我们可以使用以下凭证访问它。john@test.com/123.。
4. Conclusion
4.总结
In this tutorial, we learned about themes in Keycloak – their types and structure.
在本教程中,我们了解了Keycloak的主题–它们的类型和结构。
Then we looked at a couple of pre-built themes and how to extend them to create our own customized theme in a standalone instance.
然后我们看了几个预建的主题,以及如何扩展它们以在独立的实例中创建我们自己的定制主题。
Lastly, we saw how to achieve the same in an embedded Keycloak server.
最后,我们看到如何在一个嵌入式Keycloak服务器中实现同样的目的。
As always, the source code is available over on GitHub. For the standalone server, it’s on the tutorials GitHub, and for the embedded instance, on the OAuth GitHub.
一如既往,源代码可在GitHub上获得。对于独立服务器,它位于教程GitHub上,而对于嵌入式实例,它位于OAuth GitHub上。
