1. Overview
1.概述
In this tutorial, we’ll learn how to use Spring OAuth2RestTemplate to make OAuth2 REST calls.
在本教程中,我们将学习如何使用Spring OAuth2RestTemplate来进行OAuth2 REST调用。
We’ll create a Spring Web Application capable of listing the repositories of a GitHub account.
我们将创建一个能够列出GitHub账户存储库的Spring Web应用。
2. Maven Configuration
2.Maven配置
First, we need to add spring-boot-starter-security and the spring-security-oauth2-autoconfigure dependencies to our pom.xml. As we are building a web application, we also need spring-boot-starter-web and spring-boot-starter-thymeleaf artifacts to be included.
首先,我们需要将spring-boot-starter-security和spring-security-oauth2-autoconfigure依赖项添加到我们的pom.xml。由于我们正在构建一个 Web 应用程序,我们还需要包括spring-boot-starter-web和spring-boot-starter-thymeleaf工件。
<dependency>
    <groupId>org.springframework.boot</groupId>
    <artifactId>spring-boot-starter-web</artifactId>
</dependency>
<dependency>
    <groupId>org.springframework.boot</groupId>
    <artifactId>spring-boot-starter-security</artifactId>
</dependency>
<dependency>
    <groupId>org.springframework.security.oauth.boot</groupId>
    <artifactId>spring-security-oauth2-autoconfigure</artifactId>
    <version>2.6.8</version>
</dependency>
<dependency>
    <groupId>org.springframework.boot</groupId>
    <artifactId>spring-boot-starter-thymeleaf</artifactId>
</dependency>
3. OAuth2 Properties
3.OAuth2属性
Next, let’s add the OAuth configuration to our application.properties file to be able to connect the GitHub account:
接下来,让我们在application.properties文件中添加OAuth配置,以便能够连接GitHub账户。
github.client.clientId=[CLIENT_ID]
github.client.clientSecret=[CLIENT_SECRET]
github.client.userAuthorizationUri=https://github.com/login/oauth/authorize
github.client.accessTokenUri=https://github.com/login/oauth/access_token
github.client.clientAuthenticationScheme=form

github.resource.userInfoUri=https://api.github.com/user
github.resource.repoUri=https://api.github.com/user/repos
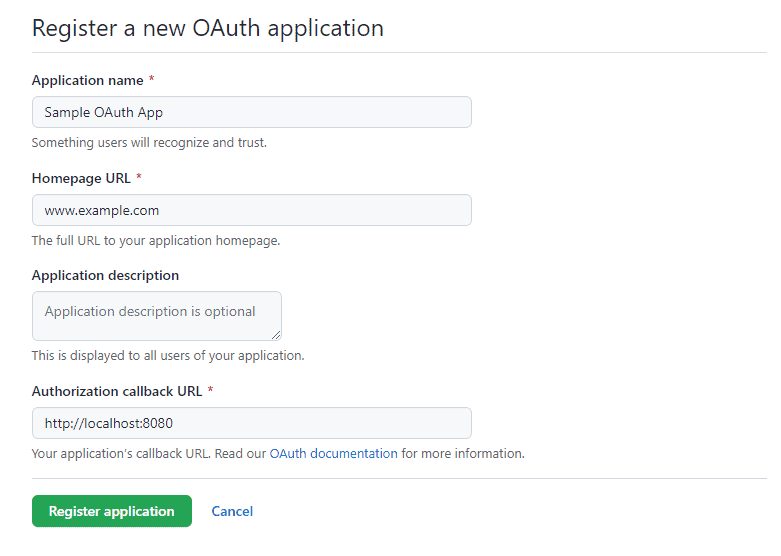
Notice we need to replace [CLIENT_ID] and [CLIENT_SECRET] with values from a GitHub OAuth App. We can follow the Creating an OAuth App guide to register a new app on GitHub:
注意,我们需要将[CLIENT_ID]和[CLIENT_SECRET]替换为GitHub OAuth应用的值。我们可以按照创建OAuth应用程序指南在GitHub上注册一个新的应用程序。
Let’s make sure the Authorization callback URL is set to http://localhost:8080, which will redirect the OAuth flow to our web application home page.
让我们确保授权回调URL被设置为http://localhost:8080,,这将把OAuth流重定向到我们的Web应用主页。
4. OAuth2RestTemplate Configuration
4.OAuth2RestTemplate配置
Now, it’s time to create a security configuration to provide our application with OAuth2 support.
现在,是时候创建一个安全配置,为我们的应用程序提供OAuth2支持。
4.1. The SecurityConfig Class
4.1.SecurityConfig类
First, let’s create Spring’s security configuration:
首先,让我们创建Spring的安全配置。
@Configuration
@EnableOAuth2Client
public class SecurityConfig {
    OAuth2ClientContext oauth2ClientContext;

    public SecurityConfig(OAuth2ClientContext oauth2ClientContext) {
        this.oauth2ClientContext = oauth2ClientContext;
    }

    ...
}
The @EnableOAuth2Client gives us access to an OAuth2 context that we’ll use to create our OAuth2RestTemplate.
@EnableOAuth2Client让我们访问一个OAuth2上下文,我们将用它来创建我们的OAuth2RestTemplate。
4.2. OAuth2RestTemplate Bean
4.2.OAuth2RestTemplate Bean
Second, we’ll create the bean for our OAuth2RestTemplate:
其次,我们将为我们的OAuth2RestTemplate创建bean。
@Bean
public OAuth2RestTemplate restTemplate() {
    return new OAuth2RestTemplate(githubClient(), oauth2ClientContext);
}

@Bean
@ConfigurationProperties("github.client")
public AuthorizationCodeResourceDetails githubClient() {
    return new AuthorizationCodeResourceDetails();
}
With this, we’re using the OAuth2 properties and context to create an instance of the template.
有了这个,我们要使用OAuth2的属性和上下文来创建一个模板的实例。
The @ConfigurationProperties annotation injects all github.client properties to the AuthorizationCodeResourceDetails instance.
@ConfigurationProperties注解将所有github.client属性注入到AuthorizationCodeResourceDetails实例。
4.3. Authentication Filter
4.3.认证过滤器
Third, we need an authentication filter to handle the OAuth2 flow:
第三,我们需要一个认证过滤器来处理OAuth2流程。
private Filter oauth2ClientFilter() {
    OAuth2ClientAuthenticationProcessingFilter oauth2ClientFilter = new OAuth2ClientAuthenticationProcessingFilter("/login/github");
    OAuth2RestTemplate restTemplate = restTemplate();
    oauth2ClientFilter.setRestTemplate(restTemplate);
    UserInfoTokenServices tokenServices = new UserInfoTokenServices(githubResource().getUserInfoUri(), githubClient().getClientId());
    tokenServices.setRestTemplate(restTemplate);
    oauth2ClientFilter.setTokenServices(tokenServices);
    return oauth2ClientFilter;
}

@Bean
@ConfigurationProperties("github.resource")
public ResourceServerProperties githubResource() {
    return new ResourceServerProperties();
}
Here, we’re instructing the filter to initiate the OAuth2 flow on the /login/github URL of our application.
这里,我们指示过滤器在我们应用程序的/login/github URL上启动OAuth2流程。
4.4. Spring Security Configuration
4.4.Spring安全配置
Finally, let’s register the OAuth2ClientContextFilter and create a web security configuration:
最后,让我们注册OAuth2ClientContextFilter并创建一个Web安全配置。
@Bean
public SecurityFilterChain filterChain(HttpSecurity http) throws Exception {
    http.authorizeRequests()
        .antMatchers("/", "/login**", "/error**")
        .permitAll()
        .anyRequest()
        .authenticated()
        .and()
        .logout()
        .logoutUrl("/logout")
        .logoutSuccessUrl("/")
        .and()
        .addFilterBefore(oauth2ClientFilter(), BasicAuthenticationFilter.class);
    return http.build();
}

@Bean
public FilterRegistrationBean<OAuth2ClientContextFilter> oauth2ClientFilterRegistration(OAuth2ClientContextFilter filter) {
    FilterRegistrationBean<OAuth2ClientContextFilter> registration = new FilterRegistrationBean<>();
    registration.setFilter(filter);
    registration.setOrder(Ordered.HIGHEST_PRECEDENCE + 1);
    return registration;
}
We secure our web application paths and ensure that the OAuth2ClientAuthenticationProcessingFilter is registered ahead of BasicAuthenticationFilter.
我们保护我们的Web应用程序路径,并确保OAuth2ClientAuthenticationProcessingFilter在BasicAuthenticationFilter之前注册。
5. Using the OAuth2RestTemplate
5.使用OAuth2RestTemplate
The main goal of the OAuth2RestTemplate is to reduce the code needed to make OAuth2-based API calls. It basically meets two needs for our application:
OAuth2RestTemplate的主要目标是减少进行基于OAuth2的API调用所需的代码。它基本上满足了我们应用程序的两个需求。
- Handles the OAuth2 authentication flow
- Extends Spring RestTemplate for making API calls
We’re now able to use the OAuth2RestTemplate as an auto-wired bean in a web controller.
我们现在能够使用OAuth2RestTemplate作为Web控制器中的一个自动连接的bean。
5.1. Login
5.1.登录
Let’s create the index.html file with login and home options:
让我们创建带有登录和主页选项的index.html文件。
<!DOCTYPE html>
<html lang="en" xmlns="http://www.w3.org/1999/xhtml" xmlns:th="http://www.thymeleaf.org">
<head>
    <title>OAuth2Client</title>
</head>
<body>
<h3>
    <a href="/login/github" th:href="@{/home}" th:if="${#httpServletRequest?.remoteUser != undefined }">
        Go to Home
    </a>
    <a href="/hello" th:href="@{/login/github}" th:if="${#httpServletRequest?.remoteUser == undefined }">
        GitHub Login
    </a>
</h3>
</body>
</html>
Unauthenticated users will be presented with the login option, while authenticated users can access the home page.
未认证的用户将看到登录选项,而认证的用户可以访问主页。
5.2. Home
5.2.首页
Now, let’s create a controller to greet the authenticated GitHub user:
现在,让我们创建一个控制器来迎接已认证的GitHub用户。
@Controller
public class AppController {

    OAuth2RestTemplate restTemplate;

    public AppController(OAuth2RestTemplate restTemplate) {
        this.restTemplate = restTemplate;
    }

    @GetMapping("/home")
    public String welcome(Model model, Principal principal) {
        model.addAttribute("name", principal.getName());
        return "home";
    }
}
Notice that we have a security Principal parameter in the welcome method. We’re using the Principal‘s name as an attribute to the UI model.
请注意,我们在welcome方法中有一个安全Principal参数。我们正在使用Principal的名字作为UI模型的属性。
Let’s take a look at the home.html template:
让我们看一下home.html模板。
<!DOCTYPE html>
<html lang="en" xmlns="http://www.w3.org/1999/xhtml" xmlns:th="http://www.thymeleaf.org">
<head>
    <title>Home</title>
</head>
<body>
    <p>
        Welcome <b th:inline="text"> [[${name}]] </b>
    </p>
    <h3>
        <a href="/repos">View Repositories</a><br/><br/>
    </h3>

    <form th:action="@{/logout}" method="POST">
        <input type="submit" value="Logout"/>
    </form>
</body>
</html>
In addition, we’re adding a link to view the user’s repository list and a logout option.
此外,我们还增加了一个查看用户存储库列表的链接和一个注销选项。
5.3. GitHub Repositories
5.3.GitHub 储存库
Now, it’s time to use the OAuth2RestTemplate created in the previous controller to present all the GitHub repositories owned by the user.
现在,是时候使用前面控制器中创建的OAuth2RestTemplate来展示用户拥有的所有GitHub仓库了。
First, we need to create the GithubRepo class to represent a repository:
首先,我们需要创建GithubRepo类来表示一个资源库。
public class GithubRepo {
    Long id;
    String name;

    // getters and setters

}
Second, let’s add a repositories mapping to the previous AppController:
其次,让我们在之前的AppController中添加一个资源库映射。
@GetMapping("/repos")
public String repos(Model model) {
    Collection<GithubRepo> repos = restTemplate.getForObject("https://api.github.com/user/repos", Collection.class);
    model.addAttribute("repos", repos);
    return "repositories";
}
The OAuth2RestTemplate handles all the boilerplate code for making a request to GitHub. Also, it converts the REST response into a GithubRepo collection.
OAuth2RestTemplate处理所有向GitHub发出请求的模板代码。同时,它将REST响应转换为GithubRepo集合。
Finally, let’s create the repositories.html template to iterate over the repositories collection:
最后,让我们创建repositories.html模板来迭代repositories集合。
<!DOCTYPE html>
<html lang="en" xmlns="http://www.w3.org/1999/xhtml" xmlns:th="http://www.thymeleaf.org">
<head>
    <title>Repositories</title>
</head>
<body>
    <p>
        <h2>Repos</h2>
    </p>
    <ul th:each="repo: ${repos}">
        <li th:text="${repo.name}"></li>
    </ul>
</body>
</html>
6. Conclusion
6.结语
In this article, we learned how to use OAuth2RestTemplate to simplify REST calls to an OAuth2 resource server like GitHub.
在这篇文章中,我们学习了如何使用OAuth2RestTemplate来简化对OAuth2资源服务器的REST调用,如GitHub。
We went through the building blocks of a web application running the OAuth2 flow. Then, we saw how to make a REST API call to retrieve all of a GitHub user’s repositories.
我们经历了一个运行OAuth2流程的Web应用程序的构建模块。然后,我们看到了如何通过REST API调用来检索GitHub用户的所有存储库。
As always, the complete example of this tutorial can be found over on GitHub.
一如既往,本教程的完整示例可以在GitHub上找到over。
