1. Overview
1.概述
In this tutorial, we’ll explore Spring Security SAML with Okta as an identity provider (IdP).
在本教程中,我们将探讨Spring Security SAML与Okta作为身份提供者(IdP)。
2. What Is SAML?
2.什么是SAML?
Security Assertion Markup Language (SAML) is an open standard that allows an IdP to securely send the user’s authentication and authorization details to the Service Provider (SP). It uses XML-based messages for the communication between the IdP and the SP.
安全断言标记语言(SAML)是一个开放的标准,允许IdP将用户的认证和授权细节安全地发送给服务提供商(SP)。它使用基于XML的消息在IdP和SP之间进行通信。
In other words, when a user attempts to access a service, he’s required to log in with the IdP. Once logged in, the IdP sends the SAML attributes with authorization and authentication details in the XML format to the SP.
换句话说,当用户试图访问一项服务时,他需要在IdP上登录。一旦登录,IdP会以XML格式向SP发送带有授权和认证细节的SAML属性。
Apart from providing a secured authentication-transmission mechanism, SAML also promotes Single Sign-On (SSO), allowing users to log in once and reuse the same credentials to log into other service providers.
除了提供安全的认证传输机制外,SAML还提倡单点登录(SSO),允许用户登录一次并重复使用相同的凭证来登录其他服务提供商。
3. Okta SAML Setup
3.Okta SAML设置
First, as a prerequisite, we should set up an Okta developer account.
首先,作为前提条件,我们应该设置一个Okta开发者账户。
3.1. Create New Application
3.1.创建新的应用程序
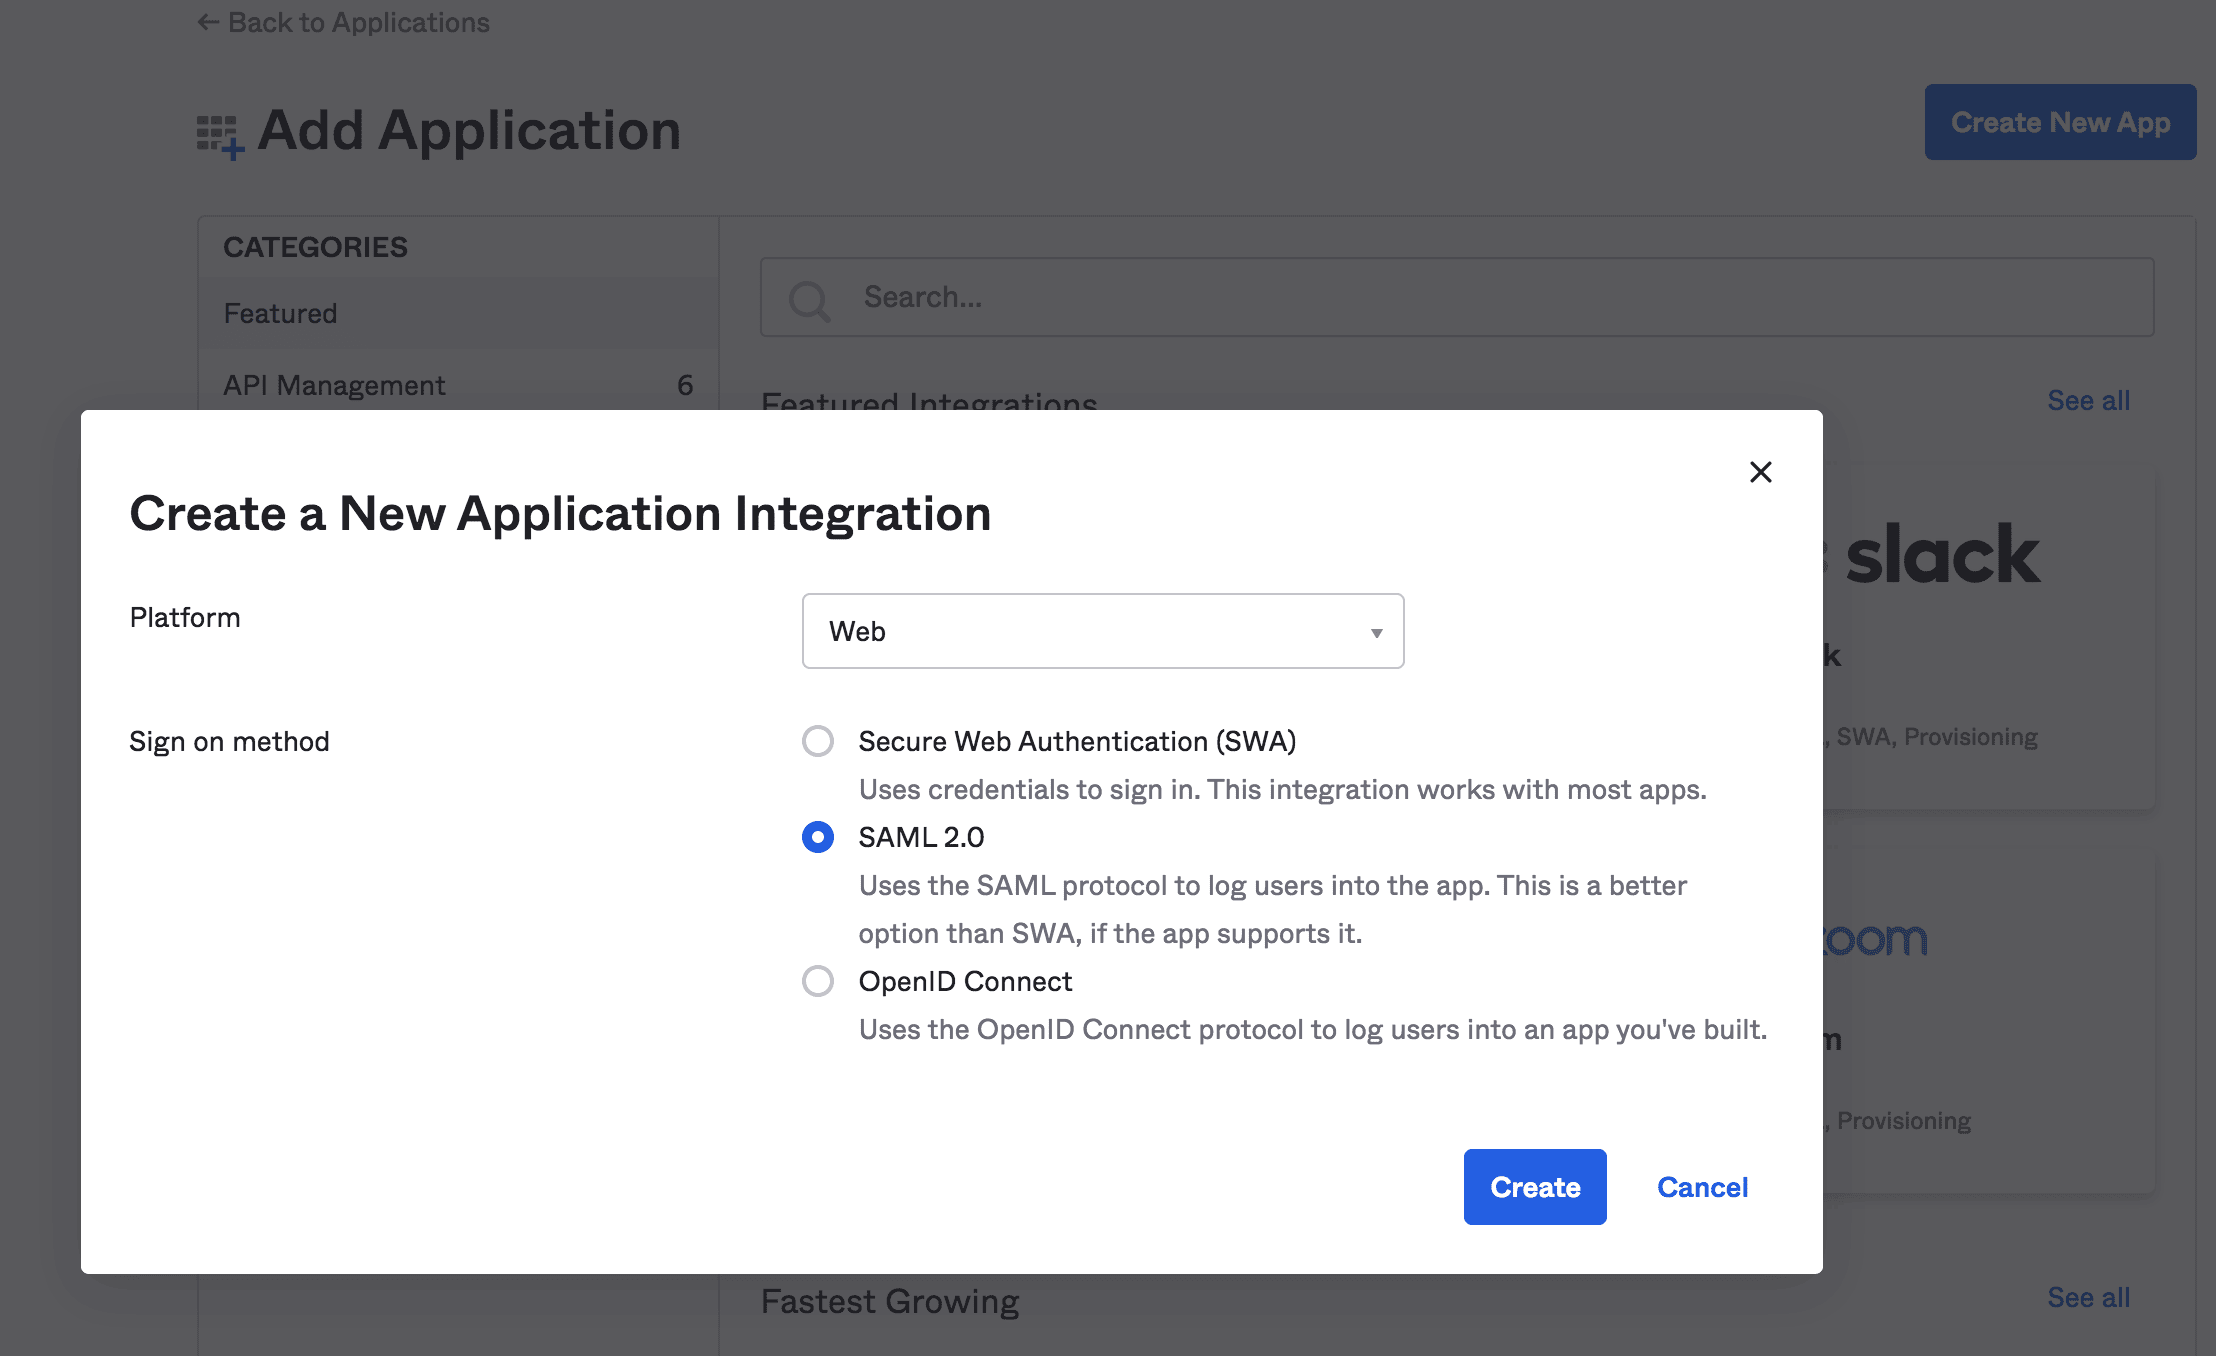
Then, we’ll create a new Web application integration with SAML 2.0 support:
然后,我们将创建一个支持SAML 2.0的新的Web应用集成。
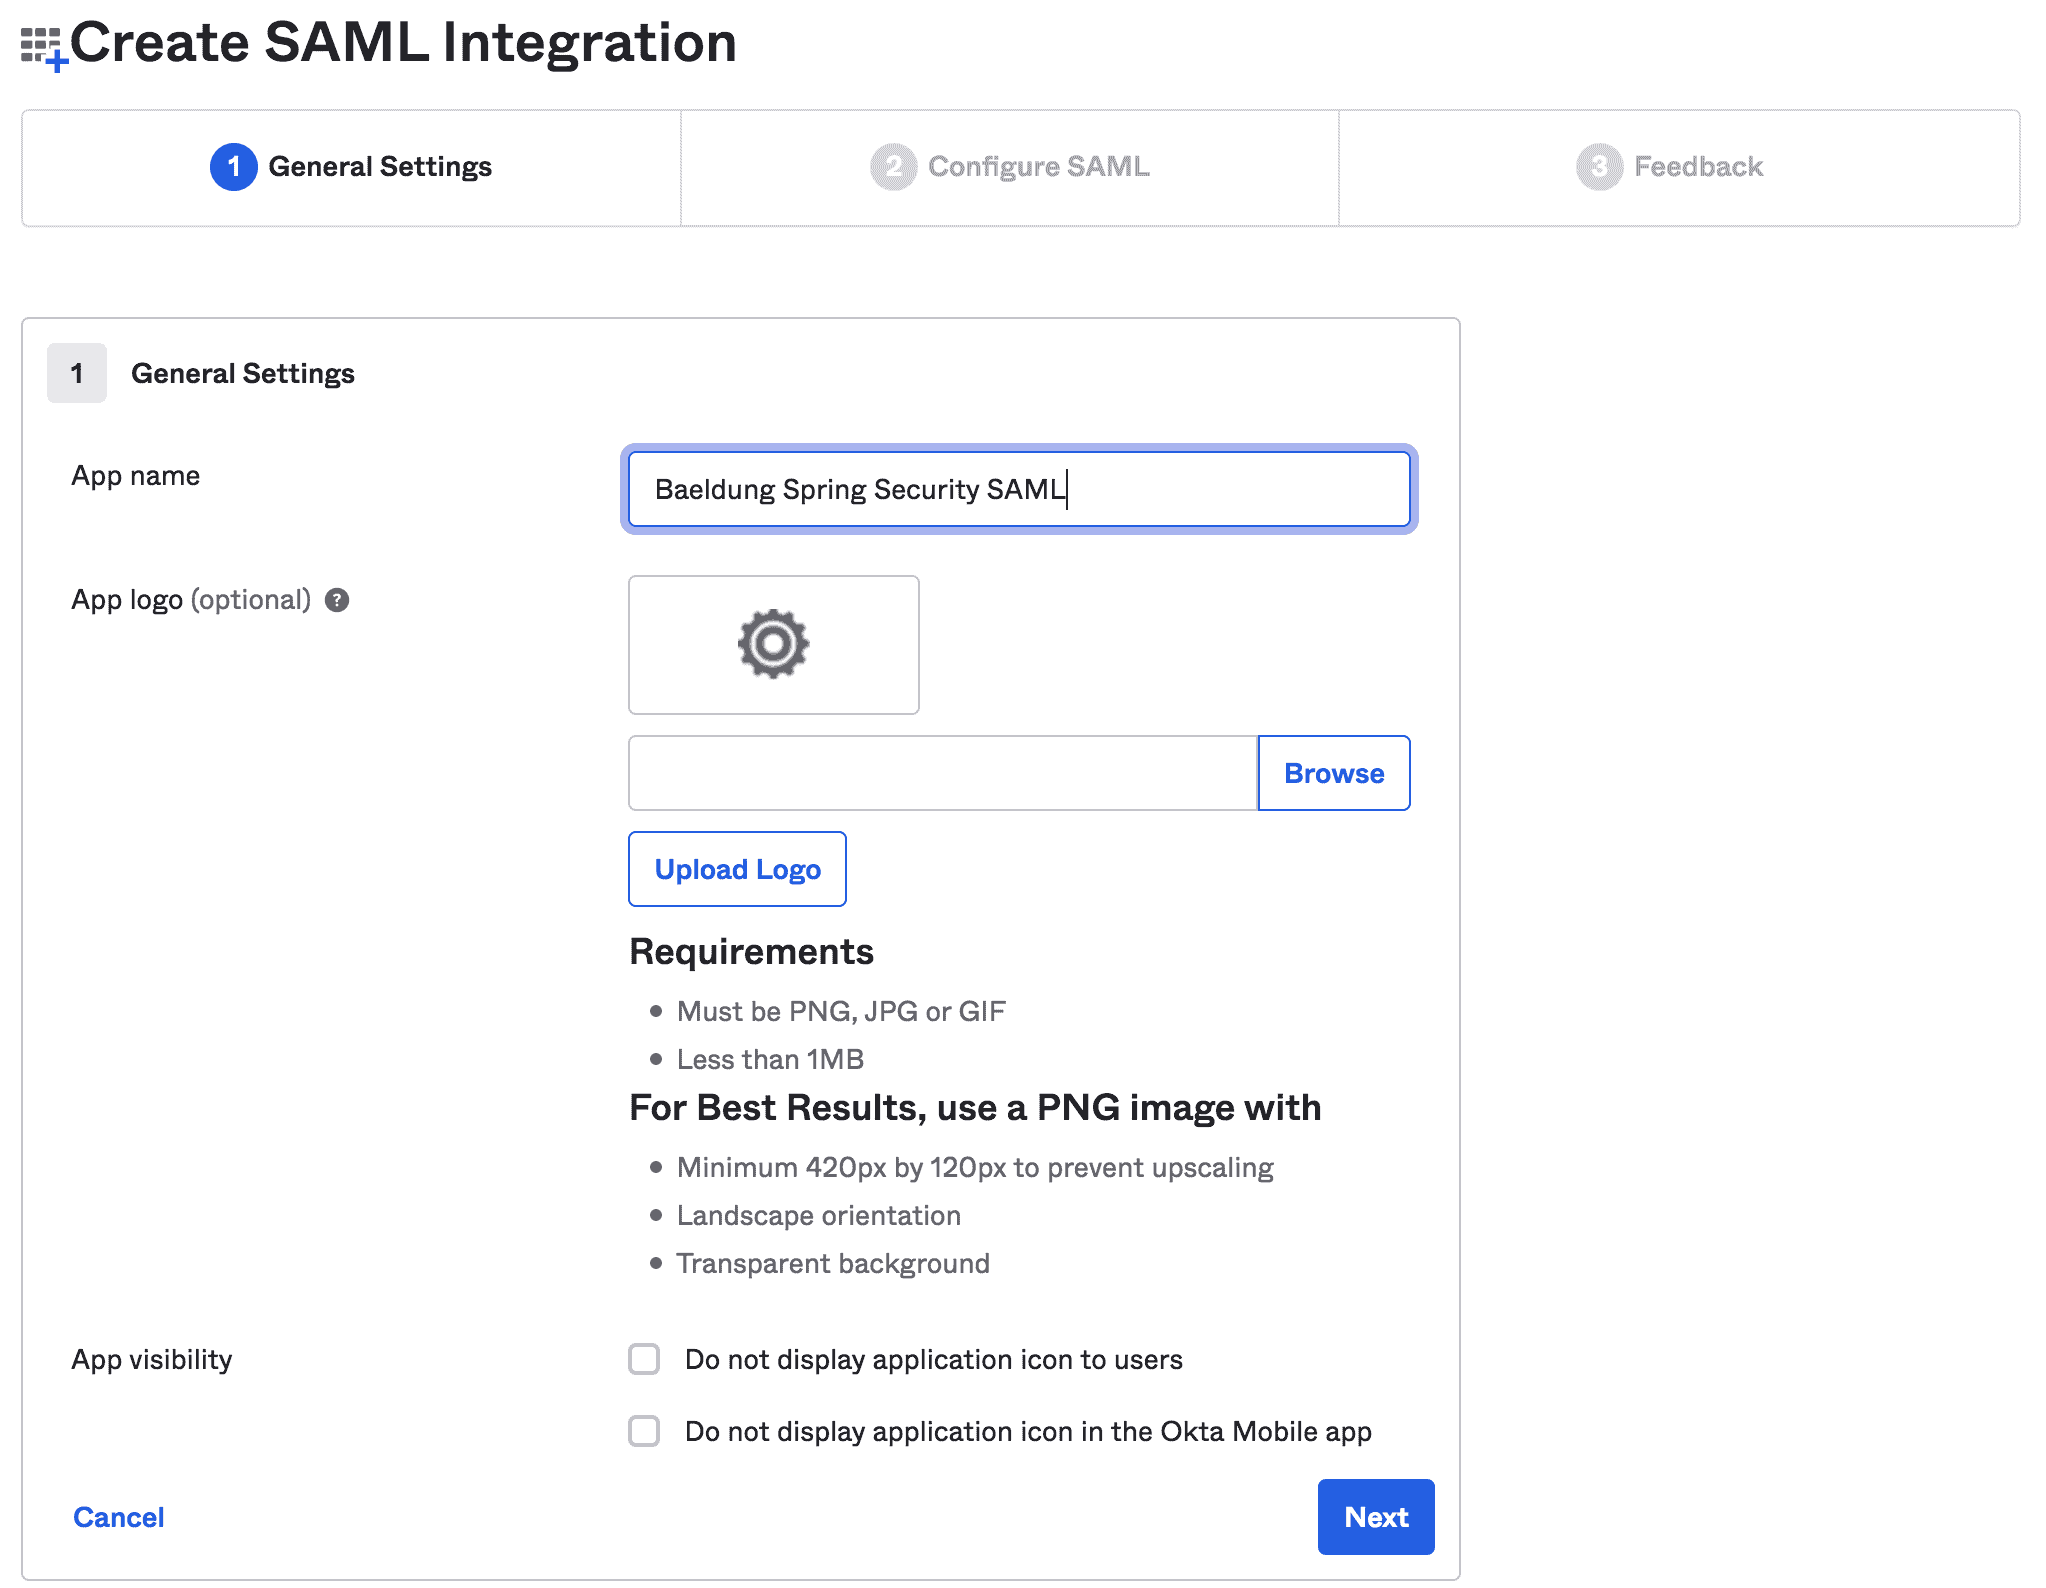
Next, we’ll fill in the general information like App name and App logo:
接下来,我们将填写一般信息,如App名称和App标志。
3.2. Edit SAML Integration
3.2 编辑SAML集成
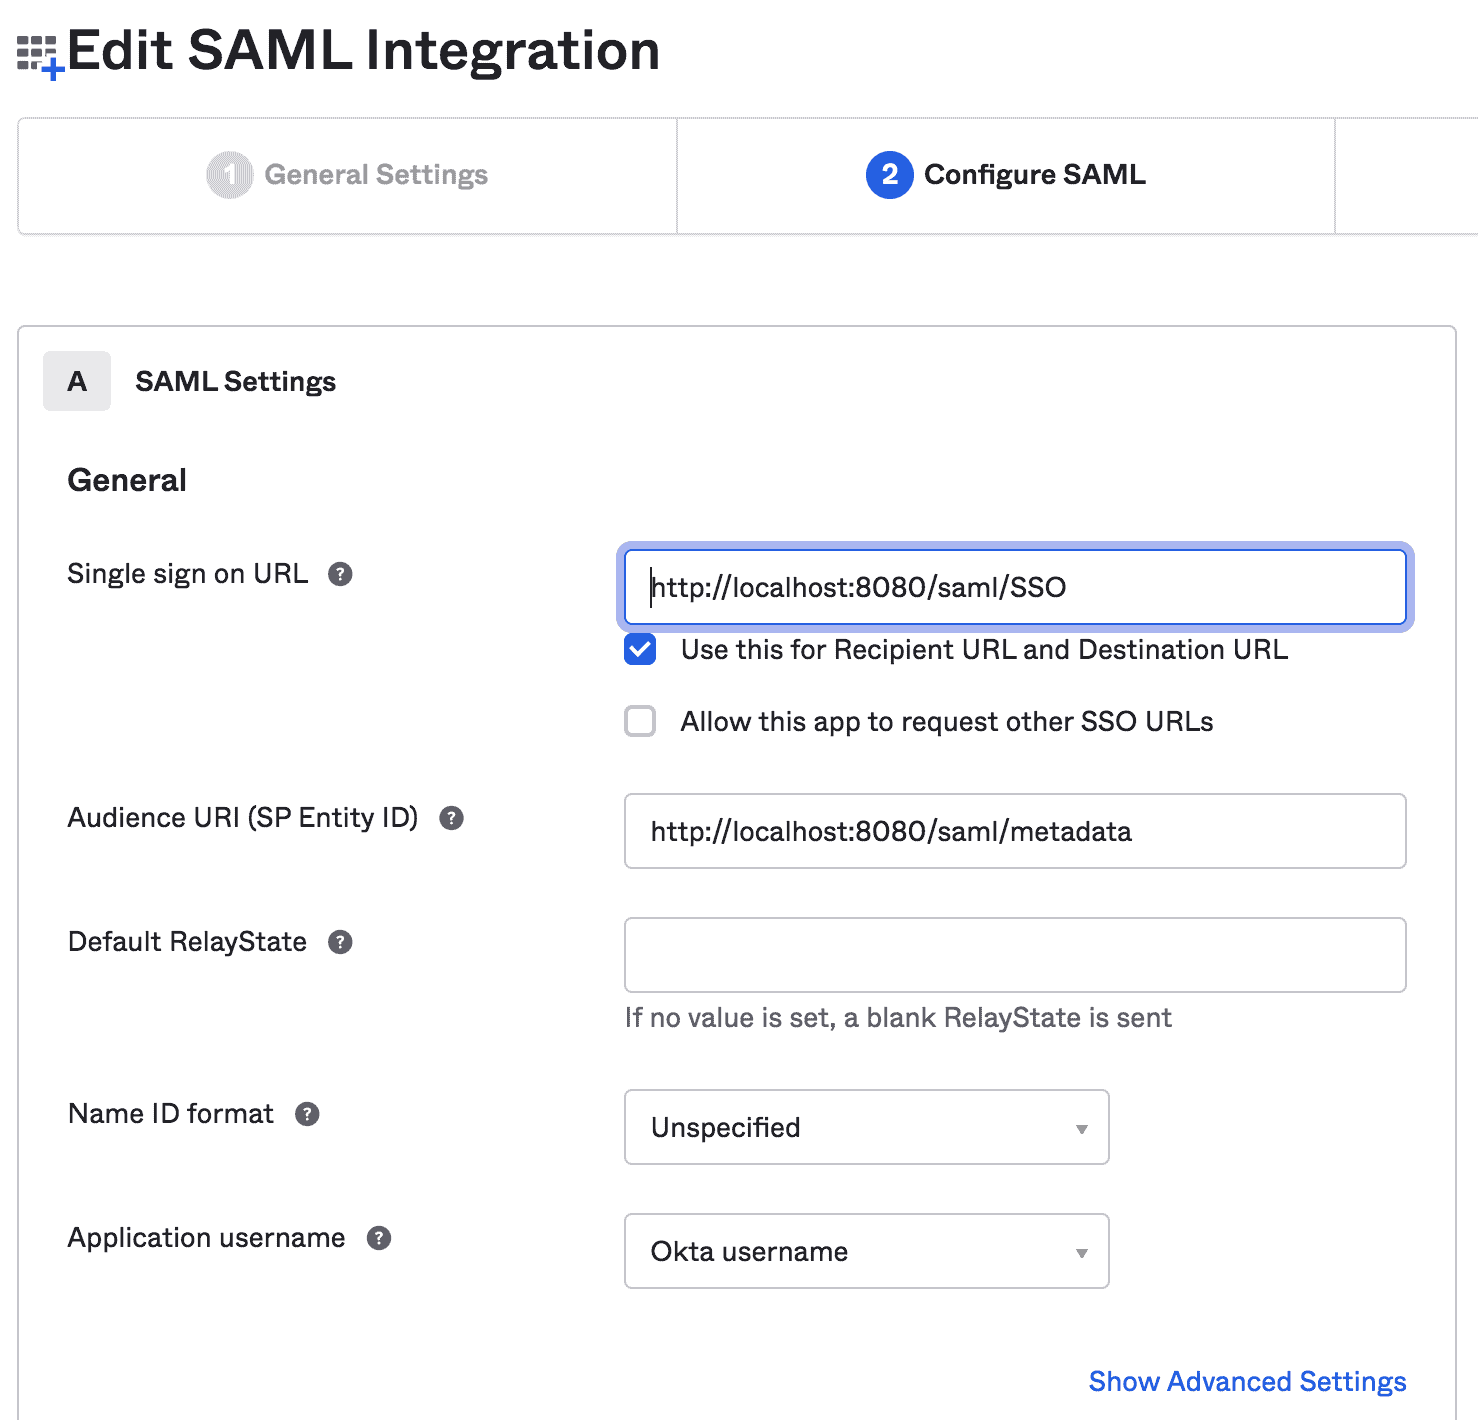
In this step, we’ll provide SAML settings like SSO URL and Audience URI:
在这一步,我们将提供SAML设置,如SSO URL和Audience URI。
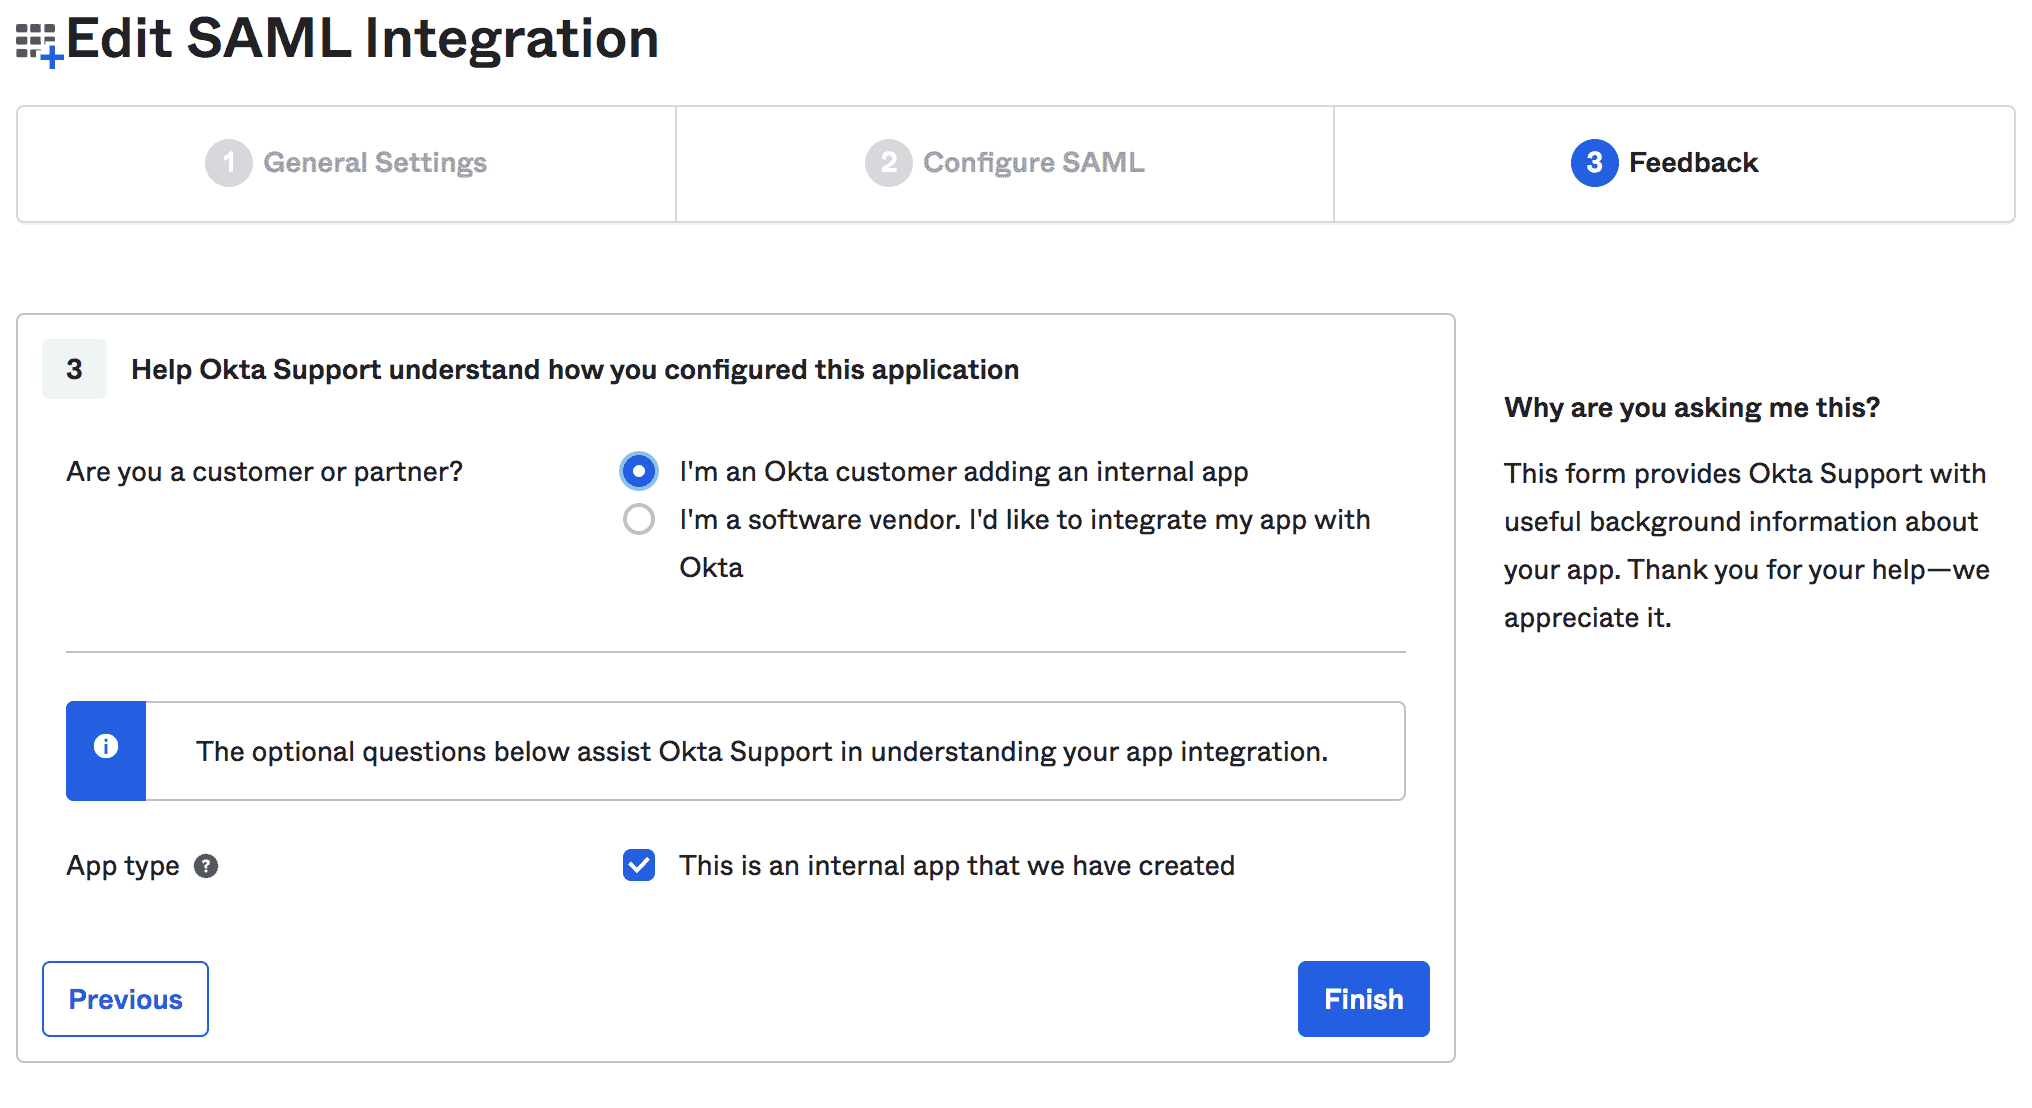
Last, we can provide feedback about our integration:
最后,我们可以对我们的整合提供反馈。
3.3. View Setup Instructions
3.3.查看设置说明
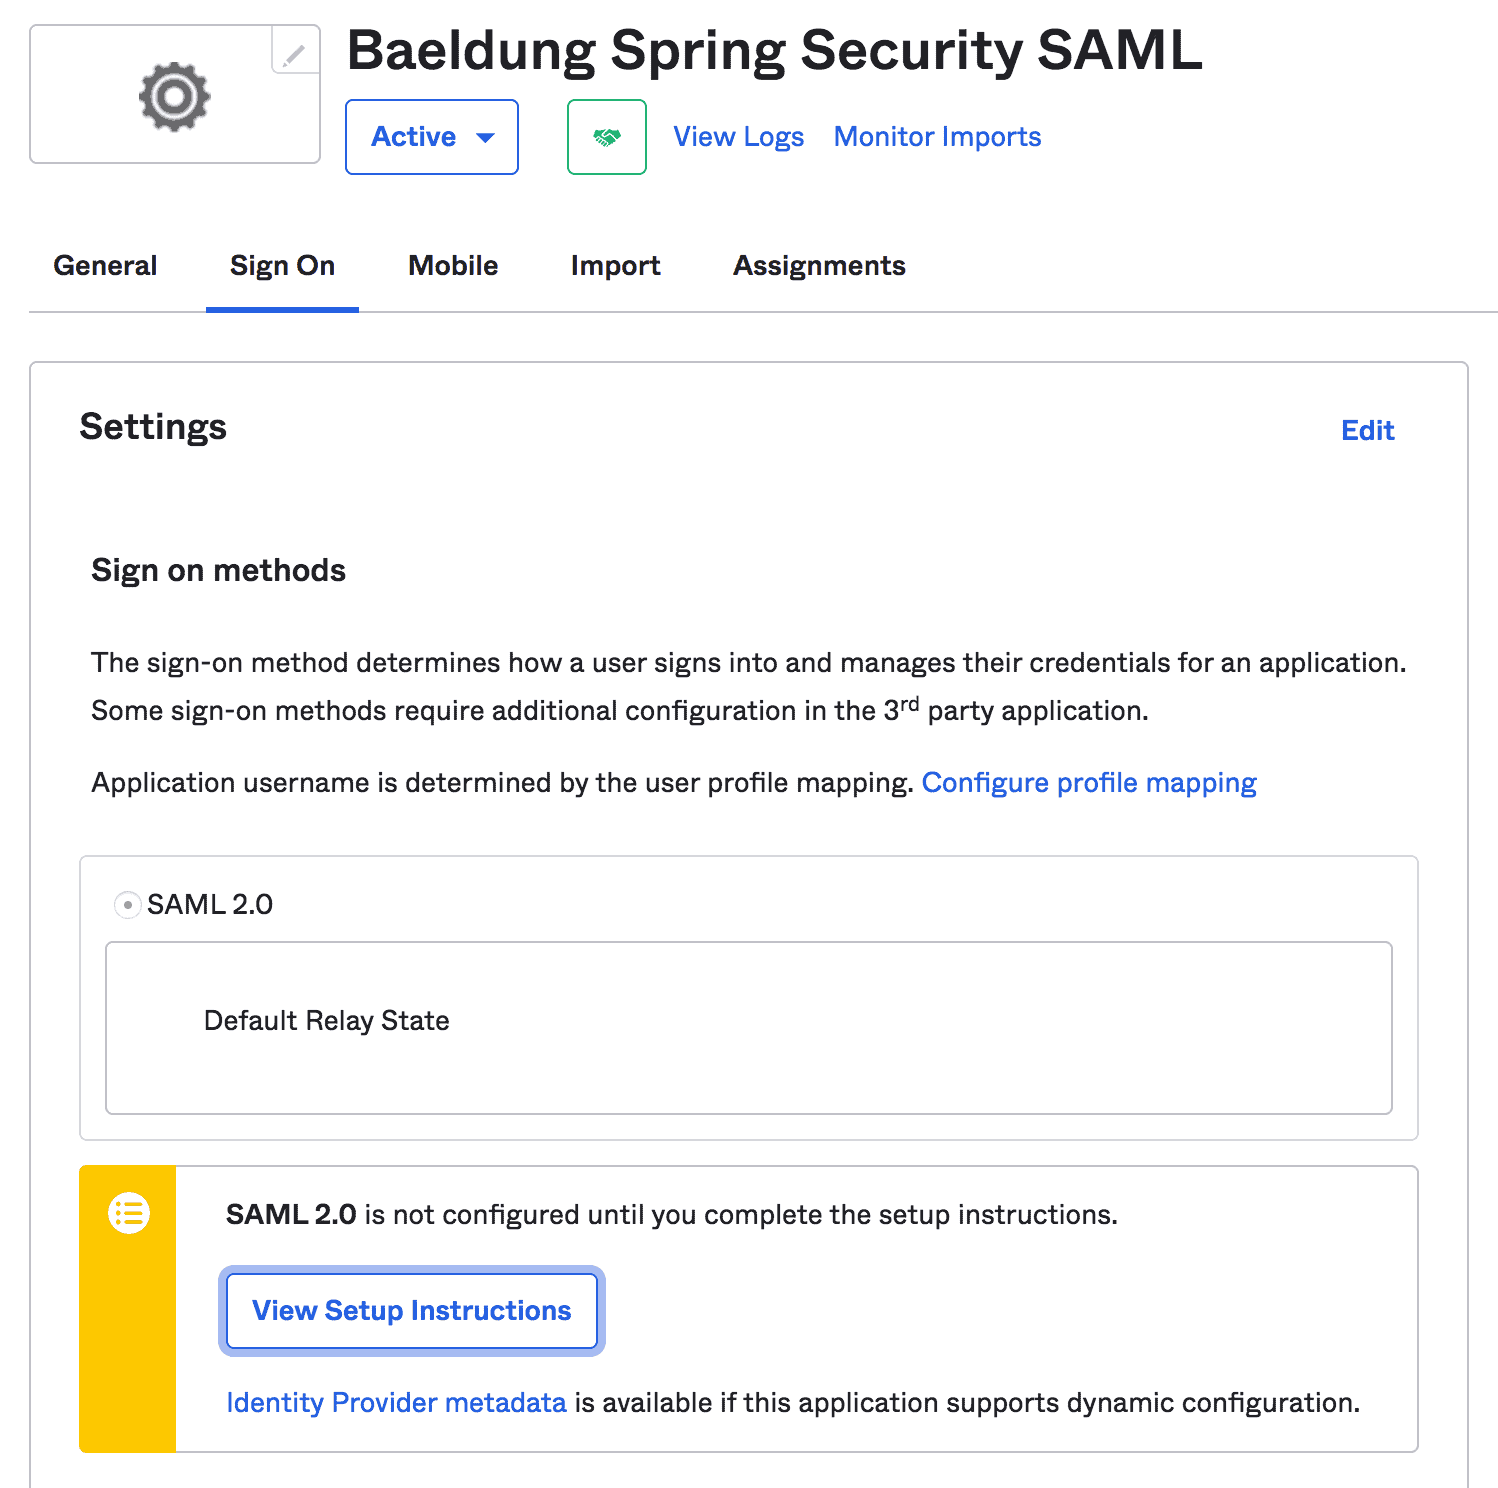
Once finished, we can view setup instructions for our Spring Boot App:
完成后,我们可以查看Spring Boot应用程序的设置说明。
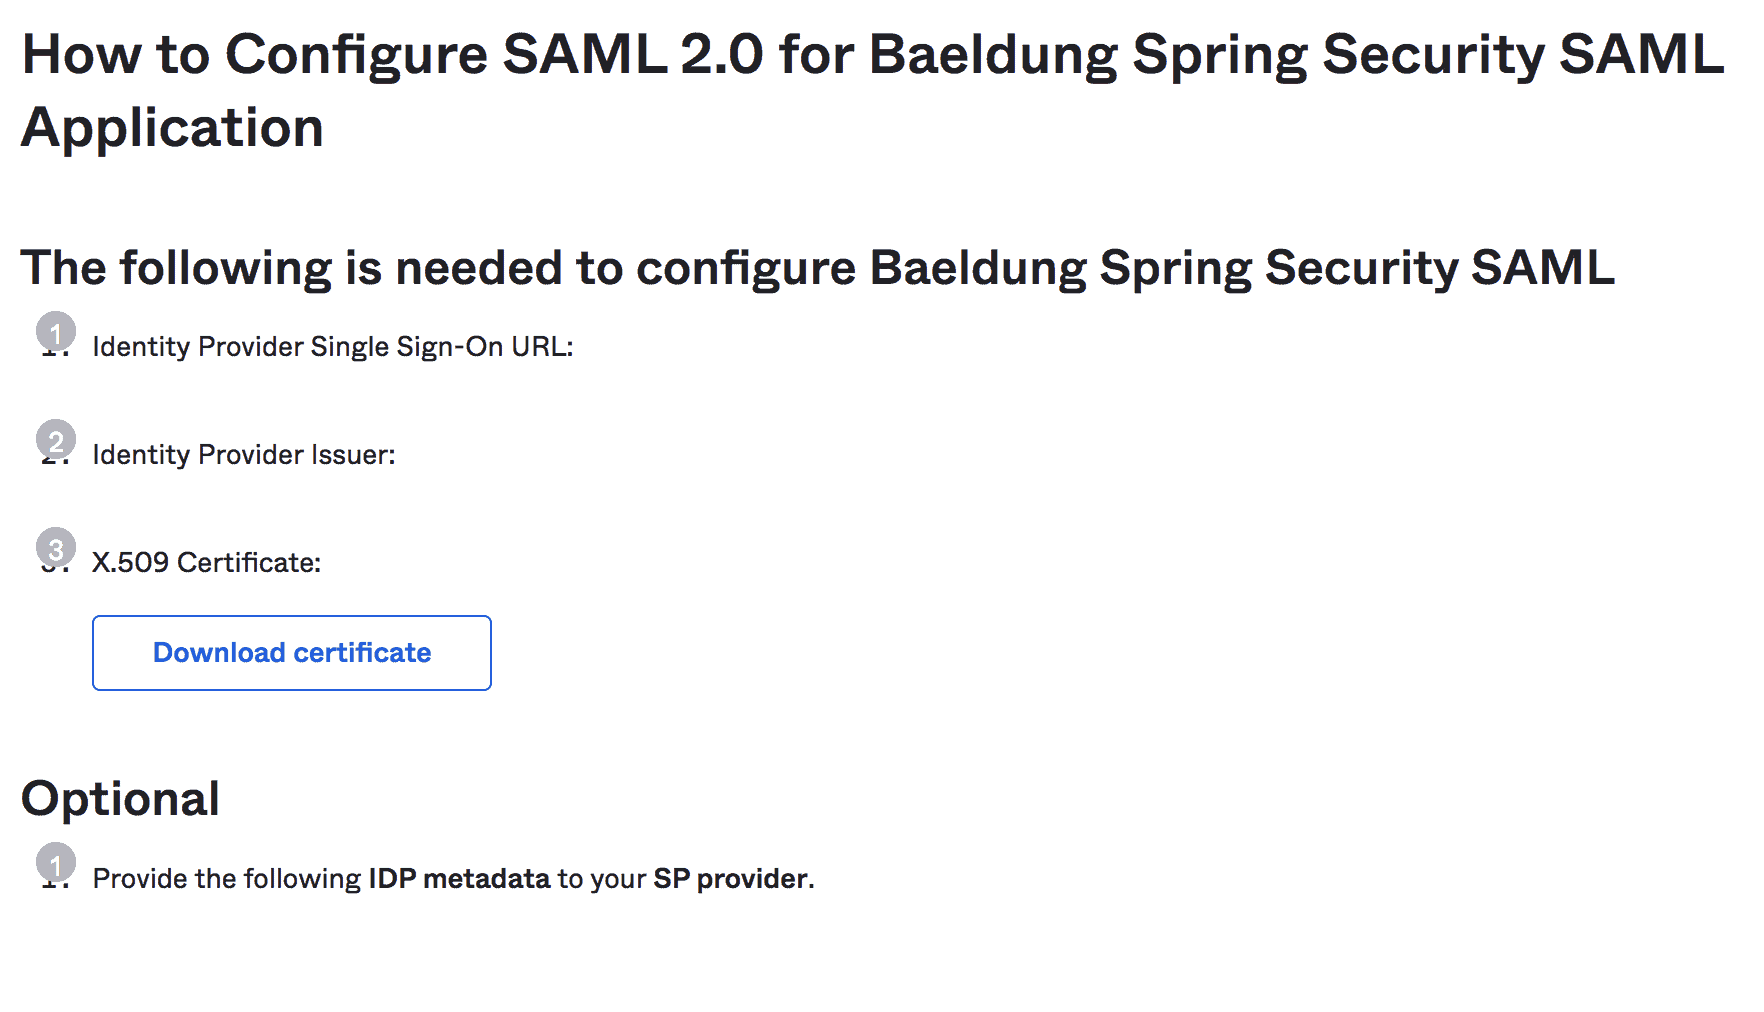
Note: we should copy the instructions like IdP Issuer URL and IdP metadata XML that will be required further in the Spring Security configurations:
注意:我们应该复制IdP Issuer URL和IdP metadata XML等说明,这些说明在Spring Security配置中会被进一步要求。
4. Spring Boot Setup
4.Spring Boot设置
Other than usual Maven dependencies like spring-boot-starter-web and spring-boot-starter-security, we’ll require the spring-security-saml2-core dependency:
除了像spring-boot-starter-web和spring-boot-starter-security这样常见的Maven依赖项外,我们还需要spring-security-saml2-core依赖。
<dependency>
    <groupId>org.springframework.boot</groupId>
    <artifactId>spring-boot-starter-web</artifactId>
    <version>2.7.2</version>
</dependency>
<dependency>
    <groupId>org.springframework.boot</groupId>
    <artifactId>spring-boot-starter-security</artifactId>
    <version>2.7.2</version>
</dependency>
<dependency>
    <groupId>org.springframework.security.extensions</groupId>
    <artifactId>spring-security-saml2-core</artifactId>
    <version>1.0.10.RELEASE</version>
</dependency>
Also, make sure to add the Shibboleth repository to download the latest opensaml jar required by the spring-security-saml2-core dependency:
此外,请确保添加Shibboleth资源库,以下载opensaml jar,这是spring-security-saml2-core依赖所要求的。
<repository>
    <id>Shibboleth</id>
    <name>Shibboleth</name>
    <url>https://build.shibboleth.net/nexus/content/repositories/releases/</url>
</repository>
Alternatively, we can set up the dependencies in a Gradle project:
另外,我们也可以在Gradle项目中设置依赖关系。
compile group: 'org.springframework.boot', name: 'spring-boot-starter-web', version: "<code class="language-xml">2.7.2" compile group: 'org.springframework.boot', name: 'spring-boot-starter-security', version: "2.7.2" compile group: 'org.springframework.security.extensions', name: 'spring-security-saml2-core', version: "1.0.10.RELEASE"
5. Spring Security Configuration
5.Spring安全配置
Now that we have Okta SAML Setup and Spring Boot project ready, let’s start with the Spring Security configurations required for SAML 2.0 integration with Okta.
现在我们已经有了Okta SAML设置和Spring Boot项目,让我们开始进行SAML 2.0与Okta集成所需的Spring Security配置。
5.1. SAML Entry Point
5.1.SAML入口点
First, we’ll create a bean of the SAMLEntryPoint class that will work as an entry point for SAML authentication:
首先,我们将创建一个SAMLEntryPoint类的bean,它将作为SAML认证的一个入口点。
@Bean
public WebSSOProfileOptions defaultWebSSOProfileOptions() {
    WebSSOProfileOptions webSSOProfileOptions = new WebSSOProfileOptions();
    webSSOProfileOptions.setIncludeScoping(false);
    return webSSOProfileOptions;
}

@Bean
public SAMLEntryPoint samlEntryPoint() {
    SAMLEntryPoint samlEntryPoint = new SAMLEntryPoint();
    samlEntryPoint.setDefaultProfileOptions(defaultWebSSOProfileOptions());
    return samlEntryPoint;
}
Here, the WebSSOProfileOptions bean allows us to set up parameters of the request sent from SP to IdP asking for user authentication.
在这里,WebSSOProfileOptionsBean允许我们设置从SP发送至IdP要求用户认证的请求的参数。
5.2. Login and Logout
5.2.登录和注销
Next, let’s create a few filters for our SAML URIs like /discovery, /login, and /logout:
接下来,让我们为我们的SAML URI创建一些过滤器,如/discovery、/login、和/logout。
@Bean
public FilterChainProxy samlFilter() throws Exception {
    List<SecurityFilterChain> chains = new ArrayList<>();
    chains.add(new DefaultSecurityFilterChain(new AntPathRequestMatcher("/saml/SSO/**"),
        samlWebSSOProcessingFilter()));
    chains.add(new DefaultSecurityFilterChain(new AntPathRequestMatcher("/saml/discovery/**"),
        samlDiscovery()));
    chains.add(new DefaultSecurityFilterChain(new AntPathRequestMatcher("/saml/login/**"),
        samlEntryPoint));
    chains.add(new DefaultSecurityFilterChain(new AntPathRequestMatcher("/saml/logout/**"),
        samlLogoutFilter));
    chains.add(new DefaultSecurityFilterChain(new AntPathRequestMatcher("/saml/SingleLogout/**"),
        samlLogoutProcessingFilter));
    return new FilterChainProxy(chains);
}
Then, we’ll add a few corresponding filters and handlers:
然后,我们将添加一些相应的过滤器和处理程序。
@Bean
public SAMLProcessingFilter samlWebSSOProcessingFilter() throws Exception {
    SAMLProcessingFilter samlWebSSOProcessingFilter = new SAMLProcessingFilter();
    samlWebSSOProcessingFilter.setAuthenticationManager(authenticationManager());
    samlWebSSOProcessingFilter.setAuthenticationSuccessHandler(successRedirectHandler());
    samlWebSSOProcessingFilter.setAuthenticationFailureHandler(authenticationFailureHandler());
    return samlWebSSOProcessingFilter;
}

@Bean
public SAMLDiscovery samlDiscovery() {
    SAMLDiscovery idpDiscovery = new SAMLDiscovery();
    return idpDiscovery;
}

@Bean
public SavedRequestAwareAuthenticationSuccessHandler successRedirectHandler() {
    SavedRequestAwareAuthenticationSuccessHandler successRedirectHandler = new SavedRequestAwareAuthenticationSuccessHandler();
    successRedirectHandler.setDefaultTargetUrl("/home");
    return successRedirectHandler;
}

@Bean
public SimpleUrlAuthenticationFailureHandler authenticationFailureHandler() {
    SimpleUrlAuthenticationFailureHandler failureHandler = new SimpleUrlAuthenticationFailureHandler();
    failureHandler.setUseForward(true);
    failureHandler.setDefaultFailureUrl("/error");
    return failureHandler;
}
So far, we’ve configured the entry point for the authentication (samlEntryPoint) and a few filter chains. So, let’s take a deep dive into their details.
到目前为止,我们已经配置了认证的入口点(samlEntryPoint)和一些过滤器链。所以,让我们深入了解一下它们的细节。
When the user tries to log in for the first time, the samlEntryPoint will handle the entry request. Then, the samlDiscovery bean (if enabled) will discover the IdP to contact for authentication.
当用户第一次尝试登录时,samlEntryPoint将处理登录请求。然后,samlDiscovery Bean(如果启用)将发现IdP以联系认证。
Next, when the user logs in, the IdP redirects the SAML response to the /saml/sso URI for processing, and corresponding samlWebSSOProcessingFilter will authenticate the associated auth token.
接下来,当用户登录时,IdP将SAML响应重定向到/saml/sso URI进行处理,相应的samlWebSSOProcessingFilter将验证相关的auth令牌。
When successful, the successRedirectHandler will redirect the user to the default target URL (/home). Otherwise, the authenticationFailureHandler will redirect the user to the /error URL.
如果成功,successRedirectHandler将把用户重定向到默认的目标URL(/home)。否则,authenticationFailureHandler将把用户重定向到/error URL。
Last, let’s add the logout handlers for single and global logouts:
最后,让我们为单个和全局注销添加注销处理程序。
@Bean
public SimpleUrlLogoutSuccessHandler successLogoutHandler() {
    SimpleUrlLogoutSuccessHandler successLogoutHandler = new SimpleUrlLogoutSuccessHandler();
    successLogoutHandler.setDefaultTargetUrl("/");
    return successLogoutHandler;
}

@Bean
public SecurityContextLogoutHandler logoutHandler() {
    SecurityContextLogoutHandler logoutHandler = new SecurityContextLogoutHandler();
    logoutHandler.setInvalidateHttpSession(true);
    logoutHandler.setClearAuthentication(true);
    return logoutHandler;
}

@Bean
public SAMLLogoutProcessingFilter samlLogoutProcessingFilter() {
    return new SAMLLogoutProcessingFilter(successLogoutHandler(), logoutHandler());
}

@Bean
public SAMLLogoutFilter samlLogoutFilter() {
    return new SAMLLogoutFilter(successLogoutHandler(),
        new LogoutHandler[] { logoutHandler() },
        new LogoutHandler[] { logoutHandler() });
}
5.3. Metadata Handling
5.3 元数据处理
Now, we’ll provide IdP metadata XML to the SP. It’ll help to let our IdP know which SP endpoint it should redirect to once the user is logged in.
现在,我们将向SP提供IdP元数据XML。这将有助于让我们的IdP知道一旦用户登录,它应该重定向到哪个SP端点。
So, we’ll configure the MetadataGenerator bean to enable Spring SAML to handle the metadata:
因此,我们将配置MetadataGenerator bean,以使Spring SAML能够处理元数据。
public MetadataGenerator metadataGenerator() {
    MetadataGenerator metadataGenerator = new MetadataGenerator();
    metadataGenerator.setEntityId(samlAudience);
    metadataGenerator.setExtendedMetadata(extendedMetadata());
    metadataGenerator.setIncludeDiscoveryExtension(false);
    metadataGenerator.setKeyManager(keyManager());
    return metadataGenerator;
}

@Bean
public MetadataGeneratorFilter metadataGeneratorFilter() {
    return new MetadataGeneratorFilter(metadataGenerator());
}

@Bean
public ExtendedMetadata extendedMetadata() {
    ExtendedMetadata extendedMetadata = new ExtendedMetadata();
    extendedMetadata.setIdpDiscoveryEnabled(false);
    return extendedMetadata;
}
The MetadataGenerator bean requires an instance of the KeyManager to encrypt the exchange between SP and IdP:
MetadataGenerator Bean需要一个KeyManager的实例来加密SP和IdP之间的交换。
@Bean
public KeyManager keyManager() {
    DefaultResourceLoader loader = new DefaultResourceLoader();
    Resource storeFile = loader.getResource(samlKeystoreLocation);
    Map<String, String> passwords = new HashMap<>();
    passwords.put(samlKeystoreAlias, samlKeystorePassword);
    return new JKSKeyManager(storeFile, samlKeystorePassword, passwords, samlKeystoreAlias);
}
Here, we have to create and provide a Keystore to the KeyManager bean. We can create a self-signed key and Keystore with the JRE command:
在这里,我们必须创建并向KeyManagerbean提供一个Keystore。我们可以用JRE命令创建一个自签名的密钥和Keystore。
keytool -genkeypair -alias baeldungspringsaml -keypass baeldungsamlokta -keystore saml-keystore.jks5.4. MetadataManager
5.4. 元数据管理器
Then, we’ll configure the IdP metadata into our Spring Boot application using the ExtendedMetadataDelegate instance:
然后,我们将使用ExtendedMetadataDelegate实例将IdP元数据配置到我们的Spring Boot应用程序中。
@Bean
@Qualifier("okta")
public ExtendedMetadataDelegate oktaExtendedMetadataProvider() throws MetadataProviderException {
    org.opensaml.util.resource.Resource resource = null
    try {
        resource = new ClasspathResource("/saml/metadata/sso.xml");
    } catch (ResourceException e) {
        e.printStackTrace();
    }
    Timer timer = new Timer("saml-metadata")
    ResourceBackedMetadataProvider provider = new ResourceBackedMetadataProvider(timer,resource);
    provider.setParserPool(parserPool());
    return new ExtendedMetadataDelegate(provider, extendedMetadata());
}

@Bean
@Qualifier("metadata")
public CachingMetadataManager metadata() throws MetadataProviderException, ResourceException {
    List<MetadataProvider> providers = new ArrayList<>();
    providers.add(oktaExtendedMetadataProvider());
    CachingMetadataManager metadataManager = new CachingMetadataManager(providers);
    metadataManager.setDefaultIDP(defaultIdp);
    return metadataManager;
}
Here, we’ve parsed the metadata from the sso.xml file that contains the IdP metadata XML, copied from the Okta developer account while viewing the setup instructions.
在这里,我们从sso.xml文件中解析了元数据,该文件包含IdP元数据XML,是在查看设置说明时从Okta开发者账户复制的。
Similarly, the defaultIdp variable contains the IdP Issuer URL, copied from the Okta developer account.
同样,defaultIdp变量包含从Okta开发者账户复制的IdP发行者URL。
5.5. XML Parsing
5.5 XML解析
For XML parsing, we can use an instance of the StaticBasicParserPool class:
对于XML解析,我们可以使用StaticBasicParserPool类的一个实例。
@Bean(initMethod = "initialize")
public StaticBasicParserPool parserPool() {
    return new StaticBasicParserPool();
}

@Bean(name = "parserPoolHolder")
public ParserPoolHolder parserPoolHolder() {
    return new ParserPoolHolder();
}
5.6. SAML Processor
5.6.SAML处理器
Then, we require a processor to parse the SAML message from the HTTP request:
然后,我们需要一个处理器来解析HTTP请求中的SAML消息。
@Bean
public HTTPPostBinding httpPostBinding() {
    return new HTTPPostBinding(parserPool(), VelocityFactory.getEngine());
}

@Bean
public HTTPRedirectDeflateBinding httpRedirectDeflateBinding() {
    return new HTTPRedirectDeflateBinding(parserPool());
}

@Bean
public SAMLProcessorImpl processor() {
    ArrayList<SAMLBinding> bindings = new ArrayList<>();
    bindings.add(httpRedirectDeflateBinding());
    bindings.add(httpPostBinding());
    return new SAMLProcessorImpl(bindings);
}
Here, we’ve used POST and Redirect bindings with respect to our configuration in the Okta developer account.
在这里,我们使用了POST和Redirect绑定,与我们在Okta开发者账户中的配置有关。
5.7. SAMLAuthenticationProvider Implementation
5.7.SAMLAuthenticationProvider实现
Last, we require a custom implementation of the SAMLAuthenticationProvider class to check the instance of the ExpiringUsernameAuthenticationToken class and set the obtained authorities:
最后,我们需要一个SAMLAuthenticationProvider类的自定义实现,以检查ExpiringUsernameAuthenticationToken类的实例并设置获得的授权。
public class CustomSAMLAuthenticationProvider extends SAMLAuthenticationProvider {
    @Override
    public Collection<? extends GrantedAuthority> getEntitlements(SAMLCredential credential, Object userDetail) {
        if (userDetail instanceof ExpiringUsernameAuthenticationToken) {
            List<GrantedAuthority> authorities = new ArrayList<GrantedAuthority>();
            authorities.addAll(((ExpiringUsernameAuthenticationToken) userDetail).getAuthorities());
            return authorities;
        } else {
            return Collections.emptyList();
        }
    }
}
Also, we should configure the CustomSAMLAuthenticationProvider as a bean in the SecurityConfig class:
此外,我们应该将CustomSAMLAuthenticationProvider配置为SecurityConfig类中的一个bean。
@Bean
public SAMLAuthenticationProvider samlAuthenticationProvider() {
    return new CustomSAMLAuthenticationProvider();
}
5.8. SecurityConfig
5.8.SecurityConfig
Finally, we’ll configure a basic HTTP security using the already discussed samlEntryPoint and samlFilter:
最后,我们将使用已经讨论过的samlEntryPoint和samlFilter配置一个基本的HTTP安全。
@Override
protected void configure(HttpSecurity http) throws Exception {
    http.csrf().disable();

    http.httpBasic().authenticationEntryPoint(samlEntryPoint);

    http
      .addFilterBefore(metadataGeneratorFilter(), ChannelProcessingFilter.class)
      .addFilterAfter(samlFilter(), BasicAuthenticationFilter.class)
      .addFilterBefore(samlFilter(), CsrfFilter.class);

    http
      .authorizeRequests()
      .antMatchers("/").permitAll()
      .anyRequest().authenticated();

    http
      .logout()
      .addLogoutHandler((request, response, authentication) -> {
          response.sendRedirect("/saml/logout");
      });
}
Voila! We finished our Spring Security SAML configuration that allows the user to log in to the IdP and then receive the user’s authentication details in XML format from the IdP. Last, it authenticates the user token to allow access to our web app.
Voila!我们完成了我们的Spring Security SAML配置,允许用户登录到IdP,然后从IdP接收用户的XML格式的认证细节。最后,它验证了用户令牌,允许访问我们的网络应用。
6. HomeController
6.HomeController
Now that our Spring Security SAML configurations are ready along with the Okta developer account setup, we can set up a simple controller to provide a landing page and home page.
现在,我们的Spring Security SAML配置以及Okta开发人员帐户的设置已经准备就绪,我们可以设置一个简单的控制器来提供登陆页面和主页。
6.1. Index and Auth Mapping
6.1.索引和授权映射
First, let’s add mappings to the default target URI (/) and /auth URI:
首先,让我们为默认的目标URI(/)和/authURI添加映射。
@RequestMapping("/")
public String index() {
    return "index";
}

@GetMapping(value = "/auth")
public String handleSamlAuth() {
    Authentication auth = SecurityContextHolder.getContext().getAuthentication();
    if (auth != null) {
        return "redirect:/home";
    } else {
        return "/";
    }
}
Then, we’ll add a simple index.html that allows the user to redirect Okta SAML authentication using the login link:
然后,我们将添加一个简单的index.html,允许用户使用login链接重定向Okta SAML认证。
<!doctype html>
<html>
<head>
<title>Baeldung Spring Security SAML</title>
</head>
<body>
    <h3><Strong>Welcome to Baeldung Spring Security SAML></h3>
    <a th:href="@{/auth}">Login</a>
</body>
</html>
Now, we’re ready to run our Spring Boot App and access it at http://localhost:8080/:
现在,我们已经准备好运行我们的Spring Boot应用程序,并在http://localhost:8080/访问它。

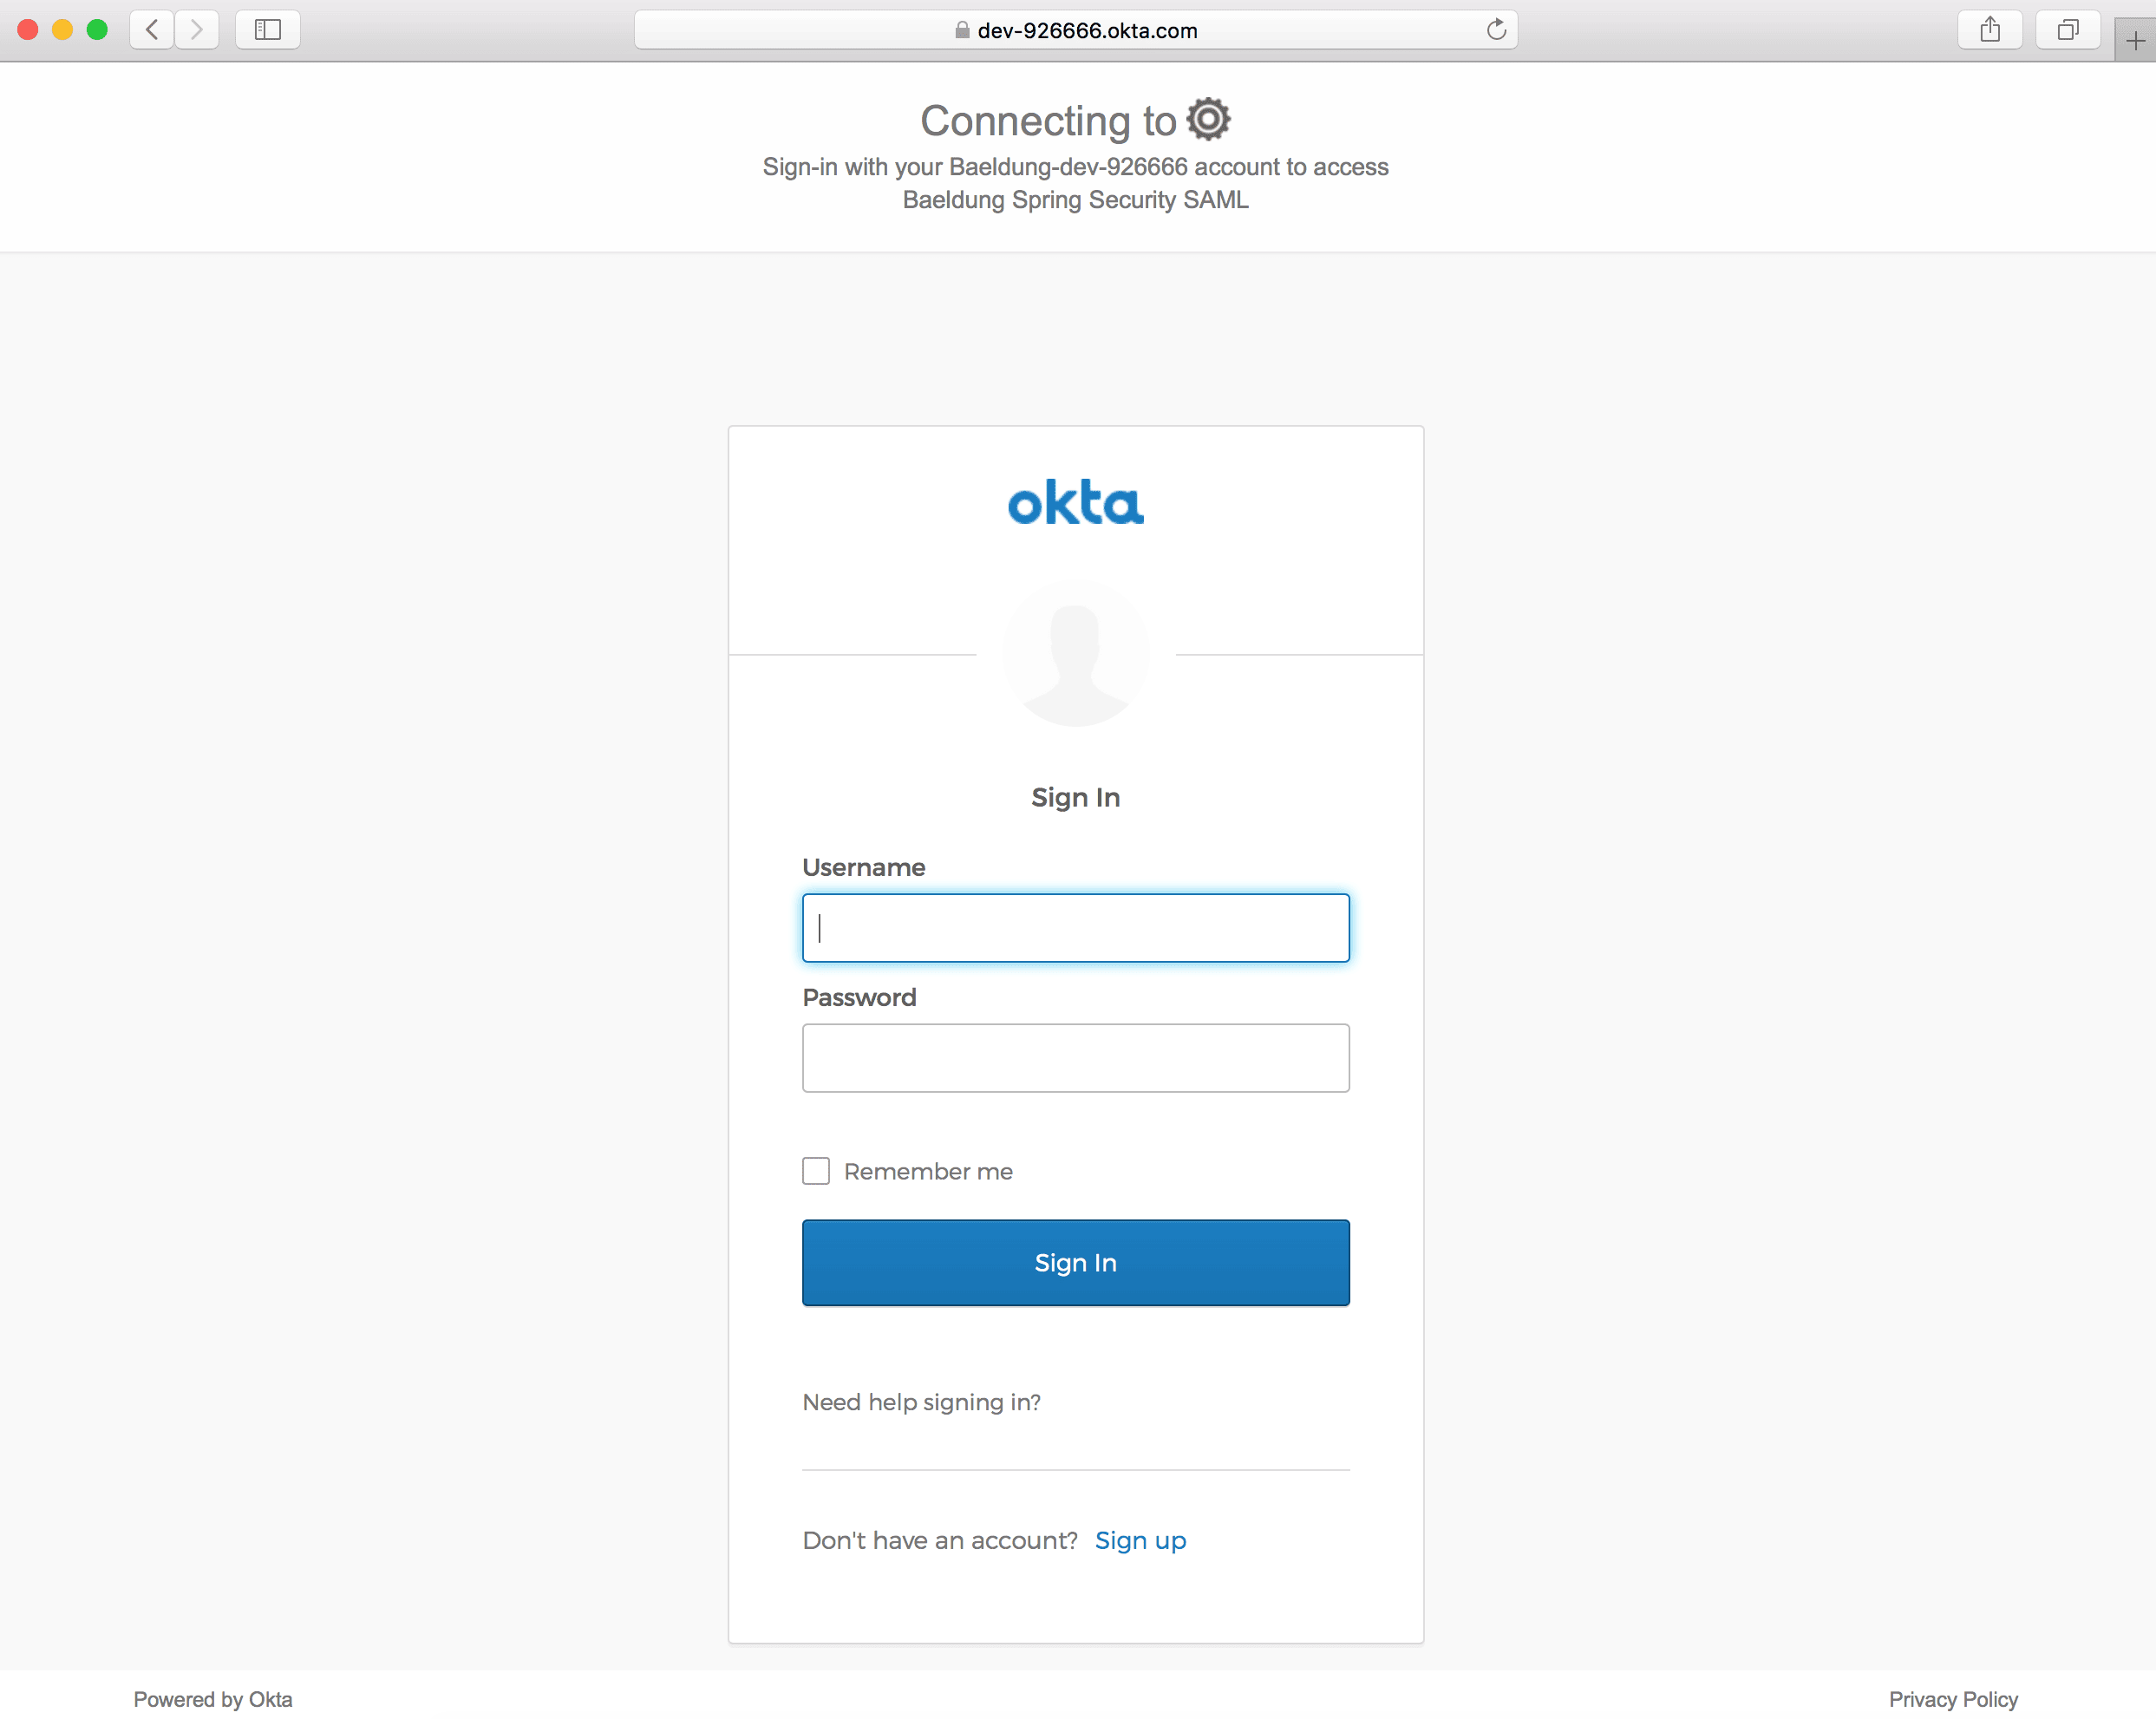
An Okta Sign-In page should open when clicking on the Login link:
6.2. Home Page
6.2.主页
Next, let’s add the mapping to the /home URI to redirect the user when successfully authenticated:
接下来,让我们为/home URI添加映射,以便在成功认证后重定向用户。
@RequestMapping("/home")
public String home(Model model) {
    Authentication authentication = SecurityContextHolder.getContext().getAuthentication();
    model.addAttribute("username", authentication.getPrincipal());
    return "home";
}
Also, we’ll add the home.html to show the logged-in user and a logout link:
另外,我们将添加home.html,以显示登录的用户和注销的链接。
<!doctype html>
<html>
<head>
<title>Baeldung Spring Security SAML: Home</title>
</head>
<body>
    <h3><Strong>Welcome!><br/>You are successfully logged in!</h3>
    <p>You are logged as <span th:text="${username}">null</span>.</p>
    <small>
        <a th:href="@{/logout}">Logout</a>
    </small>
</body>
</html>
Once logged in successfully, we should see the home page:
一旦登录成功,我们应该看到主页。
7. Conclusion
7.结语
In this tutorial, we discussed Spring Security SAML integration with Okta.
在本教程中,我们讨论了Spring Security SAML与Okta的集成。
First, we set up an Okta developer account with SAML 2.0 web integration. Then, we created a Spring Boot project with required Maven dependencies.
首先,我们建立了一个具有SAML 2.0网络集成的Okta开发者账户。然后,我们创建了一个带有所需Maven依赖项的Spring Boot项目。
Next, we did all the required setup for the Spring Security SAML like samlEntryPoint, samlFilter, metadata handling, and SAML processor.
接下来,我们为Spring Security的SAML做了所有必要的设置,如samlEntryPoint、samlFilter、元数据处理和SAML处理器。
Last, we created a controller and a few pages like index and home to test our SAML integration with Okta.
最后,我们创建了一个控制器和几个页面,如index和home来测试我们与Okta的SAML集成。
As usual, the source code is available over on GitHub.
像往常一样,源代码可在GitHub上获得。
