1. Overview
1.概述
TensorFlow is an open source library for dataflow programming. This was originally developed by Google and is available for a wide array of platforms. Although TensorFlow can work on a single core, it can as easily benefit from multiple CPU, GPU or TPU available.
TensorFlow是一个用于数据流编程的开源库。这最初是由谷歌开发的,可用于各种平台。尽管TensorFlow可以在单核上工作,但它也可以轻松地从多个CPU、GPU或TPU中获益。
In this tutorial, we’ll go through the basics of TensorFlow and how to use it in Java. Please note that the TensorFlow Java API is an experimental API and hence not covered under any stability guarantee. We’ll cover later in the tutorial possible use cases for using the TensorFlow Java API.
在本教程中,我们将了解TensorFlow的基础知识以及如何在Java中使用它。请注意,TensorFlow Java API是一个实验性的API,因此不包括在任何稳定性保证之下。我们将在本教程的后面介绍使用TensorFlow Java API的可能用例。
2. Basics
2.基础知识
TensorFlow computation basically revolves around two fundamental concepts: Graph and Session. Let’s go through them quickly to gain the background needed to go through the rest of the tutorial.
TensorFlow的计算基本上围绕着两个基本概念。图和会话。让我们快速浏览一下它们,以获得通过本教程其余部分所需的背景。
2.1. TensorFlow Graph
2.1.TensorFlow图
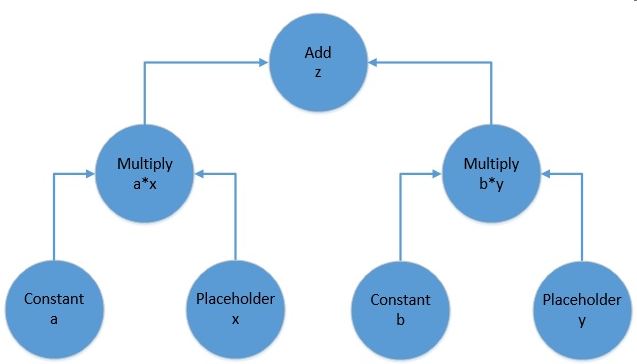
To begin with, let’s understand the fundamental building blocks of TensorFlow programs. Computations are represented as graphs in TensorFlow. A graph is typically a directed acyclic graph of operations and data, for example:
首先,让我们了解一下TensorFlow程序的基本构建模块。计算在TensorFlow中被表示为图。一个图通常是操作和数据的有向无环图,例如。
The above picture represents the computational graph for the following equation:
上图表示以下方程的计算图。
f(x, y) = z = a*x + b*yA TensorFlow computational graph consists of two elements:
一个TensorFlow的计算图由两个元素组成。
- Tensor: These are the core unit of data in TensorFlow. They are represented as the edges in a computational graph, depicting the flow of data through the graph. A tensor can have a shape with any number of dimensions. The number of dimensions in a tensor is usually referred to as its rank. So a scalar is a rank 0 tensor, a vector is a rank 1 tensor, a matrix is a rank 2 tensor, and so on and so forth.
- Operation: These are the nodes in a computational graph. They refer to a wide variety of computation that can happen on the tensors feeding into the operation. They often result in tensors as well which emanate from the operation in a computational graph.
2.2. TensorFlow Session
2.2.TensorFlow会话
Now, a TensorFlow graph is a mere schematic of the computation which actually holds no values. Such a graph must be run inside what is called a TensorFlow session for the tensors in the graph to be evaluated. The session can take a bunch of tensors to evaluate from a graph as input parameters. Then it runs backward in the graph and runs all the nodes necessary to evaluate those tensors.
现在,TensorFlow图仅仅是一个计算的示意图,它实际上不持有任何值。这样的图必须在所谓的TensorFlow会话中运行,才能对图中的张量进行评估。该会话可以从图中获取一堆要评估的张量作为输入参数。然后它在图中向后运行,并运行所有必要的节点来评估这些张量。
With this knowledge, we are now ready to take this and apply it to the Java API!
有了这些知识,我们现在就可以把这些知识应用到Java API中去了。
3. Maven Setup
3.Maven设置
We’ll set-up a quick Maven project to create and run a TensorFlow graph in Java. We just need the tensorflow dependency:
我们将设置一个快速的Maven项目,在Java中创建并运行一个TensorFlow图。我们只需要tensorflow依赖项。
<dependency>
    <groupId>org.tensorflow</groupId>
    <artifactId>tensorflow</artifactId>
    <version>1.12.0</version>
</dependency>
4. Creating the Graph
4.创建图表
Let’s now try to build the graph we discussed in the previous section using the TensorFlow Java API. More precisely, for this tutorial we’ll be using TensorFlow Java API to solve the function represented by the following equation:
现在让我们尝试使用TensorFlow Java API来构建我们在上一节讨论的图。更确切地说,在本教程中,我们将使用TensorFlow Java API来解决由以下方程代表的函数。
z = 3*x + 2*yThe first step is to declare and initialize a graph:
第一步是声明和初始化一个图。
Graph graph = new Graph()Now, we have to define all the operations required. Remember, that operations in TensorFlow consume and produce zero or more tensors. Moreover, every node in the graph is an operation including constants and placeholders. This may seem counter-intuitive, but bear with it for a moment!
现在,我们必须定义所有需要的操作。记住,TensorFlow中的操作会消耗和产生零个或多个张量。此外,图中的每个节点都是一个操作,包括常数和占位符。这似乎有悖于直觉,但请先忍耐一下吧
The class Graph has a generic function called opBuilder() to build any kind of operation on TensorFlow.
类Graph有一个名为opBuilder()的通用函数,可以在TensorFlow上建立任何种类的操作。
4.1. Defining Constants
4.1.定义常量
To begin with, let’s define constant operations in our graph above. Note that a constant operation will need a tensor for its value:
首先,让我们在上面的图中定义常数运算。请注意,一个常量操作需要一个张量作为其值。
Operation a = graph.opBuilder("Const", "a")
  .setAttr("dtype", DataType.fromClass(Double.class))
  .setAttr("value", Tensor.<Double>create(3.0, Double.class))
  .build();
Operation b = graph.opBuilder("Const", "b")
  .setAttr("dtype", DataType.fromClass(Double.class))
  .setAttr("value", Tensor.<Double>create(2.0, Double.class))
  .build();
Here, we have defined an Operation of constant type, feeding in the Tensor with Double values 2.0 and 3.0. It may seem little overwhelming to begin with but that’s just how it is in the Java API for now. These constructs are much more concise in languages like Python.
在这里,我们定义了一个常量类型的Operation,在Tensor中输入Double值2.0和3.0。开始时,这可能看起来有点令人不知所措,但这只是目前Java API中的情况。在Python这样的语言中,这些构造要简洁得多。
4.2. Defining Placeholders
4.2.定义占位符
While we need to provide values to our constants, placeholders don’t need a value at definition-time. The values to placeholders need to be supplied when the graph is run inside a session. We’ll go through that part later in the tutorial.
虽然我们需要为我们的常量提供值,但占位符在定义时不需要一个值。占位符的值需要在图形在会话中运行时提供。我们将在本教程的后面讨论这部分内容。
For now, let’s see how can we define our placeholders:
现在,让我们看看如何定义我们的占位符。
Operation x = graph.opBuilder("Placeholder", "x")
  .setAttr("dtype", DataType.fromClass(Double.class))
  .build();
Operation y = graph.opBuilder("Placeholder", "y")
  .setAttr("dtype", DataType.fromClass(Double.class))
  .build();
Note that we did not have to provide any value for our placeholders. These values will be fed as Tensors when run.
请注意,我们没有必要为我们的占位符提供任何值。这些值在运行时将作为Tensors被输入。
4.3. Defining Functions
4.3.定义函数
Finally, we need to define the mathematical operations of our equation, namely multiplication and addition to get the result.
最后,我们需要定义我们方程的数学运算,即乘法和加法来得到结果。
These are again nothing but Operations in TensorFlow and Graph.opBuilder() is handy once again:
这些又是TensorFlow中的Operations,Graph.opBuilder()又一次方便了。
Operation ax = graph.opBuilder("Mul", "ax")
  .addInput(a.output(0))
  .addInput(x.output(0))
  .build();
Operation by = graph.opBuilder("Mul", "by")
  .addInput(b.output(0))
  .addInput(y.output(0))
  .build();
Operation z = graph.opBuilder("Add", "z")
  .addInput(ax.output(0))
  .addInput(by.output(0))
  .build();
Here, we have defined there Operation, two for multiplying our inputs and the final one for summing up the intermediate results. Note that operations here receive tensors which are nothing but the output of our earlier operations.
在这里,我们定义了三个操作,其中两个用于乘以我们的输入,最后一个用于对中间结果进行求和。请注意,这里的操作接收的是张量,而张量不过是我们先前操作的输出。
Please note that we are getting the output Tensor from the Operation using index ‘0′. As we discussed earlier, an Operation can result in one or more Tensor and hence while retrieving a handle for it, we need to mention the index. Since we know that our operations are only returning one Tensor, ‘0′ works just fine!
请注意,我们正在从使用索引’0’的Operation中获取输出的Tensor。正如我们前面所讨论的,一个操作可以产生一个或多个Tensor,因此在为它检索句柄时,我们需要提到索引。因为我们知道我们的操作只返回一个Tensor,所以’0’就可以了!”。
5. Visualizing the Graph
5.图形的可视化
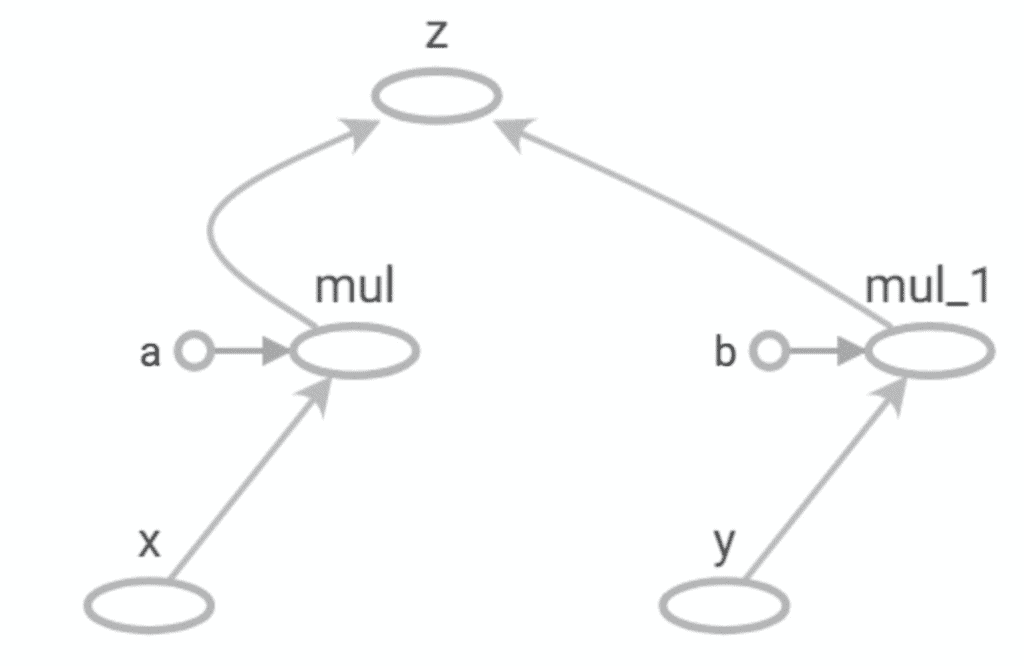
It is difficult to keep a tab on the graph as it grows in size. This makes it important to visualize it in some way. We can always create a hand drawing like the small graph we created previously but it is not practical for larger graphs. TensorFlow provides a utility called TensorBoard to facilitate this.
随着图表规模的扩大,很难对其进行监控。这使得以某种方式将其可视化变得重要。我们总是可以创建一个手绘,就像我们之前创建的小图一样,但对于较大的图来说,这并不实用。TensorFlow提供了一个名为TensorBoard的实用程序来促进这个工作。
Unfortunately, Java API doesn’t have the capability to generate an event file which is consumed by TensorBoard. But using APIs in Python we can generate an event file like:
不幸的是,Java API没有能力生成一个被TensorBoard消费的事件文件。但是,使用Python中的API,我们可以生成一个事件文件,比如。
writer = tf.summary.FileWriter('.')
......
writer.add_graph(tf.get_default_graph())
writer.flush()
Please do not bother if this does not make sense in the context of Java, this has been added here just for the sake of completeness and not necessary to continue rest of the tutorial.
如果这在Java的背景下没有意义,请不要在意,在这里添加这个只是为了完整,没有必要继续教程的其他部分。
We can now load and visualize the event file in TensorBoard like:
我们现在可以在TensorBoard中加载和可视化事件文件,如。
tensorboard --logdir .TensorBoard comes as part of TensorFlow installation.
TensorBoard是TensorFlow安装的一部分。
Note the similarity between this and the manually drawn graph earlier!
请注意,这与前面的手工绘制的图表有相似之处!
6. Working with Session
6.与会议合作
We have now created a computational graph for our simple equation in TensorFlow Java API. But how do we run it? Before addressing that, let’s see what is the state of Graph we have just created at this point. If we try to print the output of our final Operation “z”:
我们现在已经在TensorFlow Java API中为我们的简单方程创建了一个计算图。但我们如何运行它呢?在解决这个问题之前,让我们看看我们刚刚创建的Graph在此时是什么状态。如果我们试图打印我们最终的Operation“z “的输出。
System.out.println(z.output(0));This will result in something like:
这将导致类似的结果。
<Add 'z:0' shape=<unknown> dtype=DOUBLE>This isn’t what we expected! But if we recall what we discussed earlier, this actually makes sense. The Graph we have just defined has not been run yet, so the tensors therein do not actually hold any actual value. The output above just says that this will be a Tensor of type Double.
这不是我们所期望的!但如果我们回顾一下之前讨论的内容,这实际上是有意义的。我们刚刚定义的Graph还没有被运行,所以其中的张量实际上并不持有任何实际的值。上面的输出只是说这将是一个Tensor类型的Double。
Let’s now define a Session to run our Graph:
现在让我们定义一个Session来运行我们的Graph。
Session sess = new Session(graph)Finally, we are now ready to run our Graph and get the output we have been expecting:
最后,我们现在已经准备好运行我们的Graph,并获得我们所期望的输出。
Tensor<Double> tensor = sess.runner().fetch("z")
  .feed("x", Tensor.<Double>create(3.0, Double.class))
  .feed("y", Tensor.<Double>create(6.0, Double.class))
  .run().get(0).expect(Double.class);
System.out.println(tensor.doubleValue());
So what are we doing here? It should be fairly intuitive:
那么我们在这里做什么呢?这应该是相当直观的。
- Get a Runner from the Session
- Define the Operation to fetch by its name “z”
- Feed in tensors for our placeholders “x” and “y”
- Run the Graph in the Session
And now we see the scalar output:
现在我们看到标量输出。
21.0This is what we expected, isn’t it!
这就是我们所期望的,不是吗!?
7. The Use Case for Java API
7.Java API的使用案例
At this point, TensorFlow may sound like overkill for performing basic operations. But, of course, TensorFlow is meant to run graphs much much larger than this.
在这一点上,TensorFlow可能听起来对执行基本操作来说是多余的。但是,当然,TensorFlow是为了运行比这大得多的图。
Additionally, the tensors it deals with in real-world models are much larger in size and rank. These are the actual machine learning models where TensorFlow finds its real use.
此外,它在真实世界模型中处理的张量在大小和等级上要大得多。这些是实际的机器学习模型,TensorFlow在其中找到了真正的用途。
It’s not difficult to see that working with the core API in TensorFlow can become very cumbersome as the size of the graph increases. To this end, TensorFlow provides high-level APIs like Keras to work with complex models. Unfortunately, there is little to no official support for Keras on Java just yet.
不难看出,随着图的大小增加,使用TensorFlow中的核心API工作会变得非常麻烦。为此,TensorFlow 提供了像Keras这样的高级 API 来处理复杂模型。遗憾的是,目前在Java上几乎没有对Keras的官方支持。
However, we can use Python to define and train complex models either directly in TensorFlow or using high-level APIs like Keras. Subsequently, we can export a trained model and use that in Java using the TensorFlow Java API.
然而,我们可以使用Python来定义和训练复杂的模型,可以直接在TensorFlow中或使用像Keras这样的高级API。随后,我们可以导出训练好的模型,并使用TensorFlow Java API在Java中使用。
Now, why would we want to do something like that? This is particularly useful for situations where we want to use machine learning enabled features in existing clients running on Java. For instance, recommending caption for user images on an Android device. Nevertheless, there are several instances where we are interested in the output of a machine learning model but do not necessarily want to create and train that model in Java.
现在,我们为什么要做这样的事情呢?这对于我们想在现有的运行在Java上的客户端中使用机器学习功能的情况特别有用。例如,为Android设备上的用户图片推荐标题。然而,在一些情况下,我们对机器学习模型的输出感兴趣,但不一定想在Java中创建和训练该模型。
This is where TensorFlow Java API finds the bulk of its use. We’ll go through how this can be achieved in the next section.
这是TensorFlow Java API发现其大部分用途的地方。我们将在下一节中讨论如何实现这一目标。
8. Using Saved Models
8.使用保存的模型
We’ll now understand how we can save a model in TensorFlow to the file system and load that back possibly in a completely different language and platform. TensorFlow provides APIs to generate model files in a language and platform neutral structure called Protocol Buffer.
我们现在将了解我们如何将TensorFlow中的模型保存到文件系统中,并可能以完全不同的语言和平台将其加载回来。TensorFlow提供了一些API来生成语言和平台中立结构的模型文件,这些结构被称为Protocol Buffer。。
8.1. Saving Models to the File System
8.1.将模型保存到文件系统中
We’ll begin by defining the same graph we created earlier in Python and saving that to the file system.
我们将首先定义我们先前在Python中创建的同一个图,并将其保存到文件系统中。
Let’s see we can do this in Python:
让我们看看我们可以在Python中这样做。
import tensorflow as tf
graph = tf.Graph()
builder = tf.saved_model.builder.SavedModelBuilder('./model')
with graph.as_default():
  a = tf.constant(2, name='a')
  b = tf.constant(3, name='b')
  x = tf.placeholder(tf.int32, name='x')
  y = tf.placeholder(tf.int32, name='y')
  z = tf.math.add(a*x, b*y, name='z')
  sess = tf.Session()
  sess.run(z, feed_dict = {x: 2, y: 3})
  builder.add_meta_graph_and_variables(sess, [tf.saved_model.tag_constants.SERVING])
  builder.save()
As the focus of this tutorial in Java, let’s not pay much attention to the details of this code in Python, except for the fact that it generates a file called “saved_model.pb”. Do note in passing the brevity in defining a similar graph compared to Java!
由于本教程的重点在Java,我们不要太注意Python中这段代码的细节,除了它生成了一个叫做 “saved_model.pb “的文件。请顺便注意,与Java相比,定义一个类似的图形是很简洁的!
8.2. Loading Models from the File System
8.2.从文件系统加载模型
We’ll now load “saved_model.pb” into Java. Java TensorFlow API has SavedModelBundle to work with saved models:
我们现在将 “saved_model.pb “加载到Java中。Java TensorFlow API有SavedModelBundle来处理保存的模型。
SavedModelBundle model = SavedModelBundle.load("./model", "serve");
Tensor<Integer> tensor = model.session().runner().fetch("z")
  .feed("x", Tensor.<Integer>create(3, Integer.class))
  .feed("y", Tensor.<Integer>create(3, Integer.class))
  .run().get(0).expect(Integer.class);
System.out.println(tensor.intValue());
It should by now be fairly intuitive to understand what the above code is doing. It simply loads the model graph from the protocol buffer and makes available the session therein. From there onward, we can pretty much do anything with this graph as we would have done for a locally-defined graph.
现在应该可以很直观地理解上述代码在做什么了。它只是从协议缓冲区加载模型图,并使其中的会话可用。从那里开始,我们几乎可以对这个图做任何事情,就像我们对一个本地定义的图所做的那样。
9. Conclusion
9.结语
To sum up, in this tutorial we went through the basic concepts related to the TensorFlow computational graph. We saw how to use the TensorFlow Java API to create and run such a graph. Then, we talked about the use cases for the Java API with respect to TensorFlow.
总而言之,在本教程中,我们经历了与TensorFlow计算图有关的基本概念。我们看到了如何使用TensorFlow的Java API来创建和运行这样一个图。然后,我们谈到了与TensorFlow有关的Java API的使用情况。
In the process, we also understood how to visualize the graph using TensorBoard, and save and reload a model using Protocol Buffer.
在这个过程中,我们还了解了如何使用TensorBoard对图形进行可视化,并使用Protocol Buffer保存和重新加载一个模型。
As always, the code for the examples is available over on GitHub.
像往常一样,这些例子的代码可以在GitHub上找到over。

