1. Introduction
1.绪论
In this tutorial, we explore the different server modes and configurations of the JBoss WildFly application server. WildFly is a lightweight application server with a CLI and an admin console.
在本教程中,我们将探讨JBoss WildFly应用服务器的不同服务器模式和配置。WildFly是一个轻量级的应用服务器,它有一个CLI和一个管理控制台。
Before we get started, though, we need to make sure we have a JAVA_HOME variable set to a JDK. Anything after version 8 will work for WildFly 17.
不过在我们开始之前,我们需要确保我们有一个JAVA_HOME变量设置为一个JDK。任何版本8之后的东西都可以用于WildFly 17。
2. Server Modes
2.服务器模式
WildFly comes with standalone and domain modes by default. Let’s take a look at standalone first.
WildFly默认有独立模式和域模式。让我们先看一下独立模式。
2.1. Standalone
2.1 独立的
After downloading and extracting WildFly to a local directory, we need to execute the user script.
在下载并解压WildFly到本地目录后,我们需要执行用户脚本。
For Linux, we’d do:
对于Linux,我们会做。
~/bin/add-user.shOr for Windows:
或者针对Windows。
~\bin\add-user.batThe admin user will already exist; however, we’ll want to update the password to something different. Updating the default admin password is always best practice even when planning to use another account for server management.
admin用户将已经存在;然而,我们希望将密码更新为不同的东西。更新默认的管理员密码总是最好的做法,即使计划使用另一个账户进行服务器管理。
The UI will prompt us to update the password in option (a):
UI会提示我们更新选项(a)中的密码。
Enter the details of the new user to add.
Using realm 'ManagementRealm' as discovered from the existing property files.
Username : admin
User 'admin' already exists and is enabled, would you like to...
 a) Update the existing user password and roles
 b) Disable the existing user
 c) Type a new username
(a):
After changing the password, we need to run the OS-appropriate startup script:
修改密码后,我们需要运行与操作系统相适应的启动脚本。
~\bin\standalone.batAfter the server output stops, we see that the server is running.
在服务器输出停止后,我们看到服务器正在运行。
We can now access the administration console at http://127.0.0.1:9990 as prompted in the output. If we access the server URL, http://127.0.0.1:8080/, we should be prompted with a message telling us that the server is running:
我们现在可以按照输出中的提示访问管理控制台,地址是http://127.0.0.1:9990。如果我们访问服务器的URL,http://127.0.0.1:8080/,我们应该被提示一个信息,告诉我们服务器正在运行。
Server is up and running!This quick and easy setup is great for a lone instance running on a single server, but let’s check out domain mode for multiple instances.
这种快速而简单的设置对于在单台服务器上运行的孤独的实例来说是很好的,但是让我们检查一下多个实例的域模式。
2.2. Domain
2.2.领域
As mentioned above, the domain mode has multiple server instances being managed by a single host controller. The default number is two servers.
如上所述,域模式有多个服务器实例由一个主机控制器管理。默认的数量是两个服务器。
Similarly to the standalone instance, we add a user via the add-user script. However, the startup script is appropriately called domain rather than standalone.
与独立实例类似,我们通过add-user脚本添加一个用户。然而,启动脚本被恰当地称为domain而不是standalone.。
After running through the same steps for the startup process, we now hit the individual server instances.
在运行了启动过程的相同步骤后,我们现在打到各个服务器实例上。
For example, we can visit the same single instance URL for the first server at http://127.0.0.1:8080/
例如,我们可以在http://127.0.0.1:8080/访问第一个服务器的相同的单实例URL。
Server is up and running!Likewise, we can visit server two at http://127.0.0.1:8230
同样,我们可以在http://127.0.0.1:8230访问服务器二。
Server is up and running!We’ll take a look at that odd port configuration for server two a bit later.
我们稍后会看一下服务器2的额外的端口配置。
3. Deployment
3.部署
To deploy our first application, we need a good example application.
为了部署我们的第一个应用程序,我们需要一个好的示例应用程序。
Let’s use Spring Boot Hello World. With a slight modification, it’ll work on WildFly.
让我们使用Spring Boot Hello World。只要稍作修改,它就可以在WildFly上运行。
First, let’s update the pom.xml to build a WAR. We’ll change the packaging element and add the maven-war-plugin:
首先,让我们更新pom.xml,以构建一个WAR。我们将修改packaging元素,并添加maven-war-plugin。
<packaging>war</packaging>
...
<build>
  <plugins>
	<plugin>
	  <groupId>org.apache.maven.plugins</groupId>
	  <artifactId>maven-war-plugin</artifactId>
	  <configuration>
		<archive>
		  <manifestEntries>
			<Dependencies>jdk.unsupported</Dependencies>
		  </manifestEntries>
		</archive>
	  </configuration>
	</plugin>
  </plugins>
</build>
Next, we need to alter the Application class to extend SpringBootServletInitializer:
接下来,我们需要将Application类改为extendSpringBootServletInitializer。
public class Application extends SpringBootServletInitializerAnd override the configure method:
并重写configure方法。
    @Override
    protected SpringApplicationBuilder configure(SpringApplicationBuilder application) {
        return application.sources(Application.class);
    }
Finally, let’s build the project:
最后,让我们来建立这个项目。
./mvnw packageNow, we can deploy it.
现在,我们可以部署它了。
3.1. Deploy an Application
3.1.部署一个应用程序
Let’s look at how easy it is to deploy our new WildFly application through the console.
让我们看看通过控制台部署我们的新WildFly应用程序是多么容易。
Firstly, we log in to the console using the admin user and password set earlier.
首先,我们使用先前设置的管理员用户和密码登录到控制台。
Click Add -> Upload Deployment -> Choose a file…
点击添加 -> 上传部署 -> 选择一个文件…。
Secondly, we browse to the target directory for the Spring Boot application and upload the WAR file. Click Next to continue, and edit the name of the new application.
其次,我们浏览到Spring Boot应用程序的目标目录,上传WAR文件。点击Next继续,并编辑新应用程序的名称。
Lastly, we access the application by the same URL – http://127.0.0.1:8080/. We now see the application output as:
最后,我们通过相同的URL访问该应用程序–http://127.0.0.1:8080/。现在我们看到应用程序的输出为。
Greetings from Spring Boot!As a result of the successful application deployment, let’s review some of the common configuration properties.
作为成功部署应用程序的结果,让我们回顾一下一些常见的配置属性。
4. Server Configuration
4.服务器配置
For these common properties, viewing them in the administration console is the most convenient.
对于这些常见的属性,在管理控制台查看它们是最方便的。
4.1. Common Configuration Properties
4.1.通用配置属性
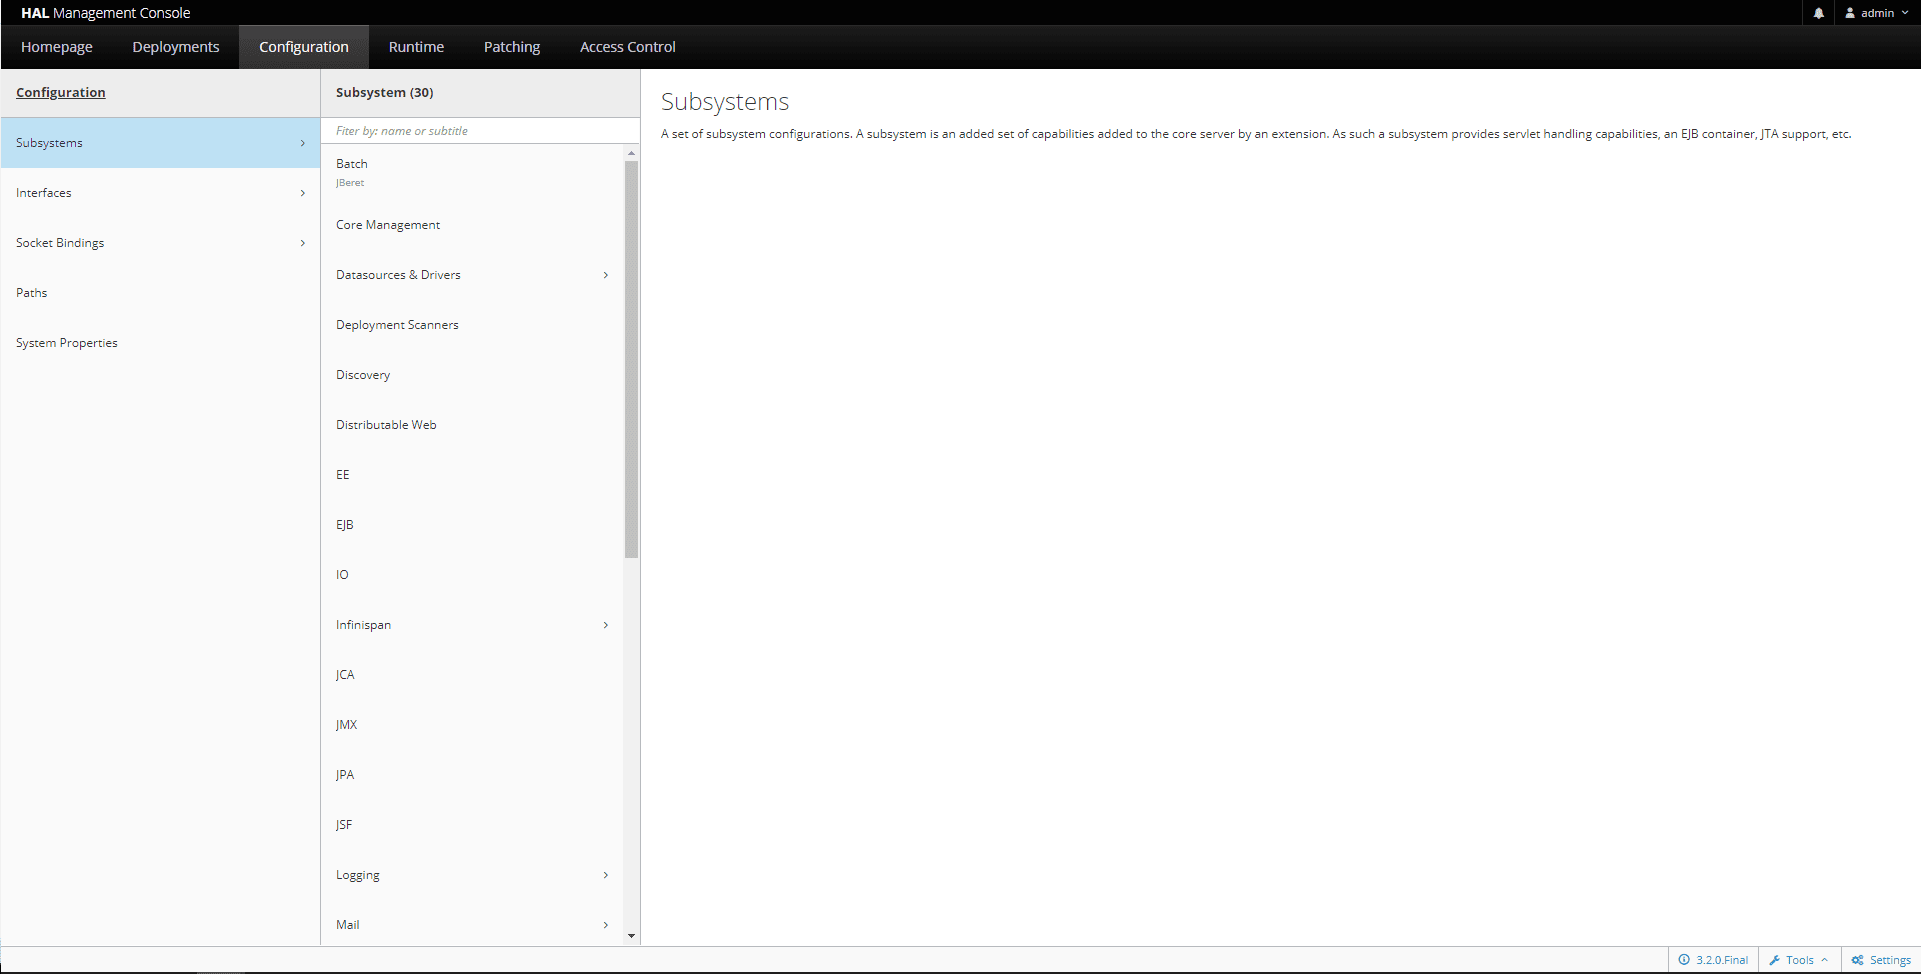
First of all, let’s take a look at the Subsystems — each one has a statistics-enabled value that can be set to true for runtime statistics:
首先,让我们看看子系统–每个子系统都有一个统计启用值,可以设置为true,以便进行运行时统计。
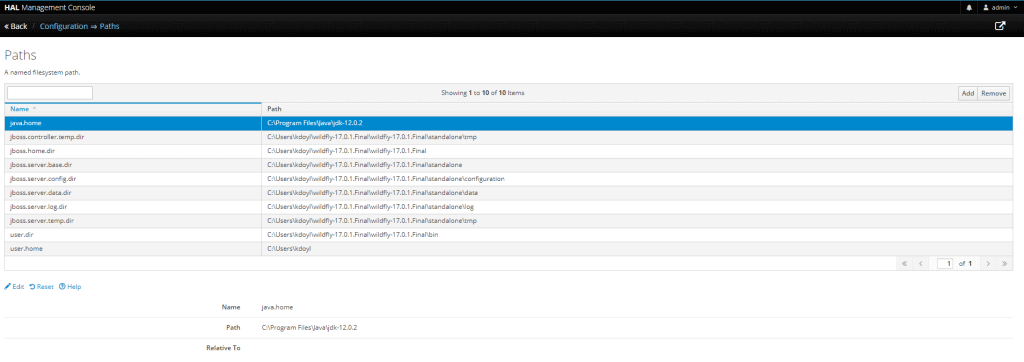
Under the Paths section, we see a couple of the important file paths being used by the server:
在路径部分,我们看到服务器正在使用的几个重要文件路径。
As an example, using specific values for the configuration directory and log directory is helpful:
作为一个例子,对配置目录和日志目录使用特定的值是有帮助的。
jboss.server.config.dir
jboss.server.log.dirw
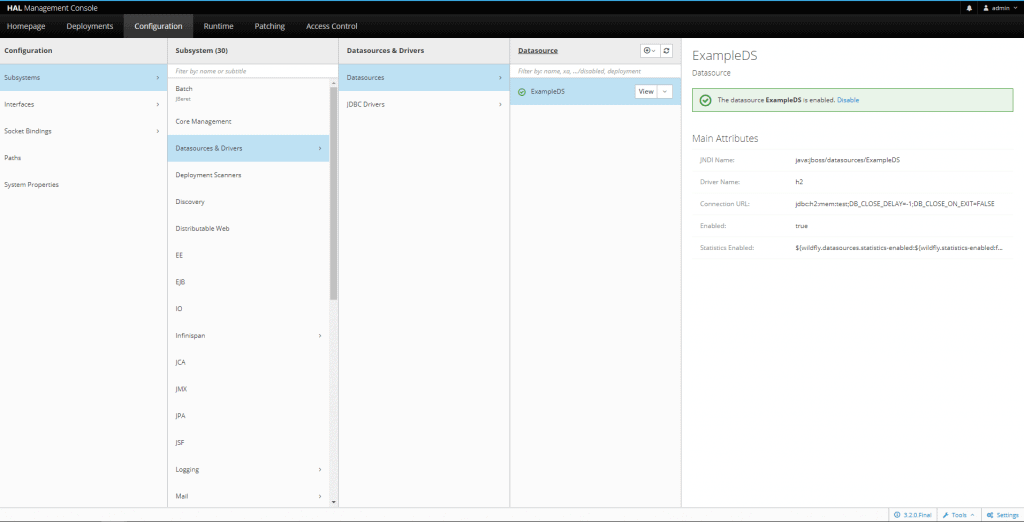
In addition, the Datasources and Drivers section provides for managing external data sources and different drivers for data persistence layers:
此外,数据源和驱动程序部分提供了管理外部数据源和数据持久化层的不同驱动程序。
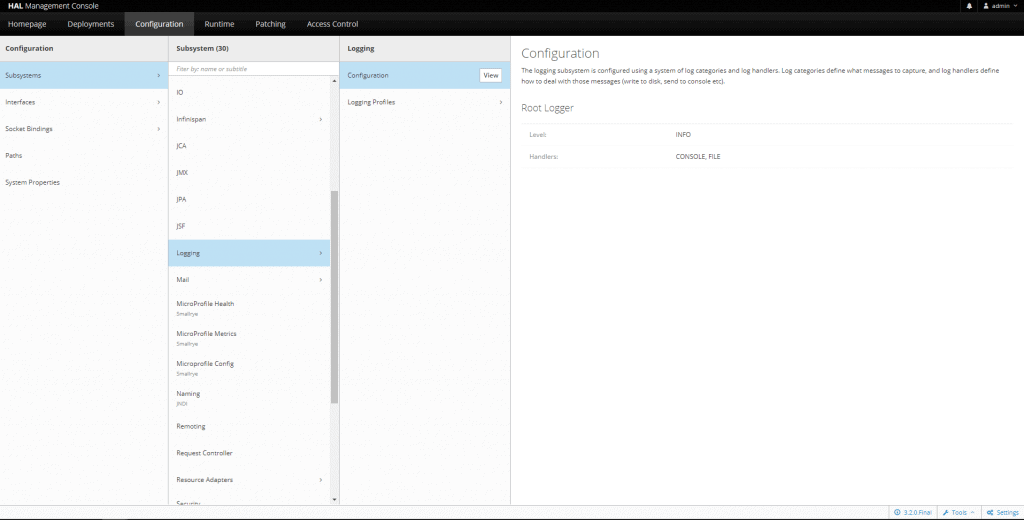
In the Logging subsystem, we update the log level from INFO to DEBUG to see more application logs:
在Logging子系统中,我们将日志级别从INFO更新为DEBUG,以看到更多的应用程序日志。
4.2. Server Configuration Files
4.2.服务器配置文件
Remember the server two URL in domain mode, http://127.0.0.1:8230? The odd port 8230 is due to a default offset value of 150 in the host-slave.xml configuration file:
还记得域模式下的服务器二的URL,http://127.0.0.1:8230吗?奇怪的端口8230是由于host-slave.xml配置文件中的一个默认偏移值150。
<server name="server-one" group="main-server-group"/>
<server name="server-two" group="main-server-group" auto-start="true">
  <jvm name="default"/>
  <socket-bindings port-offset="150"/>
</server>
However, we can make a simple update to the port-offset value:
然而,我们可以对port-offset值做一个简单的更新。
<socket-bindings port-offset="10"/>Consequently, we now access server two at URL http://127.0.0.1:8090.
因此,我们现在通过URL http://127.0.0.1:8090访问服务器二。
Another great feature of using and configuring the application in a convenient admin console is that those settings can be exported as an XML file. Using a consistent configuration through XML files simplifies managing multiple environments.
在一个方便的管理控制台中使用和配置应用程序的另一个伟大功能是,这些设置可以作为一个XML文件导出。通过XML文件使用一致的配置,简化了多个环境的管理。
5. Monitoring
5.监测
The command-line interface for WildFly allows for viewing and updating configuration values the same as the administration console.
WildFly的命令行界面允许查看和更新配置值,与管理控制台相同。
To use the CLI, we simply execute:
要使用CLI,我们只需执行。
~\bin\jboss-cli.batAfter that we type:
之后,我们打字。
[disconnected /] connect
[domain@localhost:9990 /]
As a result, we can follow the prompts to connect to our server instance. After connecting, we can access the configuration in real-time.
因此,我们可以按照提示连接到我们的服务器实例。连接后,我们可以实时访问配置。
For example, to view all current configuration as XML when connected to the server instance, we can run the read-config-as-xml command:
例如,当连接到服务器实例时,要以XML形式查看所有当前配置,我们可以运行read-config-as-xml命令。
[domain@localhost:9990 /] :read-config-as-xmlThe CLI can also be used for runtime statistics on any of the server subsystems. Most importantly, CLI is great for identifying different issues through server metrics.
CLI还可以用于任何服务器子系统的运行时统计。最重要的是,CLI对于通过服务器指标识别不同的问题很有帮助。
6. Conclusion
6.结语
In this tutorial, we walked through setting up and deploying a first application in WildFly as well as some of the configuration options for the server.
在本教程中,我们走过了在WildFly中设置和部署第一个应用程序,以及服务器的一些配置选项。
The Spring Boot sample project and export of the XML configuration can be viewed on GitHub.
Spring Boot 示例项目和导出的 XML 配置可以在 GitHub 上查看。


