1. Overview
1.概述
In this tutorial, we’ll cover the Wire Tap Enterprise Integration Pattern (EIP), which helps us monitor messages flowing through the system.
在本教程中,我们将介绍Wire Tap企业集成模式(EIP),它帮助我们监控流经系统的消息。
This pattern allows us to intercept the messages without permanently consuming them off the channel.
这种模式使我们能够拦截信息,而不会将其永久消耗在通道之外。
2. Wire Tap Pattern
2.线路抽头模式
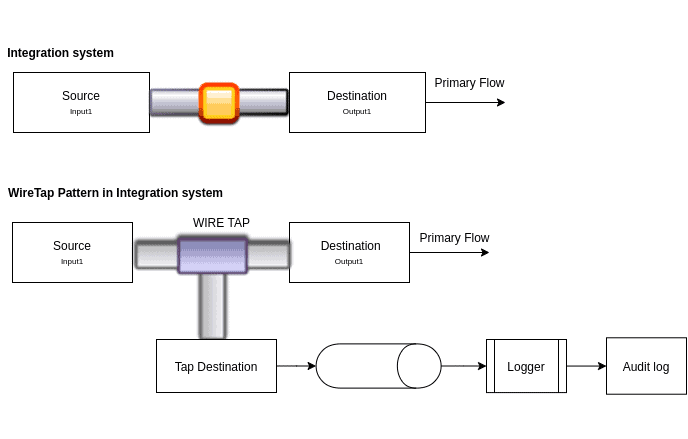
The Wire Tap inspects messages that travel on a Point-to-Point Channel. It receives the message, makes a copy, and sends it to the Tap Destination:
Wire Tap检查在点对点通道上传输的消息。它接收信息,制作一份副本,并将其发送到Tap Destination。
To understand this better, let’s create a Spring Boot application with ActiveMQ and Camel.
为了更好地理解这一点,让我们用ActiveMQ和Camel创建一个Spring Boot应用程序。
3. Maven Dependencies
3.Maven的依赖性
Let’s add camel-spring-boot-dependencies:
让我们添加camel-spring-boot-dependencies。
<dependencyManagement>
    <dependencies>
        <dependency>
            <groupId>org.apache.camel.springboot</groupId>
            <artifactId>camel-spring-boot-dependencies</artifactId>
            <version>${camel.version}</version>
            <type>pom</type>
            <scope>import</scope>
        </dependency>
    </dependencies>
</dependencyManagement>
Now, we’ll add camel-spring-boot-starter:
现在,我们将添加camel-spring-boot-starter。
<dependency>
    <groupId>org.apache.camel.springboot</groupId>
    <artifactId>camel-spring-boot-starter</artifactId>
</dependency>
To view the messages flowing through a route, we’ll also need to include ActiveMQ:
为了查看流经路由的消息,我们还需要包括ActiveMQ。
<dependency>
    <groupId>org.apache.camel.springboot</groupId>
    <artifactId>camel-activemq-starter</artifactId>
</dependency>
4. Messaging Exchange
4.信息交流
Let’s create a message object:
我们来创建一个消息对象。
public class MyPayload implements Serializable {
    private String value;
    ...
}
We will send this message to the direct:source to initiate the route:
我们将向发送此信息,以启动路由。
try (CamelContext context = new DefaultCamelContext()) {
    ActiveMQConnectionFactory connectionFactory = new ActiveMQConnectionFactory("vm://localhost?broker.persistent=false");
    connectionFactory.setTrustAllPackages(true);
    context.addComponent("direct", JmsComponent.jmsComponentAutoAcknowledge(connectionFactory));
    addRoute(context);

    try (ProducerTemplate template = context.createProducerTemplate()) {
        context.start();

        MyPayload payload = new MyPayload("One");
        template.sendBody("direct:source", payload);
        Thread.sleep(10000);
    } finally {
        context.stop();
    }
}
Next, we’ll add a route and tap destination.
接下来,我们将添加一条路线并点击目的地。
5. Tapping an Exchange
5.攻克一个事务所
We will use the wireTap method to set the endpoint URI of the Tap Destination. Camel doesn’t wait for a response from wireTap because it sets the Message Exchange Pattern to InOnly. The Wire Tap processor processes it on a separate thread:
我们将使用wireTap方法来设置 Tap Destination的端点URI 。骆驼不等待来自WireTap的响应,因为它将消息交换模式设为InOnly。Wire Tap处理器在一个独立的线程上进行处理。
wireTap("direct:tap").delay(1000)Camel’s Wire Tap node supports two flavors when tapping an exchange:
骆驼的Wire Tap节点在攻克一个交易所时支持两种口味。
5.1. Traditional Wire Tap
5.1.传统丝锥
Let’s add a traditional Wire Tap route:
让我们增加一条传统的Wire Tap路线。
RoutesBuilder traditionalWireTapRoute() {
    return new RouteBuilder() {
        public void configure() {

            from("direct:source").wireTap("direct:tap")
                .delay(1000)
                .bean(MyBean.class, "addTwo")
                .to("direct:destination");

            from("direct:tap").log("Tap Wire route: received");

            from("direct:destination").log("Output at destination: '${body}'");
        }
    };
}
Here, Camel will only copy the Exchange – it won’t do a deep clone. All copies could share objects from the original exchange.
在这里。骆驼将只复制Exchange – 它不会做一个深度克隆。所有的副本可以共享来自原始交换的对象。
While processing multiple messages concurrently, there’s a possibility of corrupting the final payload. We can create a deep clone of the payload before passing it to the Tap Destination to prevent this.
在并发处理多个消息时,存在的可能性破坏最终有效载荷的现象。我们可以在将其传递给Tap Destination之前创建一个有效载荷的深度克隆,以防止这种情况。
5.2. Sending a New Exchange
5.2.发送一个新的交换信息
The Wire Tap EIP supports an Expression or Processor, pre-populated with a copy of the exchange. An Expression can only be used to set the message body.
Wire Tap EIP支持Expression或Processor,预先填充了一份交换的副本。一个表达式只能用于设置消息体。
The Processor variation gives full power over how the exchange is populated (setting properties, headers, etc).
处理器变体对交易所的填充方式(设置属性、头文件等)给予充分授权。
Let’s implement deep cloning in the payload:
让我们在有效载荷中实现深度克隆:
public class MyPayload implements Serializable {

    private String value;
    ...
    public MyPayload deepClone() {
        MyPayload myPayload = new MyPayload(value);
        return myPayload;
   }
}
Now, let’s implement the Processor class with a copy of the original exchange as input:
现在,让我们实现Processor类,以原始交换的副本作为输入:
public class MyPayloadClonePrepare implements Processor {

    public void process(Exchange exchange) throws Exception {
        MyPayload myPayload = exchange.getIn().getBody(MyPayload.class);
        exchange.getIn().setBody(myPayload.deepClone());
        exchange.getIn().setHeader("date", new Date());
    }
}
We’ll call it using onPrepare right after wireTap:
我们将使用onPrepare在wireTap之后调用它:
RoutesBuilder newExchangeRoute() throws Exception {
    return new RouteBuilder() {
        public void configure() throws Exception {

        from("direct:source").wireTap("direct:tap")
            .onPrepare(new MyPayloadClonePrepare())
            .end()
            .delay(1000);

        from("direct:tap").bean(MyBean.class, "addThree");
        }
     };
}
6. Conclusion
6.结语
In this article, we implemented a Wire Tap pattern to monitor messages passing through certain message endpoints. Using Apache Camel’s wireTap, we copy the message and send it to a different endpoint without altering the existing flow.
在这篇文章中,我们实现了一个Wire Tap模式,以监控通过某些消息端点的消息。使用Apache Camel的wireTap,我们复制消息并将其发送到不同的端点而不改变现有流程。
Camel supports two ways to tap an exchange. In the traditional Wire Tap, the original exchange is copied. In the second, we can create a new exchange. We can populate this new exchange with new values of message body using an Expression, or we can set headers – and optionally, the body – using a Processor.
Camel支持两种方式来敲击一个交易所。在传统的Wire Tap中,原始交易所被复制。在第二种方式中,我们可以创建一个新的交换。我们可以使用表达式将消息主体的新值填充到这个新的交换中,或者我们可以使用处理器设置头文件–以及可选的主体。
The code sample is available over on GitHub.
代码样本可在over on GitHub.
