1. Overview
1.概述
In this short tutorial, we’ll take a look at the JavaFX Button component and see how we can handle user interaction.
在这个简短的教程中,我们将看看JavaFXButton组件,看看我们如何处理用户的交互。
2. Application Setup
2.应用设置
First, let’s create a small application to be able to focus on the event handlers. Let’s start with creating a simple FXML layout that contains a button:
首先,让我们创建一个小应用程序,以便能够关注事件处理程序。让我们先创建一个简单的FXML布局,其中包含一个按钮。
<?xml version="1.0" encoding="UTF-8"?>

<?import javafx.scene.control.*?>
<?import javafx.scene.layout.*?>
<BorderPane xmlns:fx="http://javafx.com/fxml"
    xmlns="http://javafx.com/javafx"
    fx:controller="com.baeldung.button.eventhandler.ButtonEventHandlerController"
    prefHeight="200.0" prefWidth="300.0">
    <center>
        <Button fx:id="button" HBox.hgrow="ALWAYS"/>
    </center>

    <bottom>
        <Label fx:id="label" text="Test label"/>
    </bottom>
</BorderPane>
Let’s create the ButtonEventHandlerController class. This is responsible for connecting the UI elements and the application logic. We’ll set the label of the button in the initialize method:
我们来创建ButtonEventHandlerController类。它负责连接UI元素和应用逻辑。我们将在initialize方法中设置按钮的标签。
public class ButtonEventHandlerController {

    private static final Logger logger = LoggerFactory.getLogger(ButtonEventHandlerController.class);

    @FXML
    private Button button;

    @FXML
    private Label label;

    @FXML
    private void initialize() {
        button.setText("Click me");
    }
}
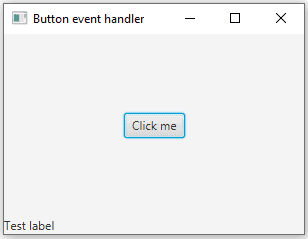
Let’s start the application. We should see a button in the center titled “Click me” and a test label at the bottom of the window:
让我们启动该应用程序。我们应该看到中间有一个名为 “点击我 “的按钮,在窗口的底部有一个测试标签。
3. Click Event
3.点击事件
Let’s start with handling simple click events and adding an event handler to the initialize method:
让我们从处理简单的点击事件开始,在初始化方法中添加一个事件处理程序。
button.setOnAction(new EventHandler<ActionEvent>() {
    @Override
    public void handle(ActionEvent event) {
        logger.info("OnAction {}", event);
    }
});
Let’s test this now. When we click on the button, there’s a new log message:
现在我们来测试一下。当我们点击按钮时,有一个新的日志信息。
INFO c.b.b.e.ButtonEventHandlerController - OnAction javafx.event.ActionEvent[source=Button[id=searchButton, styleClass=button]'Click me']Because the event handler interface has only one method, we can treat it as a functional interface and replace these lines with a single lambda expression to make our code easier to read:
由于事件处理程序接口只有一个方法,我们可以将其视为函数接口,并将这些行替换为单一的lambda表达式,以使我们的代码更容易阅读。
searchButton.setOnAction(event -> logger.info("OnAction {}", event));Let’s try to add another click event handler. We can simply copy this line and change the log message to be able to see the difference when we test the application:
让我们试着添加另一个点击事件处理程序。我们可以简单地复制这一行,并改变日志信息,以便在我们测试应用程序时能够看到差异。
button.setOnAction(event -> logger.info("OnAction {}", event));
button.setOnAction(event -> logger.info("OnAction2 {}", event));
Now, when we click on the button, we see the “OnAction 2” message only. This happens because the second setOnAction method call replaced the first event handler with the second one.
现在,当我们点击按钮时,我们只看到 “OnAction 2 “消息。这是因为第二个setOnAction方法调用将第一个事件处理程序替换为第二个。
4. Different Events
4.不同的事件
We can handle other event types as well, such as mouse press/release, drag, and keyboard events.
我们也可以处理其他事件类型,如鼠标按/放、拖动和键盘事件。
Let’s add a hover effect for our button. We’ll display a shadow when the cursor starts hovering over the button and remove the effect when the cursor leaves it:
让我们为我们的按钮添加一个悬停效果。当光标开始在按钮上悬停时,我们将显示一个阴影,而当光标离开时,将移除该效果。
Effect shadow = new DropShadow();
searchButton.setOnMouseEntered(e -> searchButton.setEffect(shadow));
searchButton.setOnMouseExited(e -> searchButton.setEffect(null));
5. Reusing Event Handlers
5.重复使用事件处理程序
In some cases, we might want to use the same event handler multiple times. Let’s create an event handler that will increase the font size of our button when we click the secondary mouse button:
在某些情况下,我们可能想多次使用同一个事件处理程序。让我们创建一个事件处理程序,当我们点击鼠标次要按钮时,它将增加我们按钮的字体大小。
EventHandler<MouseEvent> rightClickHandler = event -> {
    if (MouseButton.SECONDARY.equals(event.getButton())) {
        button.setFont(new Font(button.getFont().getSize() + 1));
    }
};
However, it has no functionality because we didn’t associate it with any events. Let’s use this event handler for the mouse press event of the button and the label:
然而,它没有任何功能,因为我们没有将它与任何事件联系起来。让我们用这个事件处理程序来处理按钮和标签的鼠标按压事件:。
button.setOnMousePressed(rightClickHandler);
label.setOnMousePressed(rightClickHandler);
Now, when we test the application and click with the secondary mouse button on the label or the button, we see that the font size increases.
现在,当我们测试应用程序,用鼠标副键点击标签或按钮时,我们看到字体大小增加了。
6. Conclusion
6.结论
We learned how to add event handlers to JavaFX buttons and execute different actions depending on the type of event.
我们学习了如何为JavaFX按钮添加事件处理程序,并根据事件的类型执行不同的动作。
As always, the code implementation is available over on GitHub.
一如既往,代码的实现可在GitHub上获得。
