1. Overview
1.概述
In this tutorial, we’ll implement a Spring application using DDD. Additionally, we’ll organize layers with the help of Hexagonal Architecture.
在本教程中,我们将使用DDD实现一个Spring应用程序。此外,我们将在六边形架构的帮助下组织各层。
With this approach, we can easily exchange the different layers of the application.
通过这种方法,我们可以轻松地交换应用程序的不同层。
2. Hexagonal Architecture
2.六角形结构
Hexagonal architecture is a model of designing software applications around domain logic to isolate it from external factors.
六角架构是一种围绕领域逻辑设计软件应用的模式以将其与外部因素隔离。
The domain logic is specified in a business core, which we’ll call the inside part, the rest being outside parts. Access to domain logic from the outside is available through ports and adapters.
领域逻辑被指定在一个业务核心中,我们称之为内部部分,其余的是外部部分。从外部访问领域逻辑可通过端口和适配器。
3. Principles
3.原则
Firstly, we should define principles to divide our code. As explained briefly already, hexagonal architecture defines the inside and the outside part.
首先,我们应该定义原则来划分我们的代码。正如已经简单解释的那样,六边形架构定义了内部和外部部分。
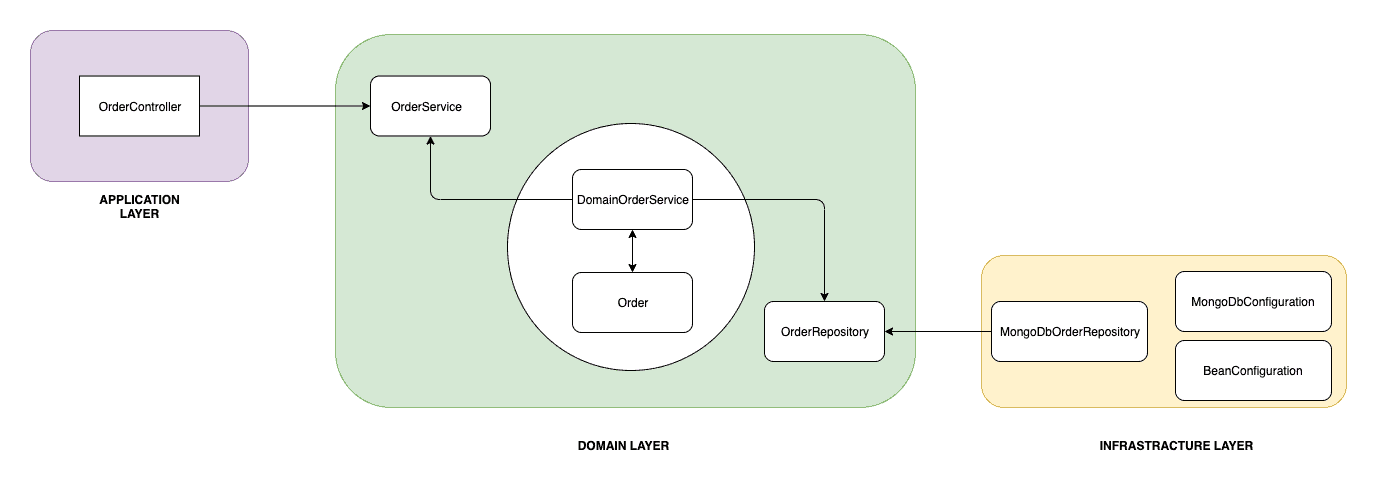
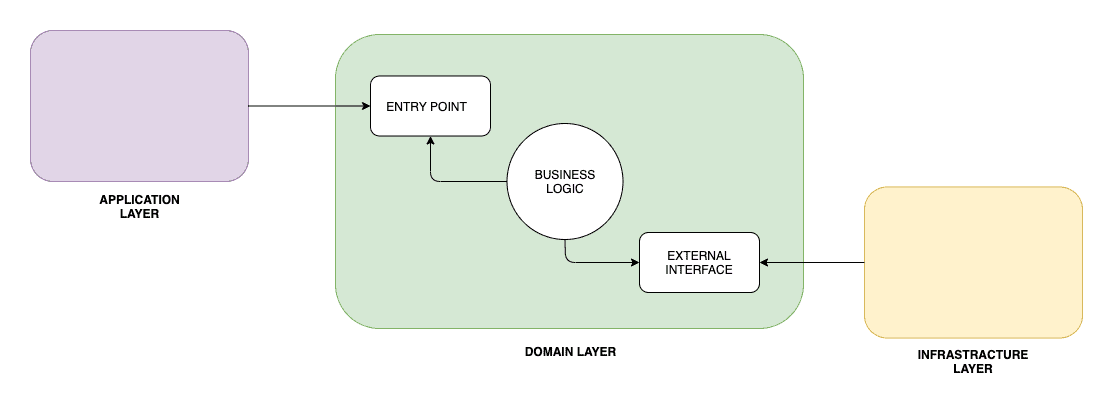
What we’ll do instead is divide our application into three layers; application (outside), domain (inside), and infrastructure (outside):
我们要做的是将我们的应用程序分为三层;应用程序(外部)、域(内部)和基础设施(外部):。
Through the application layer, the user or any other program interacts with the application. This area should contain things like user interfaces, RESTful controllers, and JSON serialization libraries. It includes anything that exposes entry to our application and orchestrates the execution of domain logic.
通过应用层,用户或任何其他程序与应用程序进行互动。这一区域应包含诸如用户界面、RESTful 控制器和 JSON 序列化库等内容。它包括任何向我们的应用程序开放入口并协调域逻辑执行的东西。
In the domain layer, we keep the code that touches and implements business logic. This is the core of our application. Additionally, this layer should be isolated from both the application part and the infrastructure part. On top of that, it should also contain interfaces that define the API to communicate with external parts, like the database, which the domain interacts with.
在领域层,我们保留接触和实现业务逻辑的代码。这是我们应用程序的核心。此外,该层应与应用程序部分和基础设施部分隔离。在此基础上,它还应该包含一些接口,这些接口定义了与外部部分(如数据库)进行通信的API,域与之进行交互。
Lastly, the infrastructure layer is the part that contains anything that the application needs to work such as database configuration or Spring configuration. Besides, it also implements infrastructure-dependent interfaces from the domain layer.
最后,基础设施层是包含应用程序需要工作的任何东西的部分,如数据库配置或Spring配置。此外,它还实现了来自领域层的依赖基础设施的接口。
4. Domain Layer
4.领域层
Let’s begin by implementing our core layer, which is the domain layer.
让我们从实现我们的核心层开始,也就是域层。
Firstly, we should create the Order class:
首先,我们应该创建Order类。
public class Order {
    private UUID id;
    private OrderStatus status;
    private List<OrderItem> orderItems;
    private BigDecimal price;

    public Order(UUID id, Product product) {
        this.id = id;
        this.orderItems = new ArrayList<>(Arrays.astList(new OrderItem(product)));
        this.status = OrderStatus.CREATED;
        this.price = product.getPrice();
    }

    public void complete() {
        validateState();
        this.status = OrderStatus.COMPLETED;
    }

    public void addOrder(Product product) {
        validateState();
        validateProduct(product);
        orderItems.add(new OrderItem(product));
        price = price.add(product.getPrice());
    }

    public void removeOrder(UUID id) {
        validateState();
        final OrderItem orderItem = getOrderItem(id);
        orderItems.remove(orderItem);

        price = price.subtract(orderItem.getPrice());
    }

    // getters
}
This is our aggregate root. Anything related to our business logic will go through this class. Additionally, Order is responsible for keeping itself in the correct state:
这是我们的聚合根。任何与我们的业务逻辑相关的东西都将通过这个类。此外,Order负责使自己处于正确的状态。
- The order can only be created with the given ID and based on one Product – the constructor itself also inits the order with CREATED status
- Once the order is completed, changing OrderItems is impossible
- It’s impossible to change the Order from outside the domain object, like with a setter
Furthermore, the Order class is also responsible for creating its OrderItem.
此外,Order类还负责创建其OrderItem。
Let’s create the OrderItem class then:
那么让我们创建OrderItem类。
public class OrderItem {
    private UUID productId;
    private BigDecimal price;

    public OrderItem(Product product) {
        this.productId = product.getId();
        this.price = product.getPrice();
    }

    // getters
}
As we can see, OrderItem is created based on a Product. It keeps the reference to it and stores the current price of the Product.
我们可以看到,OrderItem是基于Product创建的。它保持对它的引用,并存储产品的当前价格。
Next, we’ll create a repository interface (a port in Hexagonal Architecture). The implementation of the interface will be in the infrastructure layer:
接下来,我们将创建一个资源库接口(在六边形架构中是一个port)。该接口的实现将在基础设施层。
public interface OrderRepository {
    Optional<Order> findById(UUID id);

    void save(Order order);
}
Lastly, we should make sure that the Order will be always saved after each action. To do that, we’ll define a Domain Service, which usually contains logic that can’t be a part of our root:
最后,我们应该确保Order在每次行动后都会被保存。要做到这一点,我们将定义一个域服务,它通常包含不能成为我们根的一部分的逻辑。
public class DomainOrderService implements OrderService {

    private final OrderRepository orderRepository;

    public DomainOrderService(OrderRepository orderRepository) {
        this.orderRepository = orderRepository;
    }

    @Override
    public UUID createOrder(Product product) {
        Order order = new Order(UUID.randomUUID(), product);
        orderRepository.save(order);

        return order.getId();
    }

    @Override
    public void addProduct(UUID id, Product product) {
        Order order = getOrder(id);
        order.addOrder(product);

        orderRepository.save(order);
    }

    @Override
    public void completeOrder(UUID id) {
        Order order = getOrder(id);
        order.complete();

        orderRepository.save(order);
    }

    @Override
    public void deleteProduct(UUID id, UUID productId) {
        Order order = getOrder(id);
        order.removeOrder(productId);

        orderRepository.save(order);
    }

    private Order getOrder(UUID id) {
        return orderRepository
          .findById(id)
          .orElseThrow(RuntimeException::new);
    }
}
In a hexagonal architecture, this service is an adapter that implements the port. Additionally, we’ll not register it as a Spring bean because, from a domain perspective, this is in the inside part, and Spring configuration is on the outside. We’ll manually wire it with Spring in the infrastructure layer a bit later.
在六边形架构中,这个服务是一个实现端口的适配器。此外,我们不会将其注册为Spring Bean 因为从领域的角度来看,这是在内部的部分,而Spring配置是在外部。
Because the domain layer is completely decoupled from application and infrastructure layers, we can also test it independently:
由于域层与应用程序和基础设施层完全解耦,我们也可以独立测试。
class DomainOrderServiceUnitTest {

    private OrderRepository orderRepository;
    private DomainOrderService tested;
    @BeforeEach
    void setUp() {
        orderRepository = mock(OrderRepository.class);
        tested = new DomainOrderService(orderRepository);
    }

    @Test
    void shouldCreateOrder_thenSaveIt() {
        final Product product = new Product(UUID.randomUUID(), BigDecimal.TEN, "productName");

        final UUID id = tested.createOrder(product);

        verify(orderRepository).save(any(Order.class));
        assertNotNull(id);
    }
}
5. Application Layer
5.应用层
In this section, we’ll implement the application layer. We’ll allow the user to communicate with our application via a RESTful API.
在这一部分,我们将实现应用层。我们将允许用户通过RESTful API与我们的应用程序通信。
Therefore, let’s create the OrderController:
因此,让我们创建OrderController:。
@RestController
@RequestMapping("/orders")
public class OrderController {

    private OrderService orderService;

    @Autowired
    public OrderController(OrderService orderService) {
        this.orderService = orderService;
    }

    @PostMapping
    CreateOrderResponse createOrder(@RequestBody CreateOrderRequest request) {
        UUID id = orderService.createOrder(request.getProduct());

        return new CreateOrderResponse(id);
    }

    @PostMapping(value = "/{id}/products")
    void addProduct(@PathVariable UUID id, @RequestBody AddProductRequest request) {
        orderService.addProduct(id, request.getProduct());
    }

    @DeleteMapping(value = "/{id}/products")
    void deleteProduct(@PathVariable UUID id, @RequestParam UUID productId) {
        orderService.deleteProduct(id, productId);
    }

    @PostMapping("/{id}/complete")
    void completeOrder(@PathVariable UUID id) {
        orderService.completeOrder(id);
    }
}
This simple Spring Rest controller is responsible for orchestrating the execution of domain logic.
这个简单的Spring Rest控制器 负责协调域逻辑的执行。
This controller adapts the outside RESTful interface to our domain. It does it by calling the appropriate methods from OrderService (port).
这个控制器将外部的RESTful接口调整到我们的领域。它通过调用OrderService(port)中的适当方法来实现。
6. Infrastructure Layer
6.基础设施层
The infrastructure layer contains the logic needed to run the application.
基础设施层包含运行应用程序所需的逻辑。
Therefore, we’ll start by creating the configuration classes. Firstly, let’s implement a class that will register our OrderService as a Spring bean:
因此,我们将从创建配置类开始。首先,让我们实现一个类,将我们的OrderService注册为一个Spring Bean。
@Configuration
public class BeanConfiguration {

    @Bean
    OrderService orderService(OrderRepository orderRepository) {
        return new DomainOrderService(orderRepository);
    }
}
Next, let’s create the configuration responsible for enabling the Spring Data repositories we’ll use:
接下来,让我们创建负责启用我们将使用的Spring Data存储库的配置。
@EnableMongoRepositories(basePackageClasses = SpringDataMongoOrderRepository.class)
public class MongoDBConfiguration {
}
We have used the basePackageClasses property because those repositories can only be in the infrastructure layer. Hence, there’s no reason for Spring to scan the whole application. Furthermore, this class can contain everything related to establishing a connection between MongoDB and our application.
我们使用了basePackageClasses属性,因为这些资源库只能在基础设施层。因此,Spring没有理由对整个应用程序进行扫描。此外,这个类可以包含与在MongoDB和我们的应用程序之间建立连接有关的一切。
Lastly, we’ll implement the OrderRepository from the domain layer. We’ll use our SpringDataMongoOrderRepository in our implementation:
最后,我们将从领域层实现OrderRepository。我们将在实现中使用我们的SpringDataMongoOrderRepository。
@Component
public class MongoDbOrderRepository implements OrderRepository {

    private SpringDataMongoOrderRepository orderRepository;

    @Autowired
    public MongoDbOrderRepository(SpringDataMongoOrderRepository orderRepository) {
        this.orderRepository = orderRepository;
    }

    @Override
    public Optional<Order> findById(UUID id) {
        return orderRepository.findById(id);
    }

    @Override
    public void save(Order order) {
        orderRepository.save(order);
    }
}
This implementation stores our Order in MongoDB. In a hexagonal architecture, this implementation is also an adapter.
这个实现将我们的Order存储在MongoDB中。在一个六边形架构中,这个实现也是一个适配器。
7. Benefits
7.效益
The first advantage of this approach is that we separate work for each layer. We can focus on one layer without affecting others.
这种方法的第一个优点是,我们为每一层分开工作。我们可以专注于一个层而不影响其他层。
Furthermore, they’re naturally easier to understand because each of them focuses on its logic.
此外,他们自然更容易理解,因为他们每个人都专注于其逻辑。
Another big advantage is that we’ve isolated the domain logic from everything else. The domain part only contains business logic and can be easily moved to a different environment.
另一个很大的优势是,我们已经将领域逻辑与其他一切隔离开来。领域部分只包含业务逻辑,可以很容易地转移到不同的环境中。
In fact, let’s change the infrastructure layer to use Cassandra as a database:
事实上,让我们改变基础设施层,使用Cassandra作为数据库。
@Component
public class CassandraDbOrderRepository implements OrderRepository {

    private final SpringDataCassandraOrderRepository orderRepository;

    @Autowired
    public CassandraDbOrderRepository(SpringDataCassandraOrderRepository orderRepository) {
        this.orderRepository = orderRepository;
    }

    @Override
    public Optional<Order> findById(UUID id) {
        Optional<OrderEntity> orderEntity = orderRepository.findById(id);
        if (orderEntity.isPresent()) {
            return Optional.of(orderEntity.get()
                .toOrder());
        } else {
            return Optional.empty();
        }
    }

    @Override
    public void save(Order order) {
        orderRepository.save(new OrderEntity(order));
    }

}
Unlike MongoDB, we now use an OrderEntity to persist the domain in the database.
与MongoDB不同,我们现在使用一个OrderEntity来在数据库中持久化域。
If we add technology-specific annotations to our Order domain object, then we violate the decoupling between infrastructure and domain layers.
如果我们在Orderdomain对象中添加技术特定的注释,那么我们违反了基础设施和领域层之间的解耦。
The repository adapts the domain to our persistence needs.
存储库使领域适应我们的持久性需求。
Let’s go a step further and transform our RESTful application into a command-line application:
让我们更进一步,将我们的RESTful应用程序转变为一个命令行应用程序。
@Component
public class CliOrderController {

    private static final Logger LOG = LoggerFactory.getLogger(CliOrderController.class);

    private final OrderService orderService;

    @Autowired
    public CliOrderController(OrderService orderService) {
        this.orderService = orderService;
    }

    public void createCompleteOrder() {
        LOG.info("<<Create complete order>>");
        UUID orderId = createOrder();
        orderService.completeOrder(orderId);
    }

    public void createIncompleteOrder() {
        LOG.info("<<Create incomplete order>>");
        UUID orderId = createOrder();
    }

    private UUID createOrder() {
        LOG.info("Placing a new order with two products");
        Product mobilePhone = new Product(UUID.randomUUID(), BigDecimal.valueOf(200), "mobile");
        Product razor = new Product(UUID.randomUUID(), BigDecimal.valueOf(50), "razor");
        LOG.info("Creating order with mobile phone");
        UUID orderId = orderService.createOrder(mobilePhone);
        LOG.info("Adding a razor to the order");
        orderService.addProduct(orderId, razor);
        return orderId;
    }
}
Unlike before, we now have hardwired a set of predefined actions that interact with our domain. We could use this to populate our application with mocked data for example.
与以前不同的是,我们现在已经硬连接了一套预定义的动作,与我们的领域互动。例如,我们可以用它来为我们的应用程序填充模拟的数据。
Even though we completely changed the purpose of the application, we haven’t touched the domain layer.
尽管我们完全改变了应用程序的目的,但我们并没有触及领域层。
8. Conclusion
8.结语
In this article, we’ve learned how to separate the logic related to our application into specific layers.
在这篇文章中,我们已经学会了如何将与我们的应用程序相关的逻辑分离成特定的层。
First, we defined three main layers: application, domain, and infrastructure. After that, we described how to fill them and explained the advantages.
首先,我们定义了三个主要层次:应用、领域和基础设施。之后,我们描述了如何填充它们并解释了其优点。
Then, we came up with the implementation for each layer:
然后,我们想出了每一层的实现方法。
 Finally, we swapped the application and infrastructure layers without impacting the domain.
As always, the code for these examples is available over on GitHub.
像往常一样,这些例子的代码可以在GitHub上找到over。
