1. Introduction
1.介绍
Since the introduction of Java 8, a lot of people started using the (new) stream functionality. Of course, there are moments when our stream operations don’t work as expected.
自从Java 8推出后,很多人开始使用(新的)流功能。当然,有些时候,我们的流操作并不像预期的那样工作。
IntelliJ has, besides its normal debugging options, a dedicated stream debugging function. In this short tutorial, we’ll explore this great feature.
IntelliJ除了有正常调试选项外,还有一个专门的流调试功能。在这个简短的教程中,我们将探索这个伟大的功能。
2. The Stream Trace Dialog
2.流跟踪对话
Let’s start by showing how to open the Stream Trace dialog. In the toolbar of the debug window, there’s a Trace Current Stream Chain icon that’s only enabled when our application pauses on a breakpoint inside a stream API call:
让我们先来看看如何打开流跟踪对话框。在调试窗口的工具栏中,有一个Trace Current Stream Chain图标,只有当我们的应用程序在流API调用中的断点上暂停时才会启用。
Clicking the icon will open the Stream Trace dialog.
点击该图标将打开流跟踪对话框。
The dialog has two modes. We’ll take a look at Flat Mode in the first example. And, in the second example, we’ll show the default mode, which is Split Mode.
该对话框有两种模式。我们将在第一个例子中看一下扁平模式。而在第二个例子中,我们将展示默认模式,也就是分割模式。
3. Examples
3.例子
Now that we’ve introduced the stream debugging functionality in IntelliJ, it’s time to work with some code examples.
现在我们已经介绍了IntelliJ中的流调试功能,是时候用一些代码实例来工作了。
3.1. Basic Example with a Sorted Stream
3.1.有排序的流的基本例子
Let’s start with a simple code fragment to get used to the Stream Trace dialog:
让我们从一个简单的代码片段开始,以适应流跟踪对话框的使用。
int[] listOutputSorted = IntStream.of(-3, 10, -4, 1, 3)
  .sorted()
  .toArray();
Initially. we have a stream of unordered int. Next, we sort that stream and convert it to an array.
最初,我们有一个无序的int流。接下来,我们对该流进行排序,并将其转换为一个数组。
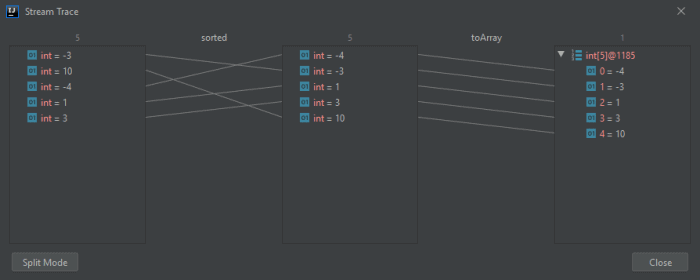
When we view the Stream Trace in Flat Mode, it shows us an overview of the steps that occur:
当我们在平面模式下查看流跟踪时,它向我们展示了所发生的步骤的概况。
On the far left, we see the initial stream. It contains the ints in the order in which we wrote them.
在最左边,我们看到初始流。它包含的ints是按照我们写它们的顺序排列的。
The first set of arrows shows us the new location of all the elements after sorting. And at the far right, we see our output. All items appear there in sorted order.
第一组箭头向我们展示了排序后所有元素的新位置。而在最右边,我们看到了我们的输出。所有的项目都以排序后的顺序出现在那里。
Now that we’ve seen the basics, it’s time for a more complex example.
现在我们已经看到了基本的东西,现在是时候来一个更复杂的例子了。
3.2. Example Using flatMap and filter
3.2.使用flatMap和filter的例子
This next example uses flatMap. Stream.flatMap helps us, for example, to convert a list of Optionals to a normal list. In this next example, we start with a list of Optional Customers. We then map it to a list of Customers and apply some filtering:
接下来的例子使用了flatMap。Stream.flatMap可以帮助我们,例如,将一个Optional的列表转换为一个普通的列表。在接下来的例子中,我们从一个Optional Customers的列表开始。然后我们把它映射到一个 Customers 列表中,并应用一些过滤功能。
List<Optional<Customer>> customers = Arrays.asList(
    Optional.of(new Customer("John P.", 15)),
    Optional.of(new Customer("Sarah M.", 78)),
    Optional.empty(),
    Optional.of(new Customer("Mary T.", 20)),
    Optional.empty(),
    Optional.of(new Customer("Florian G.", 89)),
    Optional.empty()
);

long numberOf65PlusCustomers = customers
  .stream()
  .flatMap(c -> c
    .map(Stream::of)
    .orElseGet(Stream::empty))
  .mapToInt(Customer::getAge)
  .filter(c -> c > 65)
  .count();
Next, let’s view the Stream Trace in Split Mode, which gives us a better overview of this stream.
接下来,让我们在分割模式下查看数据流跟踪,这可以让我们更好地了解这个数据流的情况。
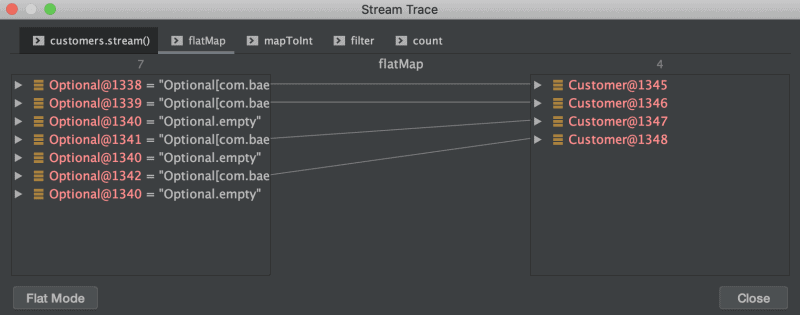
On the left, we see the input stream. Next, we see the flat-mapping of the stream of Optional customers to the stream of actual present customers:
在左边,我们看到了输入流。接下来,我们看到Optional客户流与实际现有客户流的平面映射。
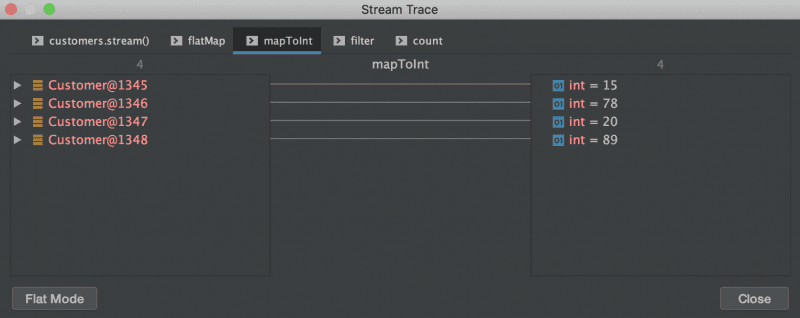
After that, we map our stream of customers to their ages:
之后,我们将客户流映射到他们的年龄。
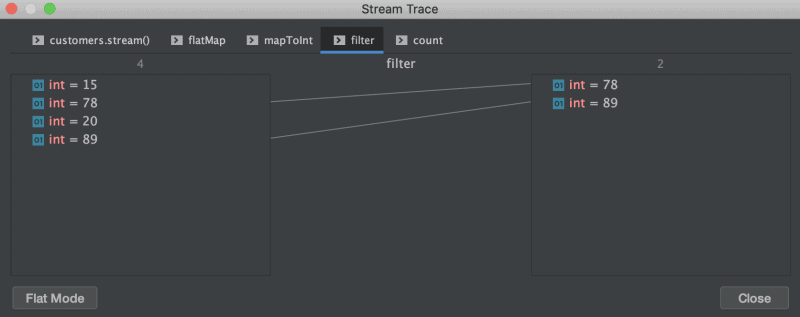
The next step filters our stream of ages to a stream of ages greater than 65:
下一步是将我们的年龄流过滤成大于65岁的年龄流。
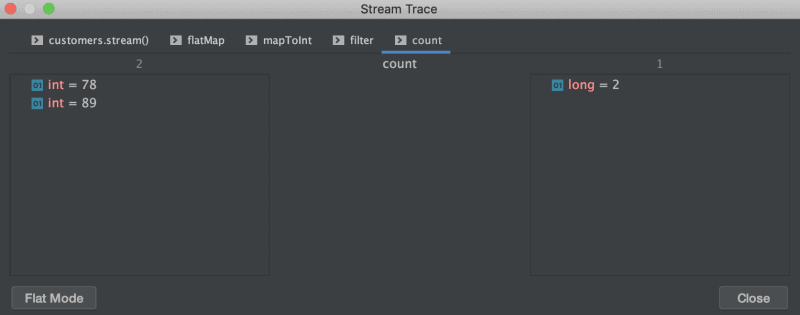
Finally, we count the number of items in our stream of ages:
最后,我们计算我们的年龄流中的项目数量。
4. Caveats
4.注意事项
In the examples above, we’ve seen some of the possibilities offered by the Stream Trace dialog. However, there are some important details to be aware of. Most of them are a direct consequence of how streams work.
在上面的例子中,我们已经看到了流跟踪对话框所提供的一些可能性。然而,有一些重要的细节需要注意。其中大部分是流的工作方式的直接结果。
Firstly, streams always need terminal operations to be executed. This is no different when using the Stream Trace dialog. Also, we must be aware of operations that do not consume the entire stream — for example, anyMatch. In this case, it will not show all elements — just the elements that are processed.
首先,流总是需要终端操作来执行。这在使用流跟踪对话框时也不例外。另外,我们必须注意那些不消耗整个流的操作 – 例如,anyMatch。在这种情况下,它不会显示所有元素–只显示被处理的元素。
Secondly, be aware that the stream will be consumed. If we declare the Stream separately from its operations, we might run into the error “Stream has already been operated upon or closed”. We can prevent this error by joining the declaration of the stream with its usage.
其次,要注意流将被消耗。如果我们将Stream与它的操作分开声明,我们可能会遇到错误“Stream已经被操作或关闭”。我们可以通过将流的声明与它的使用结合起来来防止这个错误。
5. Conclusion
5.总结
In this quick tutorial, we’ve seen how to use IntelliJ’s Stream Trace dialog.
在这个快速教程中,我们已经看到如何使用IntelliJ的流跟踪对话框。
First, we looked at a simple case showing sorting and collecting. Then, we looked at a more complex scenario involving flat-mapping, mapping, filtering, and counting.
首先,我们看了一个显示分类和收集的简单案例。然后,我们看了一个更复杂的场景,涉及平面映射、绘图、过滤和计数。
Finally, we looked into some caveats that we might bump into while using the stream debugging functionality.
最后,我们研究了一些在使用流调试功能时可能遇到的注意事项。
As always, the full source code of the article is available over on GitHub.
一如既往,该文章的完整源代码可在GitHub上获得。
