1. Overview
1.概述
In previous articles, we’ve covered the basics of JHipster and how to use it to generate a microservices-based application.
在以前的文章中,我们已经介绍了JHipster的基本原理以及如何使用它来生成基于微服务的应用程序。
In this tutorial, we’ll explore JHipster’s User Account and Authorization service — UAA for short — and how to use it to secure a fully fledged JHispter-based microservice application. Even better, all this can be achieved without writing a single line of code!
在本教程中,我们将探讨JHipster的用户账户和授权服务–简称UAA–以及如何使用它来保护一个完整的基于JHispter的微服务应用程序。更妙的是,所有这些都可以在不写一行代码的情况下实现!。
2. UAA Core Features
2.UAA的核心特征
An important feature of the applications we’ve built in our previous articles is that user accounts were an integral part of them. Now, this is fine when we have a single application, but what if we want to share user accounts between multiple JHipster-generated applications? This is where JHipster’s UAA comes in.
我们在以前的文章中构建的应用程序的一个重要特征是,用户账户是它们的一个组成部分。现在,当我们有一个单一的应用程序时,这很好,但如果我们想在多个JHipster生成的应用程序之间共享用户账户,该怎么办?这就是JHipster的UAA出现的地方。
JHipster’s UAA is a microservice that is built, deployed, and run independently of other services in our application. It serves as:
JHipster的UAA是一个微服务,在我们的应用程序中独立于其他服务构建、部署和运行。它充当。
- An OAuth2 Authorization Server, based on Spring Boot’s implementation
- An Identity Management Server, exposing a user account CRUD API
JHipster UAA also supports typical login features like self-registration and “remember me”. And of course, it fully integrates with other JHipster services.
JHipster UAA还支持典型的登录功能,如自我注册和 “记住我”。当然,它还与其他JHipster服务完全整合。
3. Development Environment Setup
3.开发环境设置
Before starting any development, we must first be sure our environment has all its prerequisites set up. Besides all of the tools described in our Intro To JHipster article, we’ll need a running JHipster Registry. Just as a quick recap, the registry service allows the different services that we’ll create to find and talk to each other.
在开始任何开发之前,我们必须首先确定我们的环境已经设置了所有的先决条件。除了在Intro To JHipster文章中描述的所有工具外,我们还需要一个正在运行的JHipster注册表。简单说一下,注册表服务允许我们创建的不同服务找到并相互交谈。
The full procedure for generating and running the registry is described in section 4.1 of our JHipster with a Microservice Architecture article so we won’t repeat it here. A Docker image is also available and can be used as an alternative.
生成和运行注册表的完整过程在我们的采用微服务架构的JHipster文章的第4.1节中有所描述,因此我们在此不再重复。Docker 镜像也是可用的,可作为替代方案使用。
4. Generating a New JHipster UAA Service
4.生成一个新的JHipster UAA服务
Let’s generate our UAA service using the JHipster command line utility:
让我们使用JHipster命令行工具生成我们的UAA服务。
$ mkdir uaa
$ cd uaa
$ jhipster
The first question we have to answer is which type of application we want to generate. Using the arrow keys, we’ll select the “JHipster UAA (for microservice OAuth2 authentication)” option:
我们要回答的第一个问题是我们要生成哪种类型的应用程序。使用箭头键,我们将选择 “JHipster UAA(用于微服务OAuth2认证)”选项。
Next, we’ll be prompted for a few of questions regarding specific details regarding the generated service, such as application name, server port and service discovery:
接下来,我们会被提示一些关于生成的服务的具体细节问题,如应用程序名称、服务器端口和服务发现。
For the most part, the default answers are fine. As for the application’s base name, which affects many of the generated artifacts, we’ve chosen “uaa” (lowercase) — a sensible name. We can play around with the other values if we want, but it won’t change the main features of the generated project.
在大多数情况下,默认答案是好的。至于应用程序的基本名称,它影响到许多生成的工件,我们选择了“uaa”(小写)–一个明智的名称。如果我们愿意,我们可以玩玩其他的值,但这不会改变生成的项目的主要特征。
After answering these questions, JHipster will create all project files and install npm package dependencies (which are not really used in this case).
回答完这些问题后,JHipster将创建所有项目文件,并安装npm包依赖(在这种情况下并不真正使用)。
We can now use the local Maven script to build and run our UAA service:
现在我们可以使用本地Maven脚本来构建和运行我们的UAA服务。
$ ./mvnw
... build messages omitted
2018-10-14 14:07:17.995  INFO 18052 --- [  restartedMain] com.baeldung.jhipster.uaa.UaaApp         :
----------------------------------------------------------
        Application 'uaa' is running! Access URLs:
        Local:          http://localhost:9999/
        External:       http://192.168.99.1:9999/
        Profile(s):     [dev, swagger]
----------------------------------------------------------
2018-10-14 14:07:18.000  INFO 18052 --- [  restartedMain] com.baeldung.jhipster.uaa.UaaApp         :
----------------------------------------------------------
        Config Server:  Connected to the JHipster Registry config server!
----------------------------------------------------------
The key message to pay attention to here is the one stating that UAA is connected to the JHipster Registry. This message indicates that UAA was able to register itself and will be available for discovery by other microservices and gateways.
这里需要注意的关键信息是说明UAA已连接到JHipster注册中心。该信息表明UAA能够注册自己,并将被其他微服务和网关发现。
5. Testing the UAA Service
5.测试UAA服务
Since the generated UAA service has no UI by itself, we must use direct API calls to test if it is working as expected.
由于生成的UAA服务本身没有用户界面,我们必须使用直接的API调用来测试它是否按预期工作。
There are two functionalities that we must make sure are working before using it with other parts or our system: OAuth2 token generation and account retrieval.
在将其用于其他部分或我们的系统之前,我们必须确保两个功能是有效的:OAuth2令牌生成和账户检索。
First, let’s get a new token from our UAA’s OAuth endpoint, using a simple curl command:
首先,让我们使用一个简单的curl命令:从我们的UAA的OAuth端点获取一个新的令牌。
$ curl -X POST --data \
 "username=user&password=user&grant_type=password&scope=openid" \
 http://web_app:changeit@localhost:9999/oauth/token
Here, we’ve used the password grant flow, using two pairs of credentials. In this kind of flow, we send client credentials using basic HTTP authentication, which we encode directly in the URL.
在这里,我们使用了密码授予流程,使用两对凭证。在这种流程中,我们使用基本的HTTP认证来发送客户端凭证,我们直接在URL中进行编码。
The end user credentials are sent as part of the body, using the standard username and password parameters. We’re also using the user account named “user”, which is available by default in the test profile.
终端用户的证书被作为主体的一部分发送,使用标准的用户名和密码参数。我们还使用名为“user”的用户账户,该账户在测试配置文件中默认可用。
Assuming we’ve provided all details correctly, we’ll get an answer containing an access token and a refresh token:
假设我们已经正确地提供了所有的细节,我们将得到一个包含访问令牌和刷新令牌的答案。
{
  "access_token" : "eyJh...(token omitted)",
  "token_type" : "bearer",
  "refresh_token" : "eyJ...(token omitted)",
  "expires_in" : 299,
  "scope" : "openid",
  "iat" : 1539650162,
  "jti" : "8066ab12-6e5e-4330-82d5-f51df16cd70f"
}
We can now use the returned access_token to get information for the associated account using the account resource, which is available in the UAA service:
我们现在可以使用返回的access_token来获取相关账户的信息,使用account资源,这在UAA服务中是可用的。
$ curl -H "Authorization: Bearer eyJh...(access token omitted)" \
 http://localhost:9999/api/account
{
  "id" : 4,
  "login" : "user",
  "firstName" : "User",
  "lastName" : "User",
  "email" : "user@localhost",
  "imageUrl" : "",
  "activated" : true,
  "langKey" : "en",
  "createdBy" : "system",
  "createdDate" : "2018-10-14T17:07:01.336Z",
  "lastModifiedBy" : "system",
  "lastModifiedDate" : null,
  "authorities" : [ "ROLE_USER" ]
}
Please notice that we must issue this command before the access token expires. By default, the UAA service issues tokens valid for five minutes, which is a sensible value for production.
请注意,我们必须在访问令牌过期前发出这个命令。默认情况下,UAA服务发出的令牌有效期为5分钟,这对生产来说是一个合理的值。
We can easily change the lifespan of valid tokens by editing the application-<profile>.yml file corresponding to the profile we’re running the app under and setting the uaa.web-client-configuration.access-token-validity-in-seconds key. The settings files reside in the src/main/resources/config directory of our UAA project.
我们可以通过编辑application-<profile>.yml文件来改变有效令牌的寿命,该文件与我们运行应用程序的配置文件相对应,并设置uaa.web-client-configuration.access-token-validity-in-seconds密钥。这些设置文件位于我们UAA项目的src/main/resources/config目录下。
6. Generating the UAA-Enabled Gateway
6.生成支持UAA的网关
Now that we’re confident our UAA service and service registry are working, let’s create an ecosystem for these to interact with. By the end, we’ll have added:
现在,我们确信我们的UAA服务和服务注册处正在工作,让我们为这些服务创建一个生态系统来进行互动。到最后,我们将添加。
- An Angular-based front-end
- A microservice back-end
- An API Gateway that fronts both of these
Let’s actually begin with the gateway, as it will be the service that will negotiate with UAA for authentication. It’s going to host our front-end application and route API requests to other microservices.
实际上,让我们从网关开始,因为它将是与UAA协商认证的服务。它将承载我们的前端应用程序,并将API请求路由到其他微服务。
Once again, we’ll use the JHipster command-line tool inside a newly created directory:
再一次,我们将在一个新创建的目录内使用JHipster命令行工具。
$ mkdir gateway
$ cd gateway
$ jhipster
As before, we have to answer a few questions in order to generate the project. The important ones are the following:
和以前一样,我们必须回答几个问题,以便生成该项目。重要的问题有以下几个。
- Application type: must be “Microservices gateway”
- Application name: We’ll use “gateway” this time
- Service discovery: Select “JHipster registry”
- Authentication type: We must select the “Authentication with JHipster UAA server” option here
- UI Framework: Let’s pick “Angular 6”
Once JHipster generates all its artifacts, we can build and run the gateway with the provided Maven wrapper script:
一旦JHipster生成了所有工件,我们就可以用提供的Maven包装脚本构建和运行网关。
$ ./mwnw
... many messages omitted
----------------------------------------------------------
        Application 'gateway' is running! Access URLs:
        Local:          http://localhost:8080/
        External:       http://192.168.99.1:8080/
        Profile(s):     [dev, swagger]
----------------------------------------------------------
2018-10-15 23:46:43.011  INFO 21668 --- [  restartedMain] c.baeldung.jhipster.gateway.GatewayApp   :
----------------------------------------------------------
        Config Server:  Connected to the JHipster Registry config server!
----------------------------------------------------------
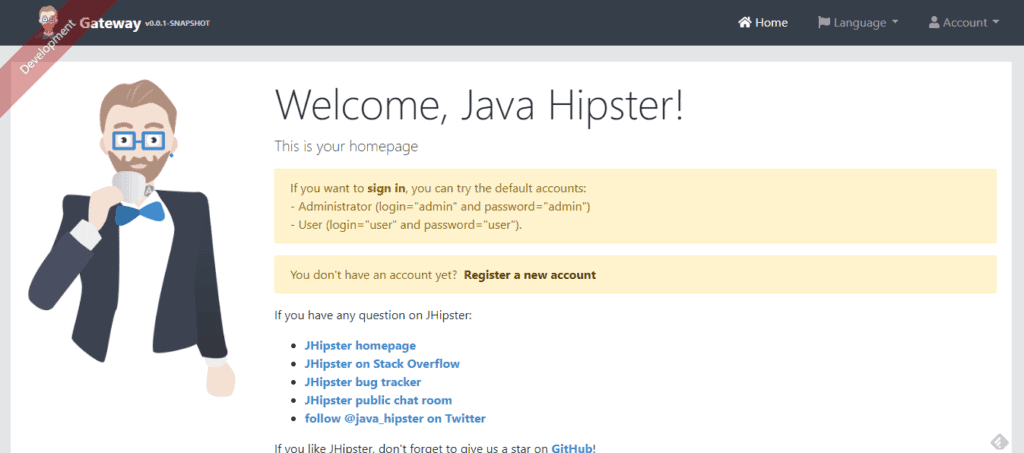
With the above message, we can access our application by pointing our browser to http://localhost:8080, which should display the default generated homepage:
通过上述信息,我们可以通过将浏览器指向http://localhost:8080来访问我们的应用程序,这应该显示默认生成的主页。
Let’s go ahead and log into our application, by navigating to the Account > Login menu item. We’ll use admin/admin as credentials, which JHipster creates automatically by default. All going well, the welcome page will display a message confirming a successful logon:
让我们继续前进,通过导航到Account > Login菜单项来登录我们的应用程序。我们将使用admin/admin作为凭证,JHipster默认会自动创建。一切顺利的话,欢迎页面将显示一条确认成功登录的信息。
Let’s recap what happened to get us here: First, the gateway sent our credentials to UAA’s OAuth2 token endpoint, which validated them and generated a response containing an access and a refresh JWT token. The gateway then took those tokens and sent them back to the browser as cookies.
让我们回顾一下我们在这里发生了什么。首先,网关将我们的证书发送到UAA的OAuth2令牌端点,该端点验证了这些证书并生成了一个包含访问和刷新JWT令牌的响应。然后,网关使用这些令牌,并将它们作为cookie发回给浏览器。
Next, the Angular front-end called the /uaa/api/account API, which once again the gateway forwarded to UAA. In this process, the gateway takes the cookie containing the access token and use its value to add an authorization header to the request.
接下来,Angular前端调用/uaa/api/account API,网关再一次将其转发给UAA。在这个过程中,网关获取包含访问令牌的cookie,并使用其值在请求中添加授权头。
If needed, we can see all this flow in great detail by checking both UAA and Gateway’s logs. We can also get full wire-level data by setting the org.apache.http.wire logger level to DEBUG.
如果需要,我们可以通过检查UAA和Gateway的日志看到所有这些流程的细节。我们还可以通过将org.apache.http.wire日志级别设置为DEBUG来获得完整的线级数据。
7. Generating a UAA-Enabled Microservice
7.生成一个支持UAA的微服务
Now that our application environment is up and running, it’s time to add a simple microservice to it. We’ll create a “quotes” microservice, which will expose a full REST API that allows us to create, query, modify, and delete a set of stock quotes. Each quote will have only three properties:
现在,我们的应用环境已经建立并运行,是时候向它添加一个简单的微服务了。我们将创建一个 “报价 “微服务,它将暴露一个完整的REST API,允许我们创建、查询、修改和删除一组股票报价。每个报价将只有三个属性。
- The quote’s trade symbol
- Its price, and
- The last trade’s timestamp
Let’s go back to our terminal and use JHipster’s command-line tool to generate our project:
让我们回到终端,使用JHipster的命令行工具来生成我们的项目。
$ mkdir quotes
$ cd quotes
$ jhipster
This time, we’ll ask JHipster to generate a Microservice application, which we’ll call “quotes”. The questions are similar to the ones we’ve answered before. We can keep the defaults for most of them, except for these three:
这一次,我们将要求JHipster生成一个微服务应用程序,我们称之为 “引言”。这些问题与我们之前回答过的问题类似。除了这三个问题之外,我们可以对大多数问题保留默认值。
- Service Discovery: Select “JHipster Registry” since we’re already using it in our architecture
- Path to the UAA application: Since we’re keeping all projects directories under the same folder, this will be ../uaa (unless we’ve changed it, of course)
- Authentication Type: Select “JHipster UAA server”
Here’s what a typical sequence of answers will look like in our case:
在我们的案例中,典型的答案顺序是这样的。
Once JHipster finishes generating the project, we can go ahead and build it:
一旦JHipster完成了项目的生成,我们就可以继续建造它。
$ mvnw
... many, many messages omitted
----------------------------------------------------------
        Application 'quotes' is running! Access URLs:
        Local:          http://localhost:8081/
        External:       http://192.168.99.1:8081/
        Profile(s):     [dev, swagger]
----------------------------------------------------------
2018-10-19 00:16:05.581  INFO 16092 --- [  restartedMain] com.baeldung.jhipster.quotes.QuotesApp   :
----------------------------------------------------------
        Config Server:  Connected to the JHipster Registry config server!
----------------------------------------------------------
... more messages omitted
The message “Connected to the JHipster Registry config server!” is what we’re looking for here. Its presence tells us that the microservice registered itself with the registry and, because of this, the gateway will be able to route requests to our “quotes” resource and display it on a nice UI, once we’ve created it. Since we’re using a microservice architecture, we split this task into two parts:
信息 “连接到JHipster注册表配置服务器!”是我们在这里要寻找的东西。它的存在告诉我们,微服务在注册表上注册了自己,因此,一旦我们创建了 “报价 “资源,网关将能够将请求路由到该资源,并在一个漂亮的用户界面上显示它。由于我们使用的是微服务架构,所以我们把这项任务分成两部分。
- Create the “quotes” resource back-end service
- Create the “quotes” UI in the front-end (part of the gateway project)
7.1. Adding the Quotes Resource
7.1.添加报价资源
First, we need to make sure the that the quotes microservice application is stopped — we can hit CTRL-C on the same console window that we previously used to run it.
首先,我们需要确保引用的微服务应用已经停止–我们可以在之前用来运行它的同一个控制台窗口上点击CTRL-C。
Now, let’s add an entity to the project using JHipster’s tool. This time we’ll use the import-jdl command, which will save us from the tedious and error-prone process of supplying all details individually. For additional information about the JDL format, please refer to the full JDL reference.
现在,让我们使用JHipster的工具向项目添加一个实体。这一次我们将使用import-jdl命令,这将使我们免于单独提供所有细节的繁琐和容易出错的过程。关于JDL格式的其他信息,请参考完整的JDL参考资料。
Next, we create a text file called quotes.jh containing our Quote entity definition, along with some code generation directives:
接下来,我们创建一个名为quotes.jh的文本文件,其中包含我们的Quote实体定义,以及一些代码生成指令。
entity Quote {
  symbol String required unique,
  price BigDecimal required,
  lastTrade ZonedDateTime required
}
dto Quote with mapstruct
paginate Quote with pagination
service Quote with serviceImpl
microservice Quote with quotes
filter Quote
clientRootFolder Quote with quotes
We can now import this entity definition to our project:
我们现在可以将这个实体定义导入到我们的项目。
$ jhipster import-jdl quotes.jh
Note: during the import, JHipster will complain about a conflict while applying changes to the master.xml file. We can safely choose the overwrite option in this case.
注意:在导入过程中,JHipster会抱怨在对master.xml文件进行修改时出现冲突。在这种情况下,我们可以安全地选择overwrite选项。
We can now build and run our microservice again using mvnw. Once it’s up, we can verify that the gateway picks up the new route accessing the Gateway view, available from the Administration menu. This time, we can see that there’s an entry for the “/quotes/**” route, which shows that the backend is ready to be used by the UI.
现在我们可以再次使用mvnw构建和运行我们的微服务。一旦启动,我们可以验证网关在访问Gateway视图时接收到新的路由,可从Administration菜单中获得。这一次,我们可以看到有一个“/quotes/**”路由的条目,这表明后端已经准备好被UI使用。
7.2. Adding the Quotes UI
7.2.添加报价界面
Finally, let’s generate the CRUD UI in the gateway project that we’ll use to access our quotes. We’ll use the same JDL file from the “quotes” microservice project to generate the UI components, and we’ll import it using JHipster’s import-jdl command:
最后,让我们在网关项目中生成CRUD UI,我们将用它来访问我们的报价。我们将使用来自 “quotes “微服务项目的同一个JDL文件来生成UI组件,我们将使用JHipster的import-jdl命令来导入它。
$ jhipster import-jdl ../jhipster-quotes/quotes.jh
...messages omitted
? Overwrite webpack\webpack.dev.js? <b>y</b>
... messages omitted
Congratulations, JHipster execution is complete!
During the import, JHipster will prompt a few times for the action it should take regarding conflicting files. In our case, we can simply overwrite existing resources, since we haven’t done any customization.
在导入过程中,JHipster会多次提示它应该对冲突的文件采取什么行动。在我们的例子中,我们可以简单地覆盖现有资源,因为我们没有做任何定制。
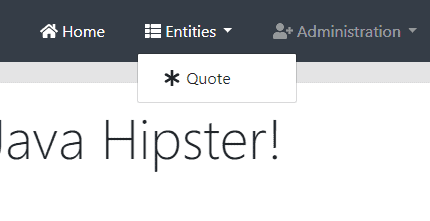
Now we can restart the gateway and see what we’ve accomplished. Let’s point our browser to the gateway at http://localhost:8080, making sure we refresh its contents. The Entities menu should now have a new entry for the Quotes resource:
现在我们可以重新启动网关,看看我们取得了什么成果。让我们把浏览器指向http://localhost:8080的网关,确保我们刷新其内容。Entities菜单现在应该有一个Quotes资源的新条目。
Clicking on this menu option brings up the Quotes listing screen:
点击这个菜单选项会出现Quotes列表屏幕。
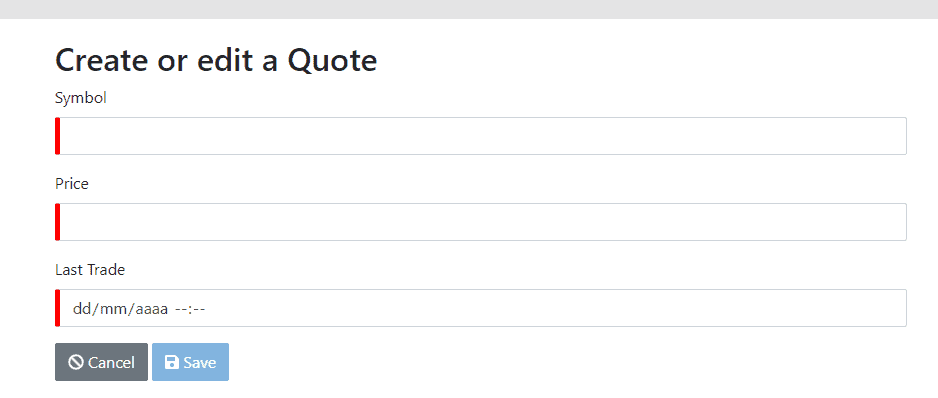
As expected, the listing is empty — we haven’t added any quotes yet! Let’s try to add one by clicking the “Create New Quote Button” on the top right of this screen, which brings us to the create/edit form:
不出所料,列表中是空的–我们还没有添加任何报价!让我们试着添加一个。让我们试着添加一个,点击这个屏幕右上方的 “创建新报价按钮”,这将使我们进入创建/编辑表格。
We can see that the generated form has all expected features:
我们可以看到,生成的表单具有所有预期的特征。
- Required fields are marked with a red indicator, which turns green once filled
- Date/Time and numeric fields use native components to help with data entry
- We can cancel this activity, which will leave data unchanged, or save our new or modified entity
After filling this form and hitting Save, we’ll see the results on the listing screen. We can now see the new Quotes instance in the data grid:
在填写完这个表格并点击Save,我们将在列表屏幕上看到结果。现在我们可以在数据网格中看到新的Quotes实例。
As an admin, we also have access to the API menu item, which takes us to the standard Swagger API Developer Portal. In this screen, we can select one of the available APIs to exercise:
作为一个管理员,我们还可以访问API菜单项,它将我们带到标准的Swagger API开发者门户。在这个屏幕上,我们可以选择一个可用的API来行使。
- default: Gateway’s own API that displays available routes
- uaa: Account and User APIs
- quotes: Quotes API
8. Next Steps
8.接下来的步骤
The application we’ve built so far works as expected and provides a solid base for further development. We’ll most definitely also need to write some (or a lot of) custom code, depending on the complexity of our requirements. Some areas that are likely to need some work are:
到目前为止,我们所建立的应用程序如预期的那样工作,为进一步的开发提供了坚实的基础。我们肯定还需要编写一些(或很多)自定义代码,这取决于我们需求的复杂性。一些可能需要进行一些工作的领域是。
- UI look and feel customization: This is usually quite easy due to the way the front-end application is structured — we can go a long way simply by fiddling with CSS and adding some images
- User repository changes: Some organizations already have some sort of internal user repository (e.g. an LDAP directory) — this will require changes on the UAA, but the nice part is that we only need to change it once
- Finer grained authorization on entities: The standard security model used by the generated entity back-end does not have any kind of instance-level and/or field-level security — it’s up to the developer to add those restrictions at the appropriate level (API or service, depending on the case)
Even with those remarks, using a tool like JHispter can help a lot when developing a new application. It will bring with it a solid foundation and can keep a good level of consistency in our code base as the system — and developers — evolve.
即使有这些评论,在开发一个新的应用程序时,使用像JHispter这样的工具会有很大的帮助。它将带来一个坚实的基础,并能在系统–和开发人员–的发展过程中保持我们代码库的良好一致性。
9. Conclusion
9.结语
In this article, we’ve shown how to use JHispter to create a working application based on a microservices architecture and JHipster’s UAA server. We achieved that without writing a single line of Java code, which is quite impressive.
在这篇文章中,我们展示了如何使用JHispter来创建一个基于微服务架构和JHipster的UAA服务器的工作应用。我们没有写一行Java代码就实现了这一目标,这让人印象深刻。
As usual, the full code for the projects presented in this article is available in our GitHub repository.
像往常一样,本文介绍的项目的完整代码可在我们的GitHub仓库中找到。


