1. Overview
1.概述
Keycloak is a third-party authorization server used to manage our web or mobile applications’ authentication and authorization requirements. It uses a default login page to sign-in users on our app’s behalf.
Keycloak是一个第三方授权服务器,用于管理我们的网络或移动应用程序的认证和授权要求。它使用一个默认的登录页面来代表我们的应用程序签入用户。
In this tutorial, we’ll focus on how we can customize the login page for our Keycloak server so that we can have a different look and feel for it. We’ll see this for both standalone as well as embedded servers.
在本教程中,我们将重点讨论如何为我们的Keycloak服务器定制登录页面,以便我们可以有不同的外观和感觉。我们将看到独立服务器和嵌入式服务器都是如此。
We’ll build on top of customizing themes for the Keycloak tutorial to do that.
我们将建立在为Keycloak教程定制主题的基础上进行。
2. Customizing a Standalone Keycloak Server
2.定制一个独立的Keycloak服务器
Continuing with our example of the custom theme, let’s see the standalone server first.
继续以custom主题为例,让我们先看看独立的服务器。
2.1. Admin Console Settings
2.1.管理控制台设置
To start the server, let’s navigate to the directory where our Keycloak distribution is kept, and run this command from its bin folder:
为了启动服务器,让我们导航到存放Keycloak发行版的目录,并从其bin文件夹中运行这个命令。
./standalone.sh -Djboss.socket.binding.port-offset=100Once the server is started, we only need to refresh the page to see our changes reflected, thanks to the modifications we previously made to the standalone.xml.
一旦服务器启动,我们只需要刷新页面就可以看到我们的变化得到反映,这要感谢我们之前对standalone.xml所作的修改。
Now let’s create a new folder, named login, inside the themes/custom directory. To keep things simple, we’ll first copy all the contents of the themes/keycloak/login directory here. This is the default login page theme.
现在让我们在themes/custom目录下创建一个新的文件夹,名为login。为了保持简单,我们首先将themes/keycloak/login目录的所有内容复制到这里。这是默认的登录页面主题。
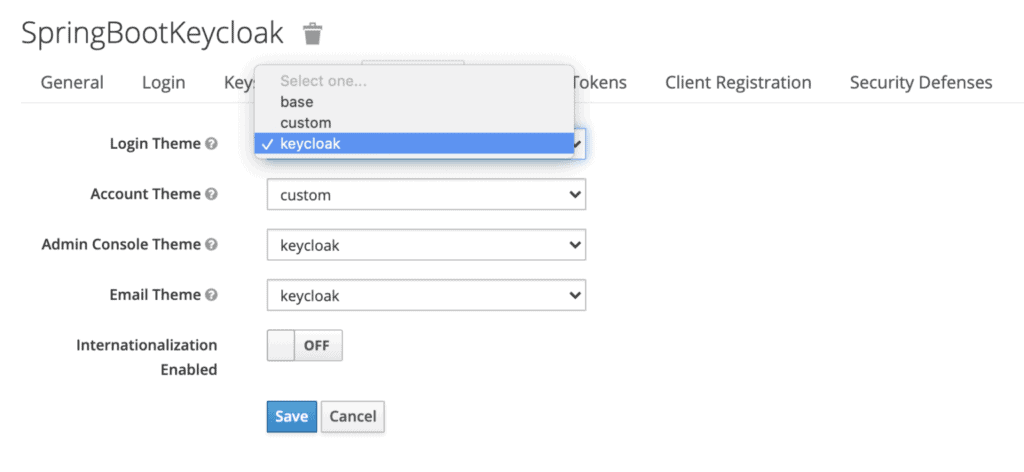
Then, we’ll go to the admin console, key-in the initial1/zaq1!QAZ credentials and go to the Themes tab for our realm:
然后,我们将进入管理员控制台,键入initial1/zaq1!QAZ凭证,并进入我们领域的Themes标签。
We’ll select custom for the Login Theme and save our changes.
我们将选择custom作为Login Theme,并保存我们的更改。
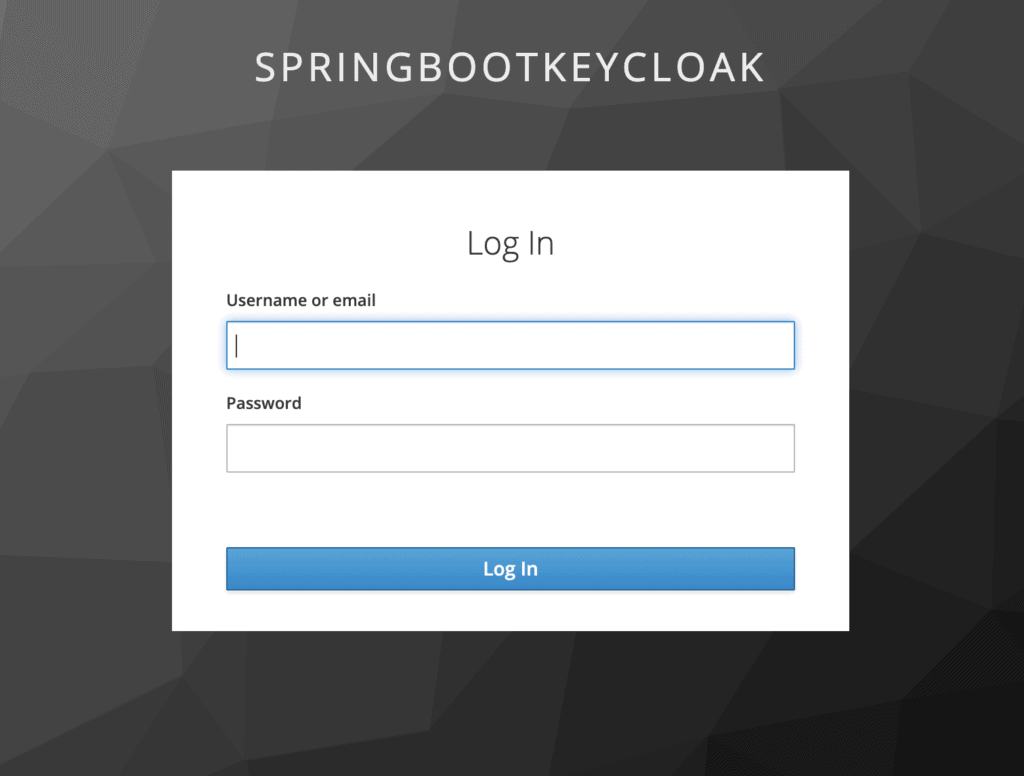
With that set, we can now try some customizations. But before that, let’s have a look at the default login page:
有了这些设置,我们现在可以尝试一些定制。但在此之前,让我们看看默认的登录页面。
2.2. Adding Customizations
2.2.添加自定义
Now let’s say we need to change the background. For that, we’ll open login/resources/css/login.css and change the class definition:
现在,让我们假设我们需要改变背景。为此,我们将打开login/resources/css/login.css并改变类的定义。
.login-pf body {
    background: #39a5dc;
    background-size: cover;
    height: 100%;
}
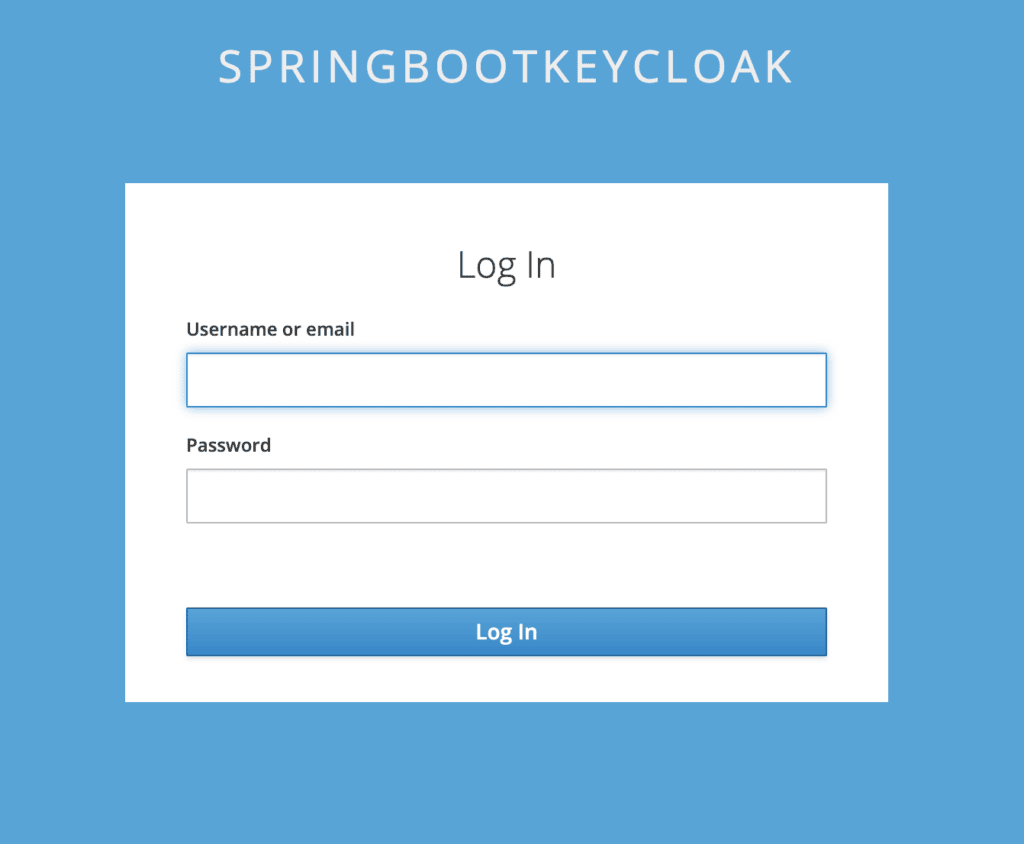
To see the effect, let’s refresh the page:
为了看到效果,让我们刷新一下页面。
Next, let’s try to change the labels for the username and password.
接下来,让我们试着改变用户名和密码的标签。
To achieve that, we need to create a new file, messages_en.properties in the theme/login/messages folder. This file overrides the default message bundle being used for the given properties:
为了实现这一点,我们需要在theme/login/messages文件夹中创建一个新文件,messages_en.properties。这个文件覆盖了正在使用的默认消息包的给定属性。
usernameOrEmail=Enter Username:
password=Enter Password:
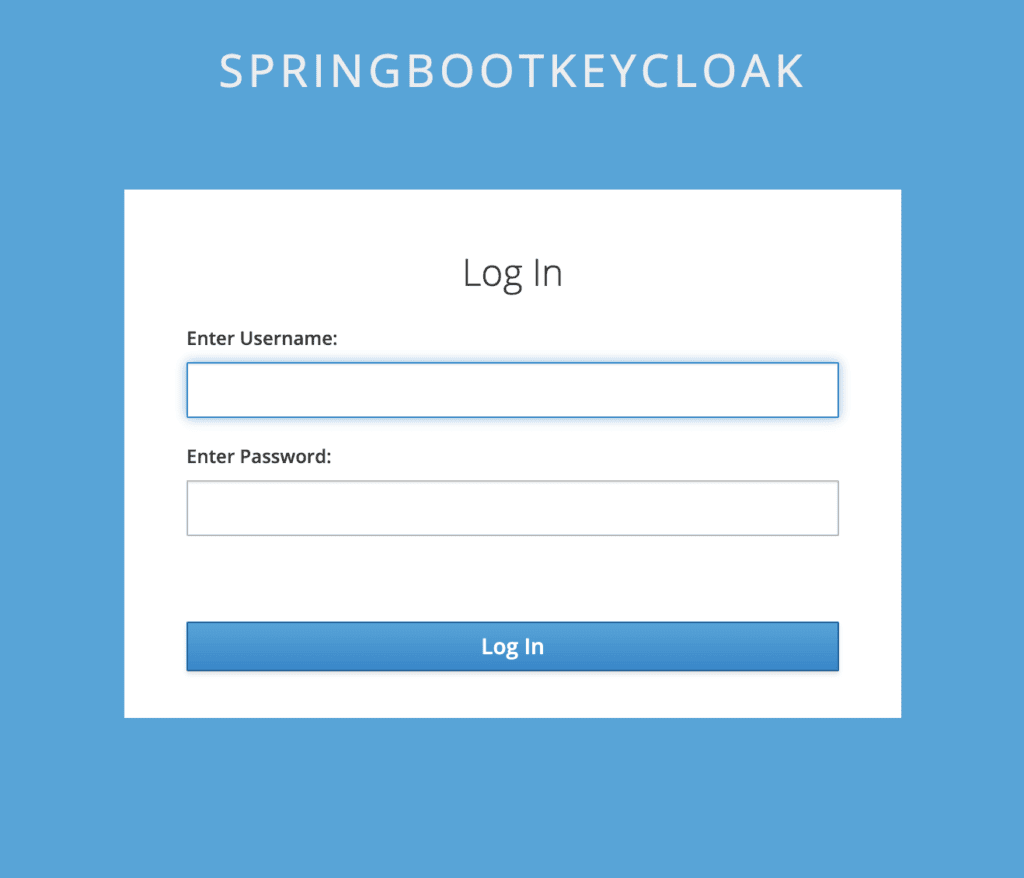
To test, again refresh the page:
为了测试,再次刷新页面。
Suppose we want to change the entire HTML or a part of it, we’ll need to override the freemarker templates that Keycloak uses by default. The default templates for the login page are kept in the base/login directory.
假设我们想改变整个HTML或它的一部分,我们需要覆盖Keycloak默认使用的freemarker模板。登录页面的默认模板被保存在base/login目录中。
Let’s say we want WELCOME TO BAELDUNG to be displayed in place of SPRINGBOOTKEYCLOAK.
假设我们想让WELCOME TO BAELDUNG显示在SPRINGBOOTKEYCLOAK的位置。
For that, we’ll need to copy base/login/template.ftl to our custom/login folder.
为此,我们需要复制base/login/template.ftl到我们的custom/login文件夹。
In the copied file, change the line:
在复制的文件中,改变这一行。
<div id="kc-header-wrapper" class="${properties.kcHeaderWrapperClass!}">
    ${kcSanitize(msg("loginTitleHtml",(realm.displayNameHtml!'')))?no_esc}
</div>
To:
敬请关注。
<div id="kc-header-wrapper" class="${properties.kcHeaderWrapperClass!}">
    WELCOME TO BAELDUNG
</div>
The login page would now display our custom message instead of the realm name.
登录页面现在将显示我们的自定义信息,而不是境界名称。
3. Customizing an Embedded Keycloak Server
3.定制一个嵌入式Keycloak服务器
The first step here is to add all the artifacts we changed for the standalone server to the source code of our embedded authorization server.
这里的第一步是把我们为独立服务器改变的所有工件添加到我们的嵌入式授权服务器的源代码中。
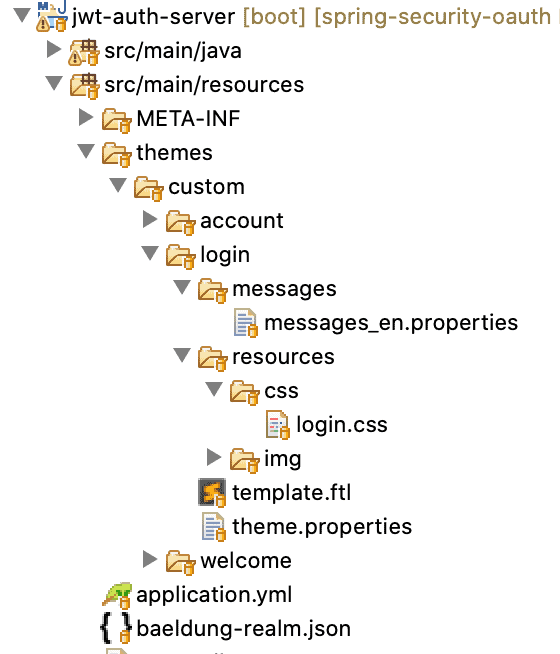
So, let’s create a new folder login inside src/main/resources/themes/custom with these contents:
因此,让我们在src/main/resources/themes/custom内创建一个新的文件夹login,并加入这些内容。
Now all we need to do is to add instruction in our realm definition file, baeldung-realm.json so that custom is used for our login theme type:
现在我们需要做的是在我们的境界定义文件baeldung-realm.json中添加指令,使custom被用于我们的登录主题类型。
"loginTheme": "custom",We’ve already redirected to the custom theme directory so that our server knows from where to pick up the theme files for the login page.
我们已经重定向到custom主题目录,以便我们的服务器知道从哪里获取登录页的主题文件。
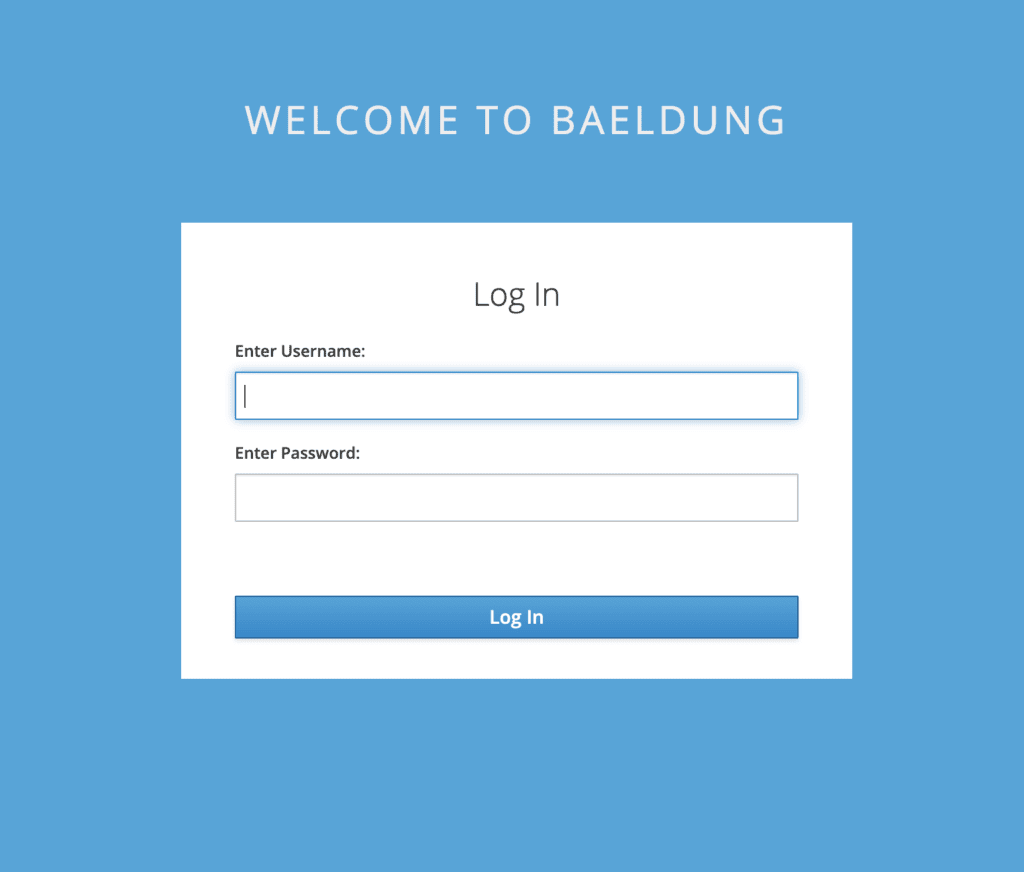
For testing, let’s hit the login page:
为了测试,让我们点击登录页面。
As we can see, all the customizations done earlier for the standalone server, such as the background, label names, and page title, are appearing here.
我们可以看到,先前为独立服务器所做的所有定制,如背景、标签名称和页面标题,都出现在这里。
4. Bypassing Keycloak Login Page
4.绕过Keycloak登录页面
Technically, we can completely bypass the Keycloak login page by using the password or direct access grant flow. However, it’s strongly recommended that this grant type shouldn’t be used at all.
从技术上讲,我们可以通过使用密码或直接访问授予流程完全绕过Keycloak登录页面。然而,我们强烈建议根本不应该使用这种授予类型。
In this case, there is no intermediary step of getting an authorization code, and then receiving the access token in exchange. Instead, we can directly send the user credentials via a REST API call and get the access token in response.
在这种情况下,不存在获取授权码的中间步骤,然后接收访问令牌作为交换。相反,我们可以通过REST API调用直接发送用户凭证,并在响应中获得访问令牌。
This effectively means that we can use our login page to collect the user’s id and password, and along with the client id and secret, send it to Keycloak in a POST to its token endpoint.
这实际上意味着我们可以使用我们的登录页面来收集用户的ID和密码,并与客户端的ID和秘密一起,以POST的方式将其发送到Keycloak的token端点。
But again, since Keycloak provides a rich feature set of login options – such as remember me, password reset, and MFA – to name a few, there is little reason to bypass it.
但同样,由于Keycloak提供了丰富的登录选项功能–如记住我、密码重置和MFA–仅举几例,所以没有什么理由绕过它。
5. Conclusion
5.总结
In this tutorial, we learned how to change the default login page for Keycloak and add our customizations.
在本教程中,我们学习了如何改变Keycloak的默认登录页面,并添加我们的定制内容。
We saw this for both a standalone and an embedded instance.
我们看到独立的和嵌入式的实例都是如此。
Lastly, we briefly went over how to bypass Keycloak’s login page entirely and why not to do that.
最后,我们简要介绍了如何完全绕过Keycloak的登录页面以及为什么不这样做。
As always, the source code is available over on GitHub. For the standalone server, it’s on the tutorials GitHub, and for the embedded instance, on the OAuth GitHub.
一如既往,源代码可在GitHub上获得。对于独立服务器,它位于教程GitHub上,而对于嵌入式实例,它位于OAuth GitHub上。
